Acculance
POS, Inventory, Accounting Application
Acculance is a comprehensive web application designed for Point of Sale (POS), Inventory management, and Accounting. Built using Laravel and Vue.js, it addresses the requirements of small and medium-sized businesses and organizations.
With the newly released version v4, we have undergone significant enhancements to the application, rendering it even more versatile and suitable for a diverse spectrum of businesses.
Changelog
Introducing our latest release, version 4.0.5! In this upgraded version, we've not only addressed existing issues but also introduced some exciting new features. A comprehensive list of these changes can be found in the provided changelog.
| Latest Version 4.0.5 Published On 18th March 2024 |
|---|
| * Added - Dynamic Invoice Message. |
| * Fixed - Permission Issue. |
| * Fixed - Other Issue Fixed. |
| Version 4.0.4 Published On 10th March 2024 |
|---|
| * Added - Today Report. |
| * Added - Sales By User Report. |
| * Added - Collection By User Report. |
| * Added - Mail Test Connection. |
| * Added - SMS Test Connection. |
| * Added - Export To Excel. |
| * Fixed - Undefined newNumber Issue at "Balance sheet". |
| * Fixed - Permission Issue. |
| * Fixed - Other Issue Fixed. |
| Version 4.0.3 Published On 10th December 2023 |
|---|
| * Added - Supplier payable report. |
| * Added - Client receivable report. |
| * Fixed - Date change issue on invoice display page when a new payment is added. |
| * Fixed - Other Issue Fixed. |
| Version 4.0.2 Published On 15th October 2023 |
|---|
| * Fixed - Expense Create Issue. |
| * Fixed - Expense Edit Issue. |
| * Fixed - Other Issue Fixed. |
| Version 4.0.1 Published On 17th September 2023 |
|---|
| * Update - UX/UI Design Update. |
| * Update - All Show Page design update. |
| * Update - Report Page design update. |
| * Update - Performance Update. |
| * Update - Security Update. |
| * Fixed - Unit Edit Page Issue. |
| * Fixed - Product Import Issue. |
| * Fixed - Installer Issue Fixed. |
| * Fixed - Other Issue Fixed. |
| Version 4.0.0 Published On 14th August 2023 |
|---|
| * Added - Client Ledger. |
| * Added - Supplier Ledger. |
| * Added - Account Ledger. |
| * Added - Client Welcome Email & SMS Notification. |
| * Added - Supplier Welcome Email & SMS Notification. |
| * Added - Invoice Email & SMS Notification. |
| * Added - Purchase Email & SMS Notification. |
| * Added - Quotation Email & SMS Notification. |
| * Added - Invoice Payment Email & SMS Notification. |
| * Added - Purchase Payment Email & SMS Notification. |
| * Added - Add Invoice Payment From Invoices Page. |
| * Added - Add Purchase Payment From Purchases Page. |
| * Added - Add Supplier From Purchase Create Page. |
| * Added - Add Product From Purchase Create Page. |
| * Added - Add Client From Quotation Create Page. |
| * Added - Albanian Language Added. |
| * Added - Sidebar Resource Menu. |
| * Added - Non Zero Inventory List. |
| * Update - UX/UI Design Update. |
| * Update - Table Design update. |
| * Update - Invoice Show Page design update. |
| * Update - Purchase Show Page design update. |
| * Update - Quotation Show Page design update. |
| * Update - Performance Update. |
| * Update - Security Update. |
| * Fixed - Inventory Adjustment Issue. |
| * Fixed - Inventory PDF Export Issue. |
| * Fixed - Inventory Product Search Export Issue. |
| * Fixed - Purchase Payment Issue. |
| * Fixed - Quotation Create & Edit Input Double Number Issue Fixed. |
| * Fixed - POS Page VAT Select Overflow Issue Fixed. |
| * Fixed - PDF Export Issue Fixed. |
| * Fixed - Reports Issue Fixed. |
| Version 3.0.0 Published On 24th January 2023 |
|---|
| * Added - Add Client From POS Page. |
| * Added - Add Product From POS Page. |
| * Added - Add Client From Invoice Create Page. |
| * Added - Product Price Added In Barcode. |
| * Fixed - Installer Issue Fixed. |
| * Fixed - Other Minor Issues Fixed. |
| Version 2.5 Published On 27th December 2022 |
|---|
| * Fixed - Installer Issue Fixed. |
| * Fixed - Other Minor Issues Fixed. |
| Version 2.4 Published On 12th December 2022 |
|---|
| * Added - Khmer Language Added. |
| * Fixed - Dashboard Page Invoice Table. |
| * Fixed - Vat Rate Numeric Number Input. |
| * Fixed - Profile Update. |
| * Fixed - Installer Issue Fixed. |
| * Fixed - Other Minor Issues Fixed. |
| Version 2.3 Published On 3rd November 2022 |
|---|
| * Fixed - Invoice Edit Issue Fixed. |
| * Fixed - Invoice Return Issue Fixed. |
| * Fixed - Inventory Adjustment Issue Fixed. |
| * Fixed - Installer Issue Fixed. |
| * Fixed - Other Minor Issues Fixed. |
| Version 2.1 Published On 8th August 2022 |
|---|
| * Added - Default Client Added In General Settings. |
| * Added - Default Account In General Settings. |
| * Added - Default Vat Rate In General Settings. |
| * Update - Default Settings Updated In POS. |
| * Update - POS Sale Create By Enter Button Press. |
| * Fixed - POS Product Search Issue Fixed. |
| * Fixed - Other Minor Issues Fixed. |
| Version 2.0 Published On 05 June 2022 |
|---|
| * Added - POS Sale Module Added. |
| * Added - Date Range Picker Added. |
| * Added - Table Per Page View Selector Added. |
| * Added - Balance Adjustment Module Added. |
| * Added - New Language Added. |
| * Fixed - Invoice Return Edit Fixed. |
| * Fixed - Other Minor Issues Fixed. |
| Version 1.0 Published On 02 May 2022 |
|---|
| * Initial Release. |
Updating
We're excited to announce the release of our new version 4.0.5! In this update, we've diligently addressed several existing bugs and introduced some new modules to enhance your experience. The best part? We've kept all database-related elements untouched, making the update process incredibly simple. Here's how you can seamlessly update your system:
- Start by acquiring the latest source code from your Envato account.
- Safeguard your current source files by taking a backup from the project's root directory.
- After backing up, delete all files and folders in your project directory.
- Upload the updated source code to the root directory of your project and then unzip the source code.
- Delete the .env file, storage folder, and the images folder inside the public folder.
- Restore the deleted folders and files using the corresponding items from your backup.
That's it! Your system is now equipped with the latest version. If you encounter any challenges during the update process, our dedicated support team is ready to assist you. Happy updating!
Note: Prior to proceeding with the update, kindly ensure that you create a backup of both the source code and the database. This precautionary step will help safeguard your data in case of any unexpected events during the update process.
Server Requirements
The Laravel framework has a few system requirements. All of these requirements are satisfied by the Laravel Homestead virtual machine, so it's highly recommended that you use Homestead as your local Laravel development environment.
However, if you are not using Homestead, you will need to make sure your server meets the following requirements:
- PHP >= 8.0.2
- BCMath PHP Extension
- Ctype PHP Extension
- Fileinfo PHP extension
- JSON PHP Extension
- Mbstring PHP Extension
- OpenSSL PHP Extension
- PDO PHP Extension
- XML PHP Extension
Note: By default, most of the popular hosting provider has all of the above requirements. If you are having any issue to install the application feel free to inform us we will try to assist you with the installation :)
Installation
The installation of the Acculance is super easy and similar like other PHP and laravel based systems. Please follow the below steps to install Acculance on your server.
Note:In this section, we will guide you through the Cpanel (Hosting) installation process. If you prefer to install the system on your cloud server or if you are considering using FileZilla or any other installation method, please feel free to inform us, and we will provide the necessary assistance to facilitate your chosen installation method.
To start, unzip the downloaded source code from Codecanyon and look for the "Acculance-v4.0.1" folder. Inside this folder, you'll find the Acculance.zip.
To upload the source code file "Acculance-v4.0.1.zip," please log in to your hosting panel and navigate to the root directory (usually named "public_html") in your hosting account. Then, proceed to upload the "Acculance-v4.0.1.zip" file.
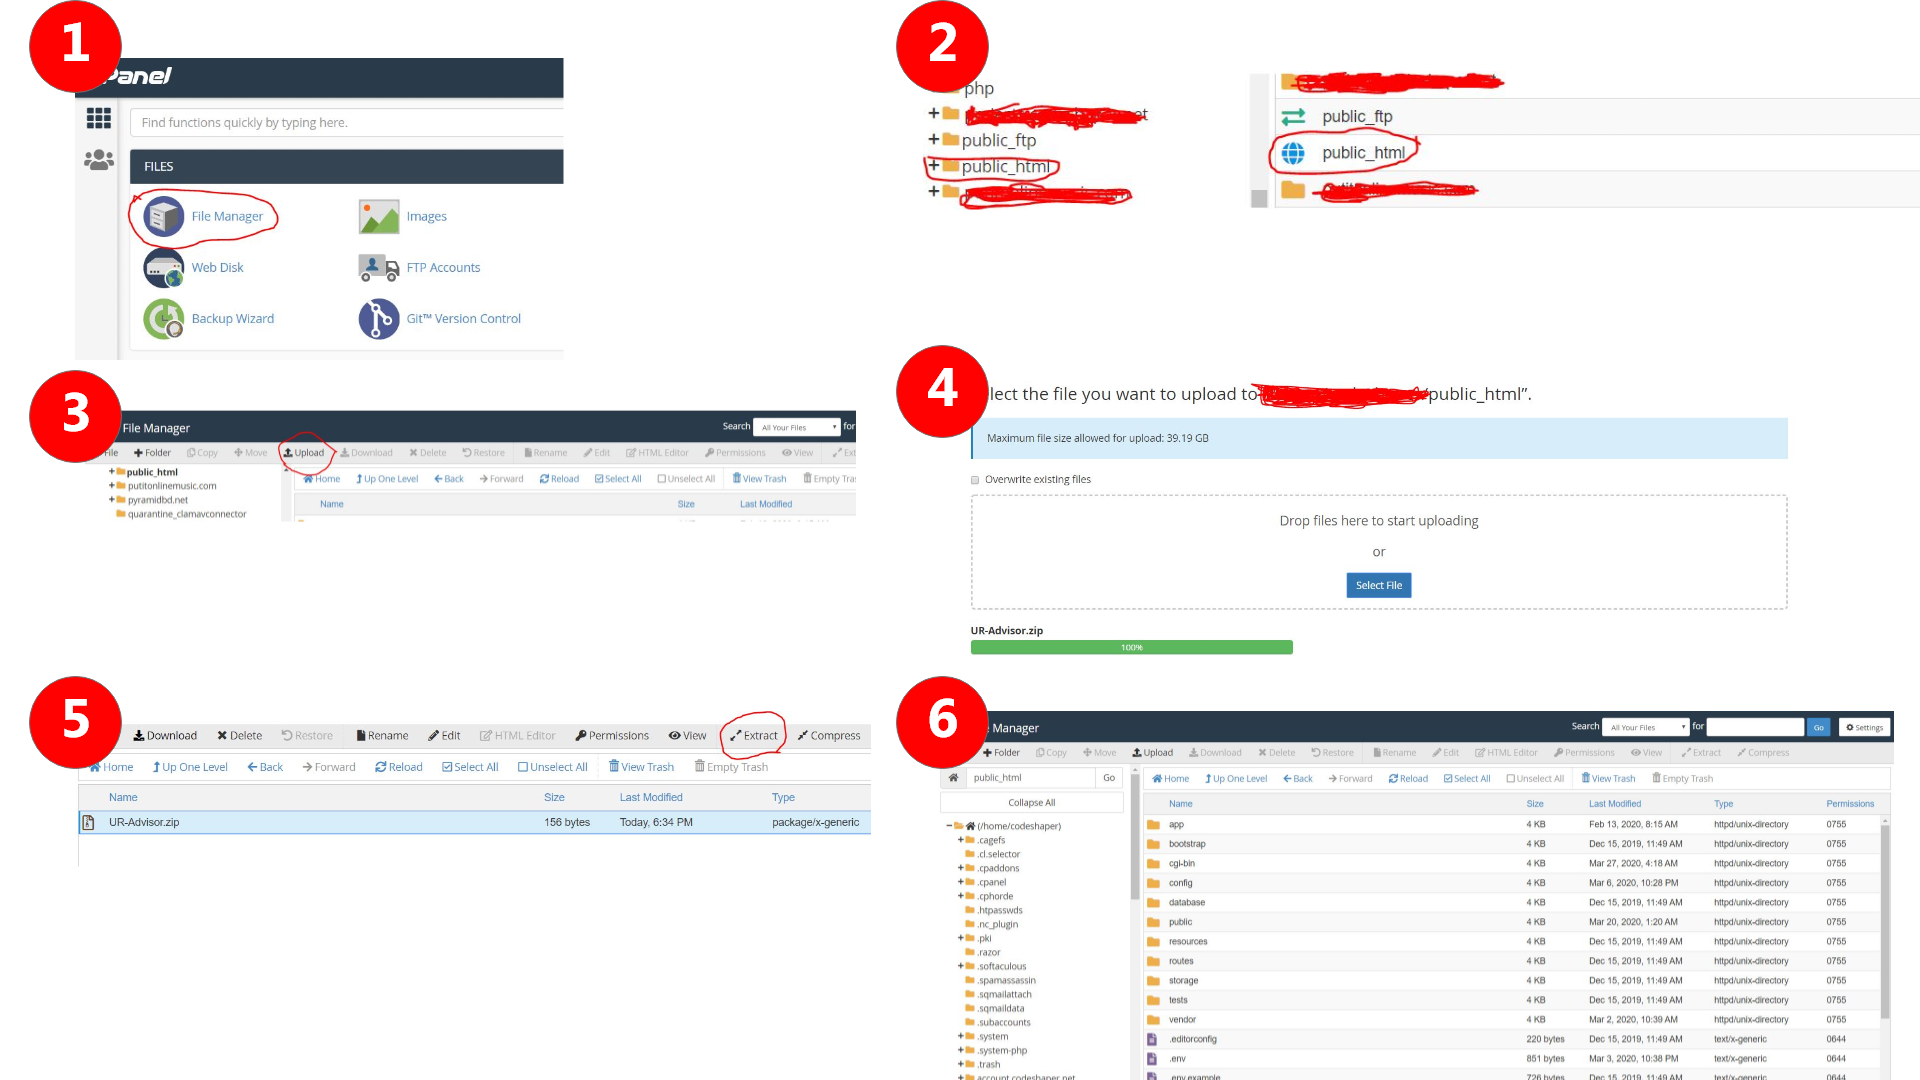
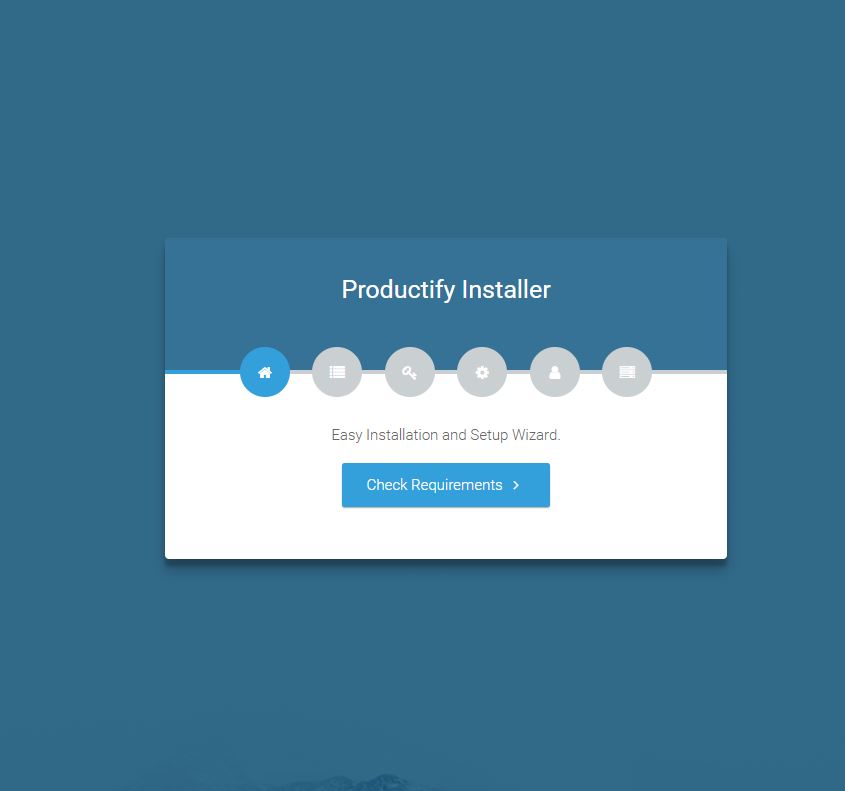
To initiate the installation of the Acculance system, please open your web browser and navigate to the following URL: http://yourdomain.com/install
(Note: Be sure to replace "yourdomain.com" with your actual domain name.)
Once you've accessed this link, you will be directed to the installation page, which will resemble the screenshot below. Follow the on-screen instructions to proceed with the installation process.
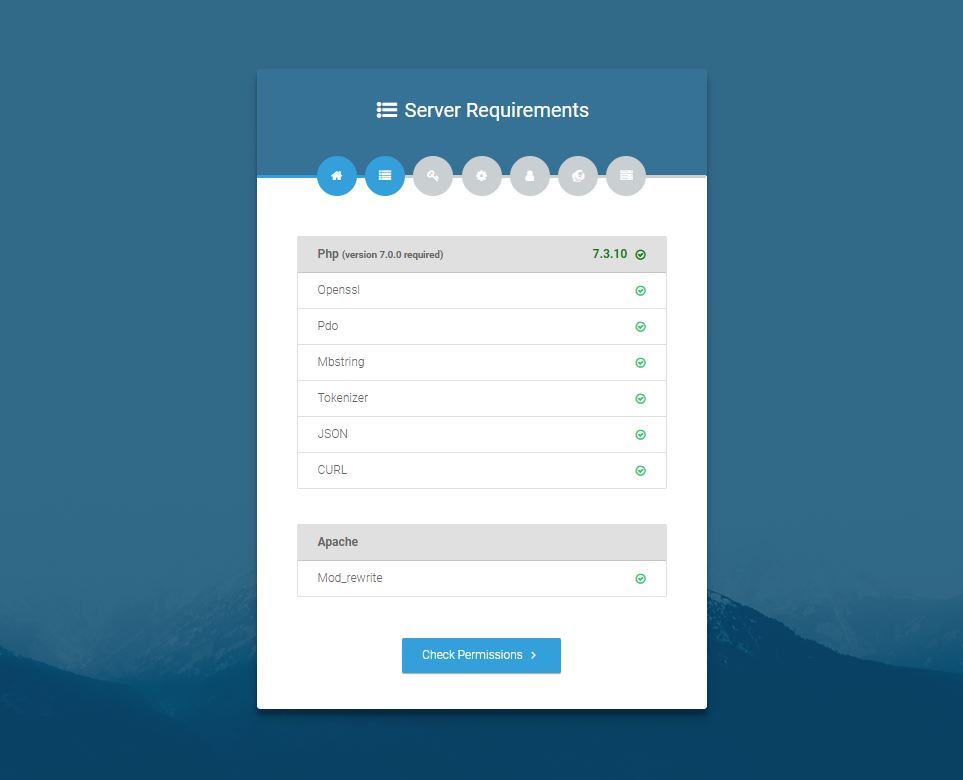
The following list comprises the necessary server dependencies or extensions required for installation. The presence of all these dependencies is indicated by green checkmarks. If any of these dependencies are missing on your system, a red cross mark will appear in the corresponding column for the absent component. It is imperative to install all these dependencies and extensions to guarantee a seamless installation and operation of the application.
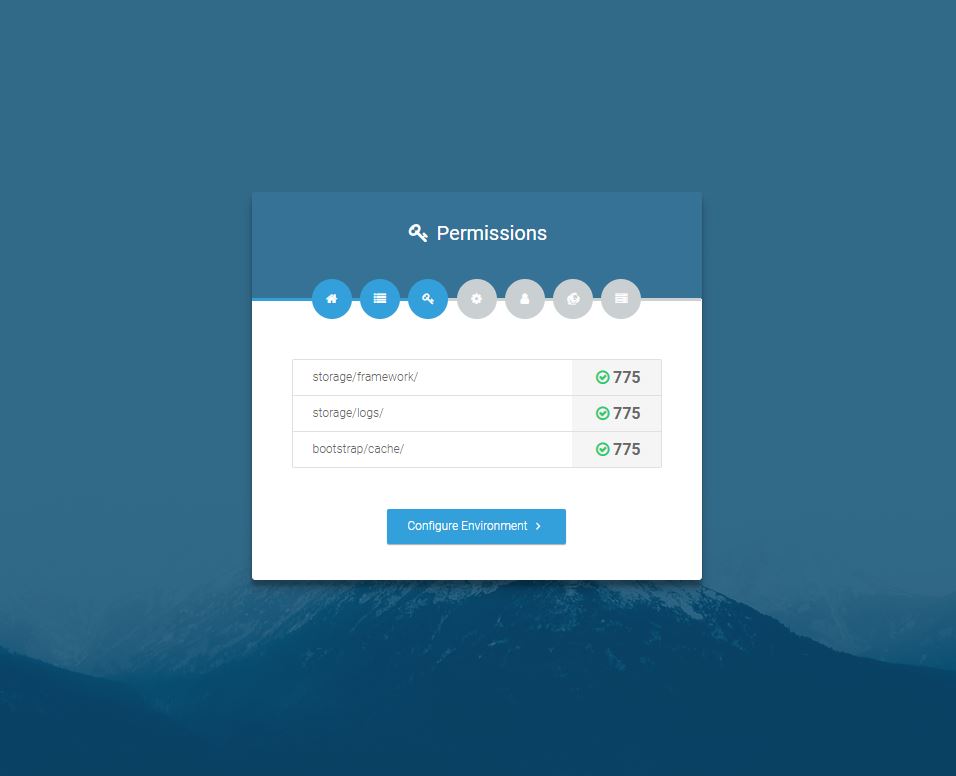
In this step, you need to grant the directed permissions respectively for instance.
| Storage/framework/ |
775 |
| Storage/logos/ |
775 |
| Bootstrap/cache/ |
775 |
To adjust folder permissions, access your Cpanel, go to the root directory, and locate the "Storage" folder. Inside it, you'll find "framework" and "logos" folders, as well as the "cache" folder within the "Bootstrap" folder. Begin with the "framework" folder: right-click, select "Change Permission," input "775," and click "Change Permission." Repeat this process for the "logos" and "cache" folders. You can refer to the provided screenshot for guidance.

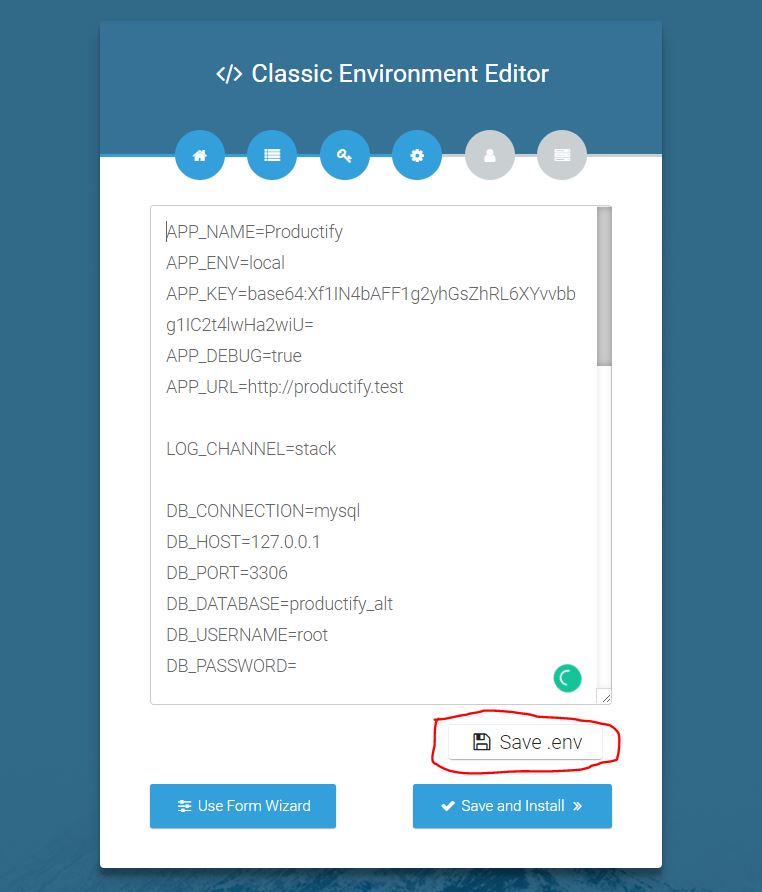
In the next step, you need to complete the environment settings wizard.
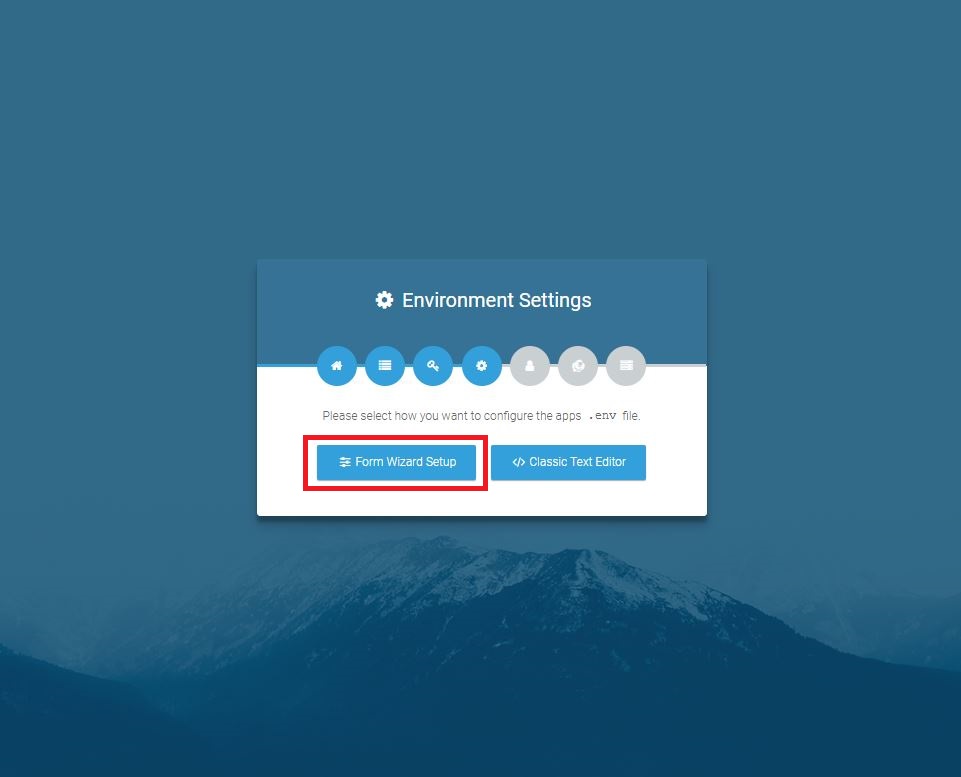
In this step continue entering some, your hosting information like DB host, DB Post, DB Name, User of DB and Password then press Setup Application button to next to Application Step Or Edit .env file for install DB.
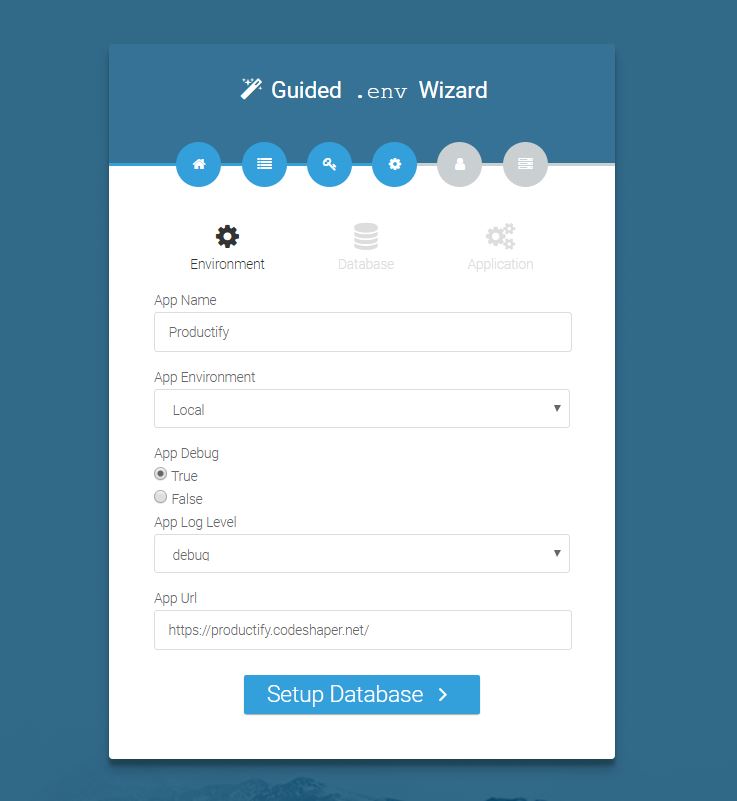
You need to enter the following information for environment setup.
| App Name | Name of the application. You can give it any name. |
| App Envrionment | For the server-side installation choose the Production mode. |
| App Debug |
By clicking the true, all the errors would be shown By clicking the false, no errors would be shown.(Recommended) |
| App Log Level | App Log system. Keep the selected one. |
| App Url |
Default localhost You can enter your domain here.(Recommended) |
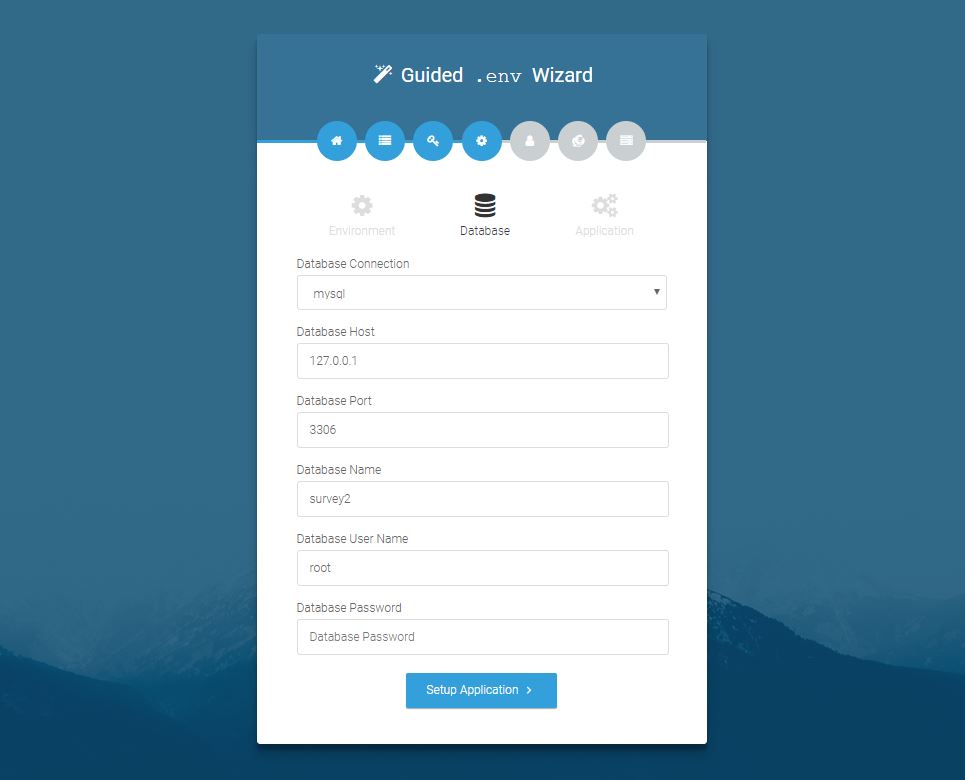
You need to enter the following information for database setup.
| Database Connection | Database connection type. Keep the selected one(mysql). |
| Database Host | Database host ip. Keep the selected one(127.0.0.1). |
| Database Port | Database port number. Keep the selected one(3306). |
| Database Name | Name of your newly created database. |
| Database User Name | Name of your database user name. |
| Database Password | your databse password |
For classic editor you will get all of the settings(.env file) together
You need to enter the following information for mail setup. The mail is required for changing the password in case you forgot your password.
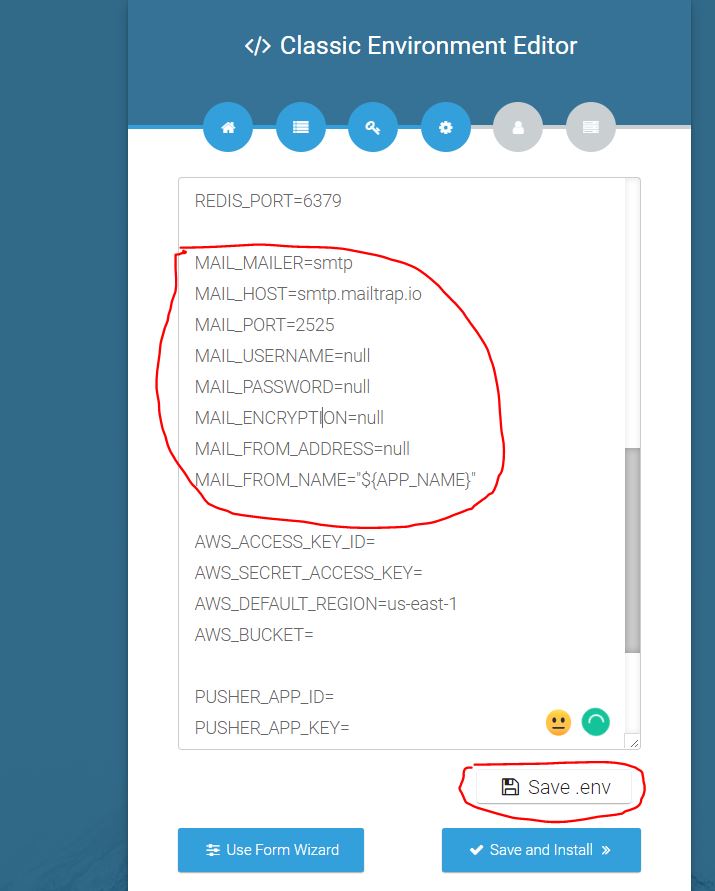
| MAIL_MAILER | The mail engine you want to use. For Gmail it is smtp |
| MAIL_HOST | The mail host for your mail engine. For Gmail, it is smtp.gmail.com |
| MAIL_PORT | The mail port for your mail engine. For Gmail, it is 465 |
| MAIL_USERNAME | The username of your Gmail account. |
| MAIL_PASSWORD | The password of your Gmail account. |
| MAIL_ENCRYPTION | The mail encryption type for your mail engine. For Gmail, it is ssl |
| MAIL_FROM_ADDRESS | The mail address which you want to use to send mail. |
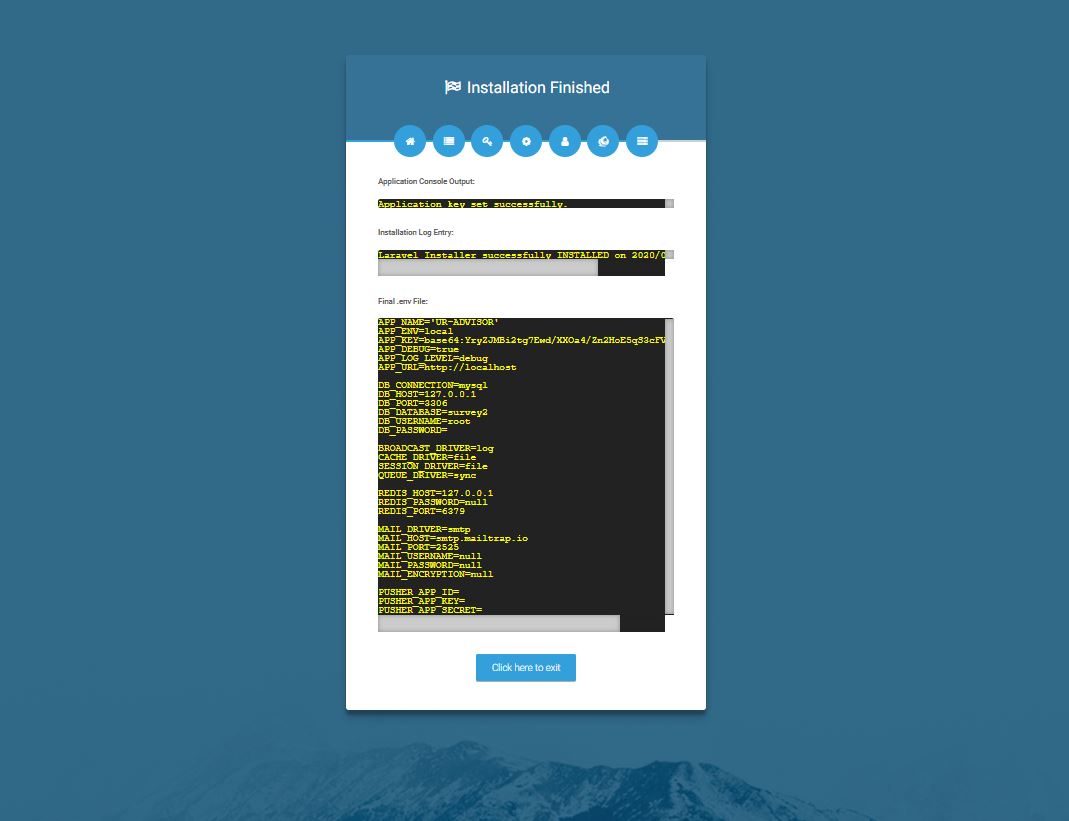
A defult admin user has created with the following login credentials.
| Name | System Admin |
|---|---|
| superadmin@acculance.com | |
| Password | acculance2022 |
Note: We understand that the installation process may pose challenges, especially for non-technical users. If you encounter any difficulties during installation, please don't hesitate to reach out to our support team via our support portal. We are here to assist you and ensure that you successfully install and configure the software to meet your needs. Your satisfaction is our priority, and we are happy to provide the necessary guidance and support.
Dashboard
The dashboard or homepage is designed to provide authenticated users with an informative overview of the system. It serves as a central hub where users can access key insights into system performance. Our dashboard features an elegant and user-friendly interface, offering customers quick access to vital information such as Revenue, Sale Return, Purchase Return, and Profit data for today, the last 7 days, the current month, and the current year, all available at a glance with just one click.
It's important to note that when you initially access the dashboard, the statistics and charts will appear empty. However, as you start adding data to the system, these statistics and charts will populate, providing you with valuable insights into your system's performance.
You can effortlessly navigate to various modules and sections of the system using the left-side navigation menu, making it convenient to access the specific functionalities you need.
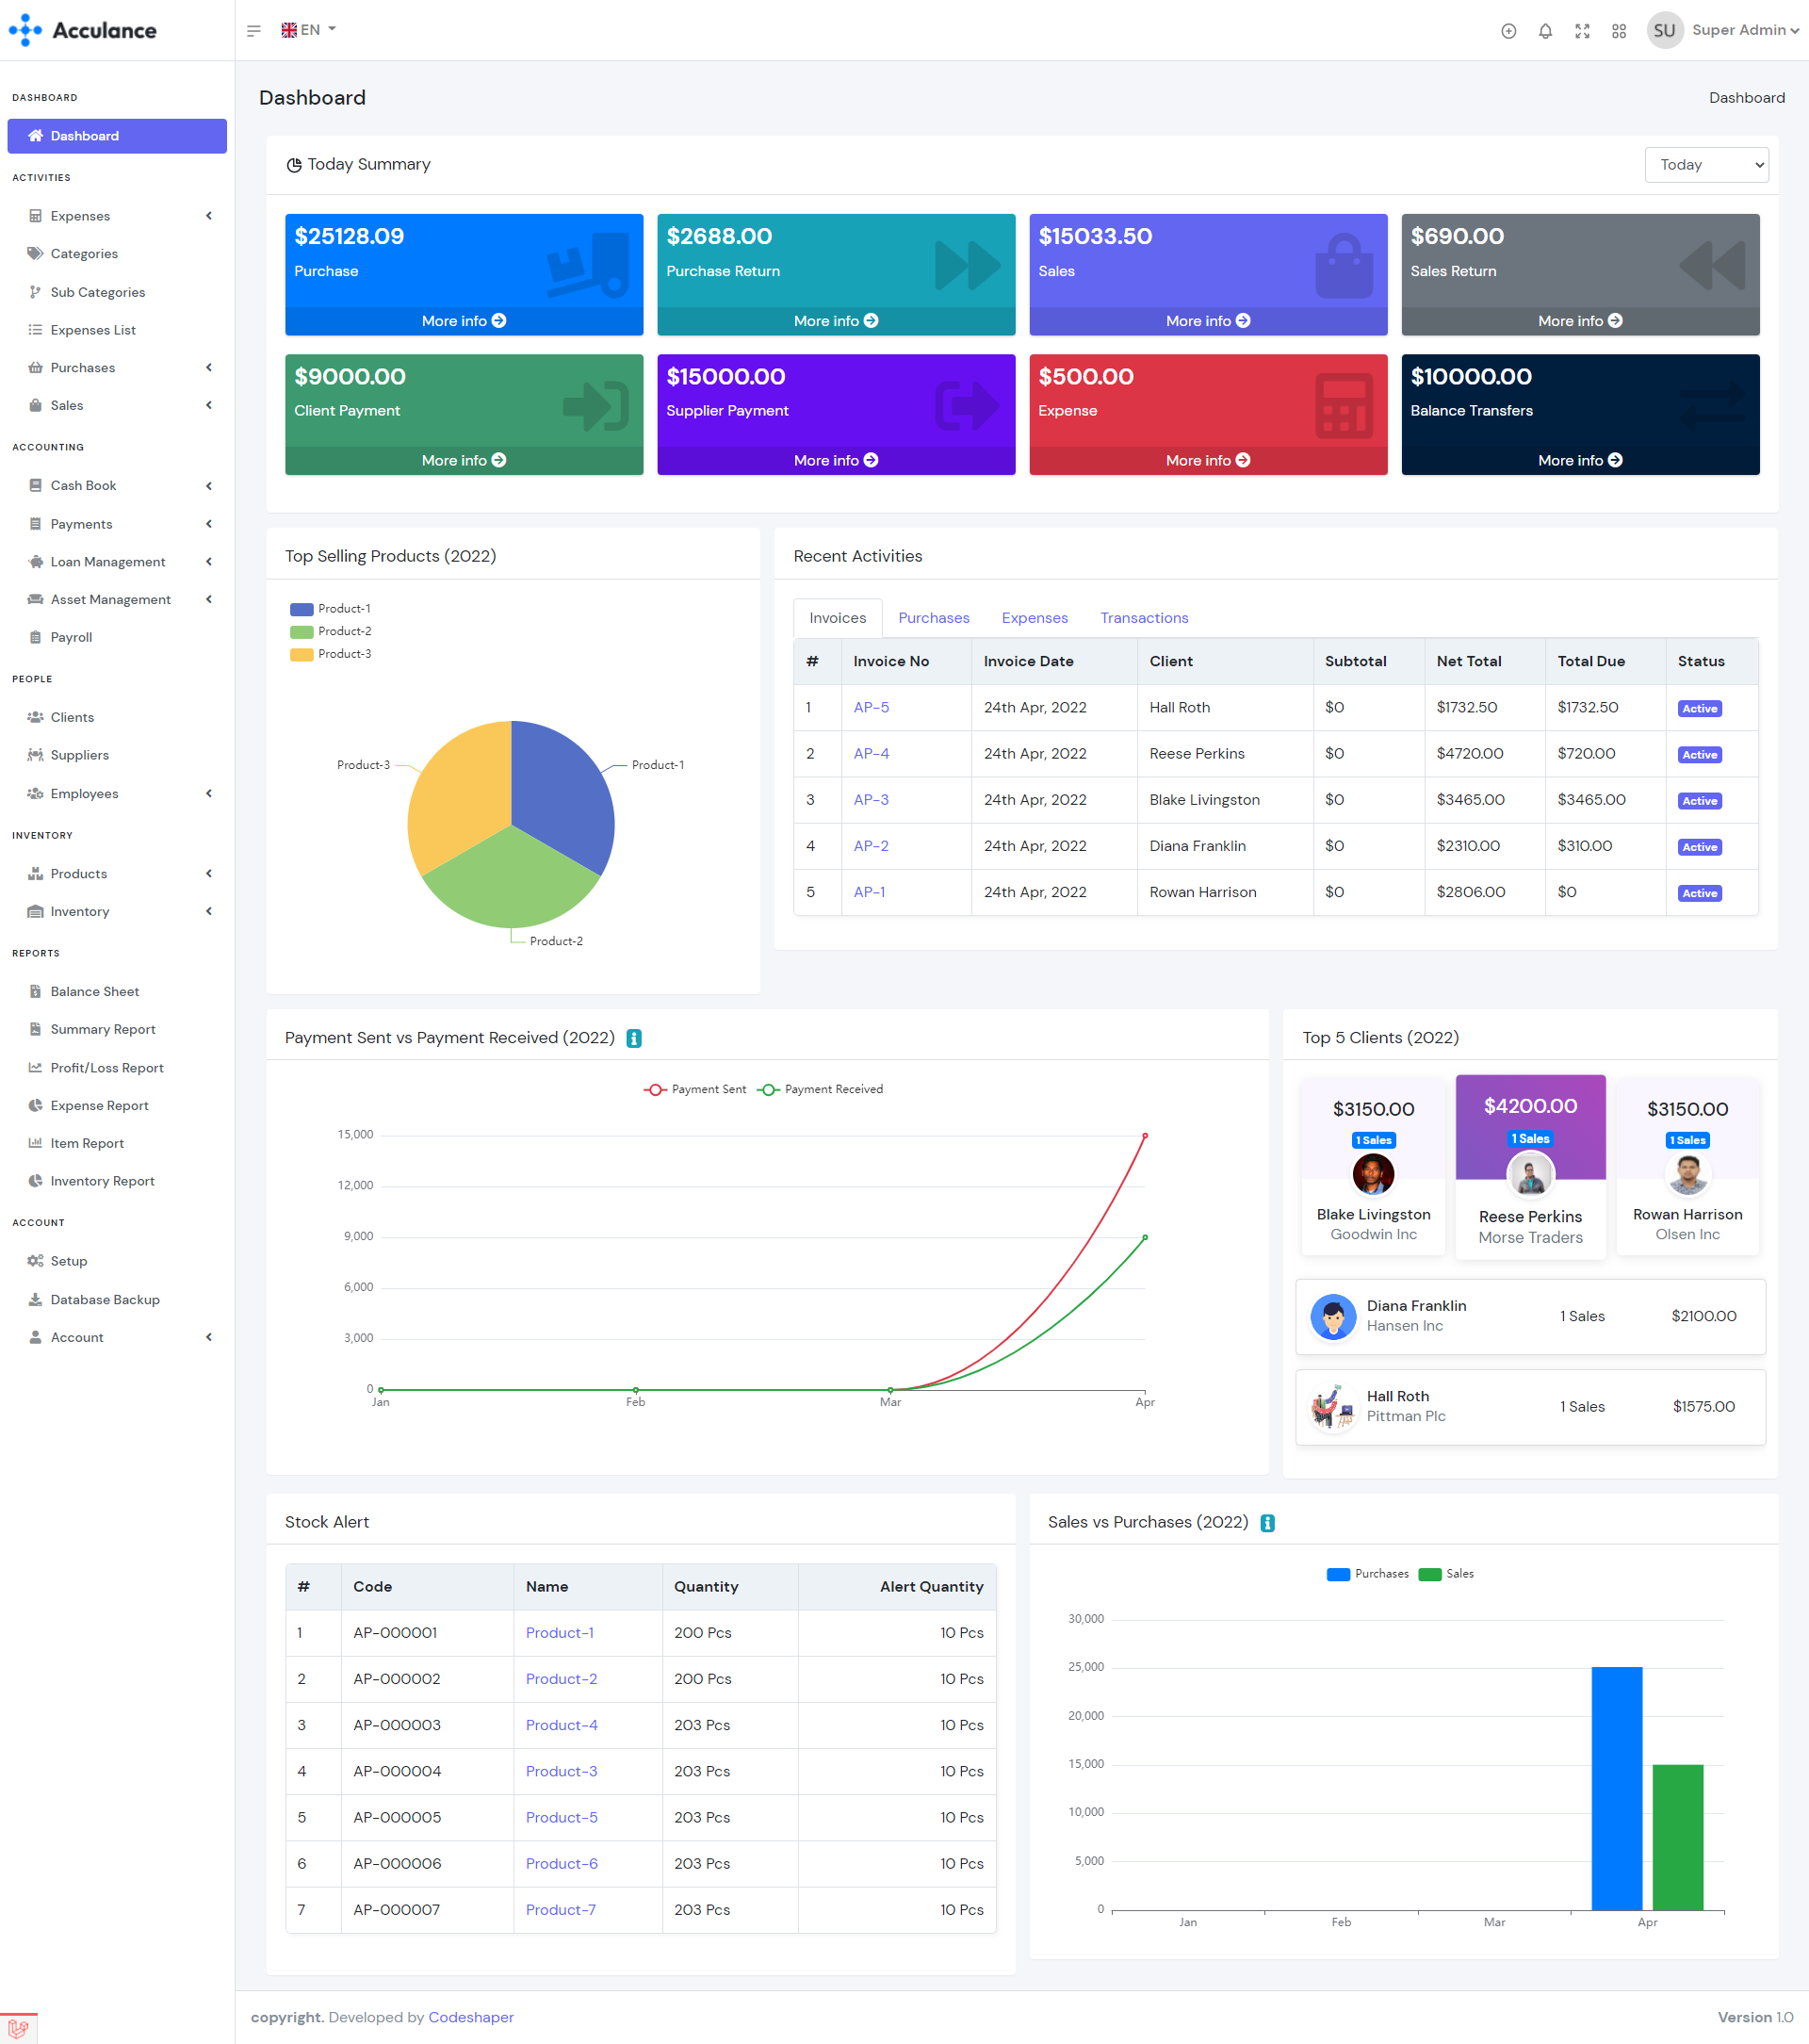
Dashboard Statistics and Charts
You can find the details about every statistic and Chart below.
| Summary |
|---|
|
As the default setting, the summary widget on your dashboard will provide you with a daily overview of several key financial aspects, including purchase, purchase returns, sales, sales returns, client payments, supplier payments, expenses, and balance transfers. To customize the view, you can utilize the filter options located on the right-hand side of the widget. These filters allow you to switch between different time intervals, enabling you to view weekly, monthly, and yearly summaries, depending on your preference and analytical needs. |
| Top Selling Products |
|---|
|
For personalized viewing options, you have the flexibility to make use of the filter controls situated on the right-hand side of the widget. These filters empower you to seamlessly switch between various time intervals, giving you the ability to access weekly, monthly, and yearly summaries according to your specific preferences and analytical requirements. |
| Recent Activities |
|---|
|
The "Recent Activities" widget is designed to display a snapshot of the most recent activities within the system. It provides a quick overview of the six most recent invoices, purchases, expenses, and transactions. However, if you wish to access the complete list of activities, you can easily navigate to the respective pages using the left sidebar menu. This allows you to review all the details and transactions in a more comprehensive manner. |
| Payment Sent vs Payment Received |
|---|
|
The "Payment Sent vs. Payment Received" Line chart provides a monthly comparison between the payments sent and received for the current year. In this comparison:
This chart offers a visual representation of the balance between payments sent and received each month, allowing you to track and analyze financial trends throughout the year. |
| Top 5 Clients |
|---|
|
The "Top 5 Clients Leaderboard" presents a list of the top 5 customers based on their maximum purchasing amounts. It displays the names of these customers along with their respective total purchase amounts and the total number of invoices they have generated for the current year. This leaderboard offers valuable insights into your most significant customer relationships and their contributions to your business during the ongoing year. |
| Stock Alert |
|---|
|
The "Stock Alert" table provides information about up to six products that currently have stock available. These products are listed in ascending order based on their stock quantities. This feature allows you to quickly identify products that may be running low in stock, ensuring that you can manage your inventory effectively and avoid any potential shortages. |
| Sales vs Purchases |
|---|
|
The "Sales vs Purchases" Bar chart offers a monthly comparison between the total sales and total purchases, with the amounts calculated after deducting the sale returns and purchase returns. This chart provides a clear visual representation of the net sales revenue and net purchase expenses for each month, helping you analyze the financial performance of your business over time. |
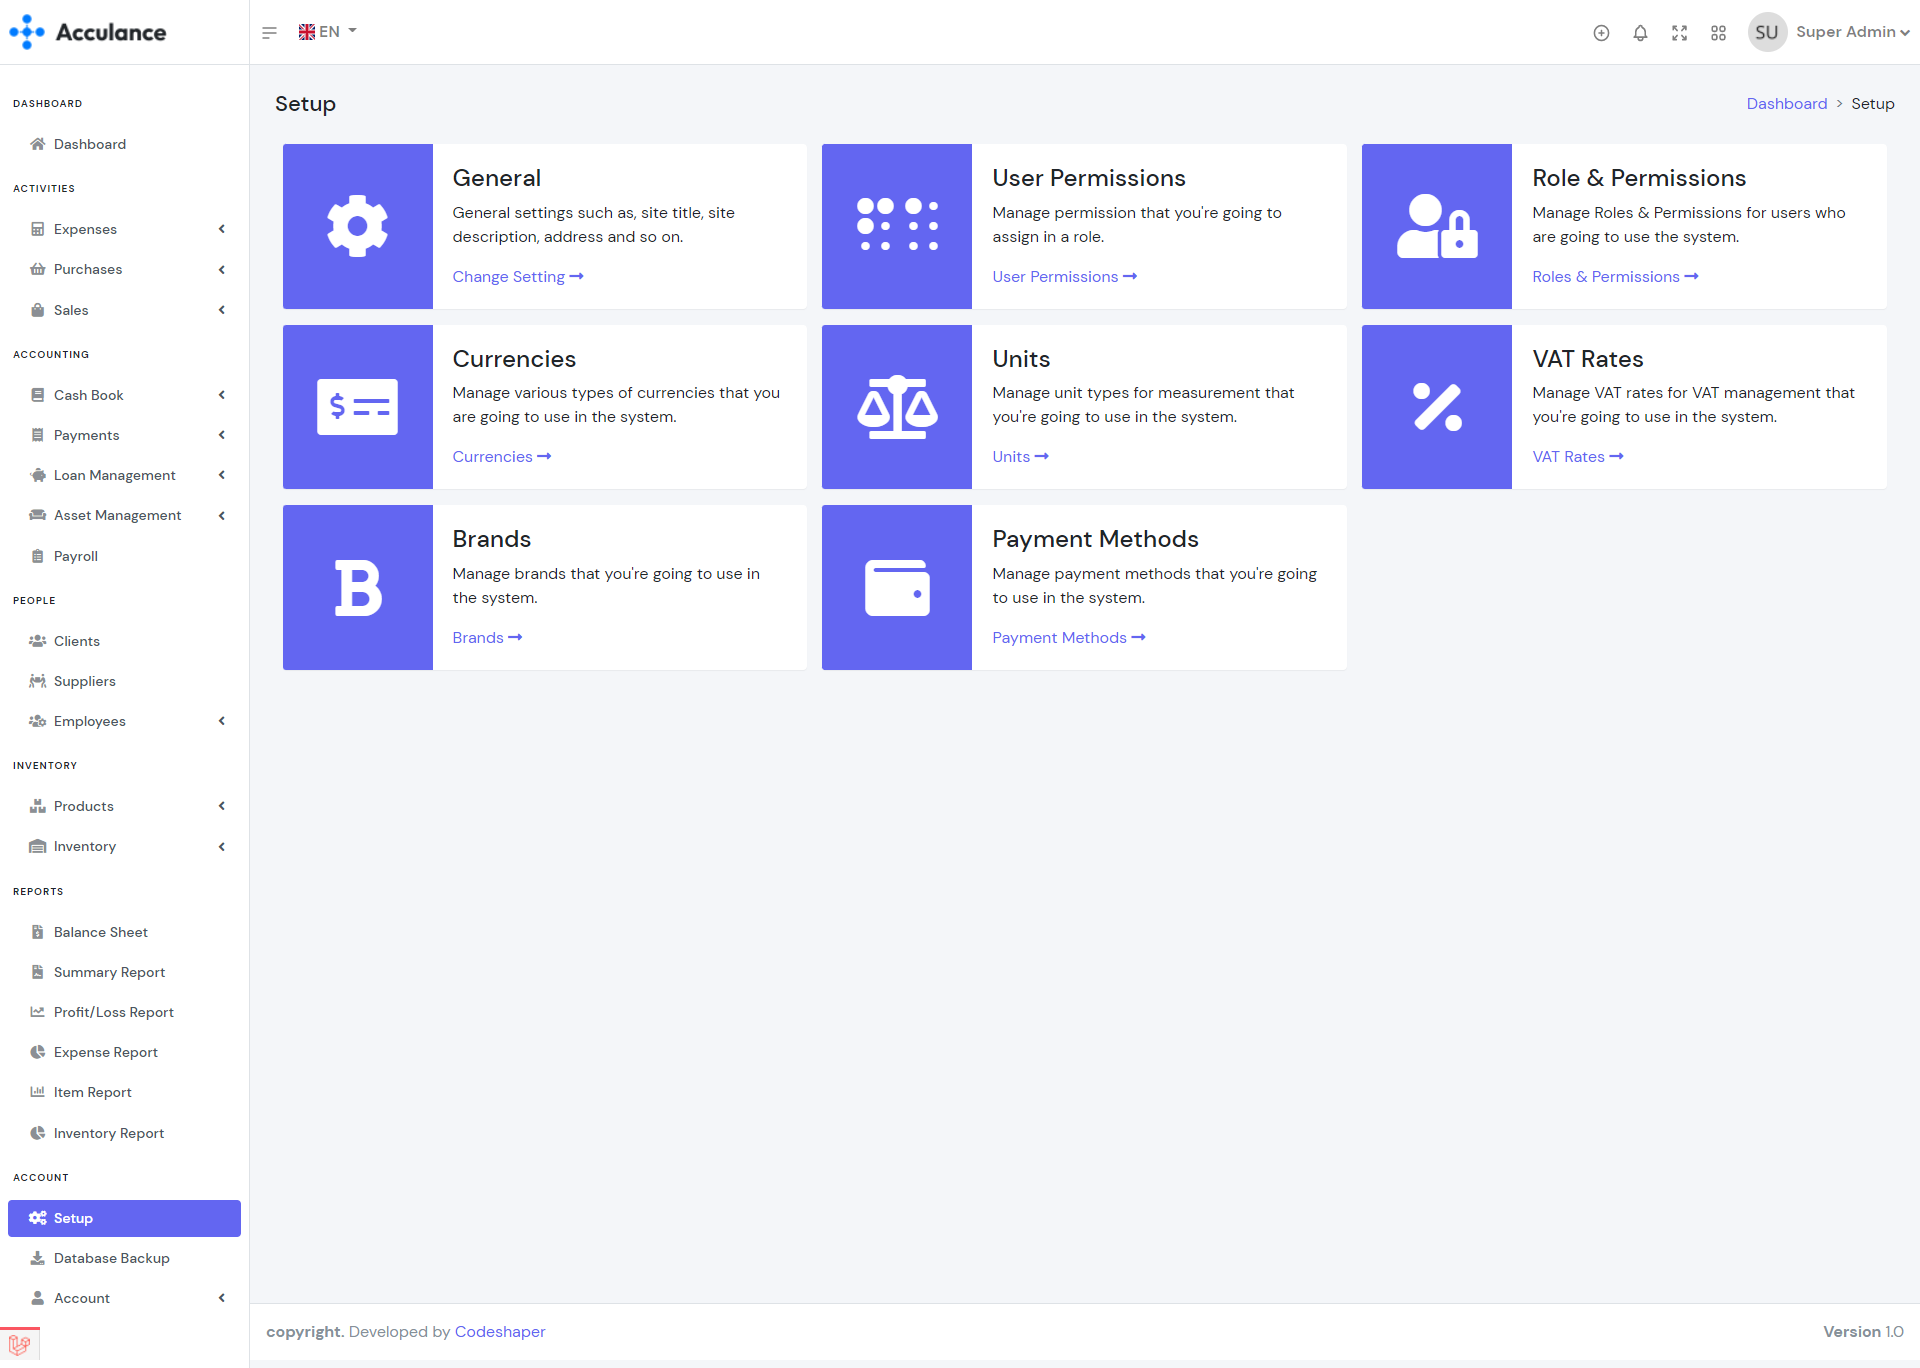
Setup
After the successful installation, you need to set up basic things in order to run the system properly. The setup page contains the page links to General settings, Roles & Permissions, Currencies, Units, VAT Rates, Brands, and Payment Methods. You need to add Roles & Permissions, Units, VAT Rates, and Brands for running the real-time system.
General Settings:
From this page, the site system owner can change the settings of the system. For more details check the below screenshot and descriptions.

Note: Red star marked fields are required and you can't leave them empty.
You need to enter the following information for system setup.
| Company Name => Enter the name of your company. Please keep it max 30 characters. It will be dispalyed in the front page. |
| Compnay Tagline => Tagline of the system. Please keep it max 80 characters. |
| Email Address => Company email address. The email address will be use in the invoice page. |
| Phone Number => Company phone number. The phone number will be use in the invoice page. |
| Address => Company address. The address will be use in the invoice page. |
| Client Prefix => The prefix of your client number. The prefix will show before the number and the number will increase by 1 automatically. You can use can word. Max 10 characters. |
| Supplier Prefix => The prefix of your supplier number. The prefix will show before the number and the number will increase by 1 automatically. You can use can word. Max 10 characters. |
| Employee Prefix => The prefix of your employee number. The prefix will show before the number and the number will increase by 1 automatically. You can use can word. Max 10 characters. |
| Product Category Prefix => The prefix of your product category number. The prefix will show before the number and the number will increase by 1 automatically. You can use can word. Max 10 characters. |
| Product Sub Category Prefix => The prefix of your product sub category number. The prefix will show before the number and the number will increase by 1 automatically. You can use can word. Max 10 characters. |
| Product Prefix => The prefix of your product number. The prefix will show before the number and the number will increase by 1 automatically. You can use can word. Max 10 characters. |
| Expense Category Prefix => The prefix of your expense category number. The prefix will show before the number and the number will increase by 1 automatically. You can use can word. Max 10 characters. |
| Expense Sub Category Prefix => The prefix of your expense sub category number. The prefix will show before the number and the number will increase by 1 automatically. You can use can word. Max 10 characters. |
| Purchase Prefix => The prefix of your purchase number. The prefix will show before the number and the number will increase by 1 automatically. You can use can word. Max 10 characters. |
| Purchase Return Prefix => The prefix of your purchase return number. The prefix will show before the number and the number will increase by 1 automatically. You can use can word. Max 10 characters. |
| Quotation Prefix => The prefix of your quotation number. The prefix will show before the number and the number will increase by 1 automatically. You can use can word. Max 10 characters. |
| Invoice Prefix => The prefix of your invoice number. The prefix will show before the number and the number will increase by 1 automatically. You can use can word. Max 10 characters. |
| Invoice Return Prefix => The prefix of your invoice return number. The prefix will show before the number and the number will increase by 1 automatically. You can use can word. Max 10 characters. |
| Invoice Adjustment Prefix => The prefix of your invoice adjustment number. The prefix will show before the number and the number will increase by 1 automatically. You can use can word. Max 10 characters. |
| Default Currency => Default Currency of the system. Select a currency from the list. |
| Default Language => Default Language of the system. Select a language from the list. |
| Copyright Text => Copyright Text. You can enter any text. Max 255 characters. |
| White Logo => The logo will be displayed in the left sidebar on dark mode. We recommend you to use image size 160px X 40px |
| Black Logo => The logo will be displayed in the left sidebar on light mode. We recommend you to use image size 160px X 40px |
| Small Logo => The small Logo of the sytem. The logo will be displayed when you click on the toggle bar and toogle the navbar. We recommend you to use image size 40px X 40px |
| Favicon Icon => The icon that will be dispalyed on the browser tab. We recommend you to use image size 512px X 512px |
Other Settings:
The things that you need to know about Roles & Permissions, Currencies, Units, VAT Rates, Brands.
| Mail Configuration |
|---|
| With the release of version 4.0.0, we are excited to introduce mail notification functionality. This new feature empowers you to easily notify your clients and suppliers about their invoices, purchases, and payments. To leverage this capability, it's essential to configure your email settings, ensuring seamless communication. |
| SMS Configuration |
|---|
| Introducing the latest advancement in version 4.0.0 – SMS notification capability. This exciting addition allows you to effortlessly inform your clients and suppliers about their invoices, purchases, and payments via SMS. To harness this functionality, it's crucial to set up your email preferences for smooth communication. Notably, we've integrated Twilio for SMS notifications, necessitating an update to your SMS configuration in alignment with your Twilio settings. |
| Roles & Permissions |
|---|
| Roles & Permissions are related to employee authentication. You can create a role and assign necessary permissions for the role. Later you can assign the role to an employee. |
| Currencies |
|---|
| You can create single or multiple currencies and later you can select your default currency from the general settings option. The default currency is USD but you can change it to your currency. |
| Units |
|---|
| Units settings are related to the products. You must create at least one unit to create products. While creating a product you will be able to select a unit for the product. |
| VAT Rates |
|---|
| VAT Rates settings are related to the products, purchases, and sales. You must create at least one VAT Rate to run the system. If you don't want to use any VAT Rates then you may create a vat rate with a 0% rate and then use this rate for products, purchases, and sales. |
| Brands |
|---|
| Brands settings are related to the products. You must create at least one brand to create products. While creating a product you will be able to select a brand for the product. |
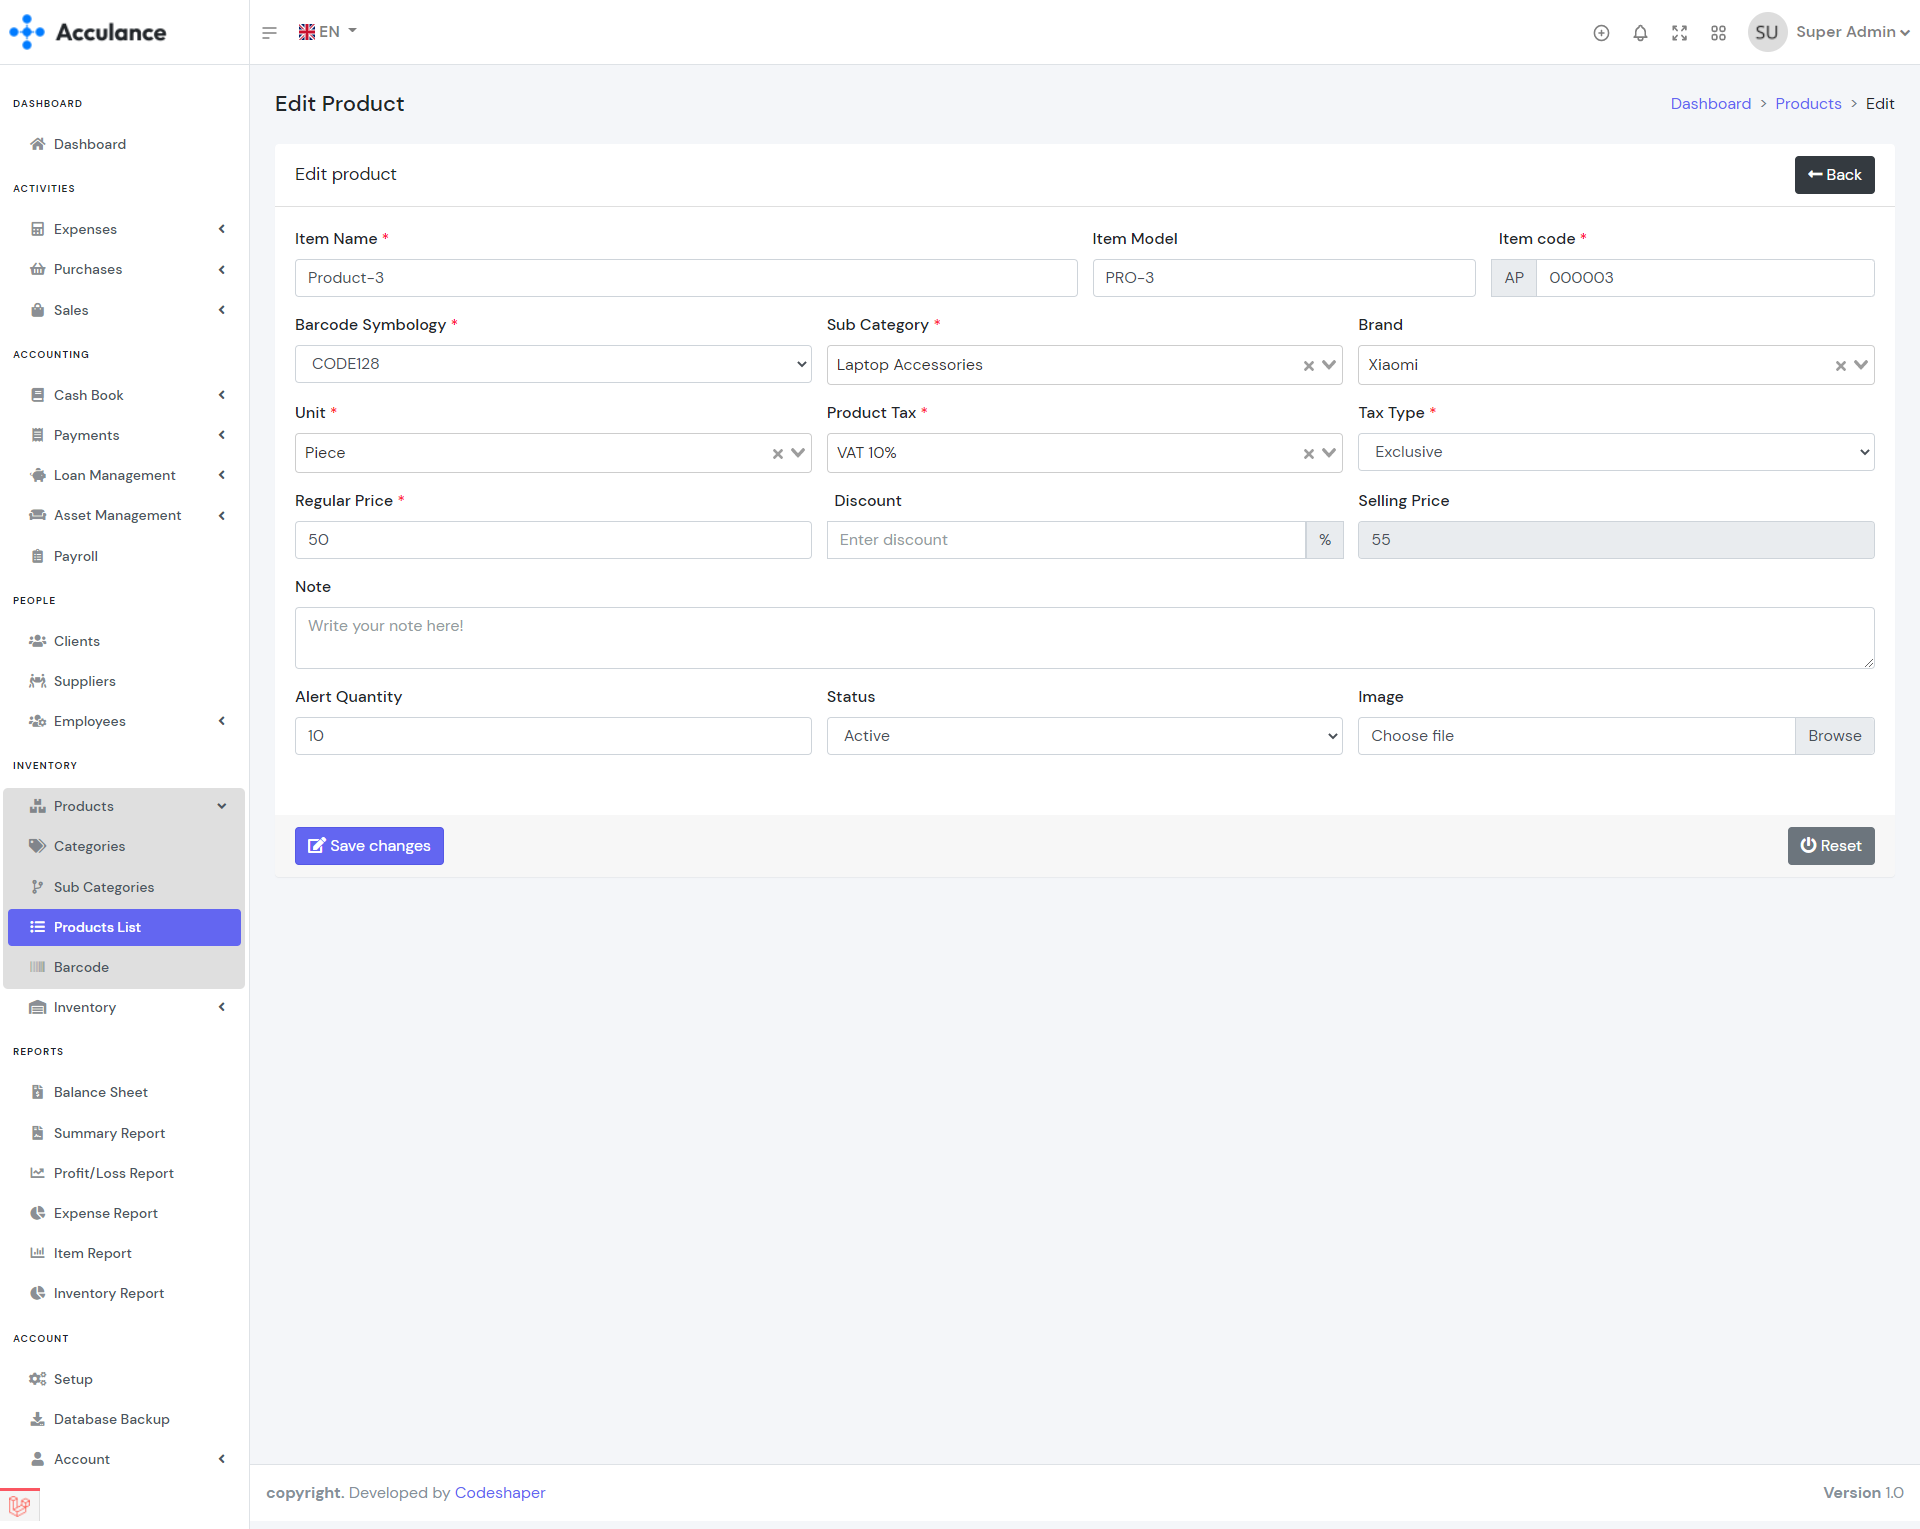
Products
Products are the most important elements of the system. After completing your setup you need to create your products. In order to create a product, you must create a category and sub-category first. To add stock you have to purchase that product. The product purchase price will be calculated automatically based on the purchase history.
| Required fields to create a product |
|---|
| Item Name => Name of the item. You can enter any name. |
| Item code => Item code that will be used for the barcode. The code will be generated automatically. But if you want you can use your own code. |
| Barcode Symbology => Symbology for the product barcode. Select a Symbology from the list. |
| Unit => Product unit. Select a unit from the list. |
| Product Tax => Tax for this product. If you don't want to use any tax then create a vat rate with a 0% rate and then select the rate here. |
| Tax Type => Select a tax type. If you select inclusive then the selling price will be the same as the regular price and the Tax will be included within the price. But if you select exclusive then tax will be added with the regular price so the selling price will increase. |
| Regular Price => Your product price. The selling price will be calculated based on the regular price. |

Product Categories
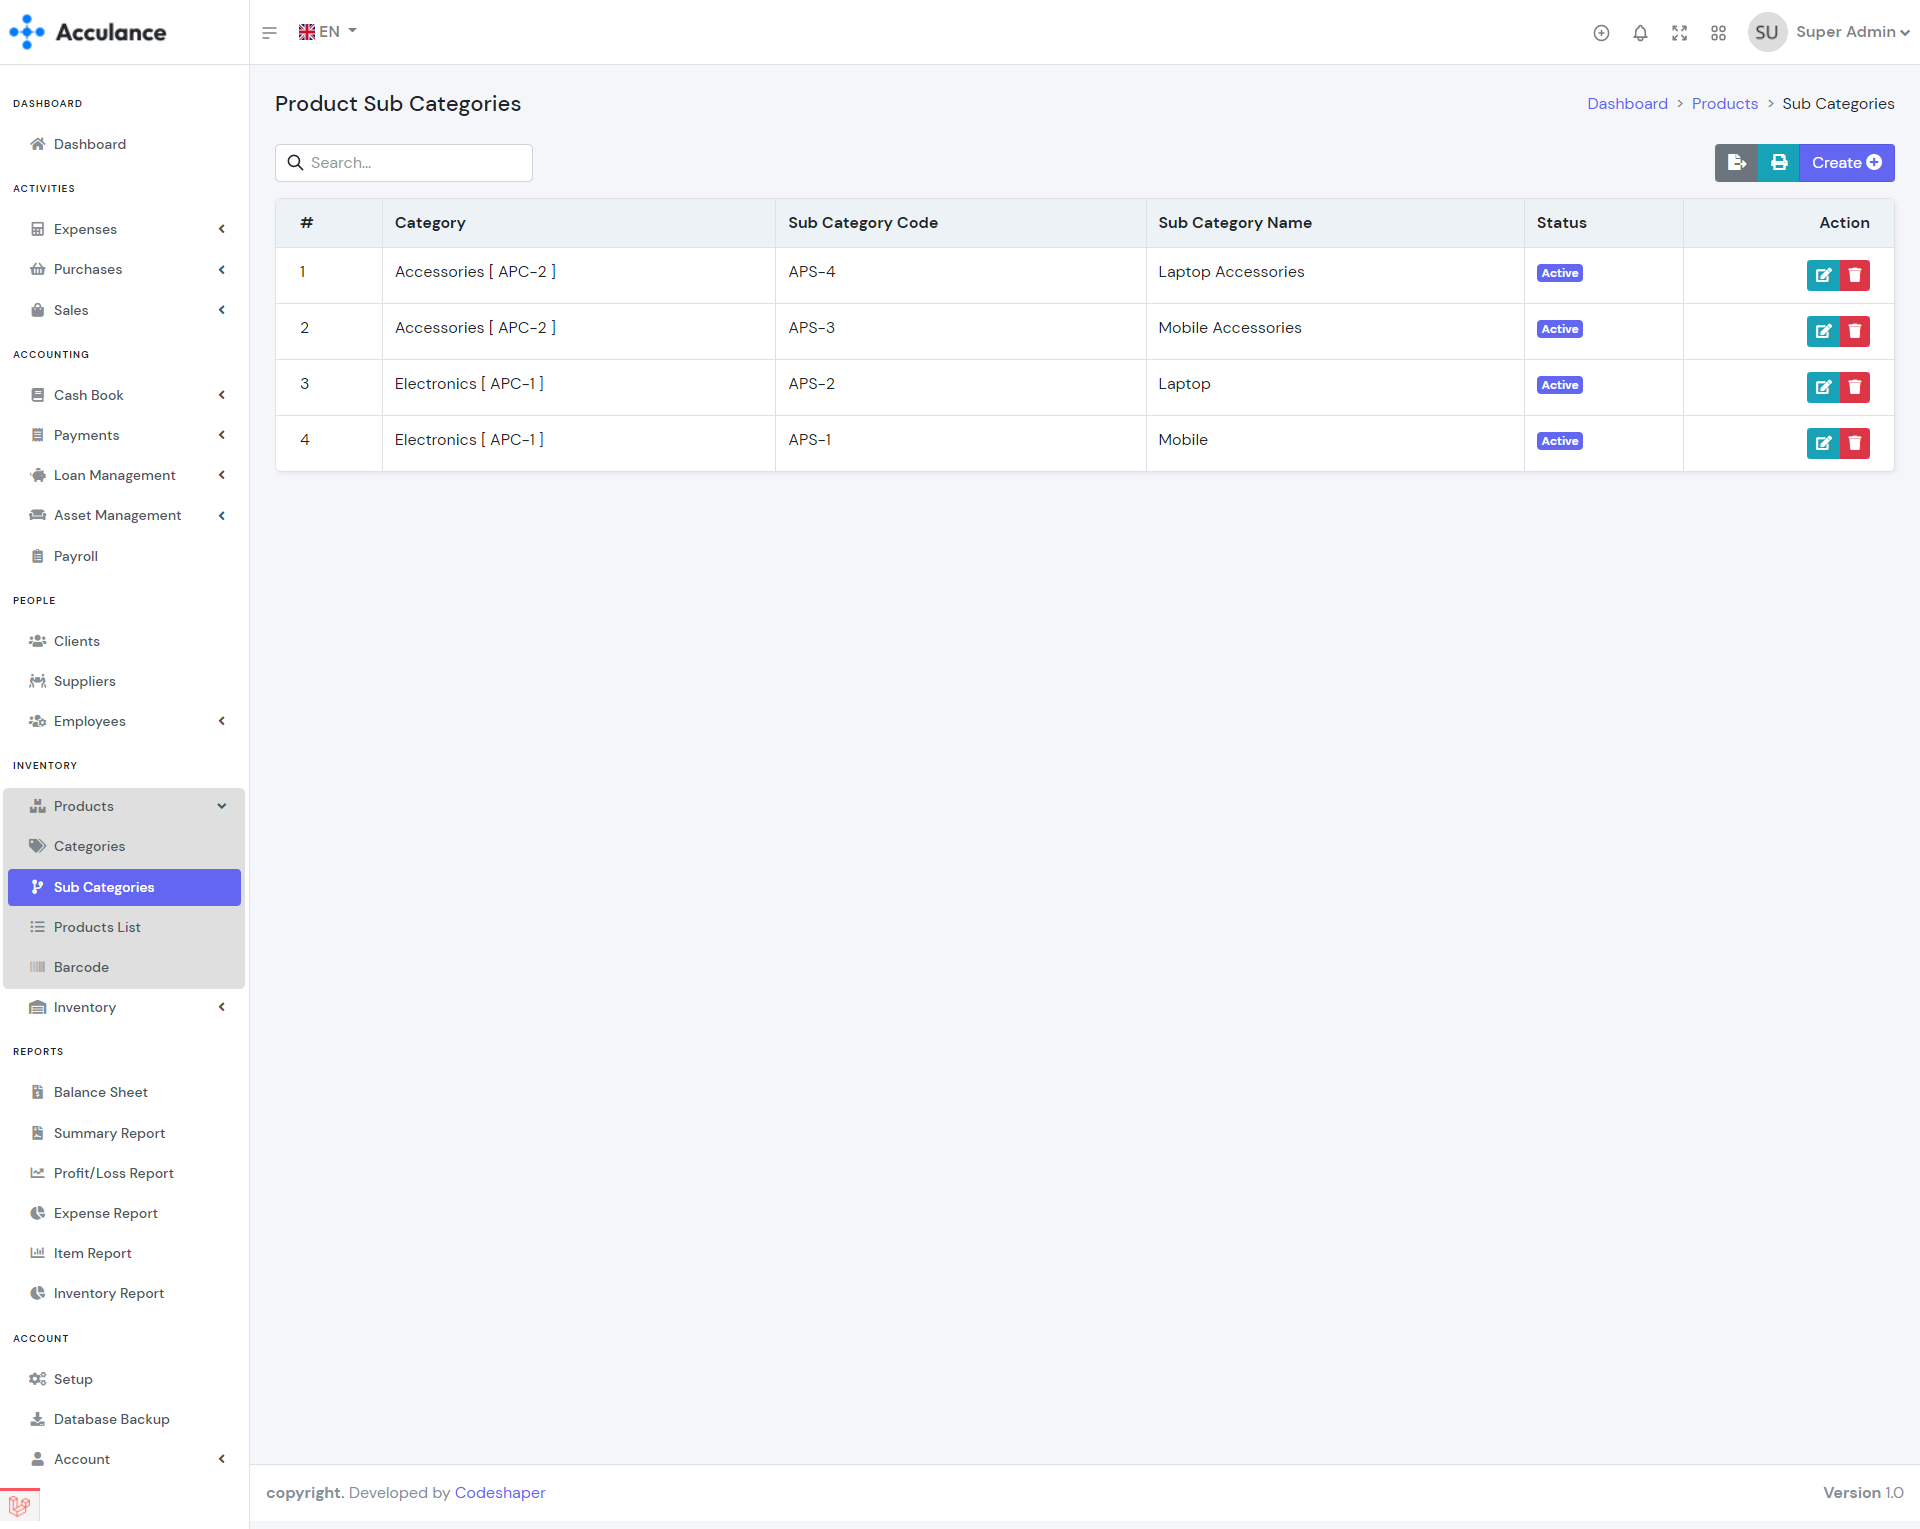
Product Sub Categories

Products List

Create Product
Edit Product
Edit Product
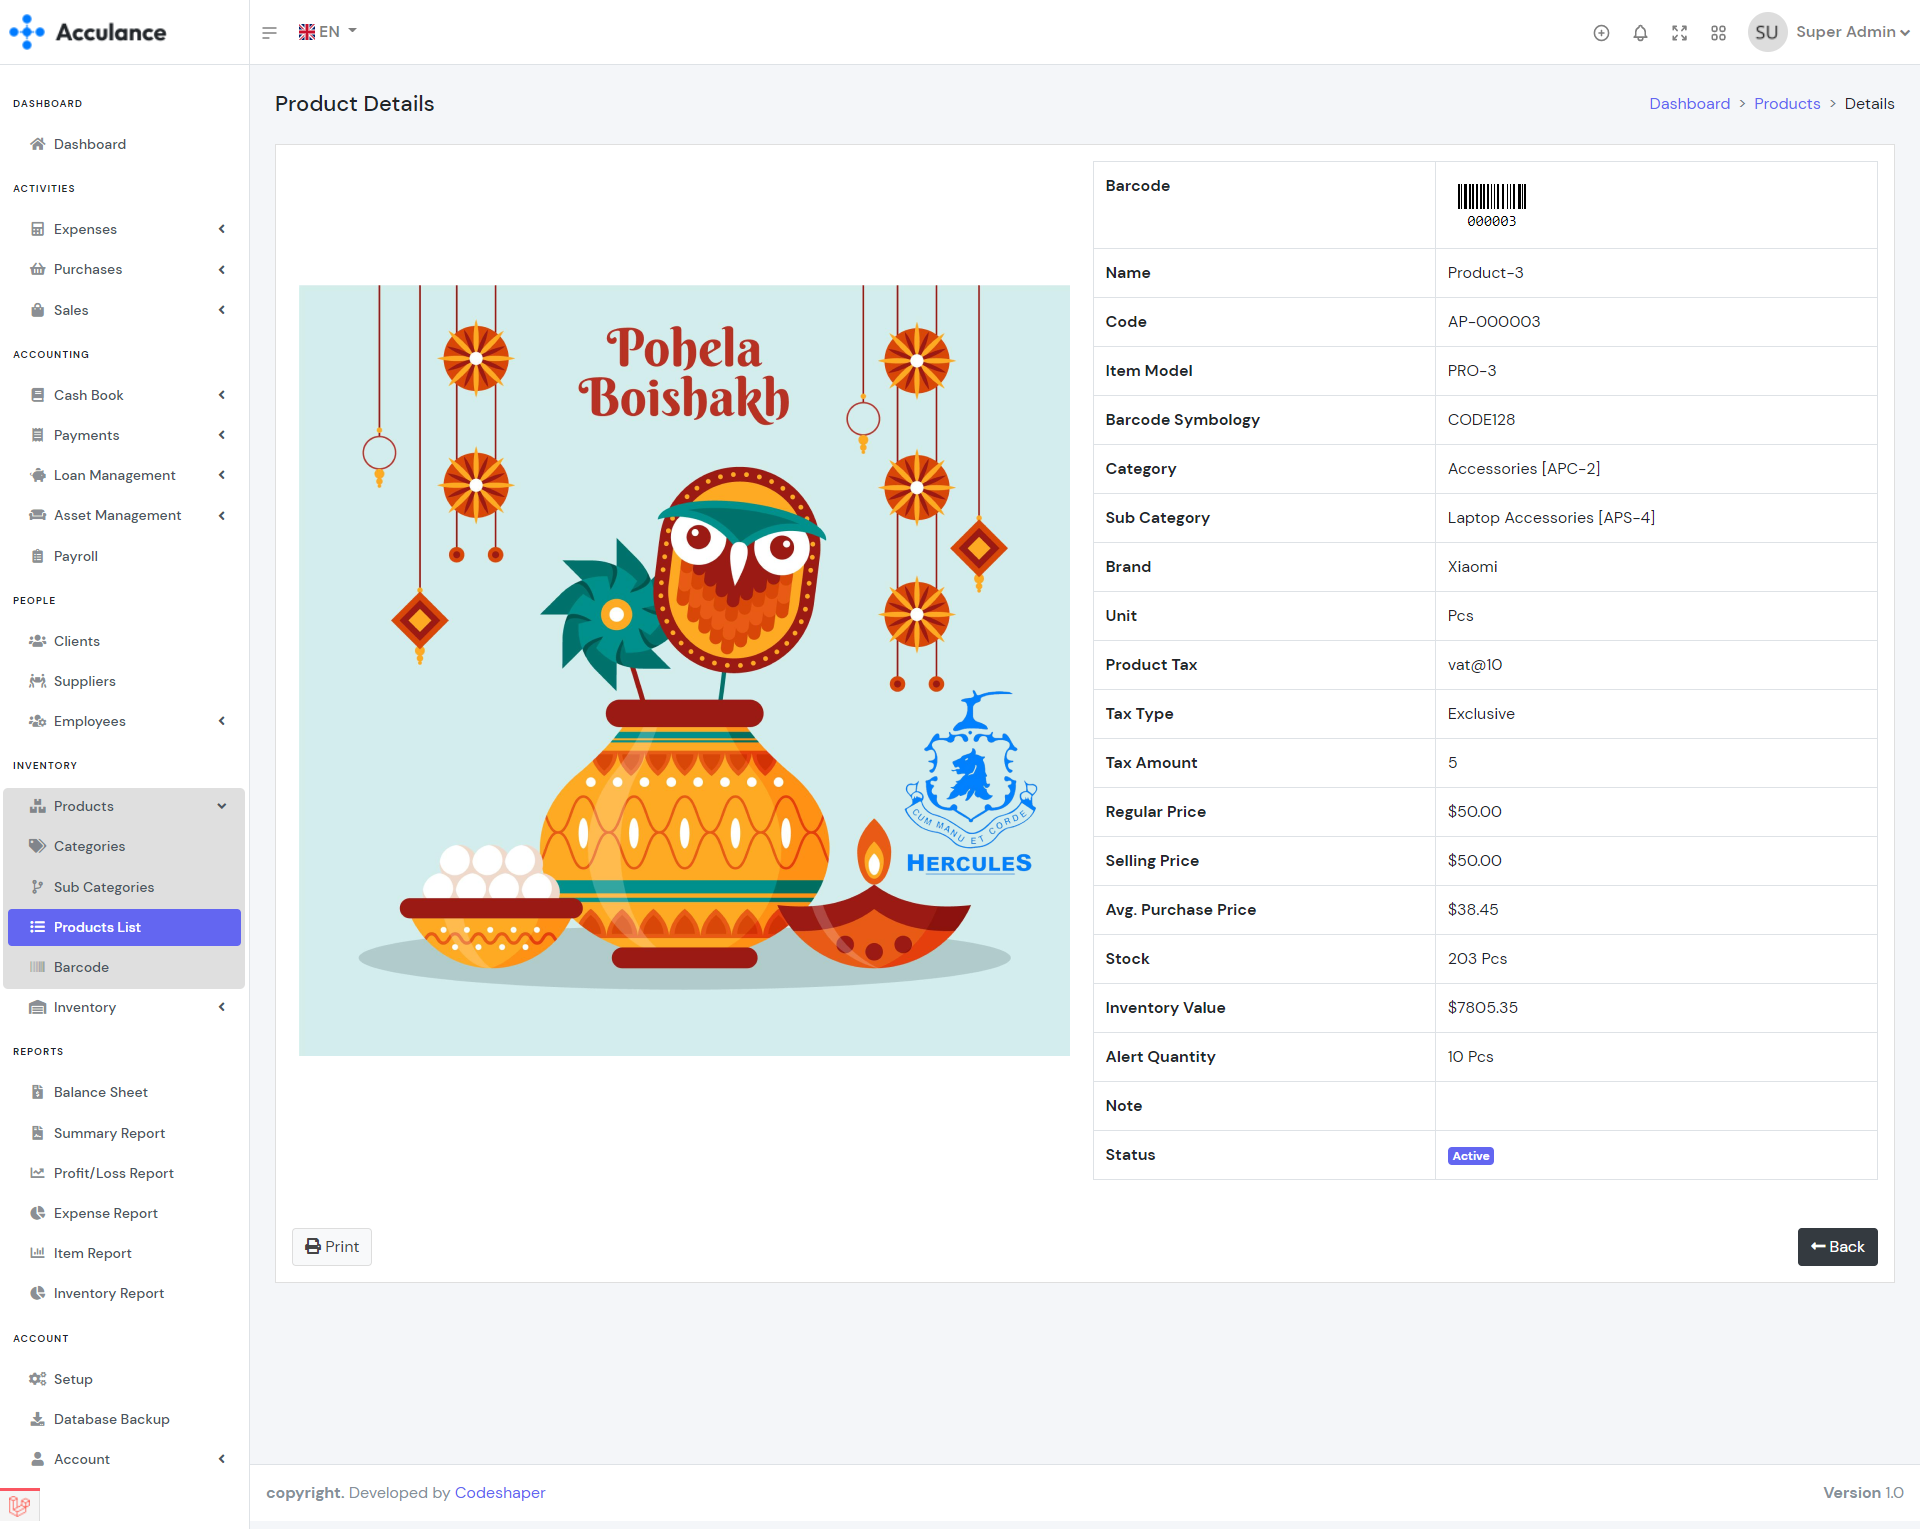
Product Details
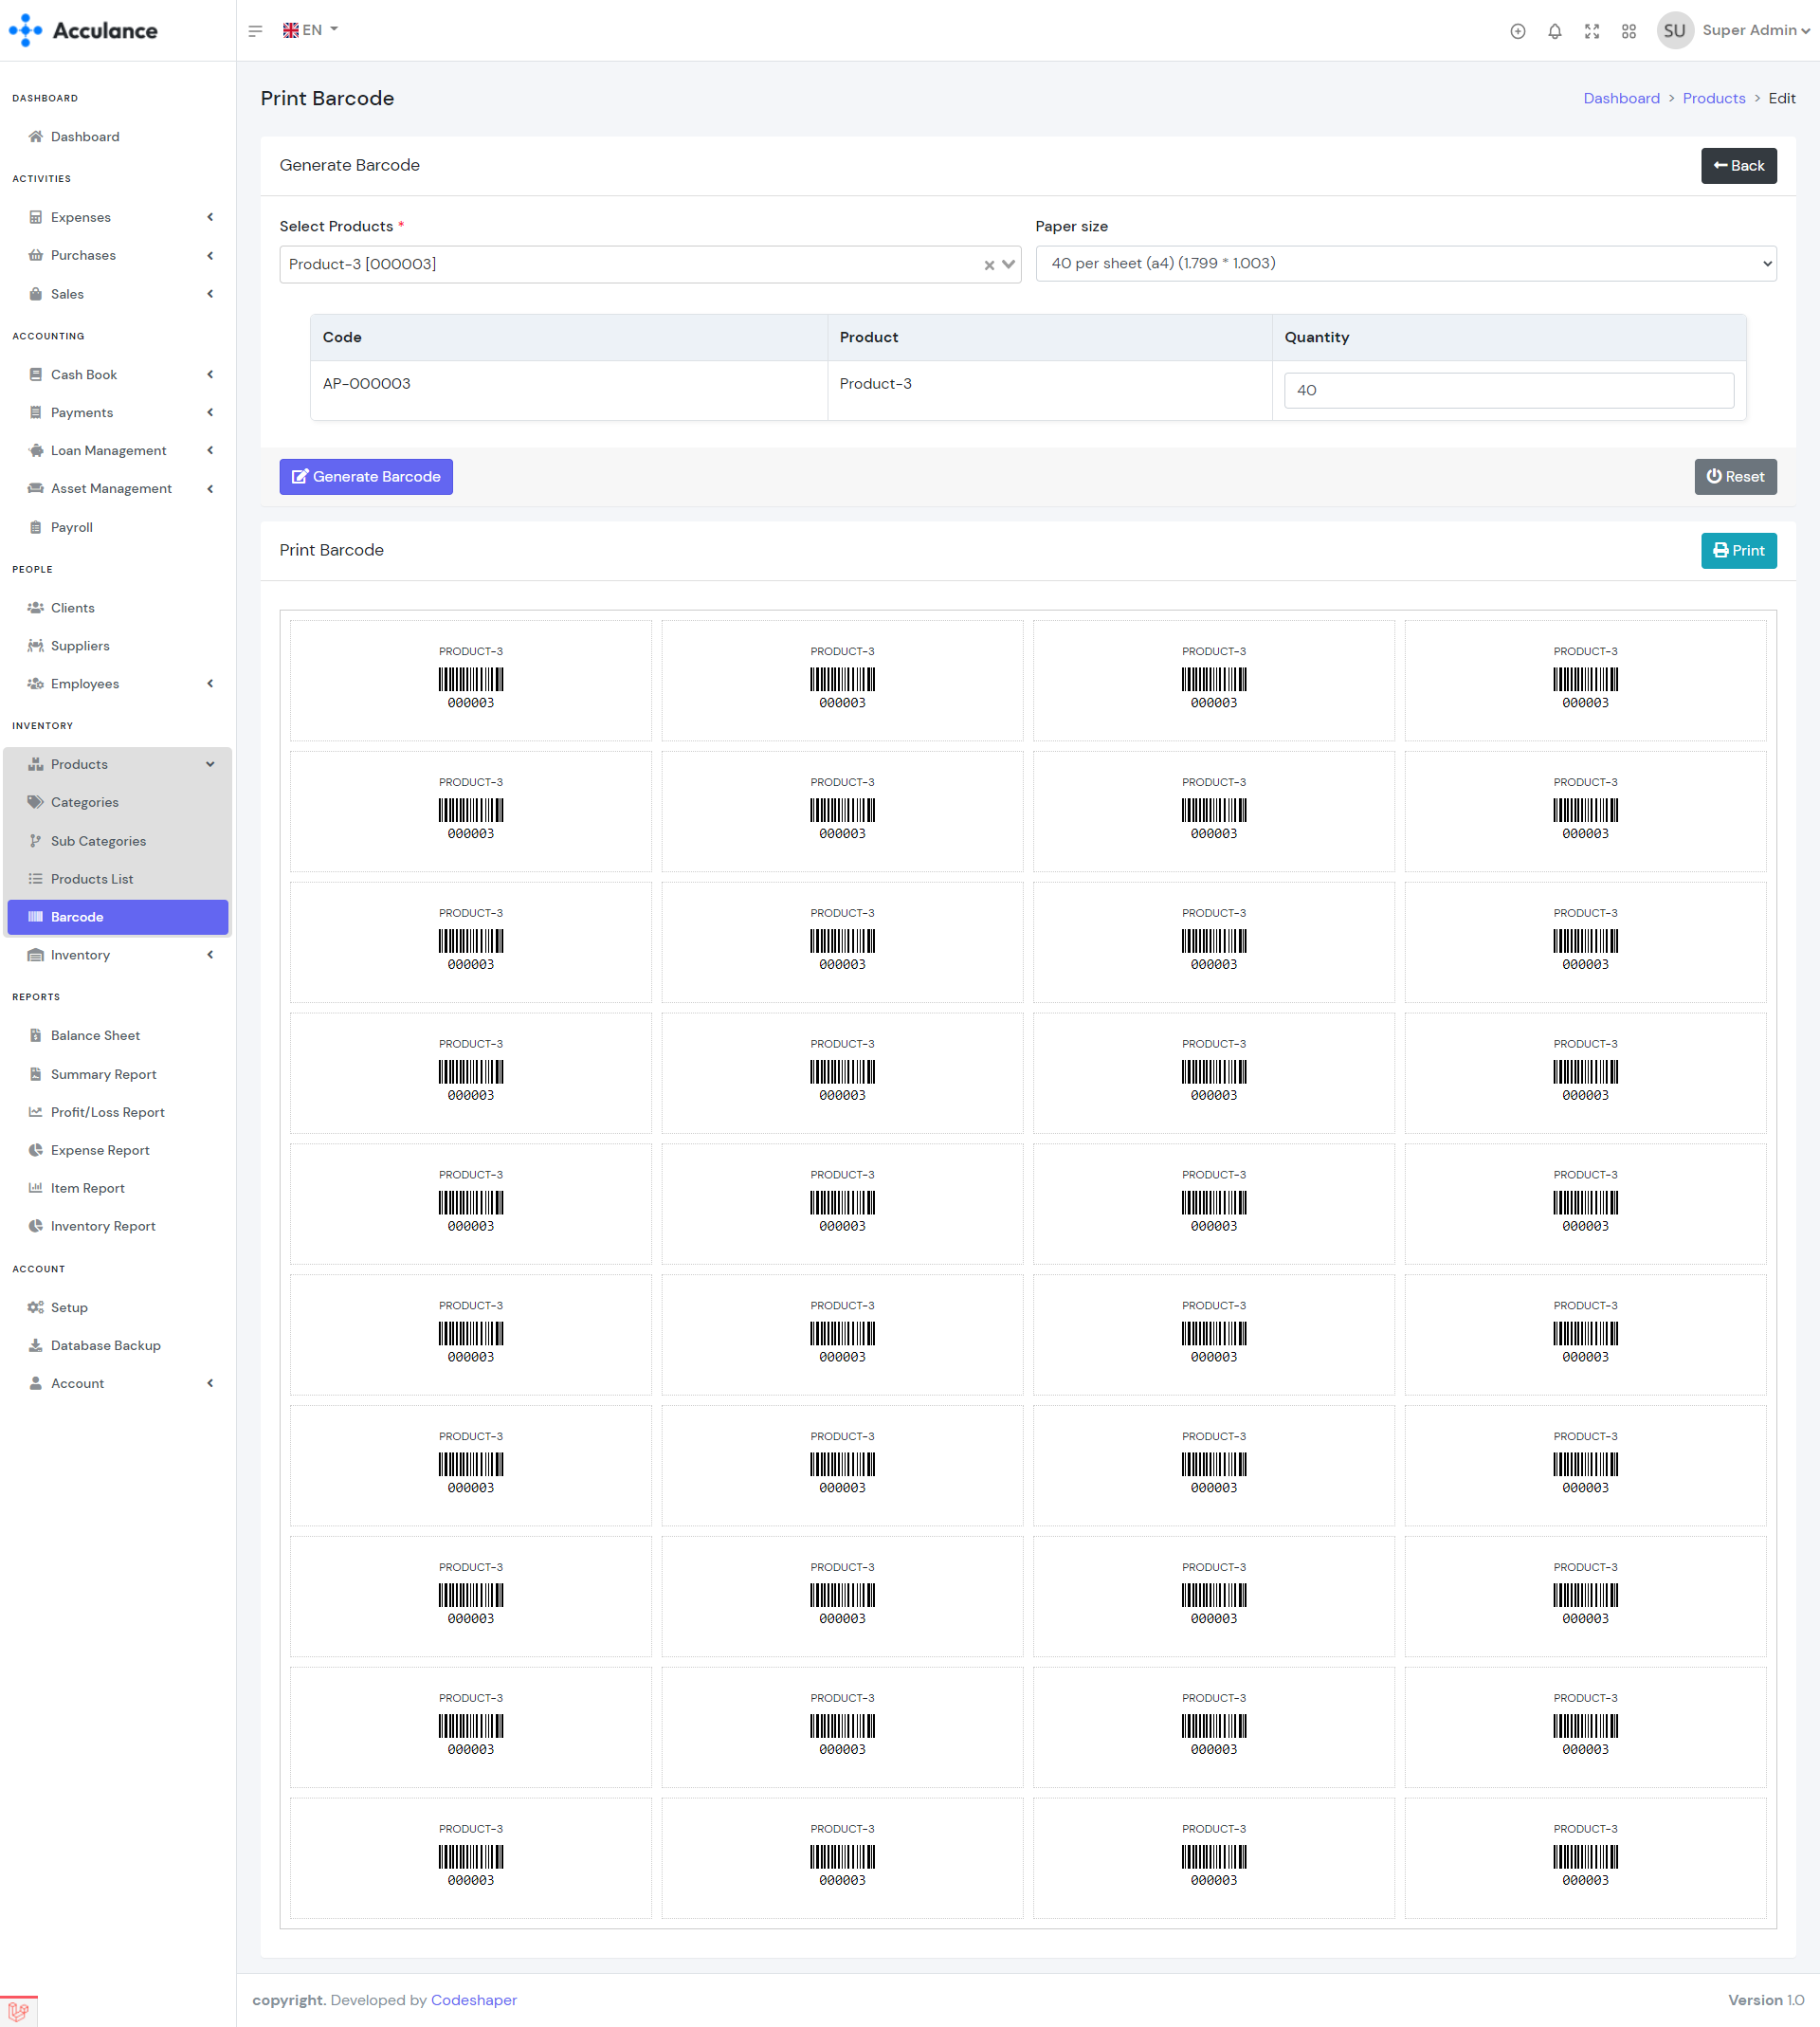
Print Barcode
Clients
Clients module help you to manage your clients. You can create, edit and delete clients. You can see the client invoices, returns, payments, and non invoice transactions from the client view page.
| Required fields to create a client |
|---|
| Name => Name of the client. You can enter any name. |
| Contact Number => Client contact number. |
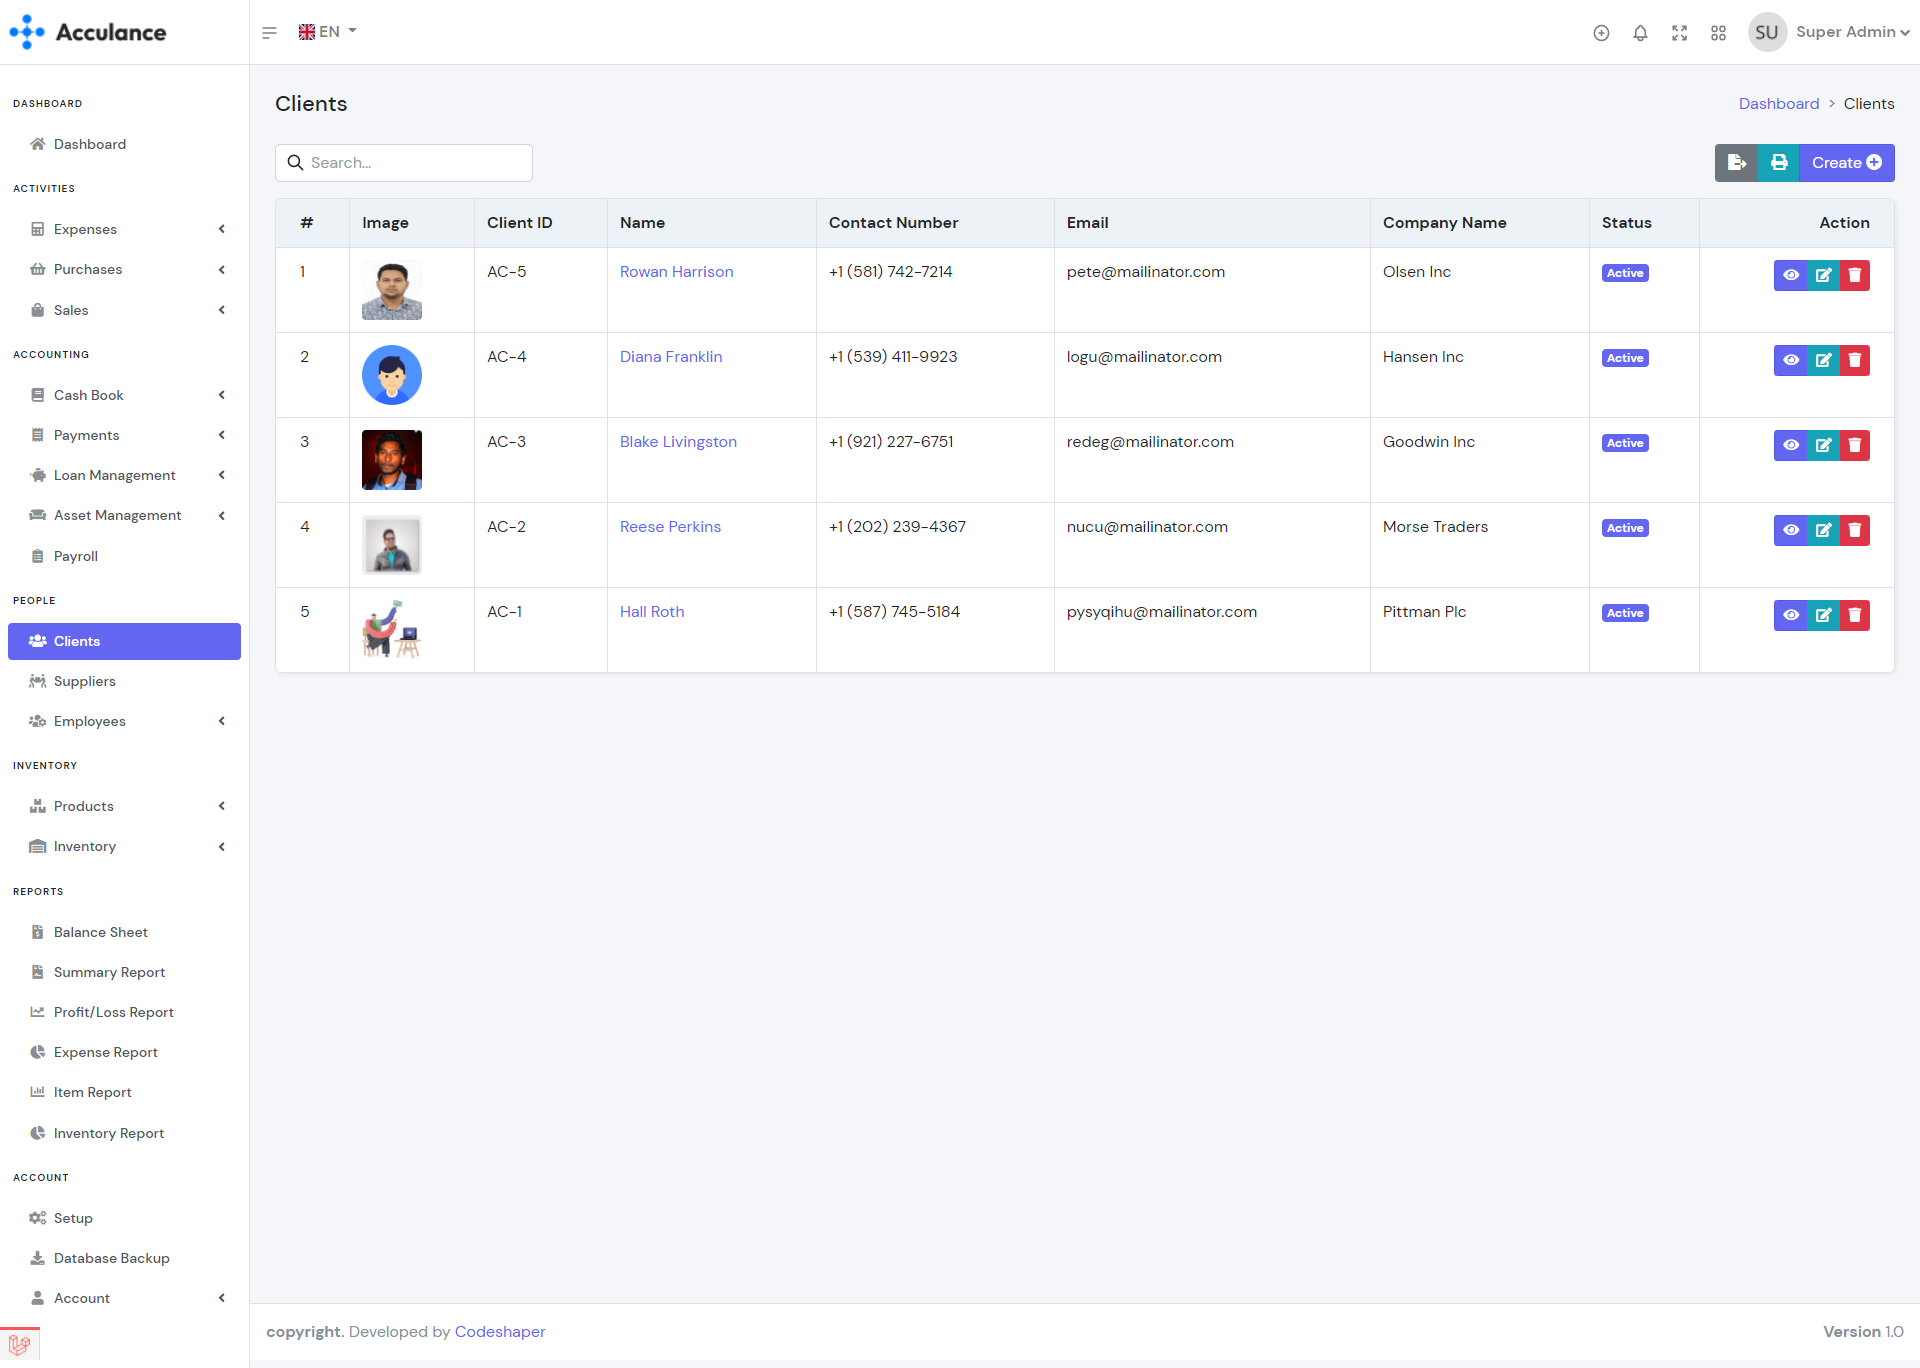
Clients List
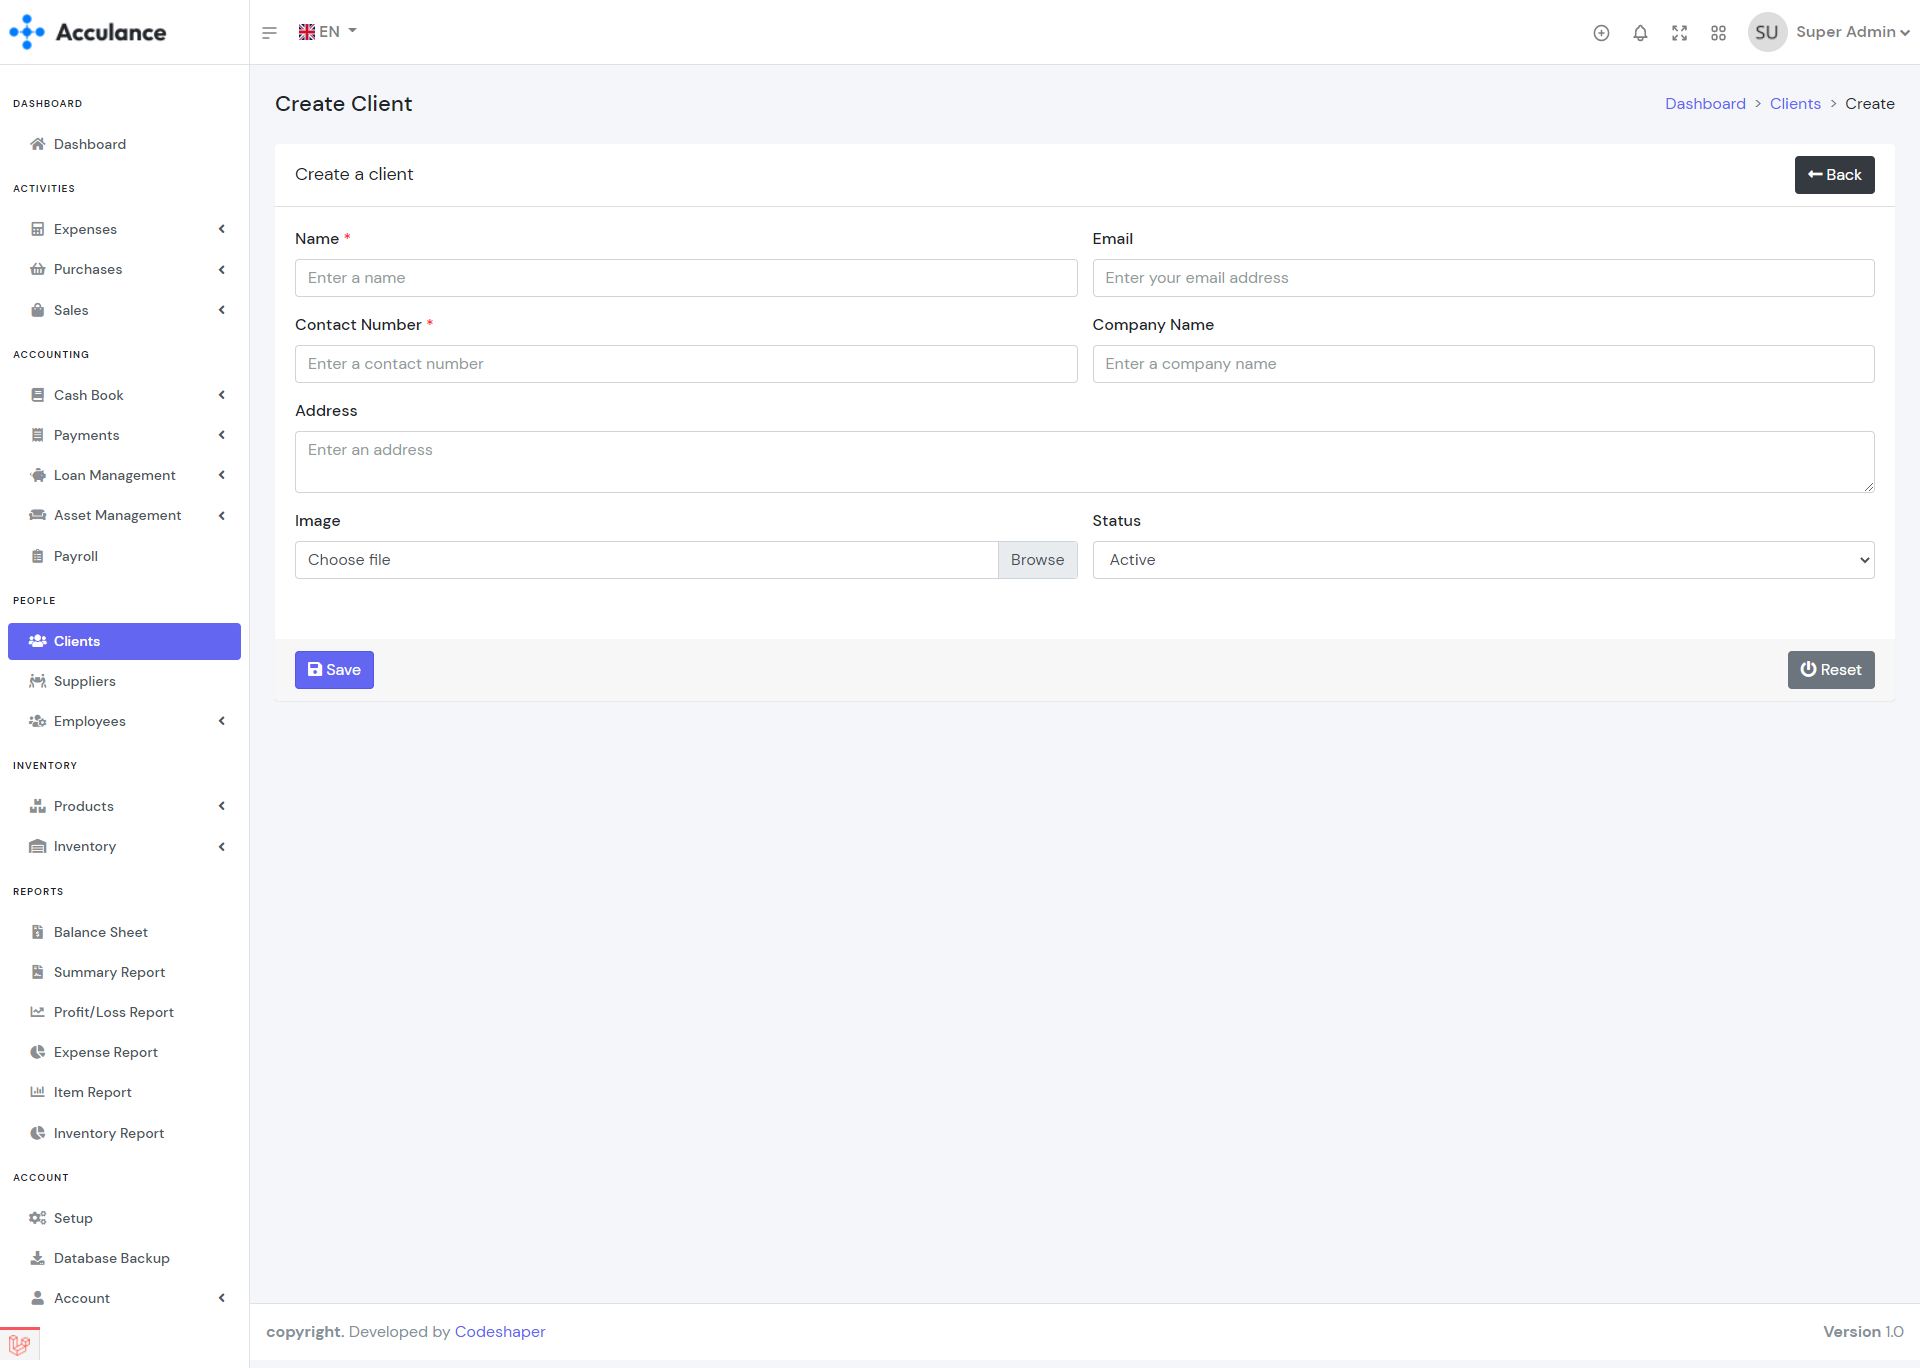
Create Client
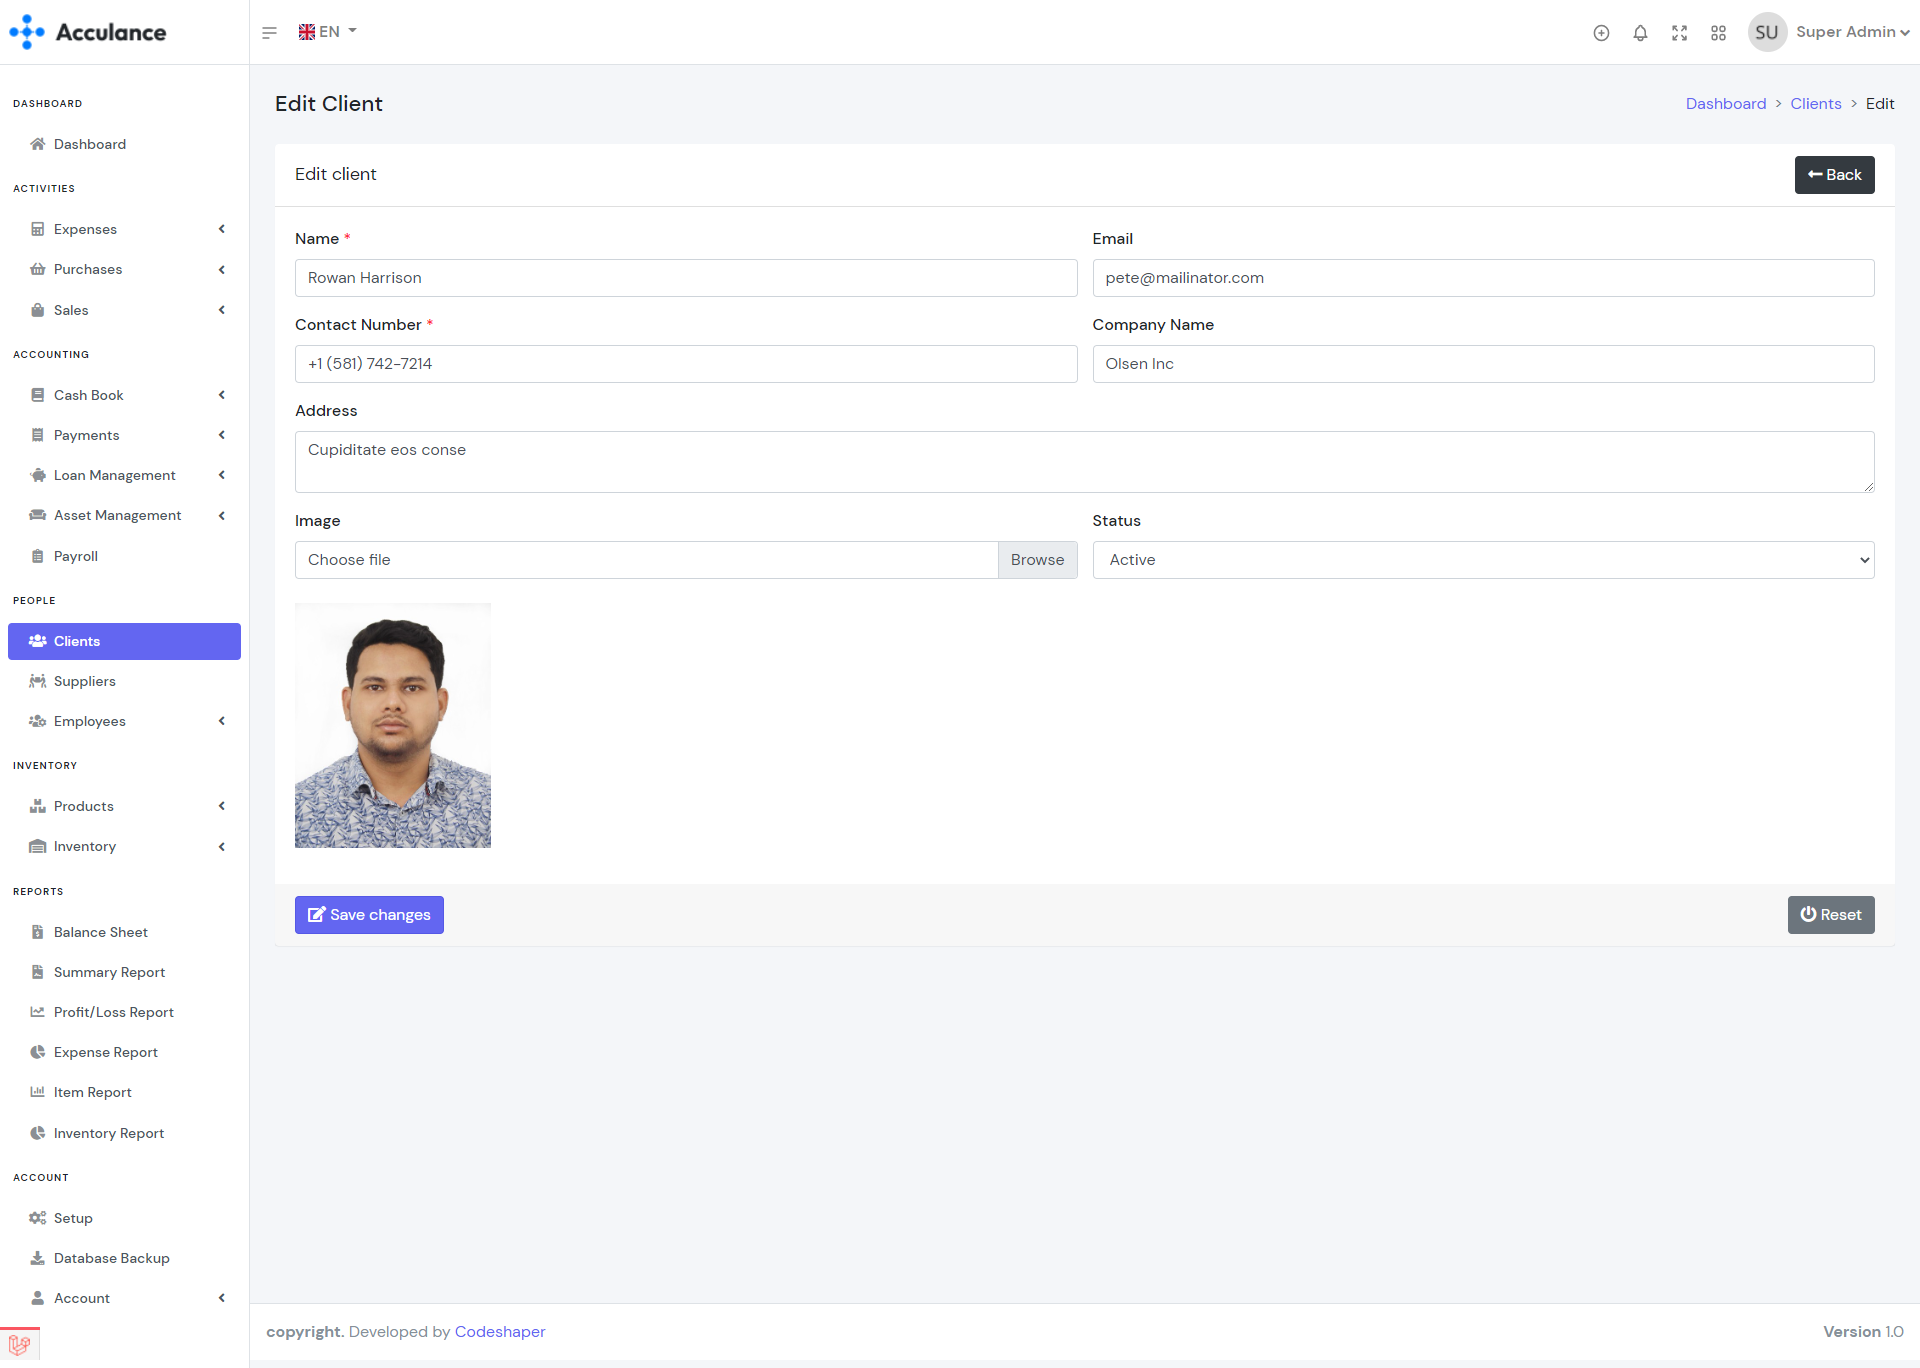
Edit Client
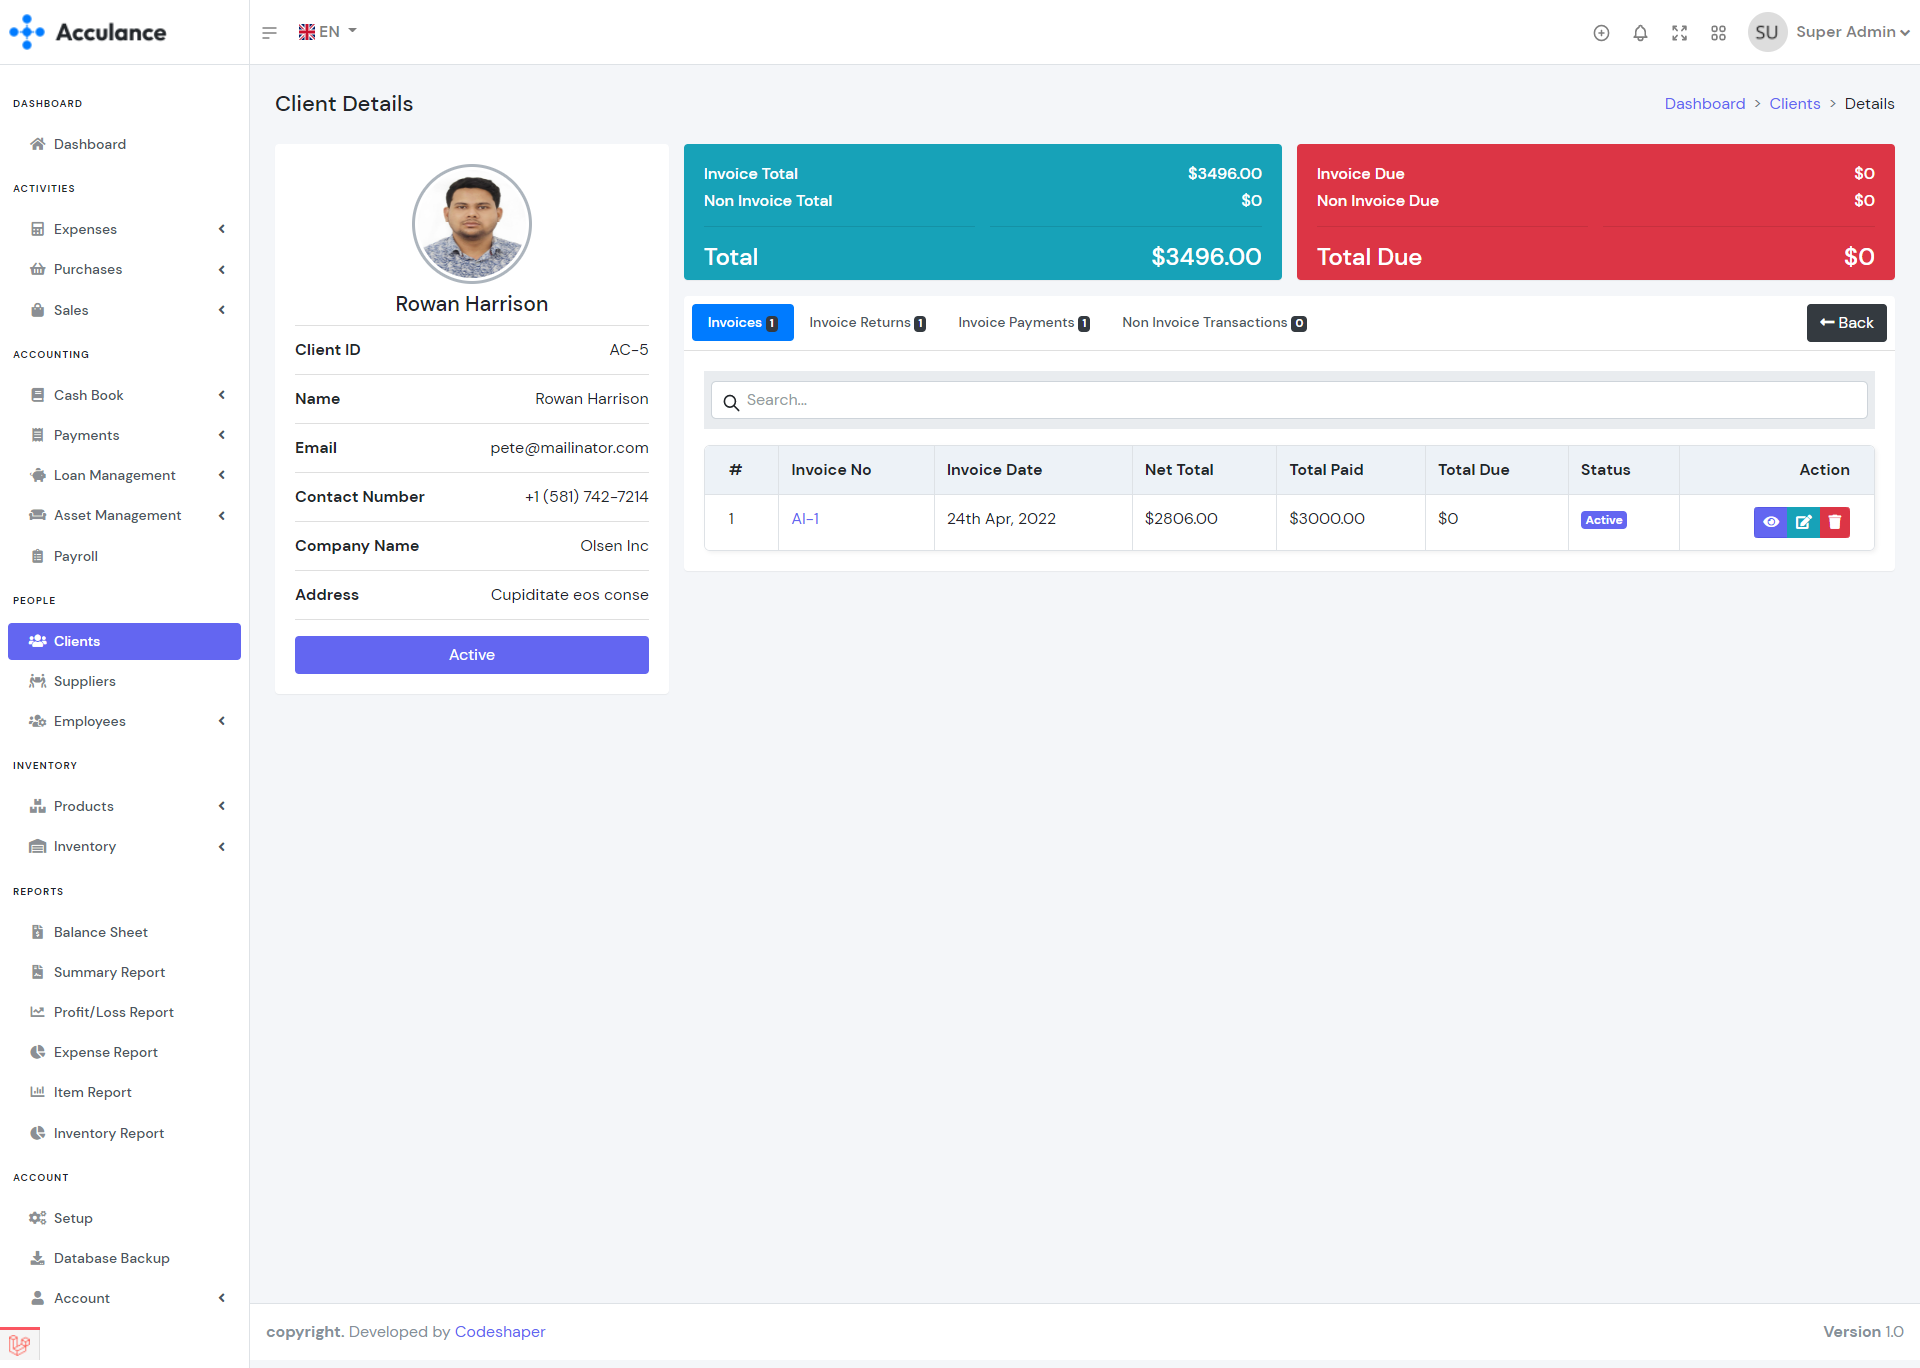
Client Details
Suppliers
Suppliers module help you to manage your suppliers. You can create, edit and delete suppliers. You can see the supplier purchases, returns, payments, and non invoice transactions from the supplier view page.
| Required fields to create a supplier |
|---|
| Name => Name of the supplier. You can enter any name. |
| Contact Number => Supplier contact number. |
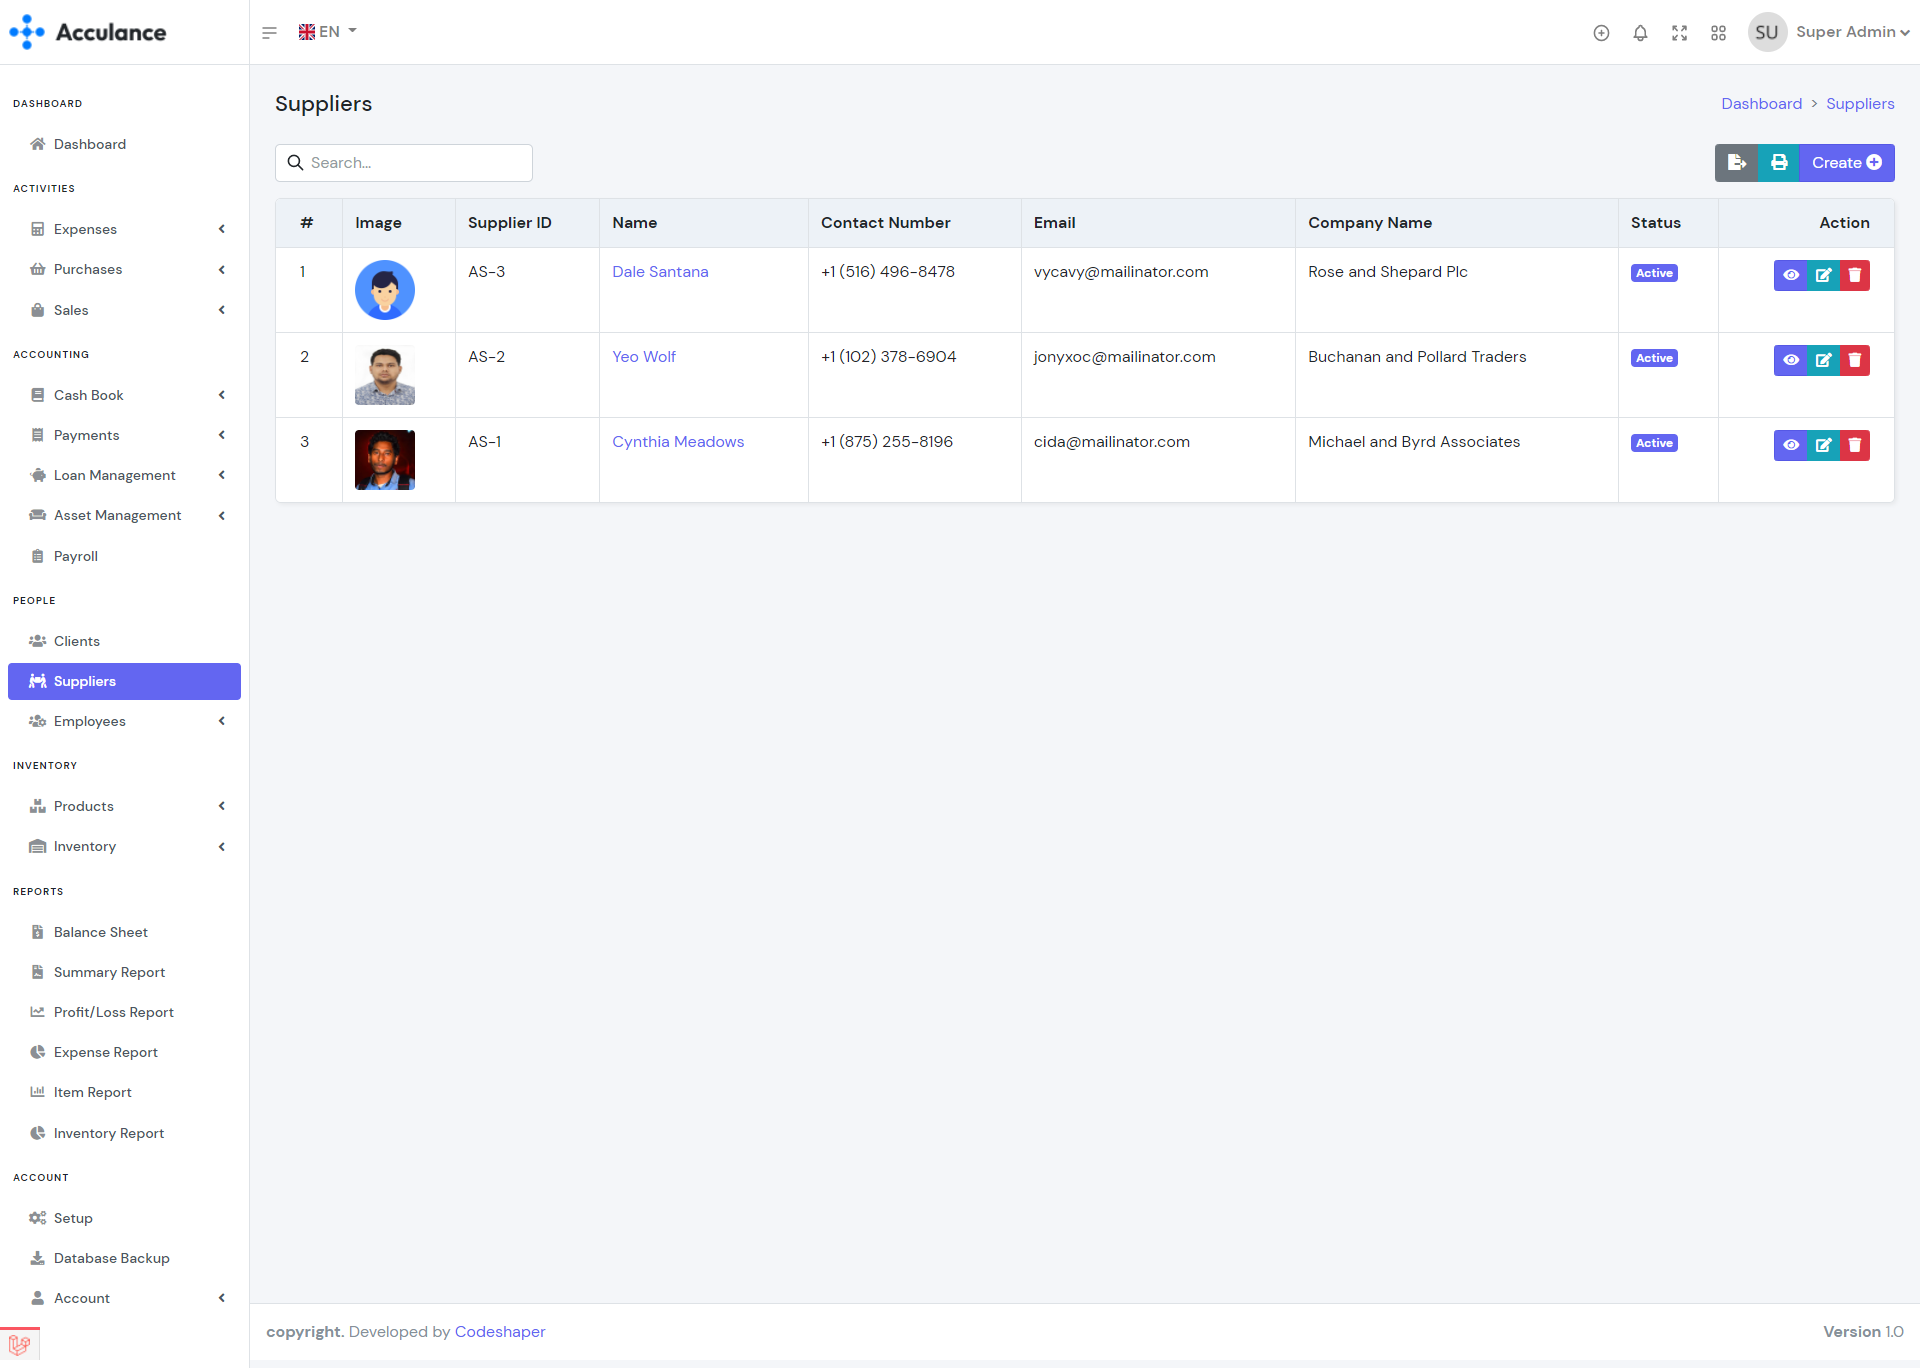
Suppliers List
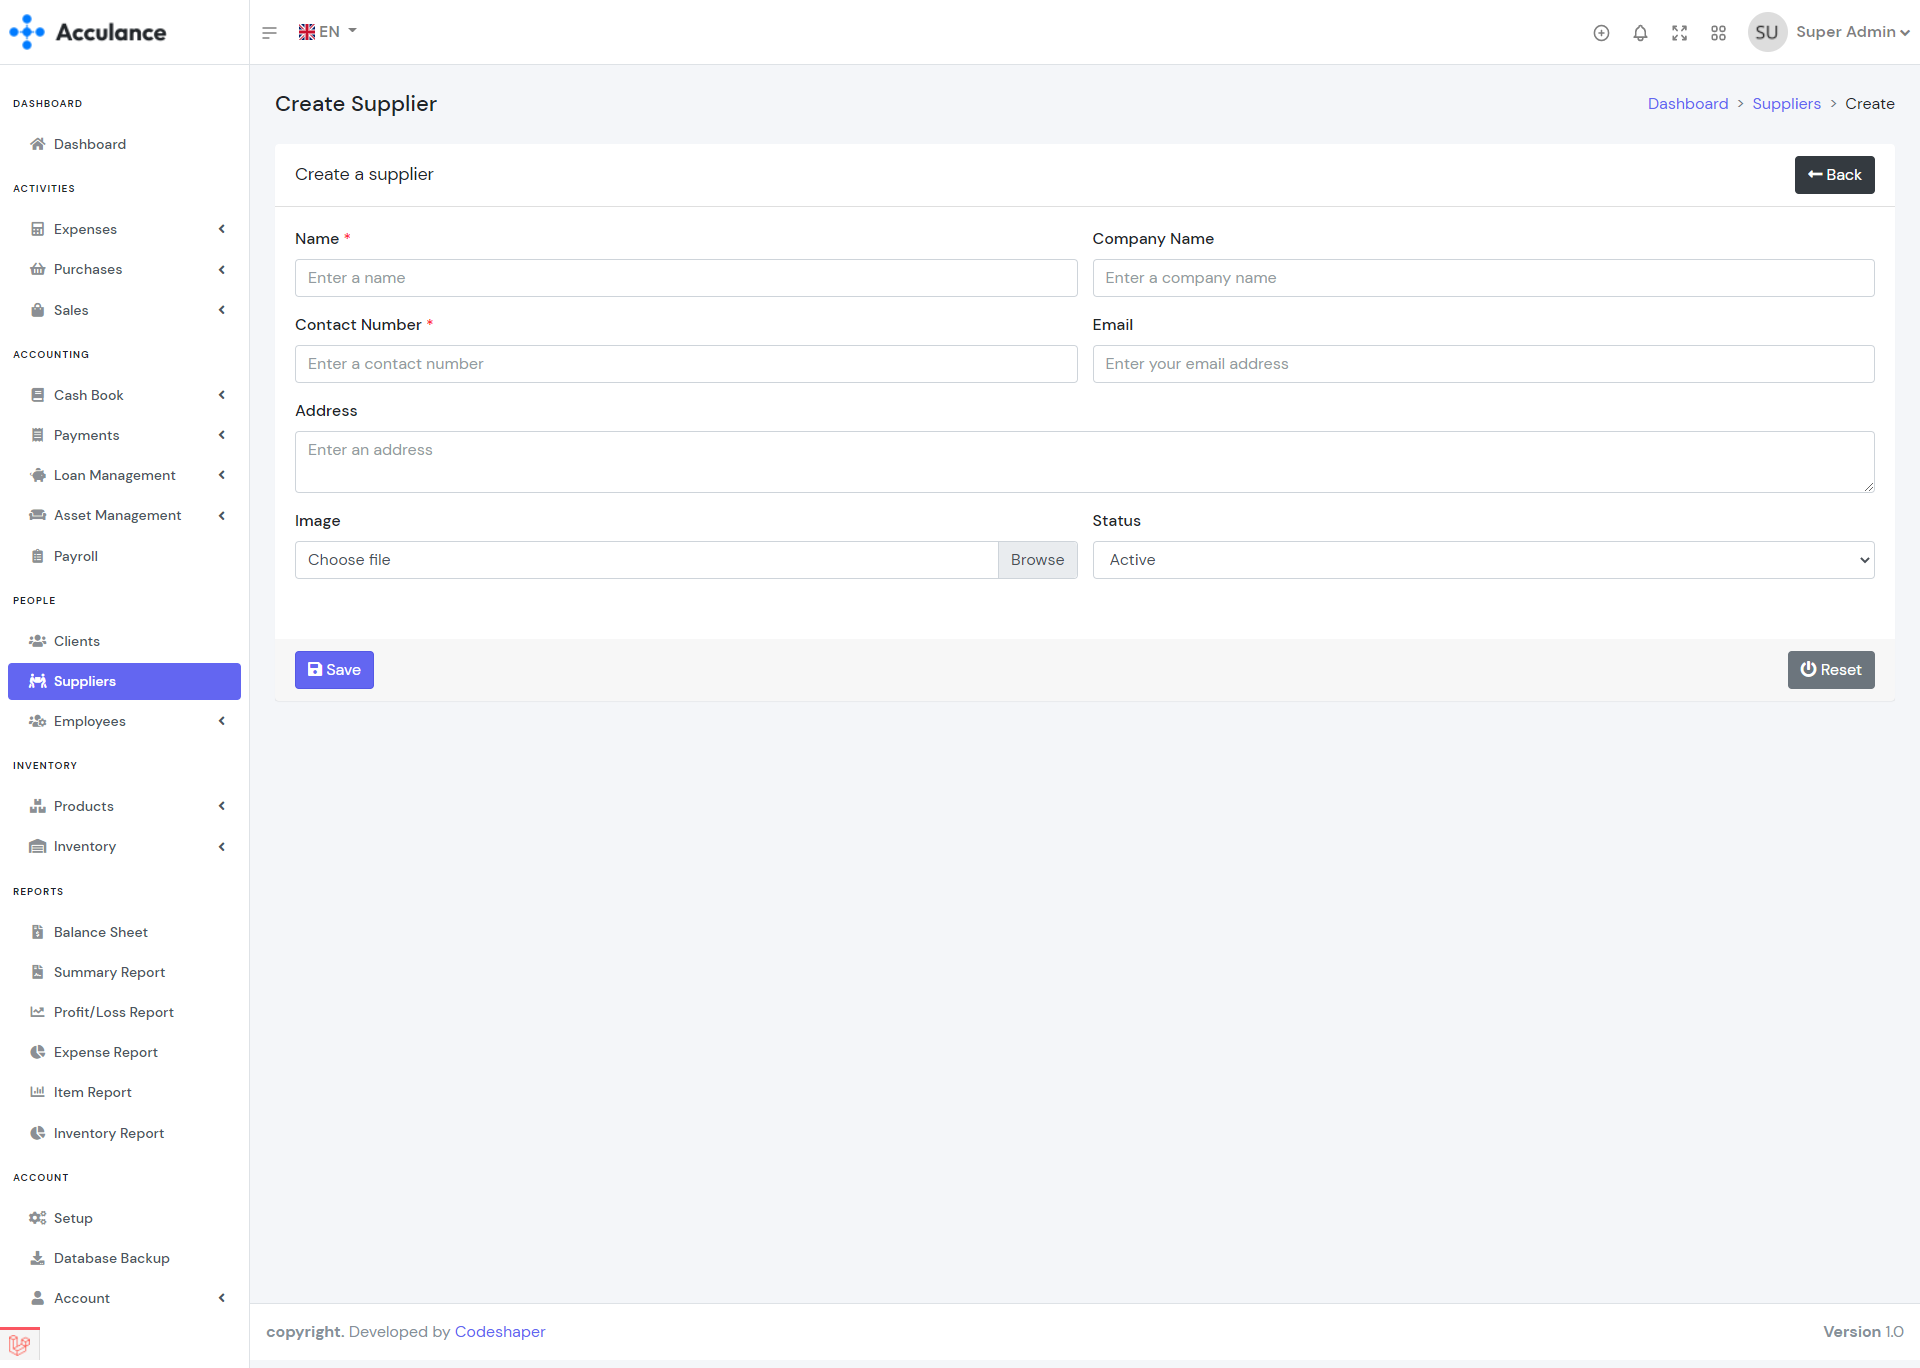
Create Supplier
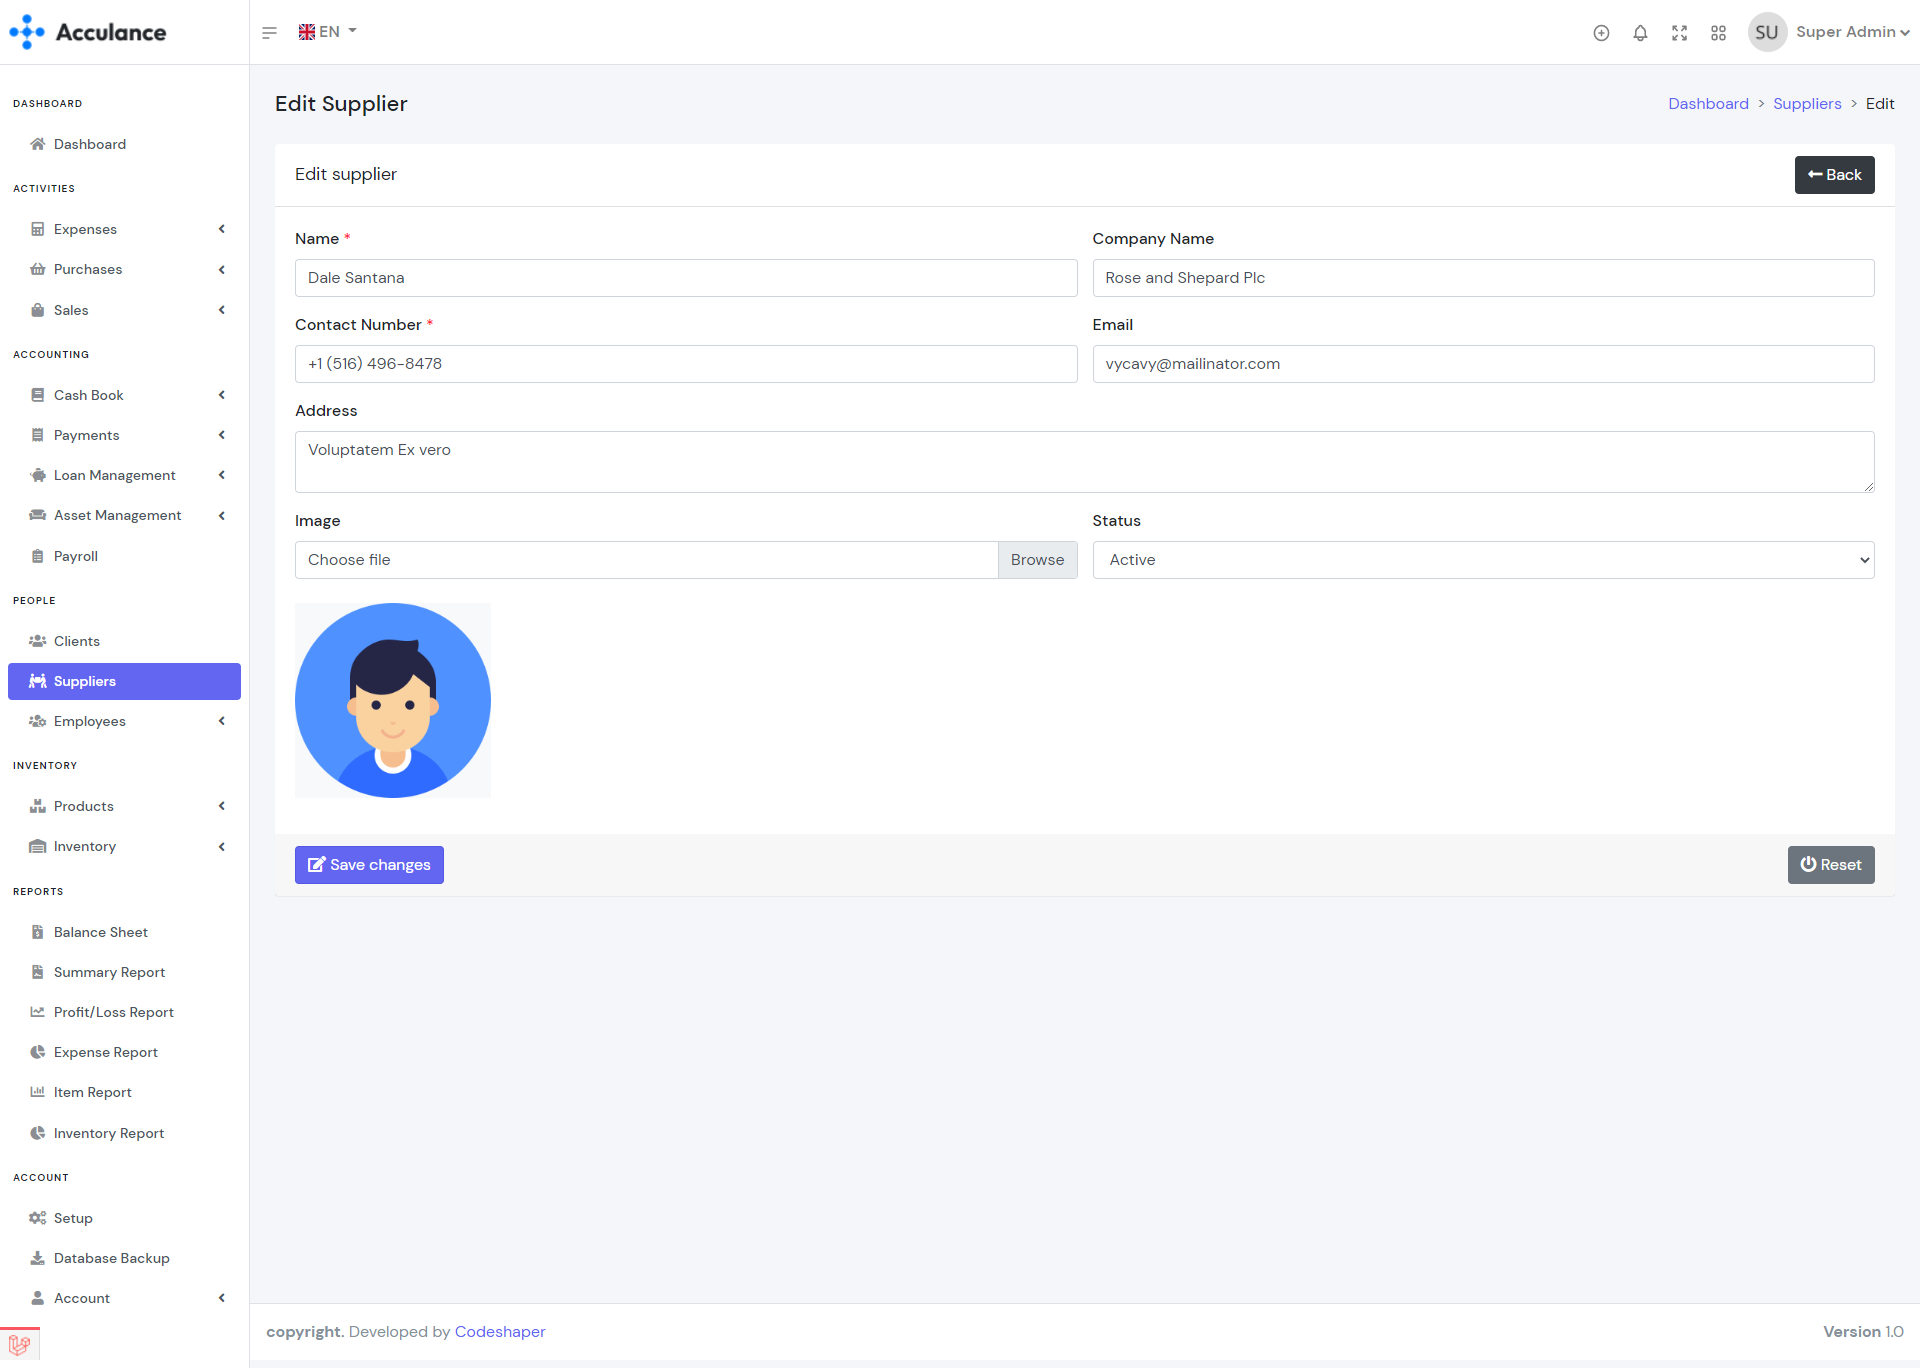
Edit Supplier
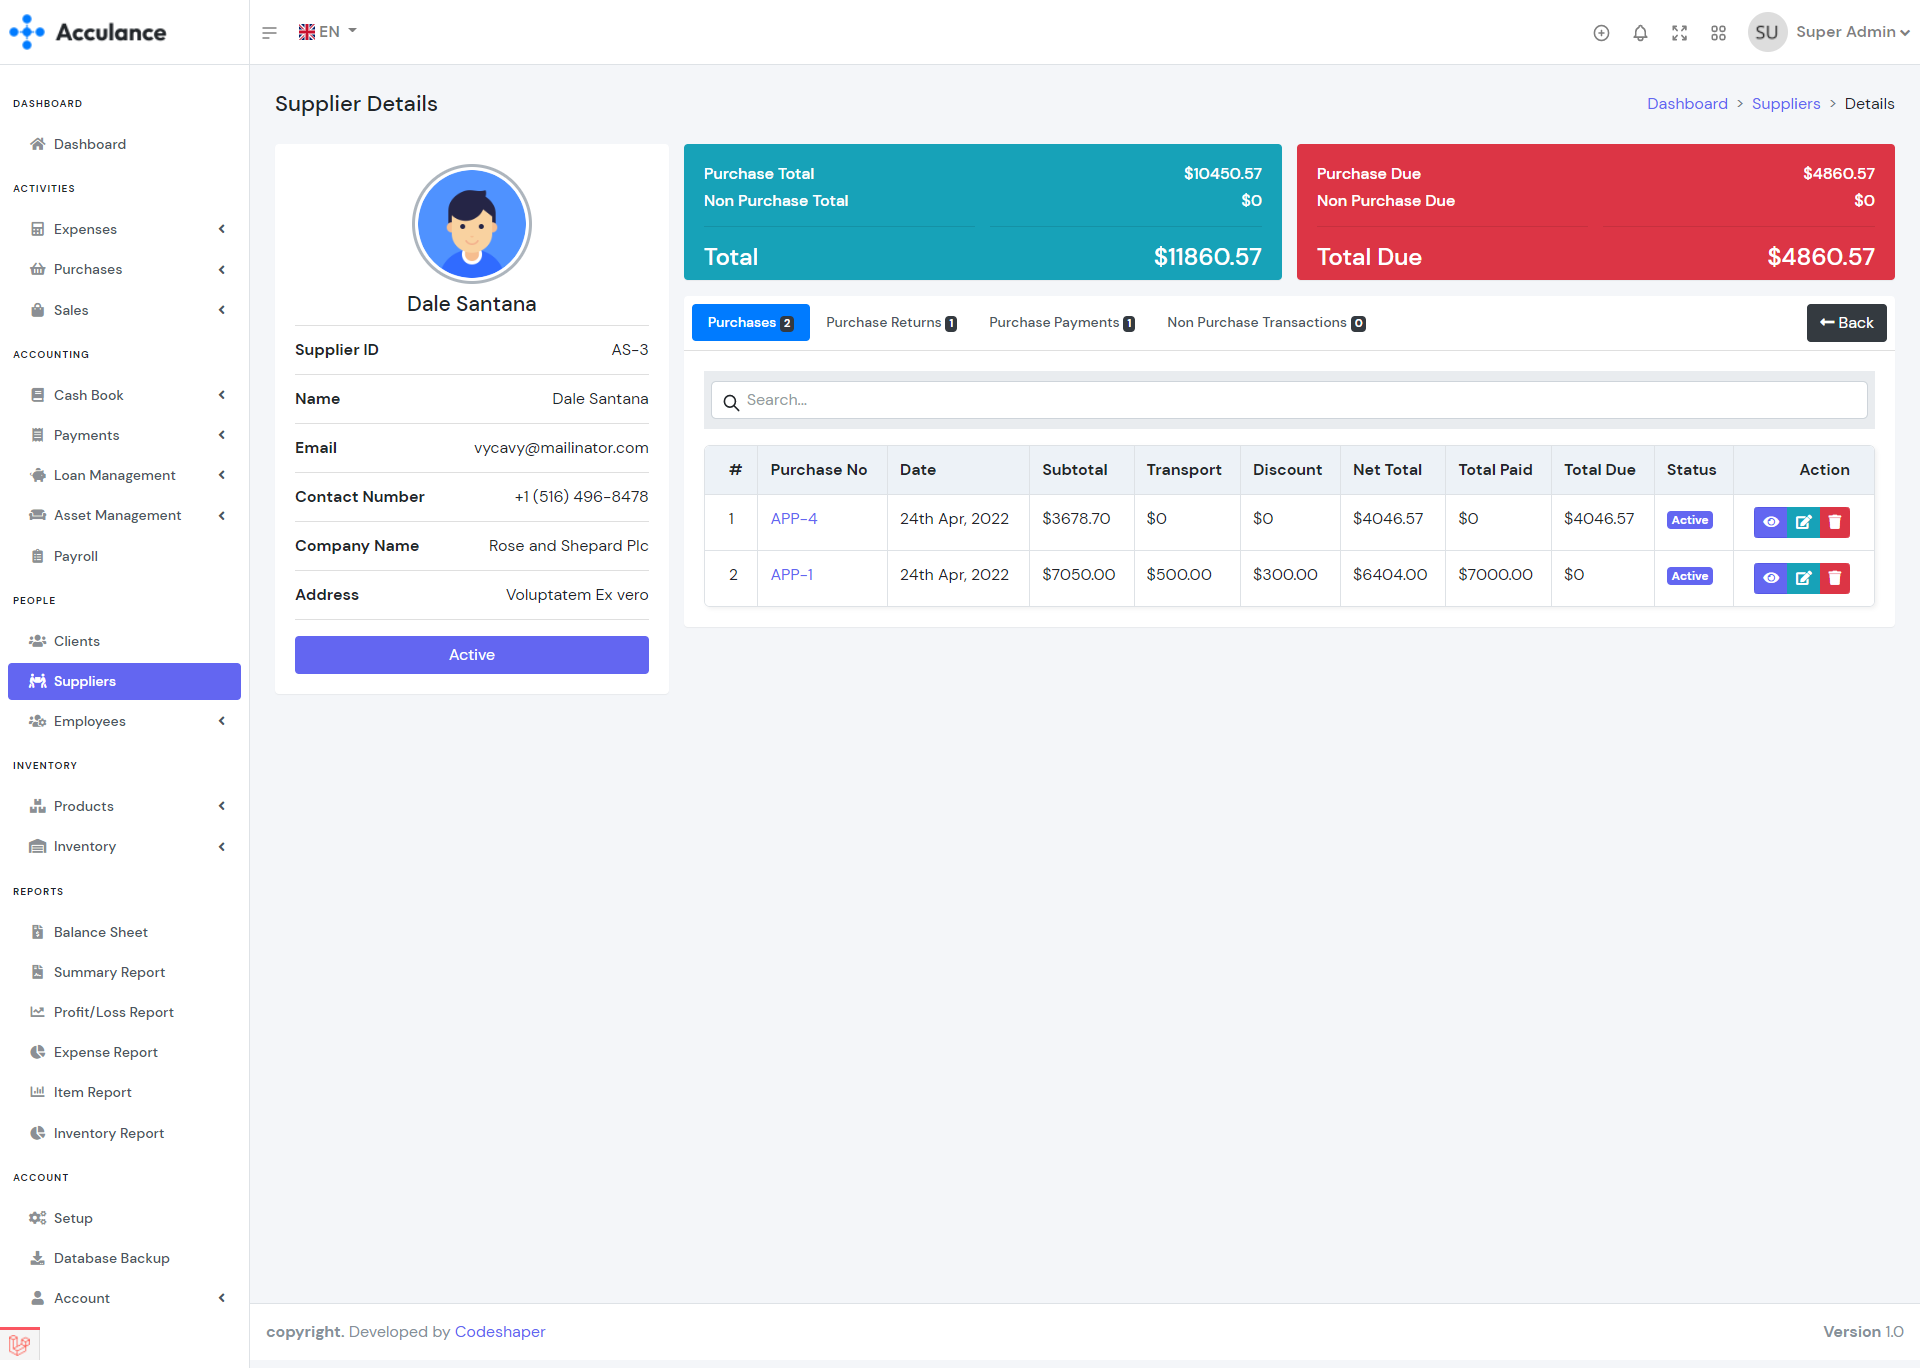
Supplier Details
Employees
Employees module helps you to manage your employees. You can create, edit and delete employees. You can see the employee payroll and increment history from the employee view page. You can also create also salary increments for the employees. In order to create an employee, you must create a department first. While creating an employee you can allow or disallow employee login and assign any role to an employee.
| Required fields to create an employee |
|---|
| Employee Name => Name of the employee. You can enter any name. |
| Department => Department of this employee. Select a department from the list. |
| Designation => Designation of this employee. Enter any designation. |
| Contact Number => Employee contact number. |
| Salary => Employee current salary. |
| Gender => Select a gender from the list. |
| Email(If you want to allow login.) => Email that will be used to login in to the system. If you want to give this employee login access. Please enter a unique emal. |
| Password(If you want to allow login.) => Password that will be used to login in to the system. If you want to give this employee login access. Please enter a strong password. |
| Role(If you want to allow login.) => Select a role for this employee. The emplyee will get access to the moduels based on the role and permisions. |
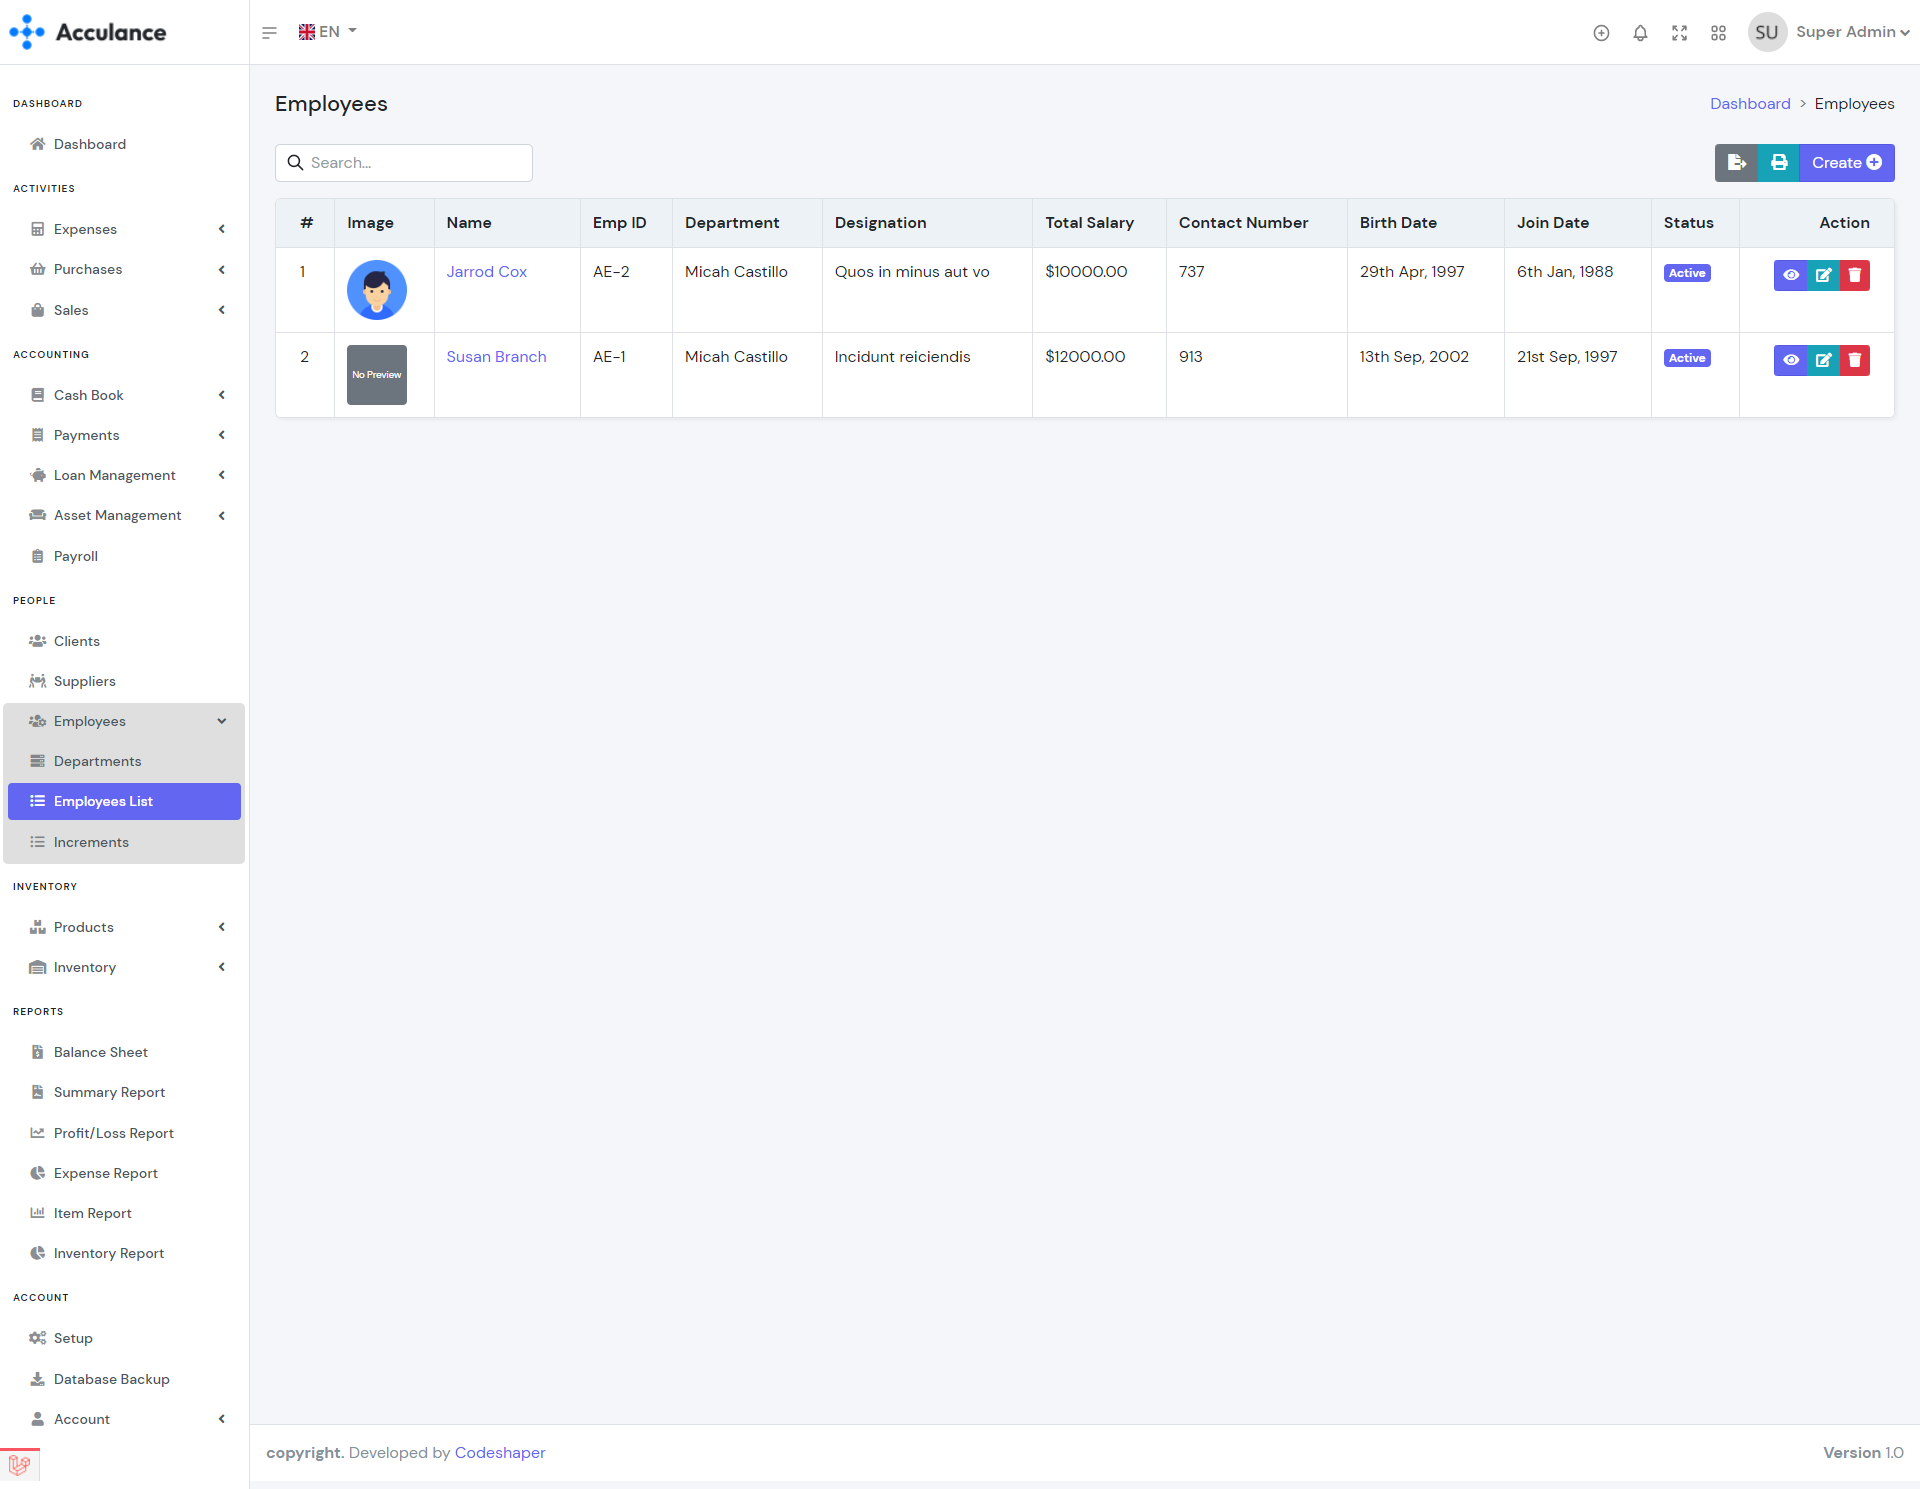
Employees List
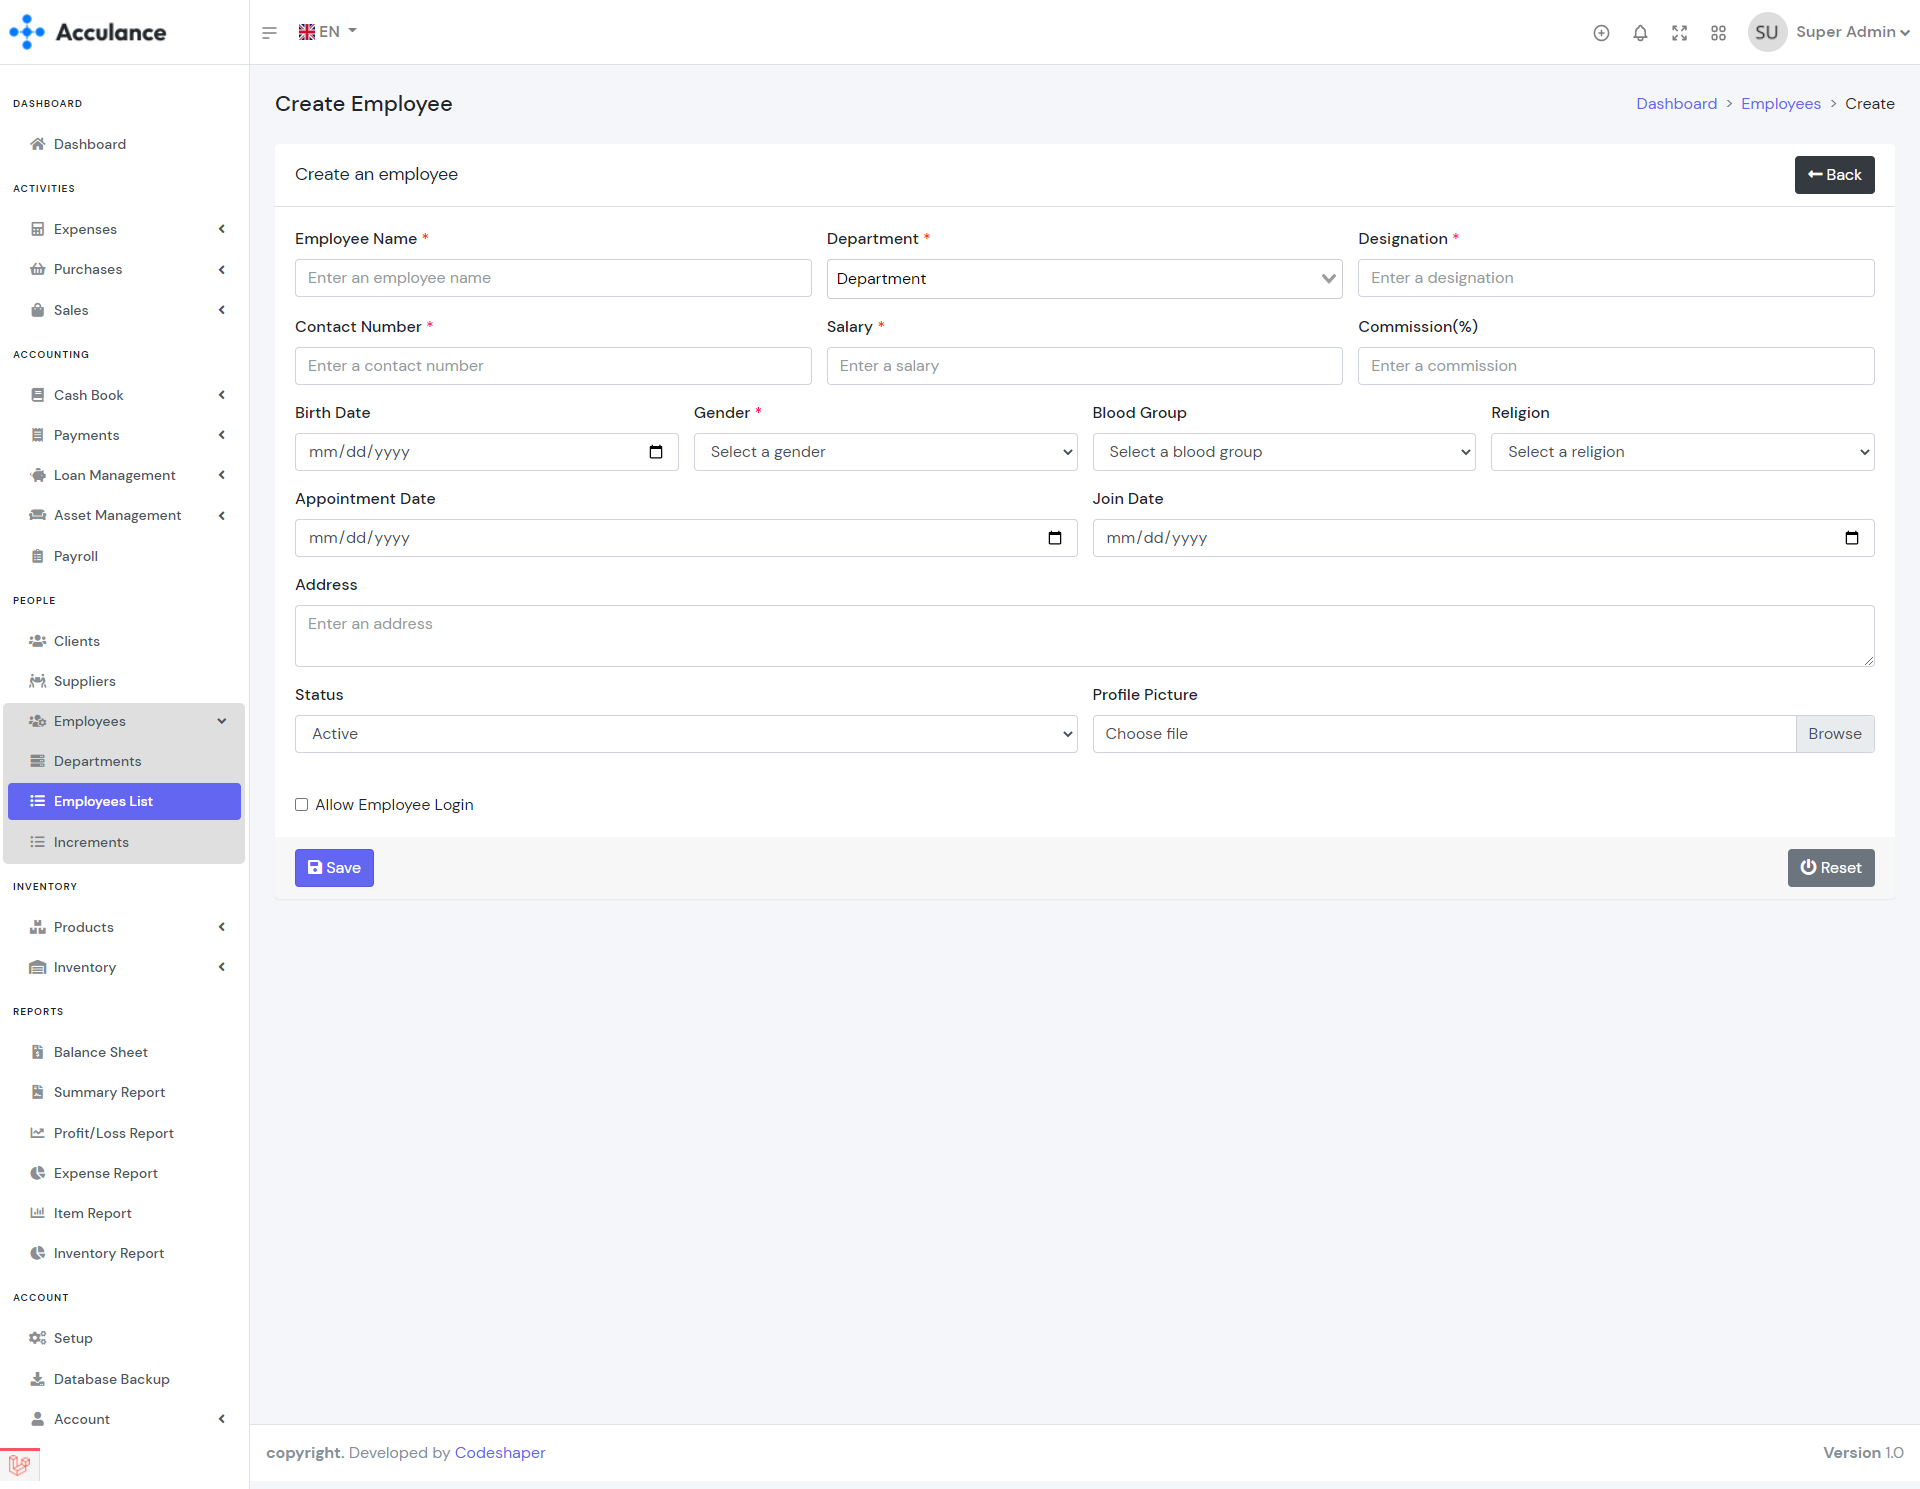
Create Employee

Edit Employee
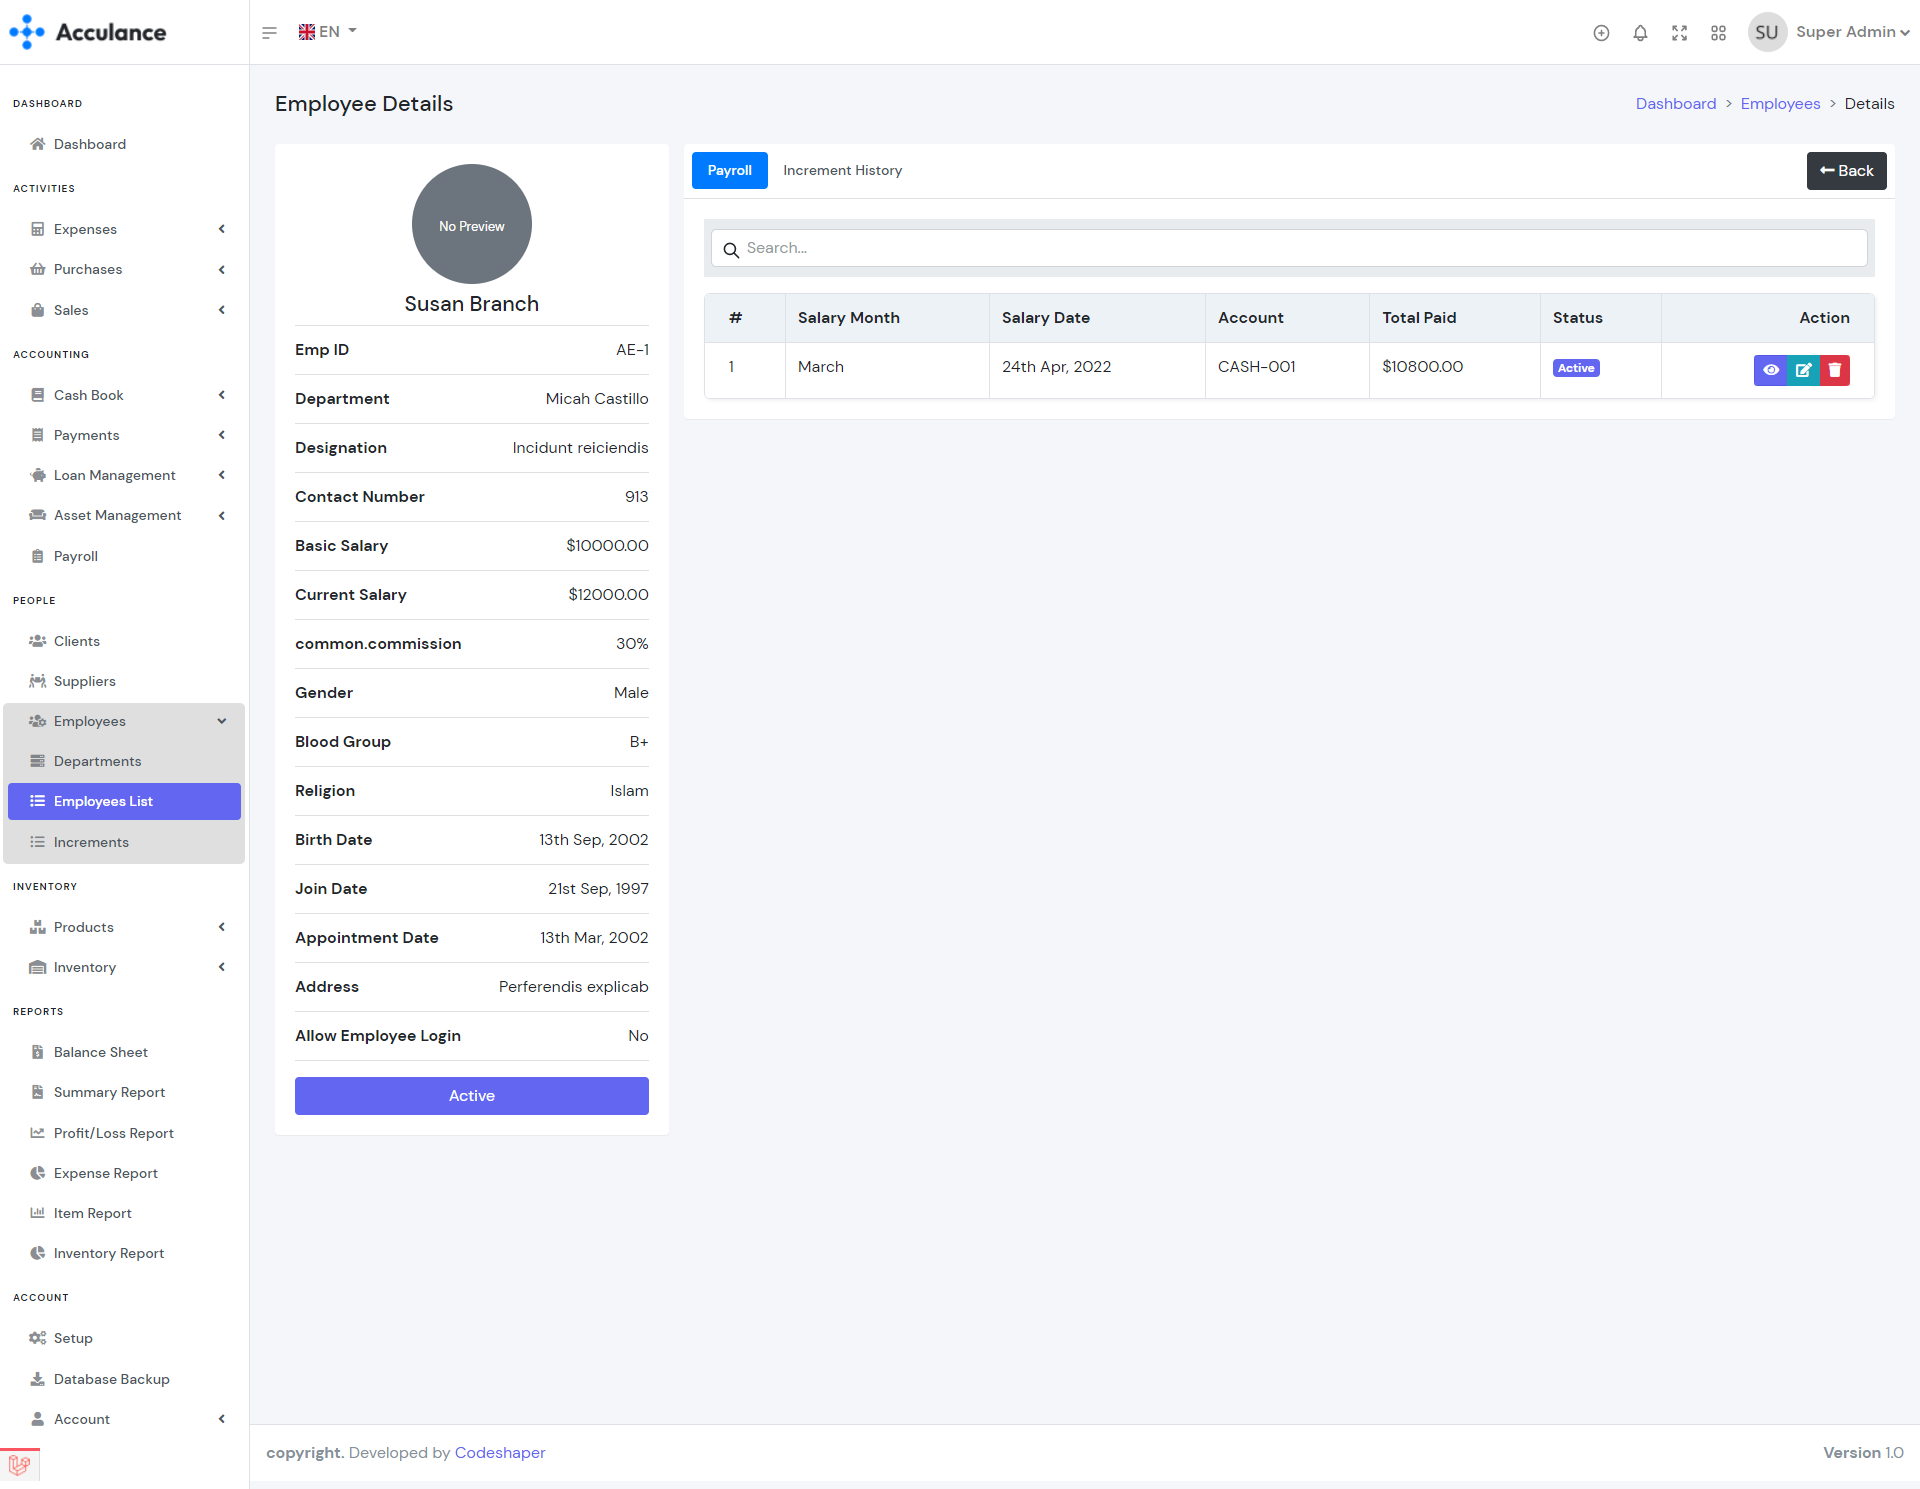
Employee Details
Accounts
Accounts module helps to link all your transactions to the accounts. You must create at least one account to run the system because all the payments must be done under an account. After creating an account you can add non invoice balance from the "Add Balance" module. This will add balance into your accoaunt and later you will be able to use the account balanbce for expenases, payments etc.
| Required fields to create an account |
|---|
| Bank Name => Name of your bank. Type bank name as plain text. |
| Account Number => Your bank account number. Type account number as plain text. |

Account List
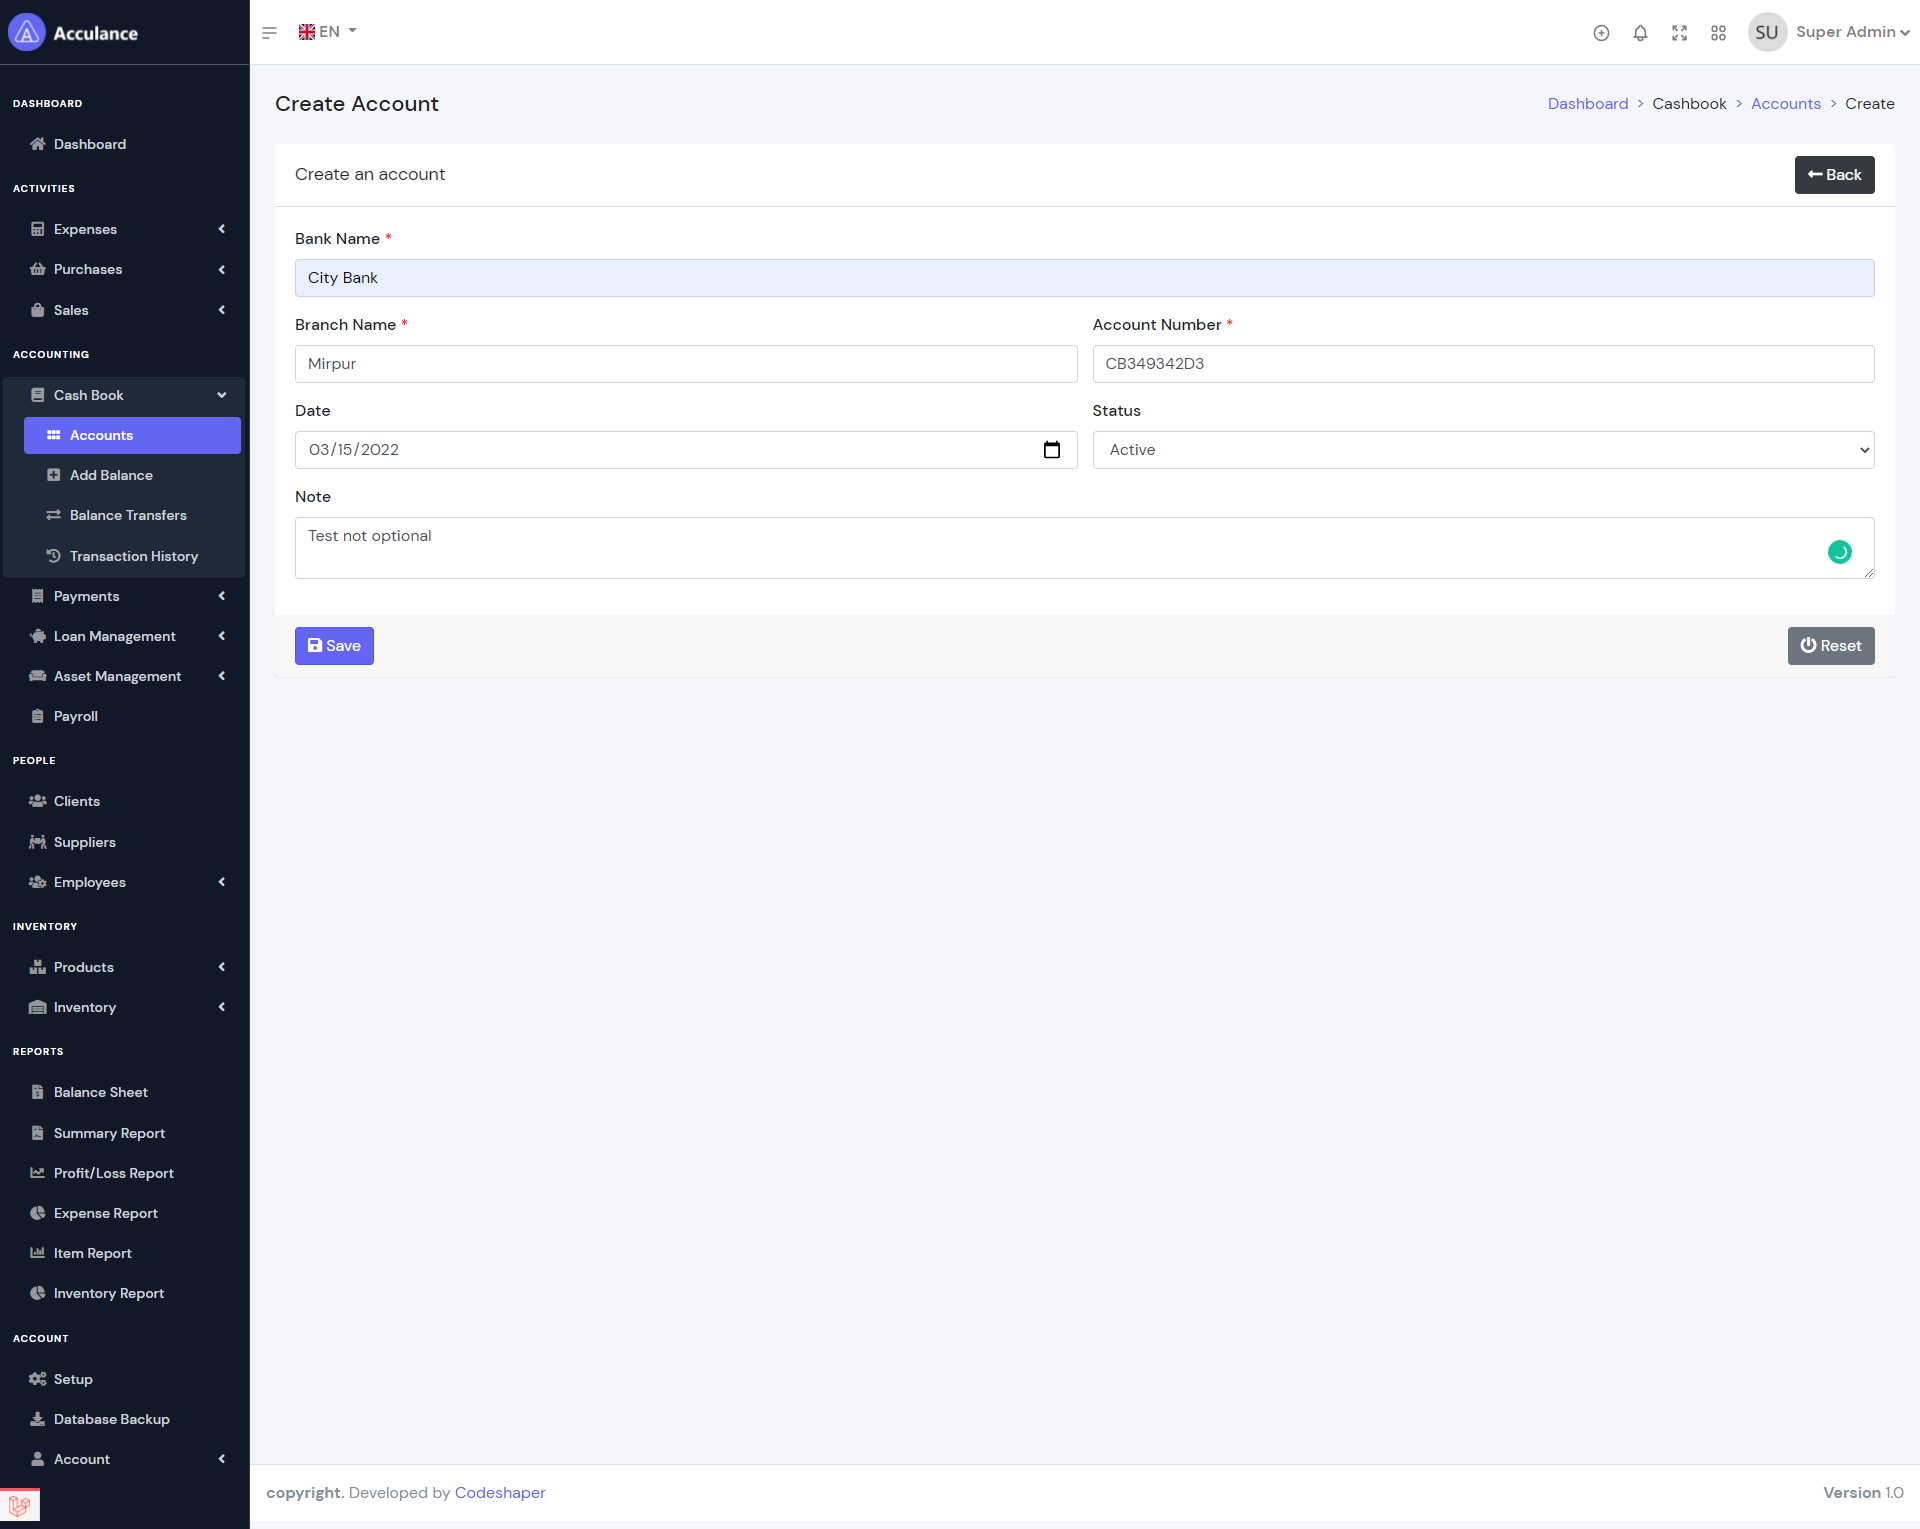
Account Create
Account Transactions
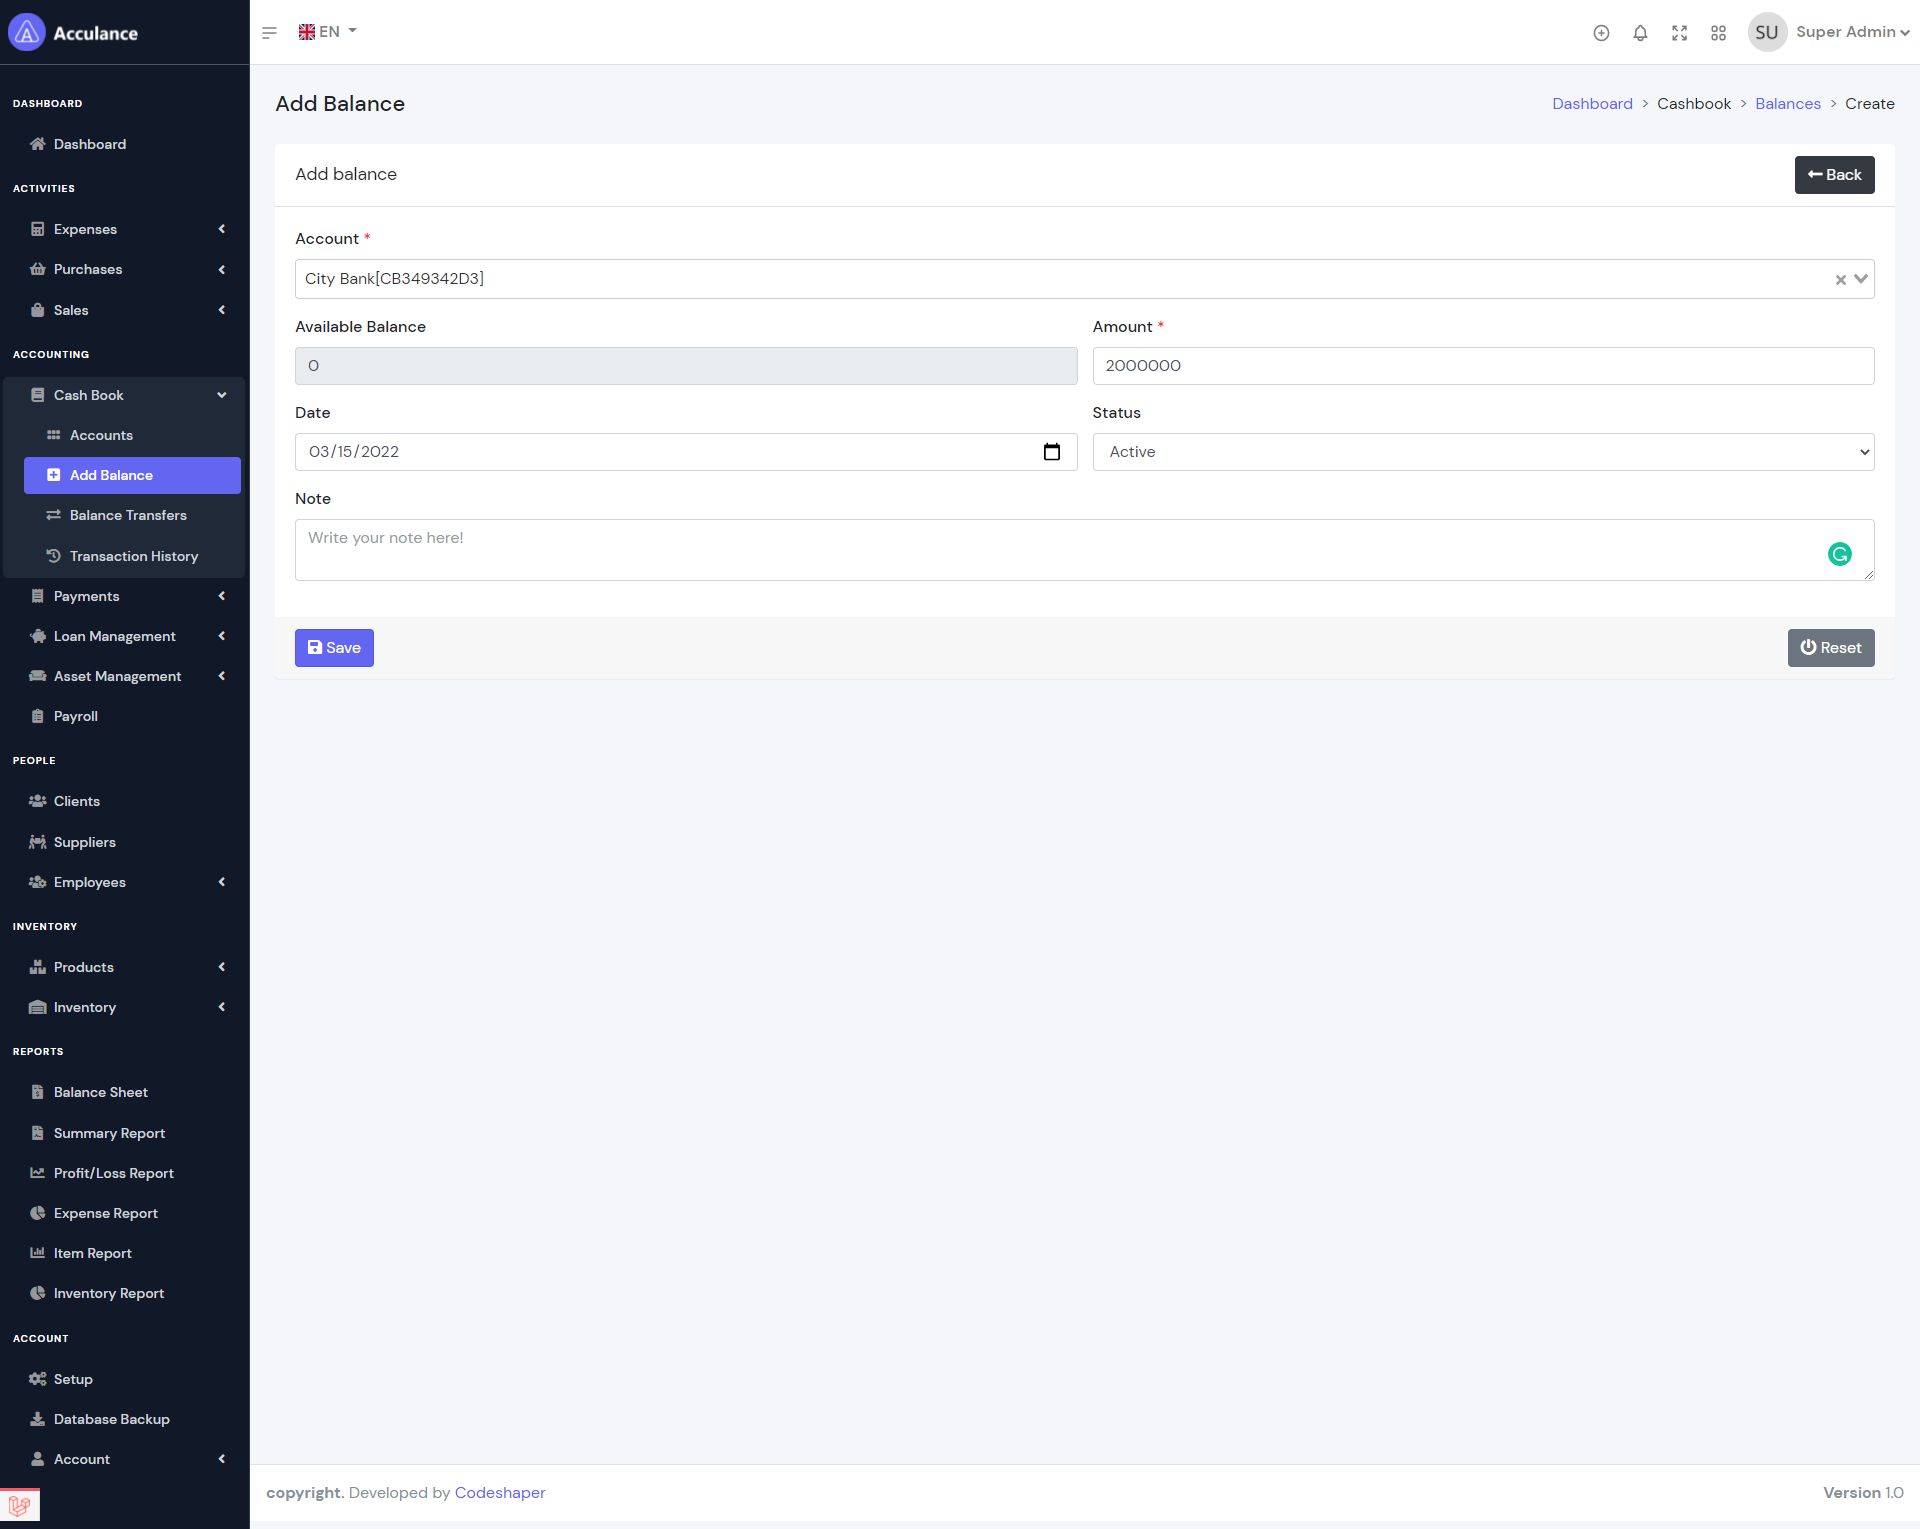
Add Balance
Note: All the transactions are link to the accounts. So if you delete any account then the transactions for this account will be delete autometically. So we recommend you to use the delete option very carefully.
Balance Transfers
Balance Transfers module helps you to transfer balance from one account to another account. To create a balance transfer you must select 2 different accounts.
| Required fields to create a balance transfer |
|---|
| Transfer Reason => Reason for the transfer. Type any reason as plain text. |
| From Account =>The paying account from where you are transferring the balance. |
| To Account => The receiving account. |
Balance Transfers List
Balance Transfers
Note: A purchase can have only one damage purchase(One-to-one relationship between Purchases and Damage Purchases).
Expenses
Expense management module allow you to manage your company expenses. All expenses are connected with accounts. In order to create any expense, you need to create Expense Categories, Expense Sub Categories and Account first.
| Required fields to create an expense |
|---|
| Expense Reason => Reason for your expense. Type any reason as plain text. |
| Category Name => Sub category for this expense. Select any sub category from the list. |
| Account => The account that you want to use for this expense. Select an account from the list. The available balance must be greater than the expense amount. |

Expense Categories List
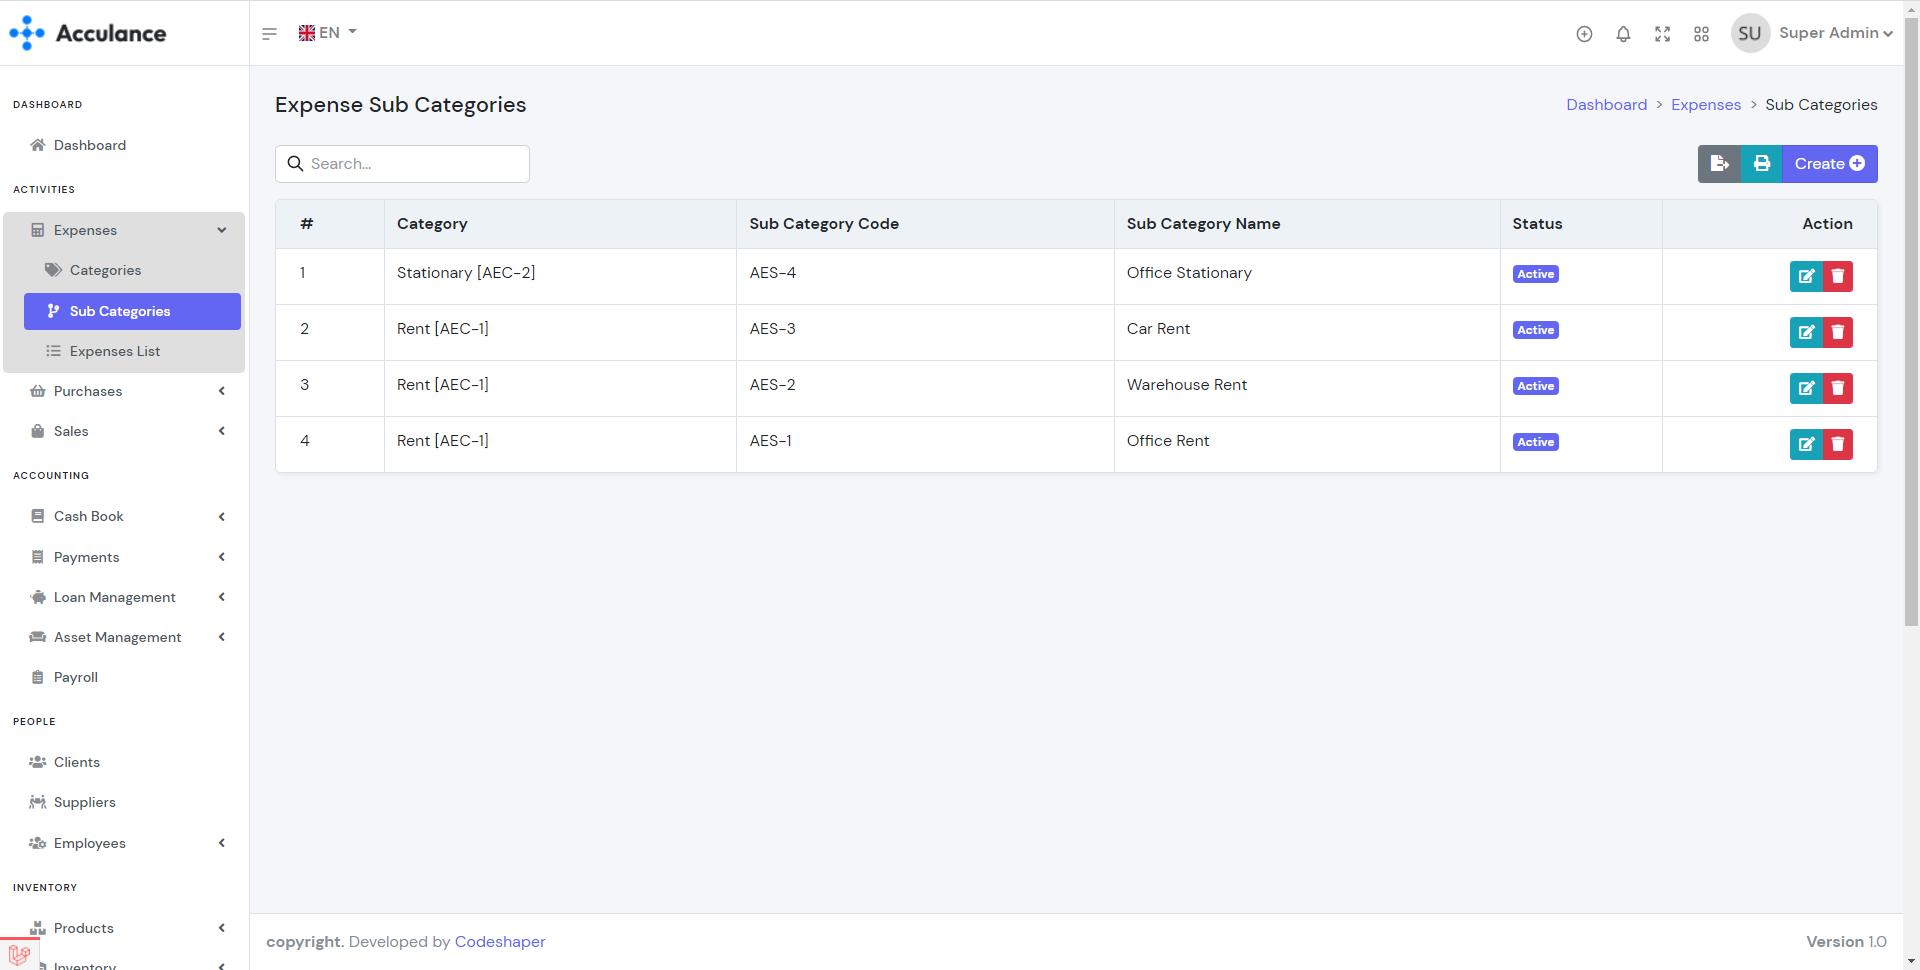
Expense Sub Categories List
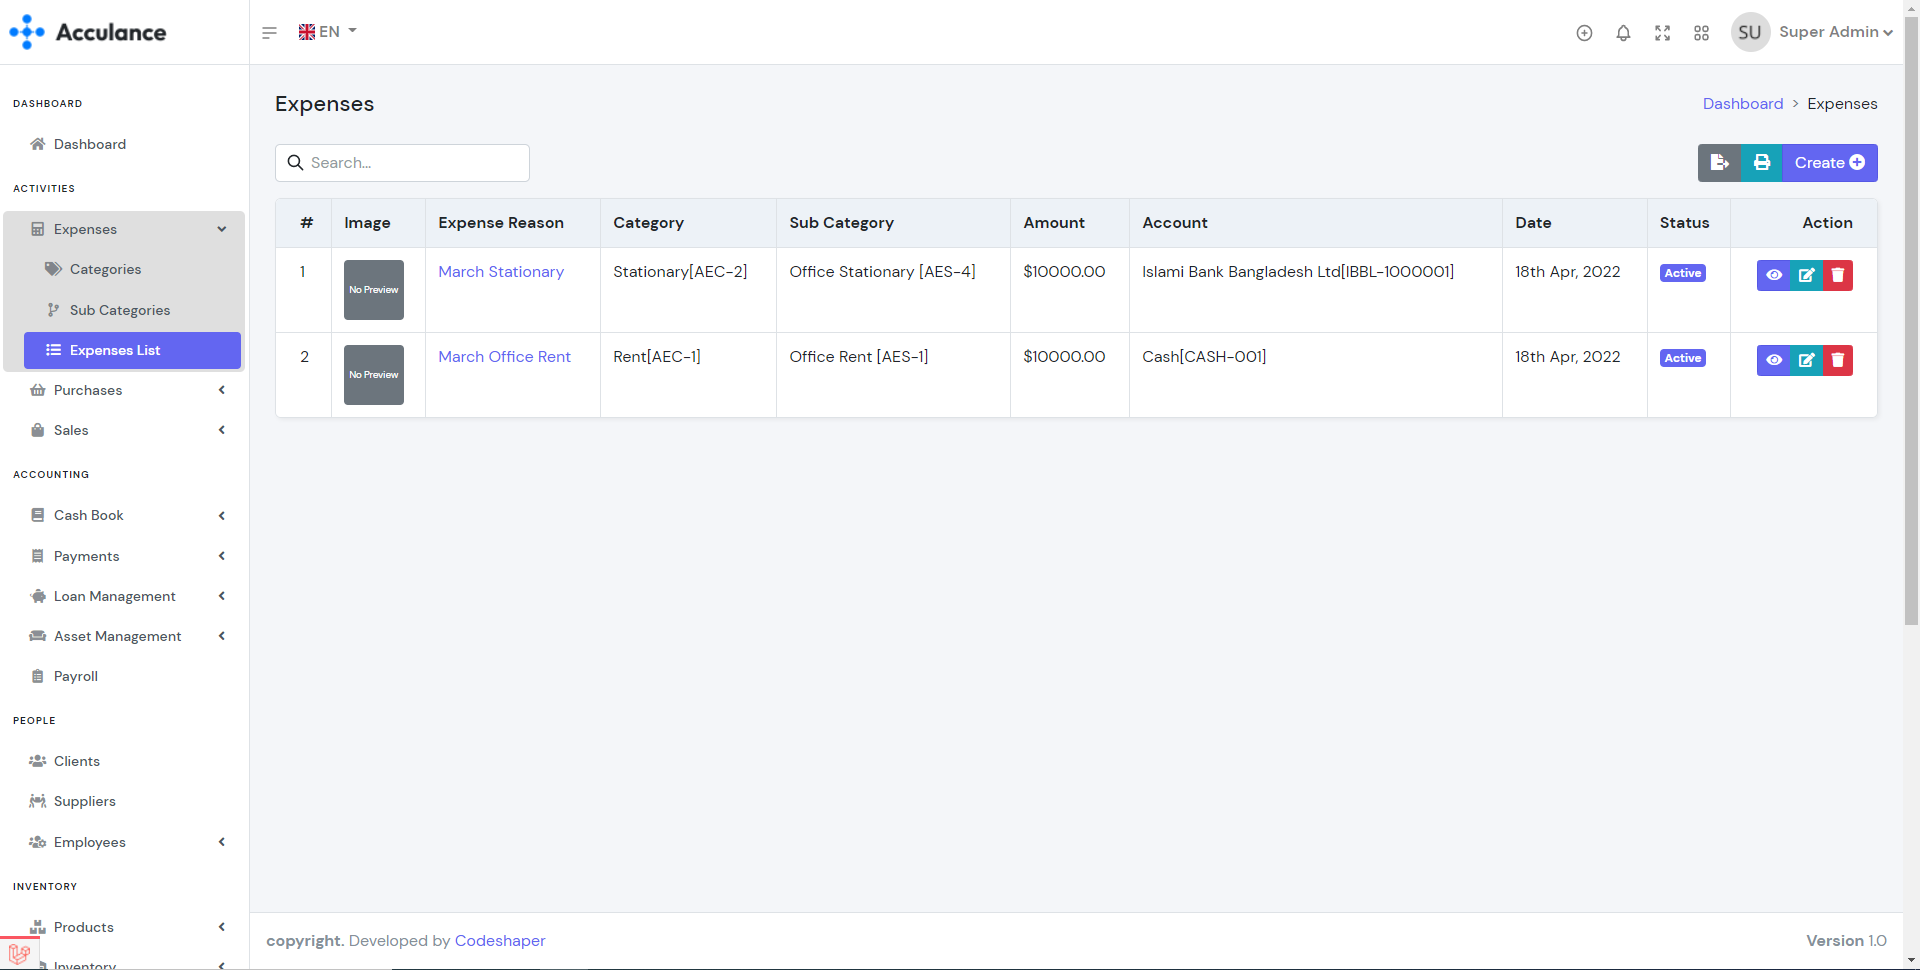
Expenses List
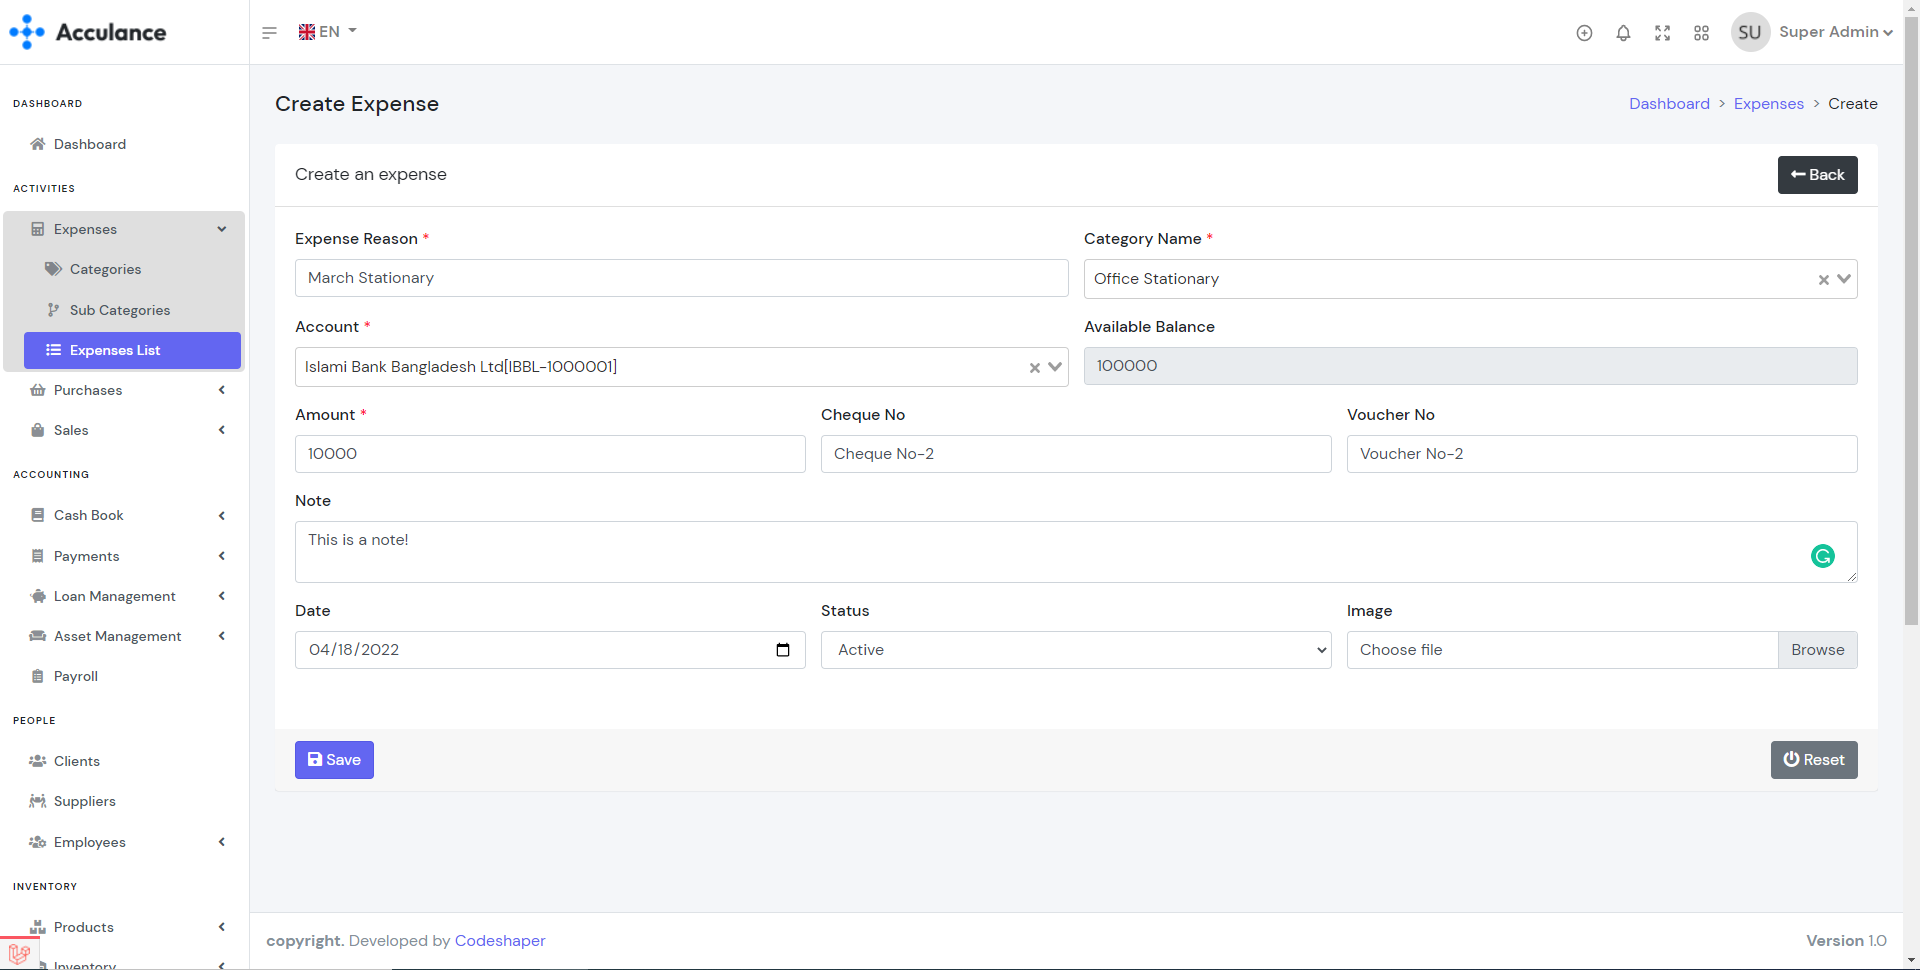
Create Expense
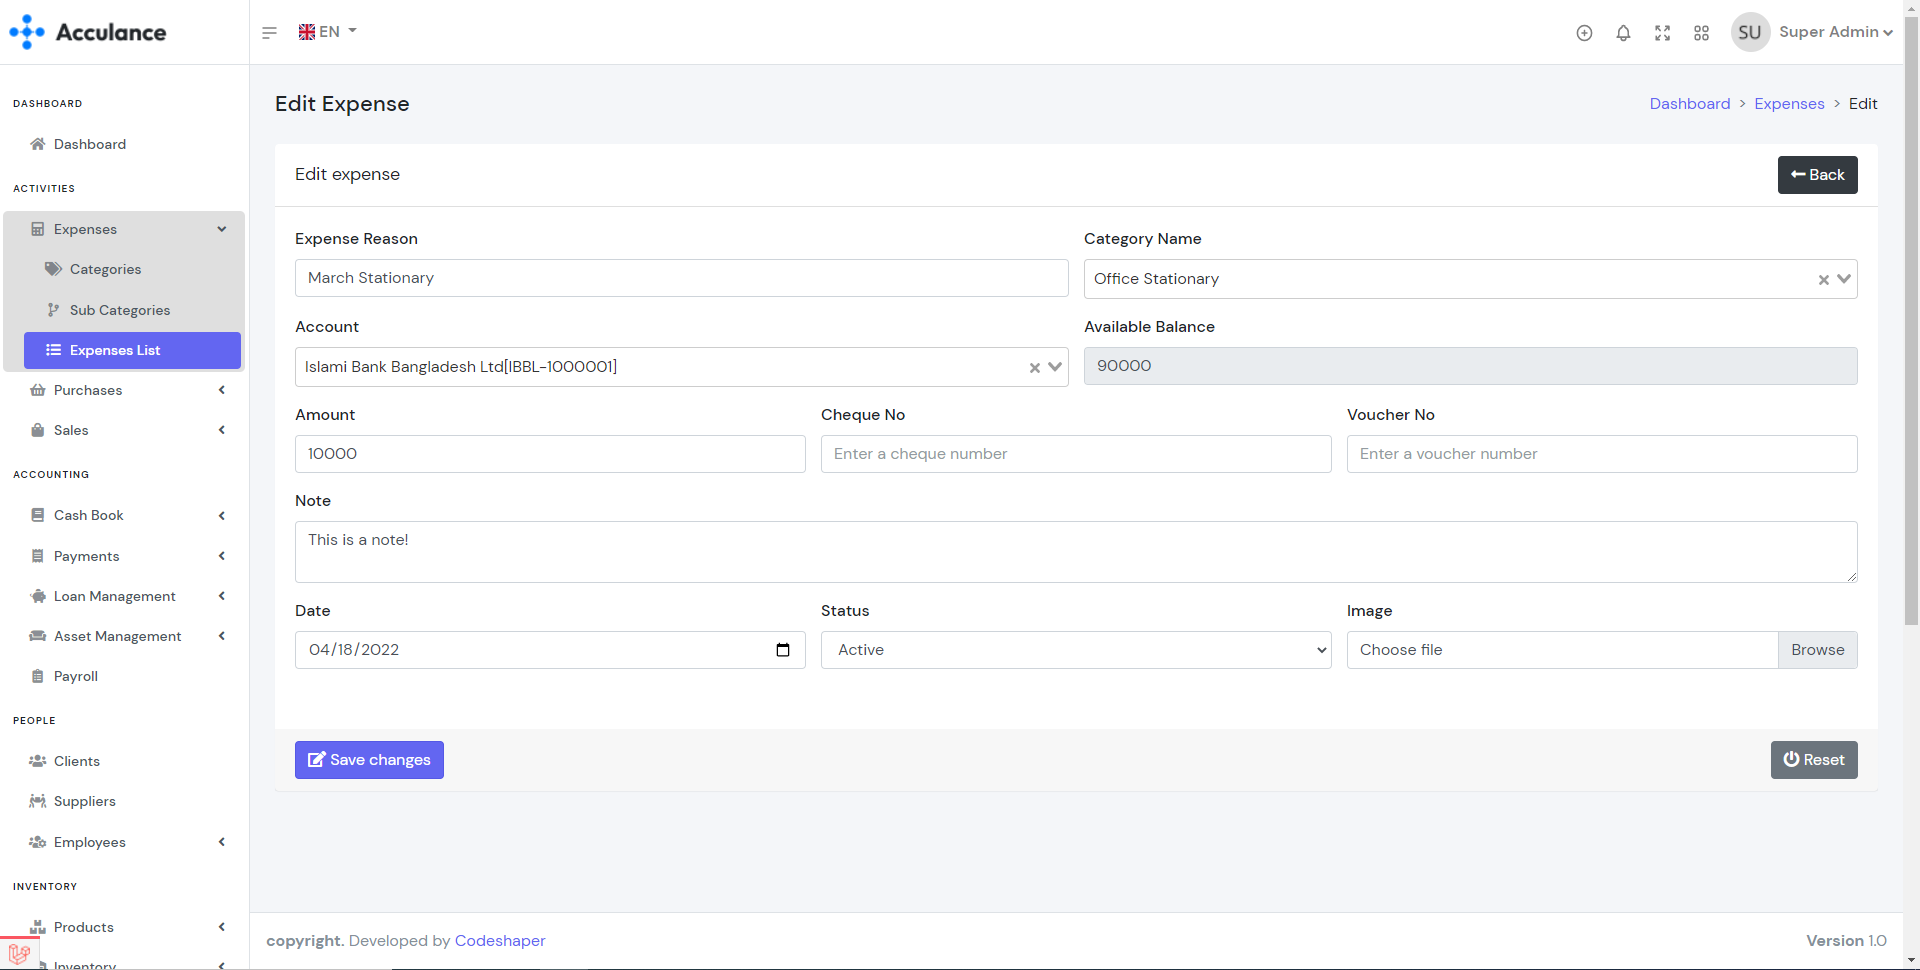
Edit Expense
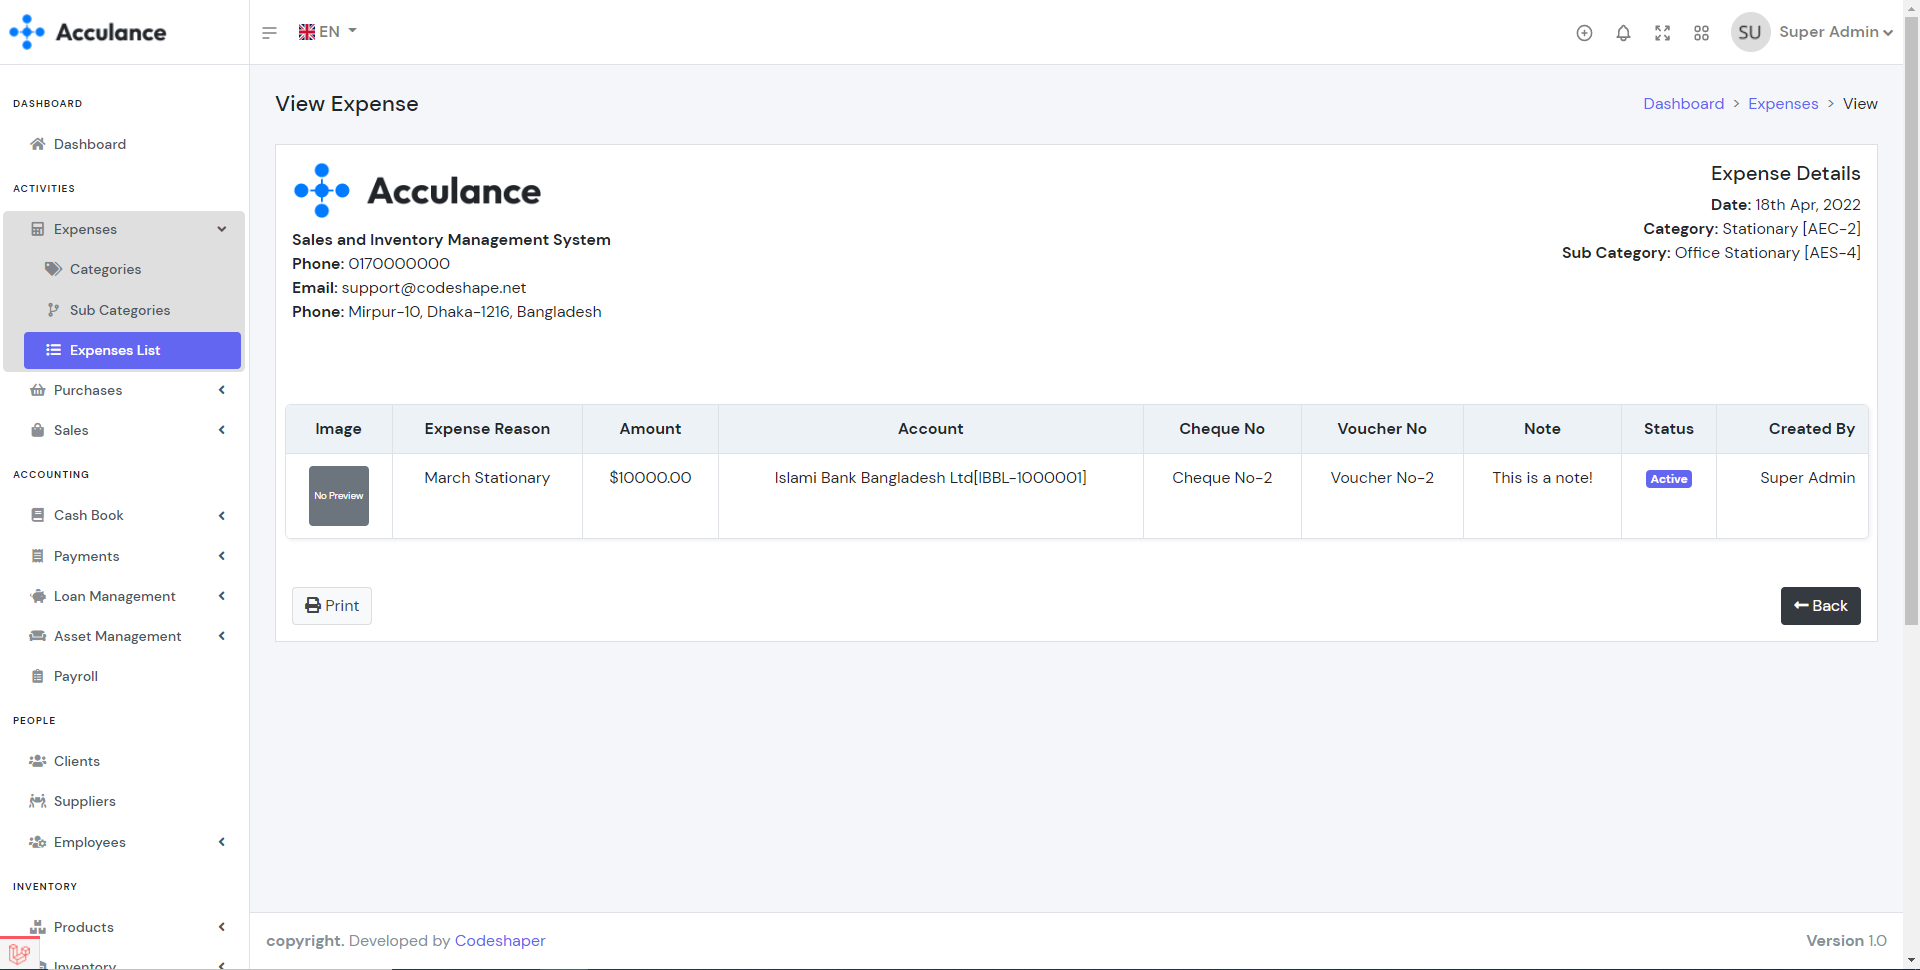
Expense Details
Purchases
Purchase management module allow you to manage purchases for your products. By creating purchases the stock quantity of products will be increased and by deleting purchases the stock quantity of products will be decreased. When creating a purchase you can send a payment directly from the create page or you can do it later from the payments module. In order to create a purchase, you need to create Supplier, Products, VAT Rates, and Account first.
| Required fields to create a purchase |
|---|
| Supplier => Supplier from whom you are purchasing. Select a supplier from the list. |
| Select Products => Products that you want to purchase. You can select single or multiple products from the list. |
| Purchase Tax => Tax that you want to use for this purchase. Select a tax rate from the list. |
| Account(If you wish to add payment) => The account that you want to use for this purchase payment. Select an account from the list. The available balance must be greater than the paying amount. |
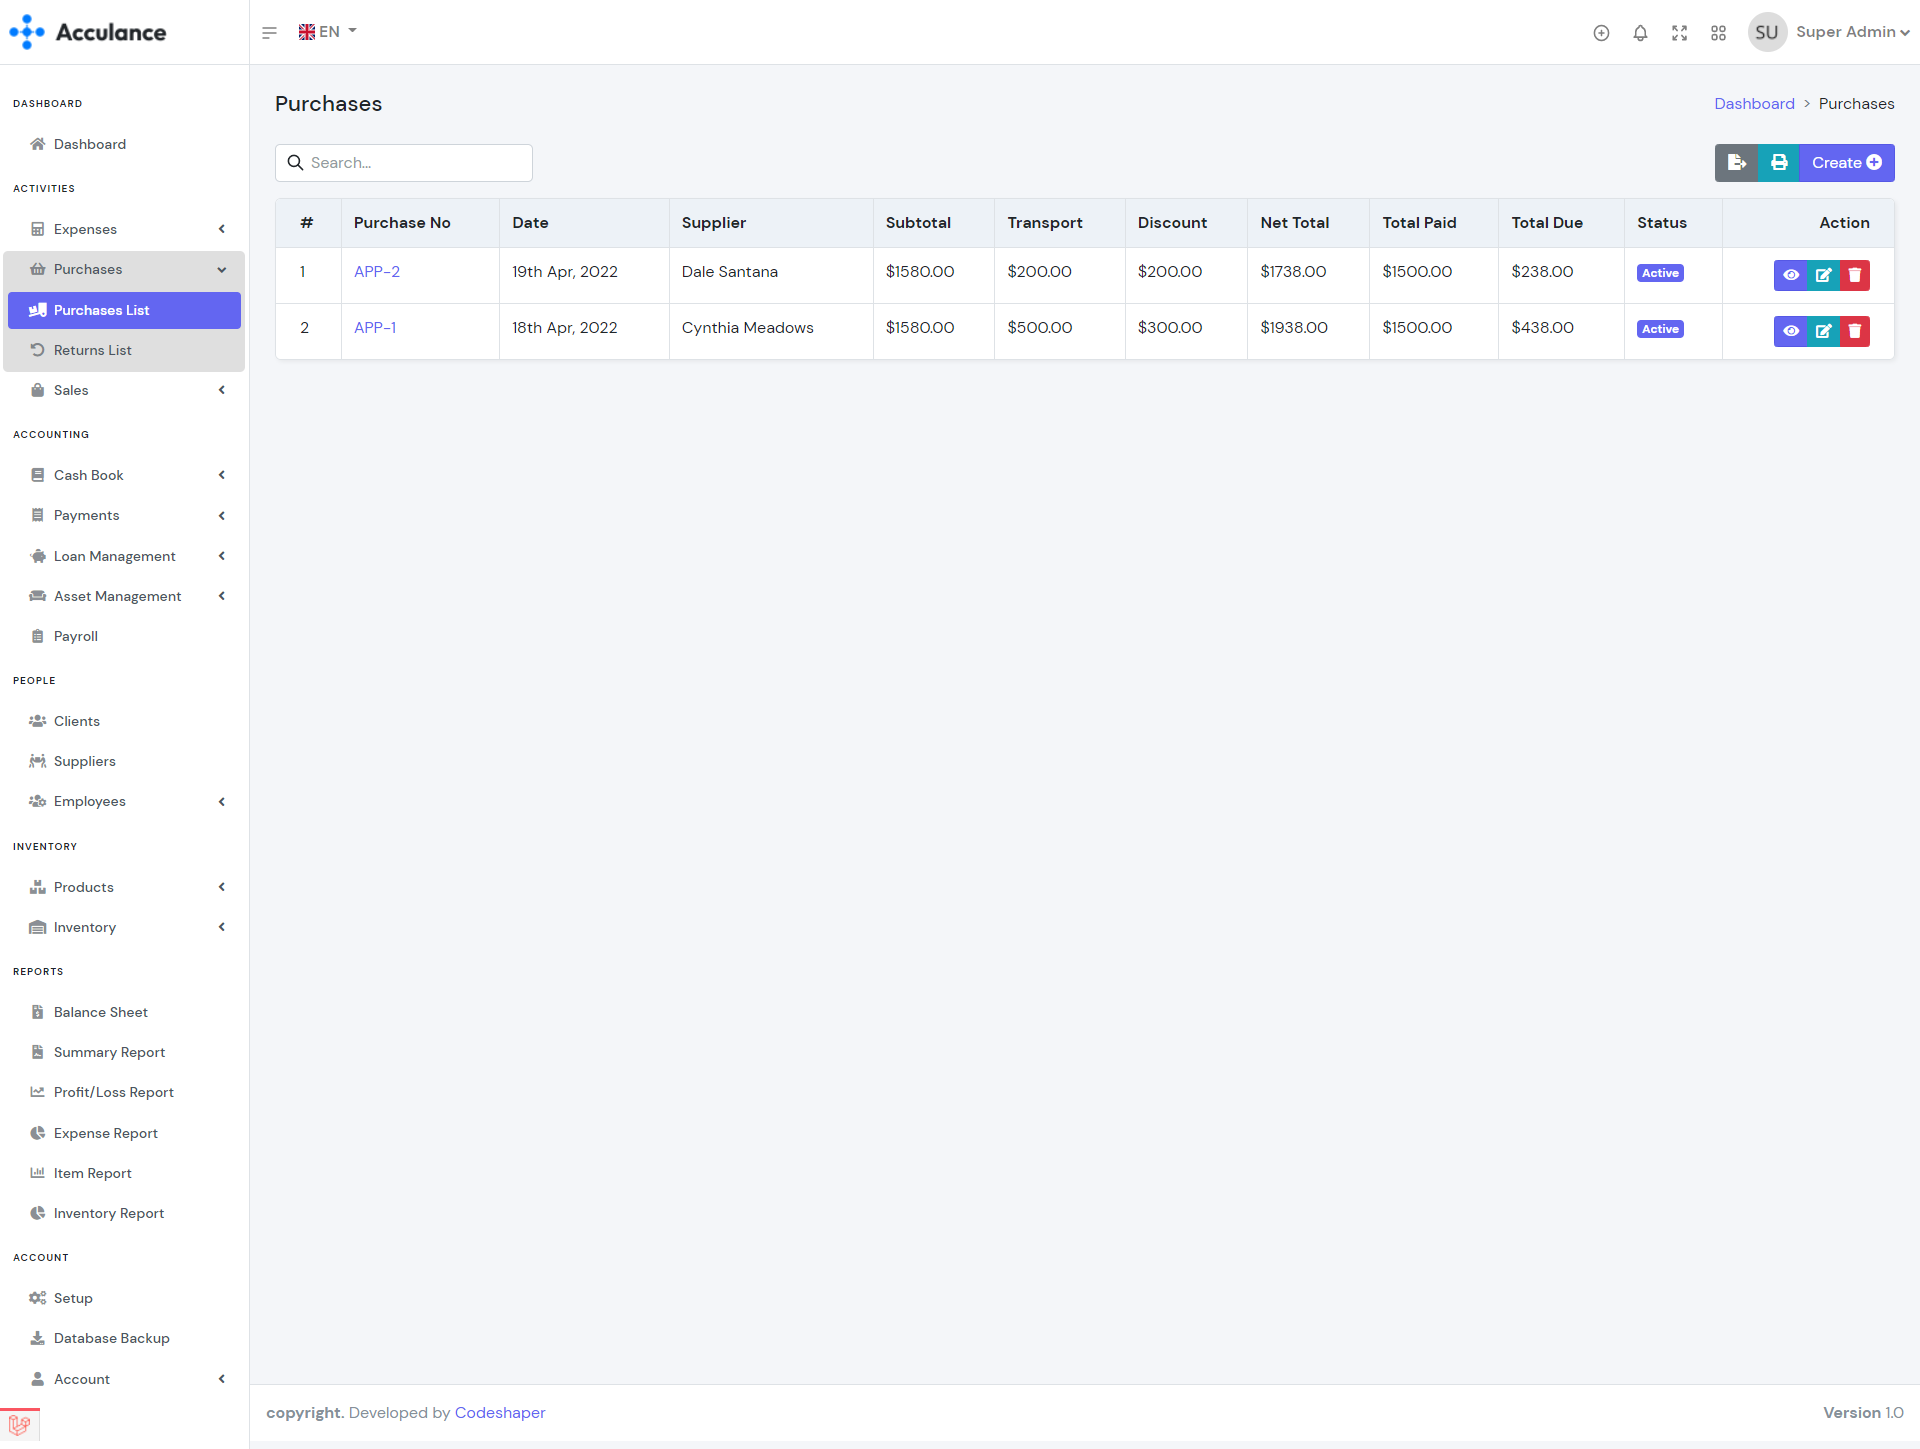
Purchases List
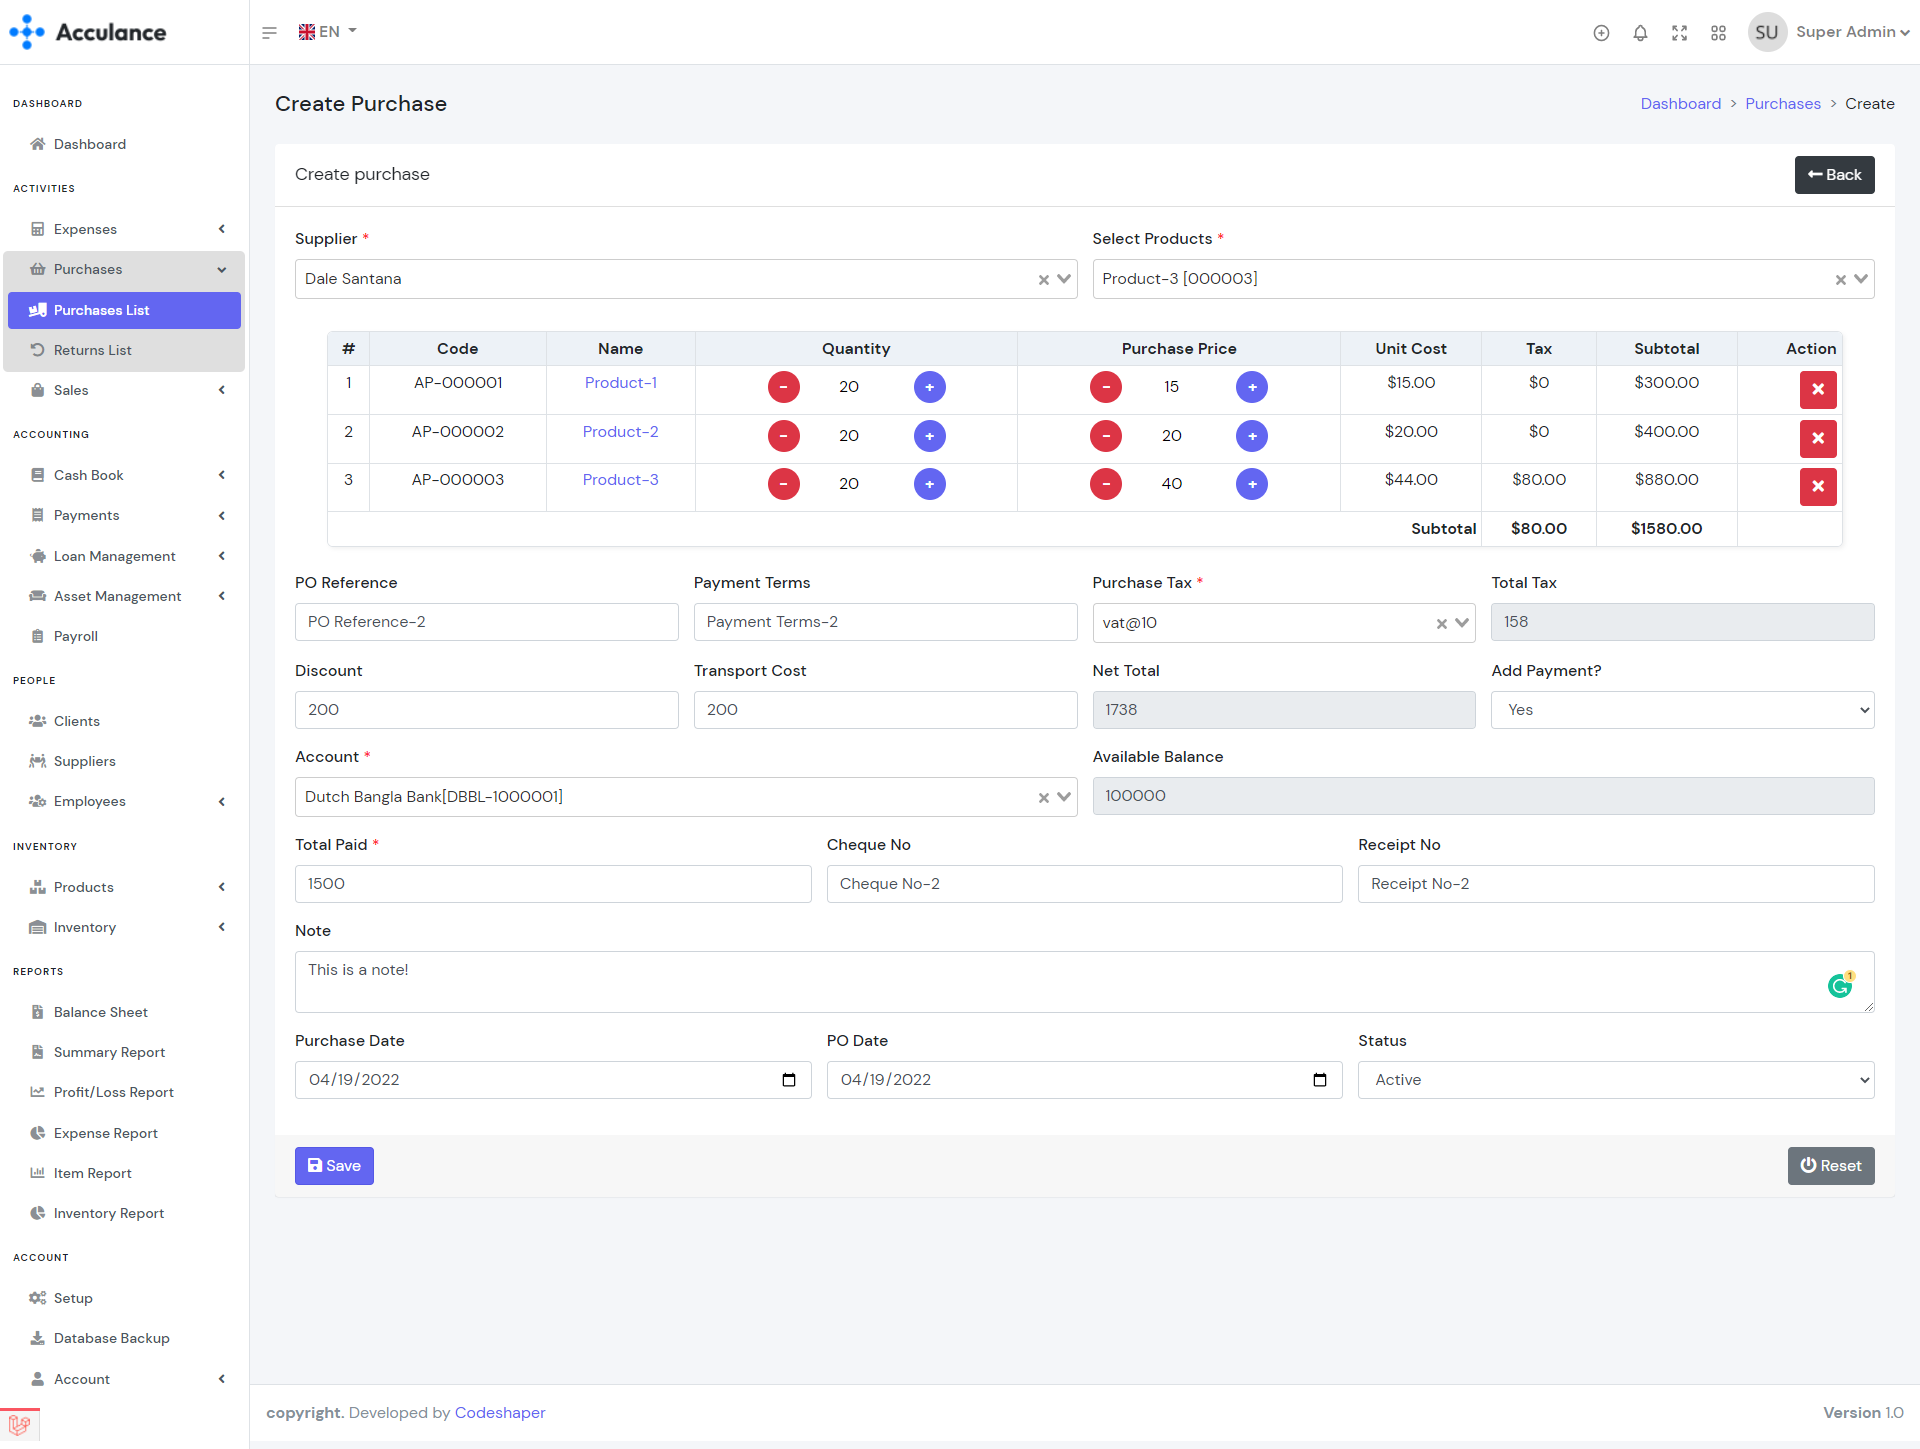
Create Purchase
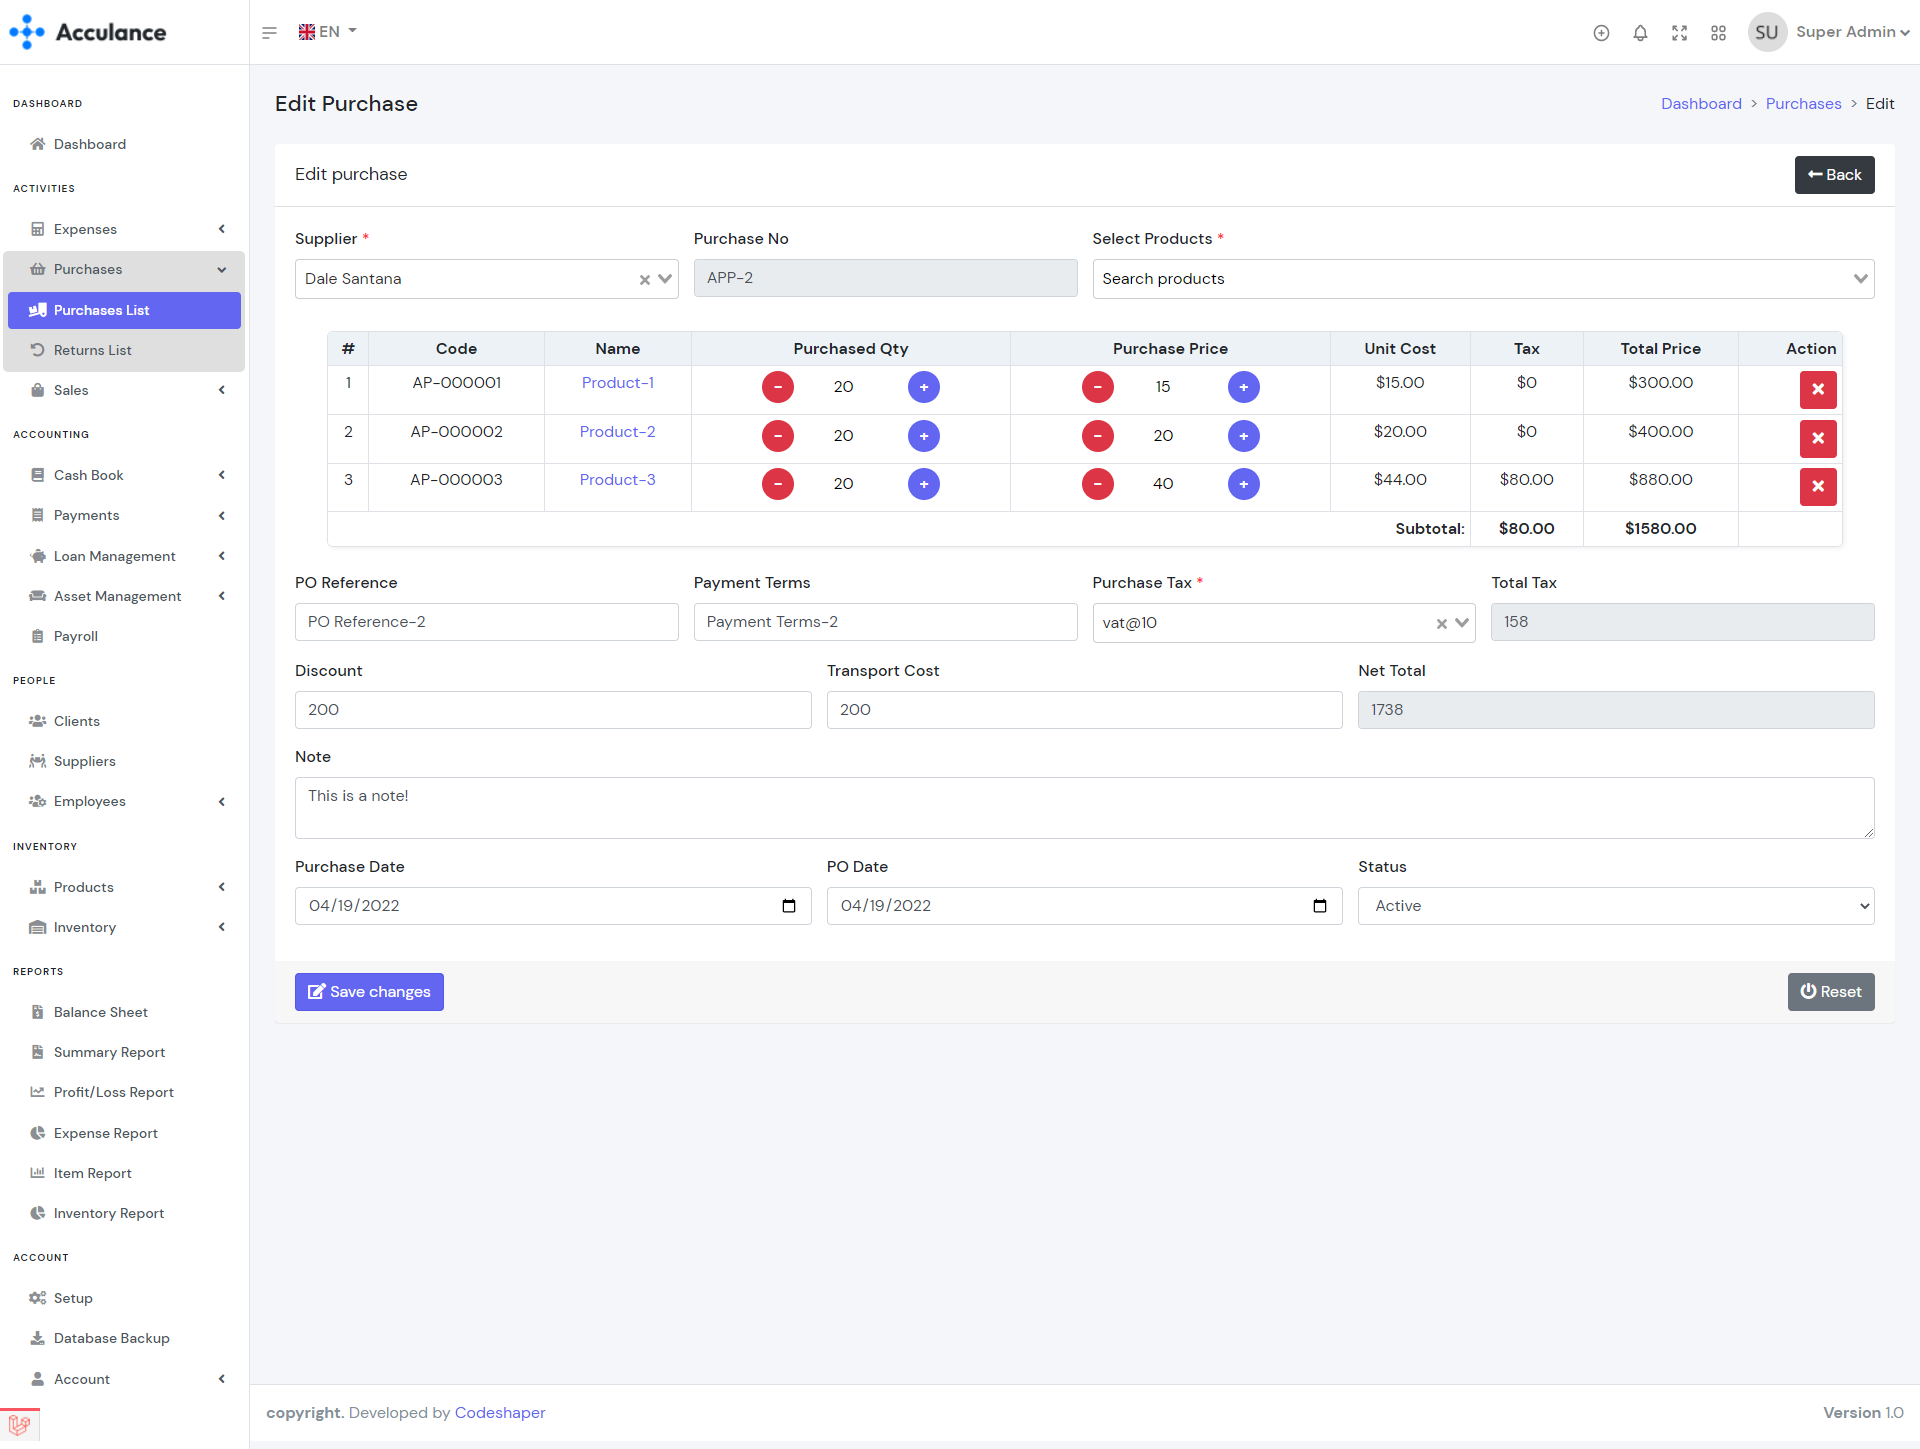
Edit Purchase
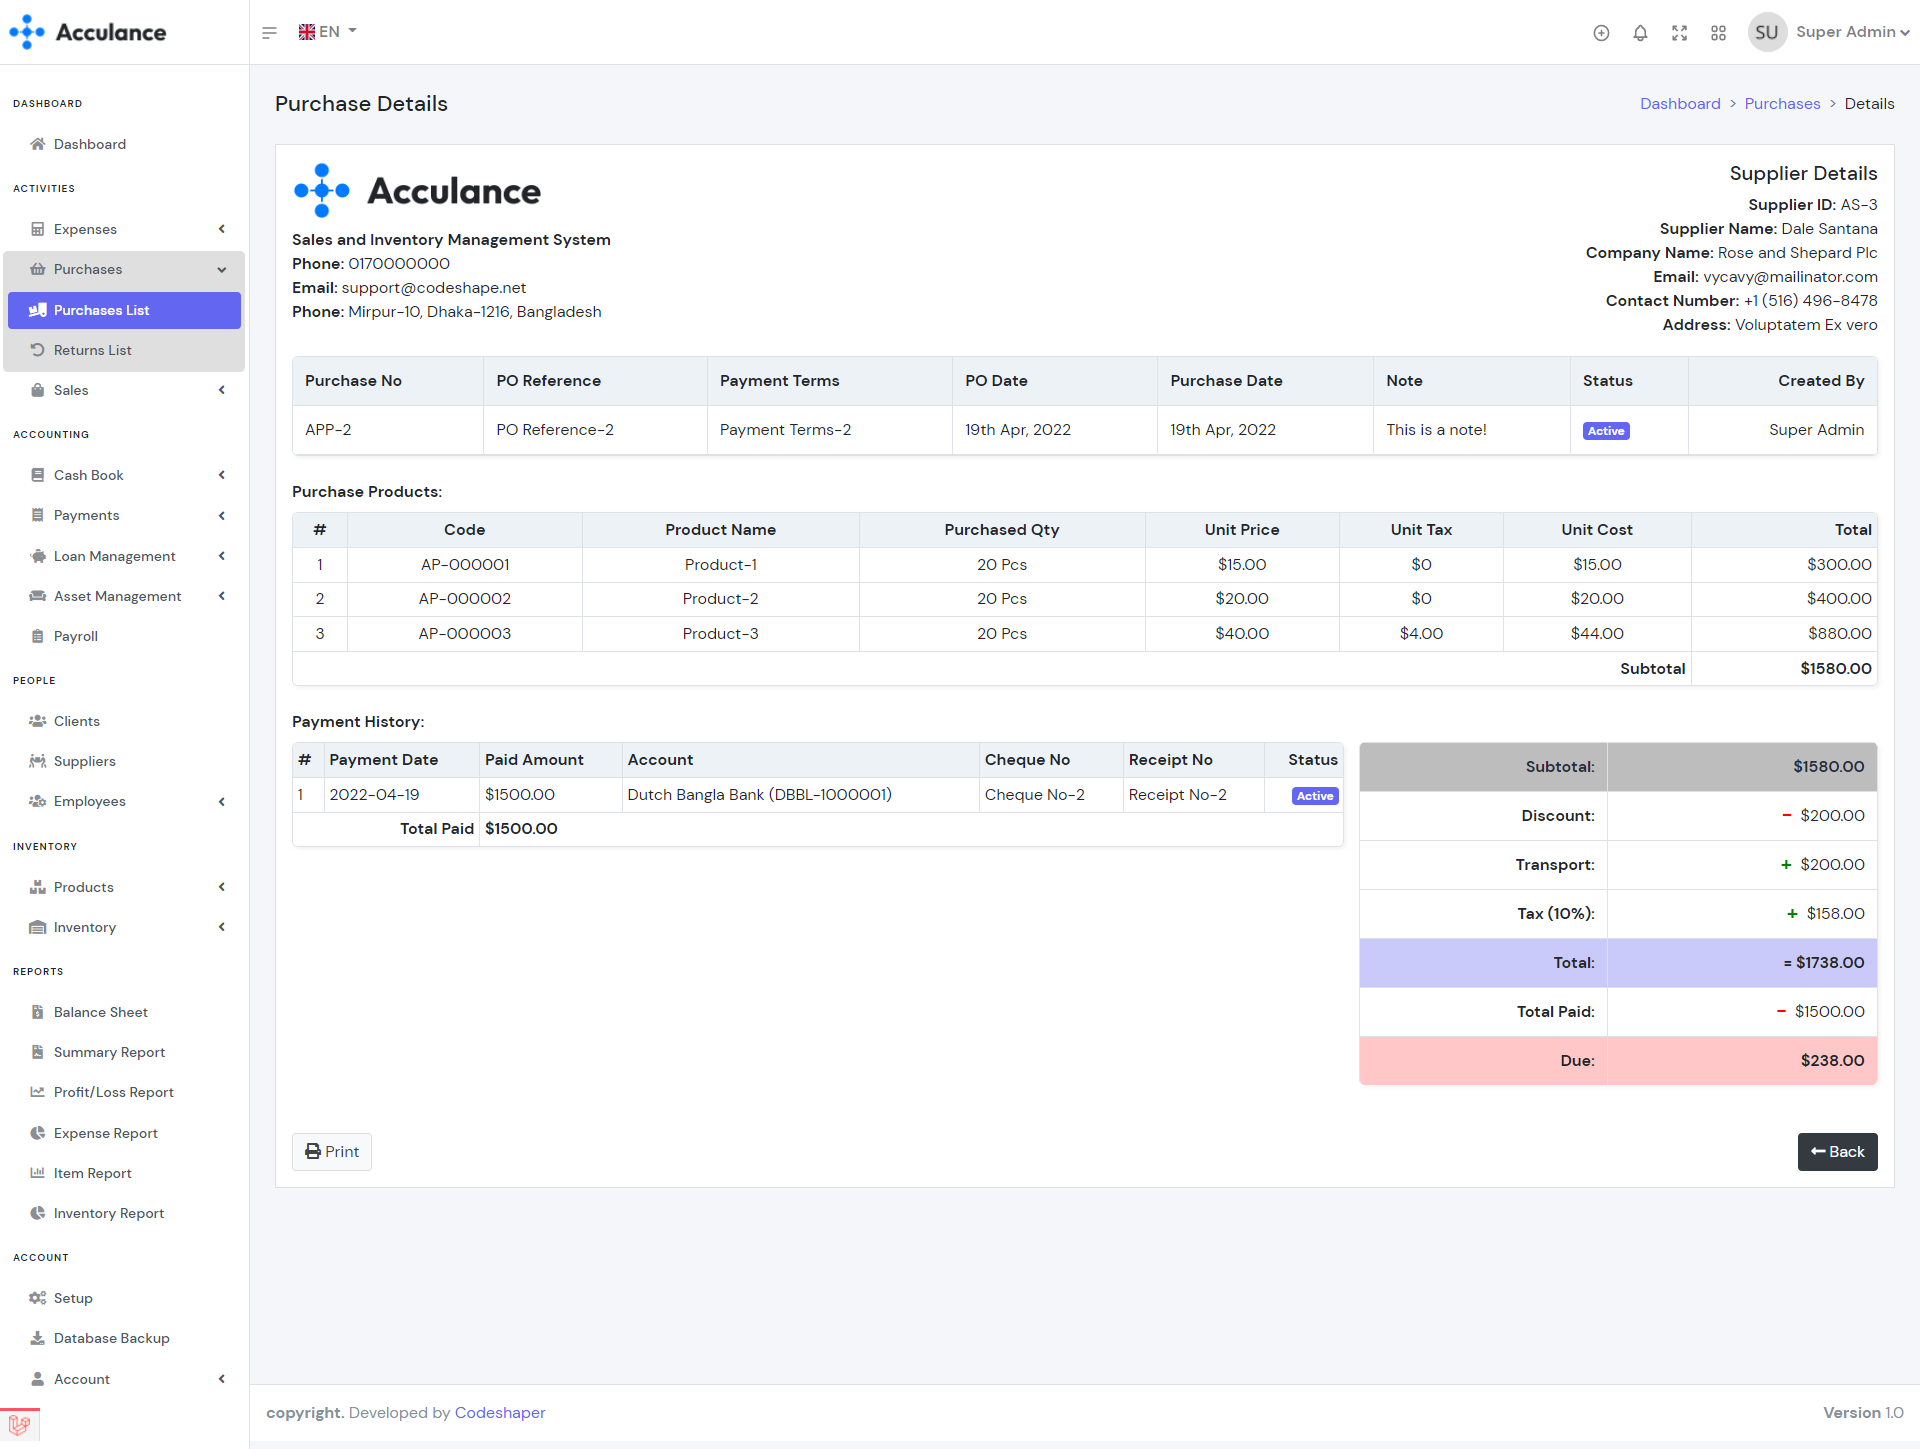
Purchase Details
Note: This is a relational module. If you delete any purchase then the purchase return and purchase payments will be deleted automatically. Deleting any purchase will decrease the stock quantity which may have an impact on the sales modules. So we recommend you to use the delete option very carefully.
Purchase Returns
Purchase Return module allow you to manage products return for any purchase. By creating purchase returns the stock quantity of products will be decreased and by deleting purchases the stock quantity of products will be increased. You can create a maximum of one return from any specific purchase. The cost of return products will be adjusted with the purchase due automatically. If the cost of return products is greater than due then the due will be adjusted and the reaming amount will be added to the account as Account Receivable.
| Required fields to create a purchase return |
|---|
| Supplier => Supplier to whom you are returning. Select a supplier from the list. |
| Select Products (Optional) => Products that you want to return. It will filter your purchases and will show the specific purchases that contain the selected products. It helps when you forgot any purchase number. |
| Purchases => List of the purchases for the selected supplier. You can select any purchase from the list and it will show you all the products for the selected purchase. |
| Account(If cost of return product greater than due) => The account that you want to use to receive the Account Receivable. Select an account from the list. |
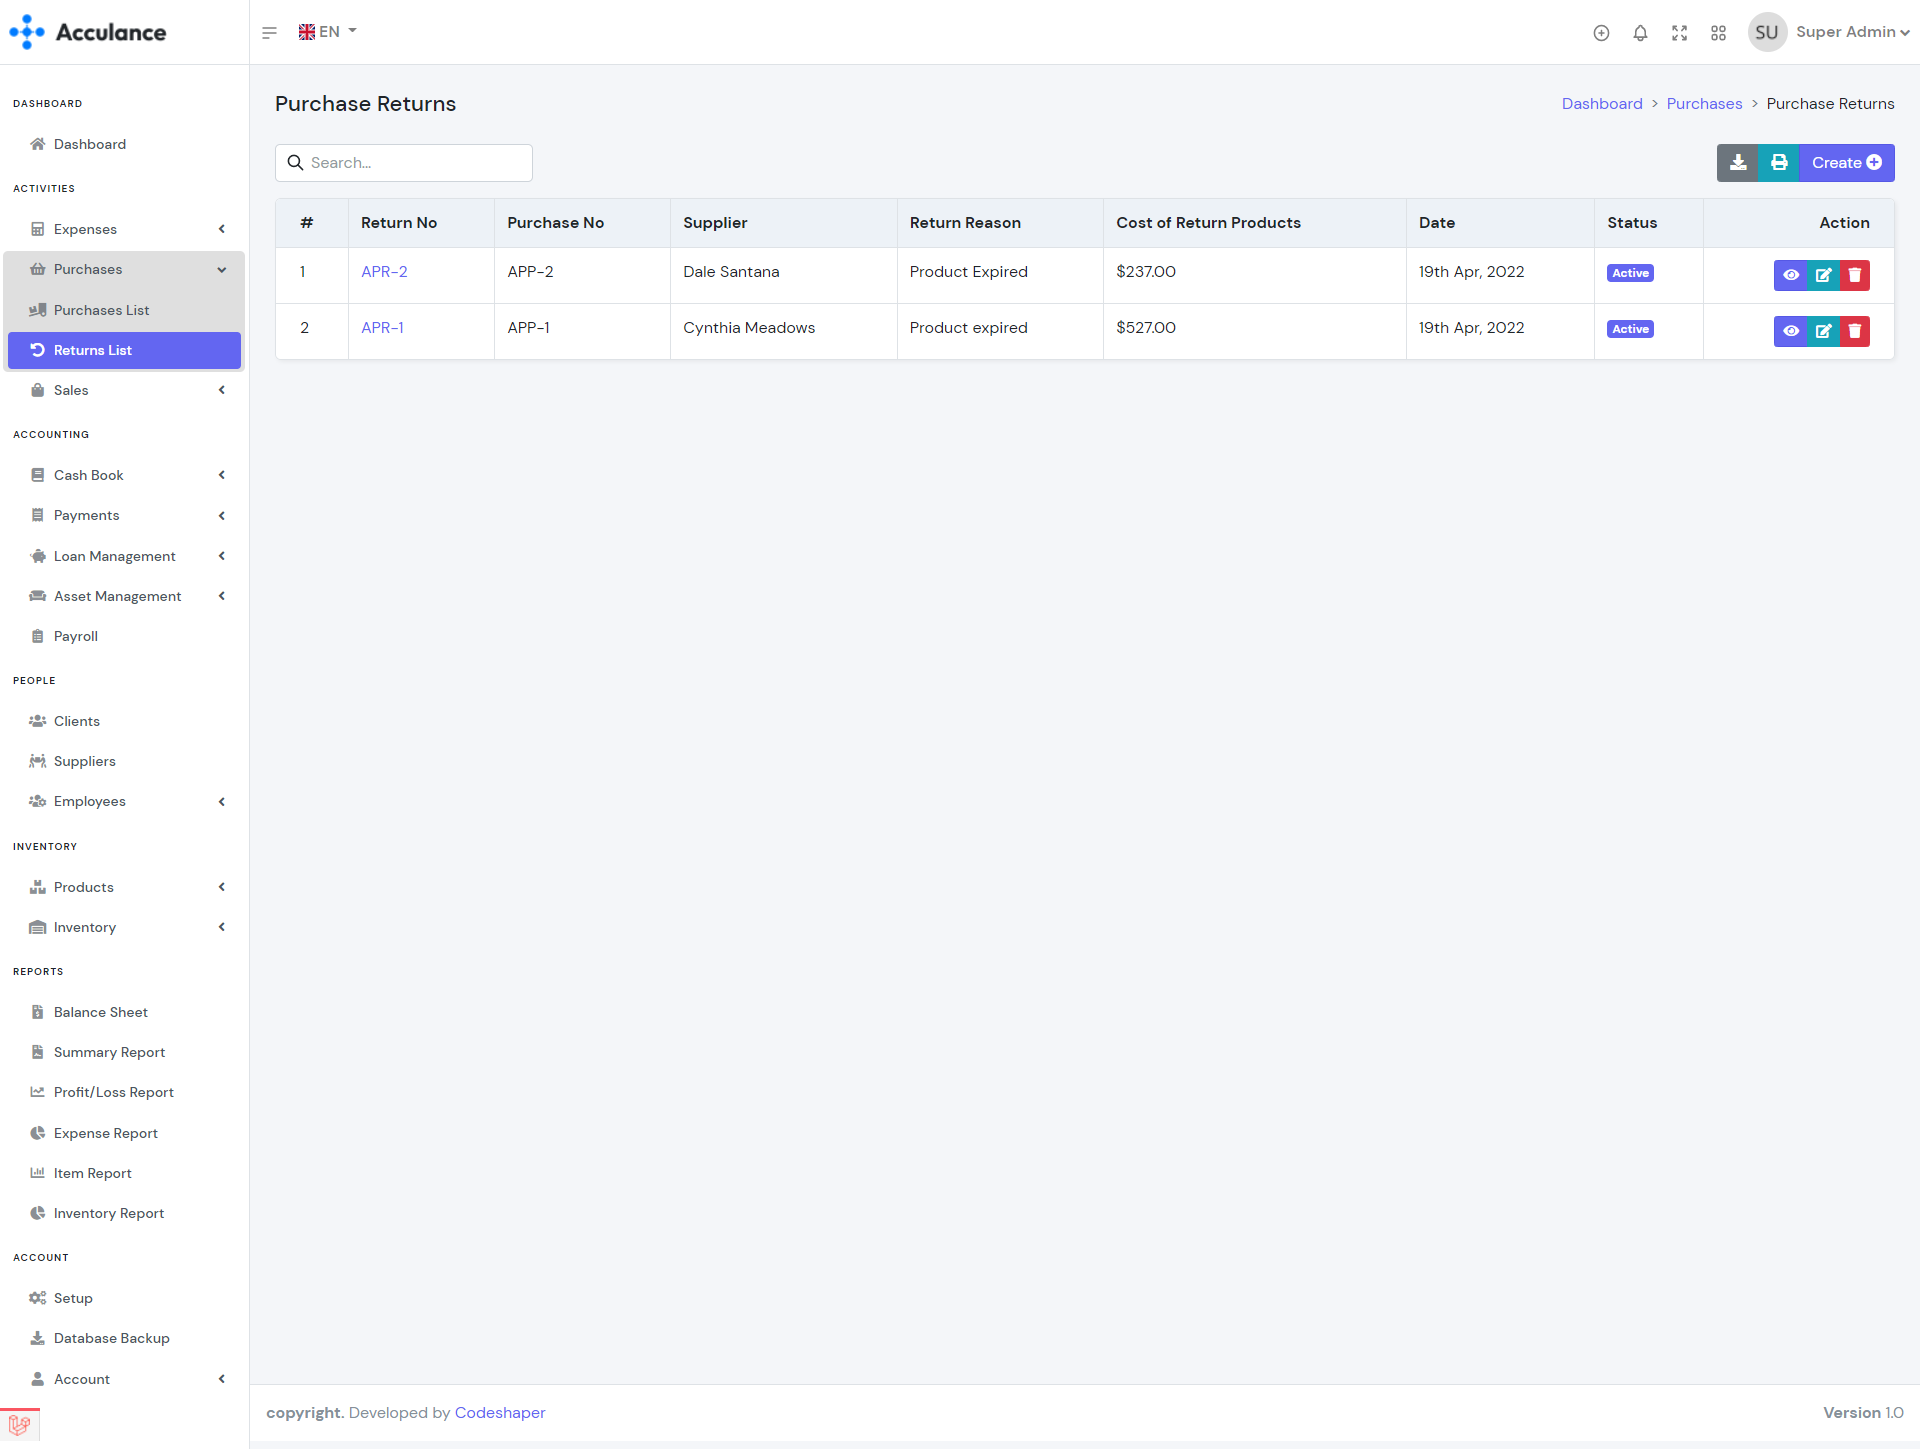
Purchase Returns List
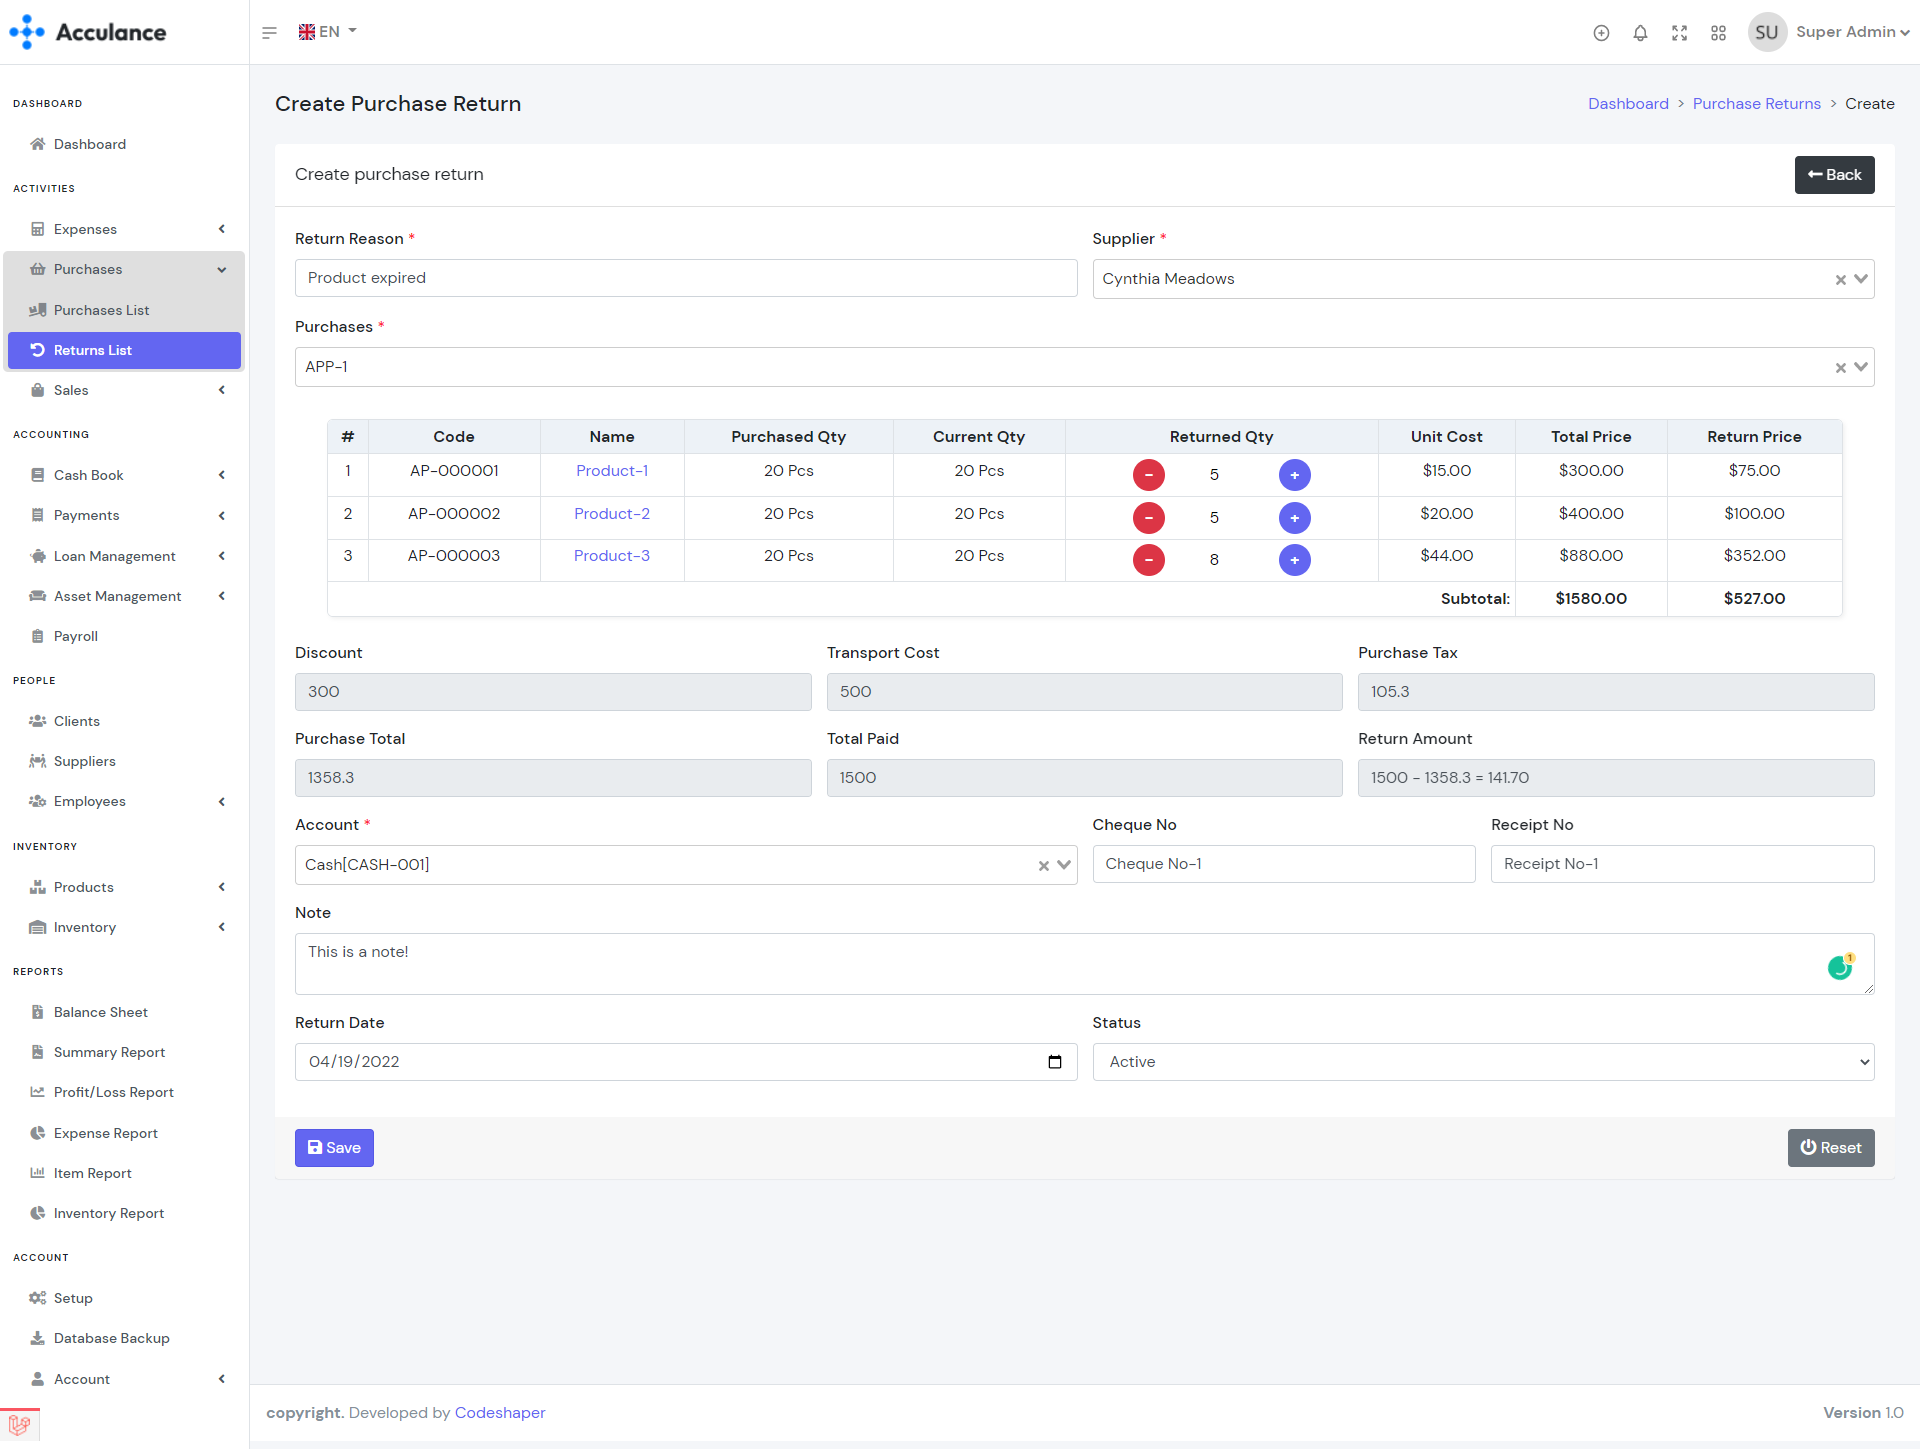
Create Purchase Return
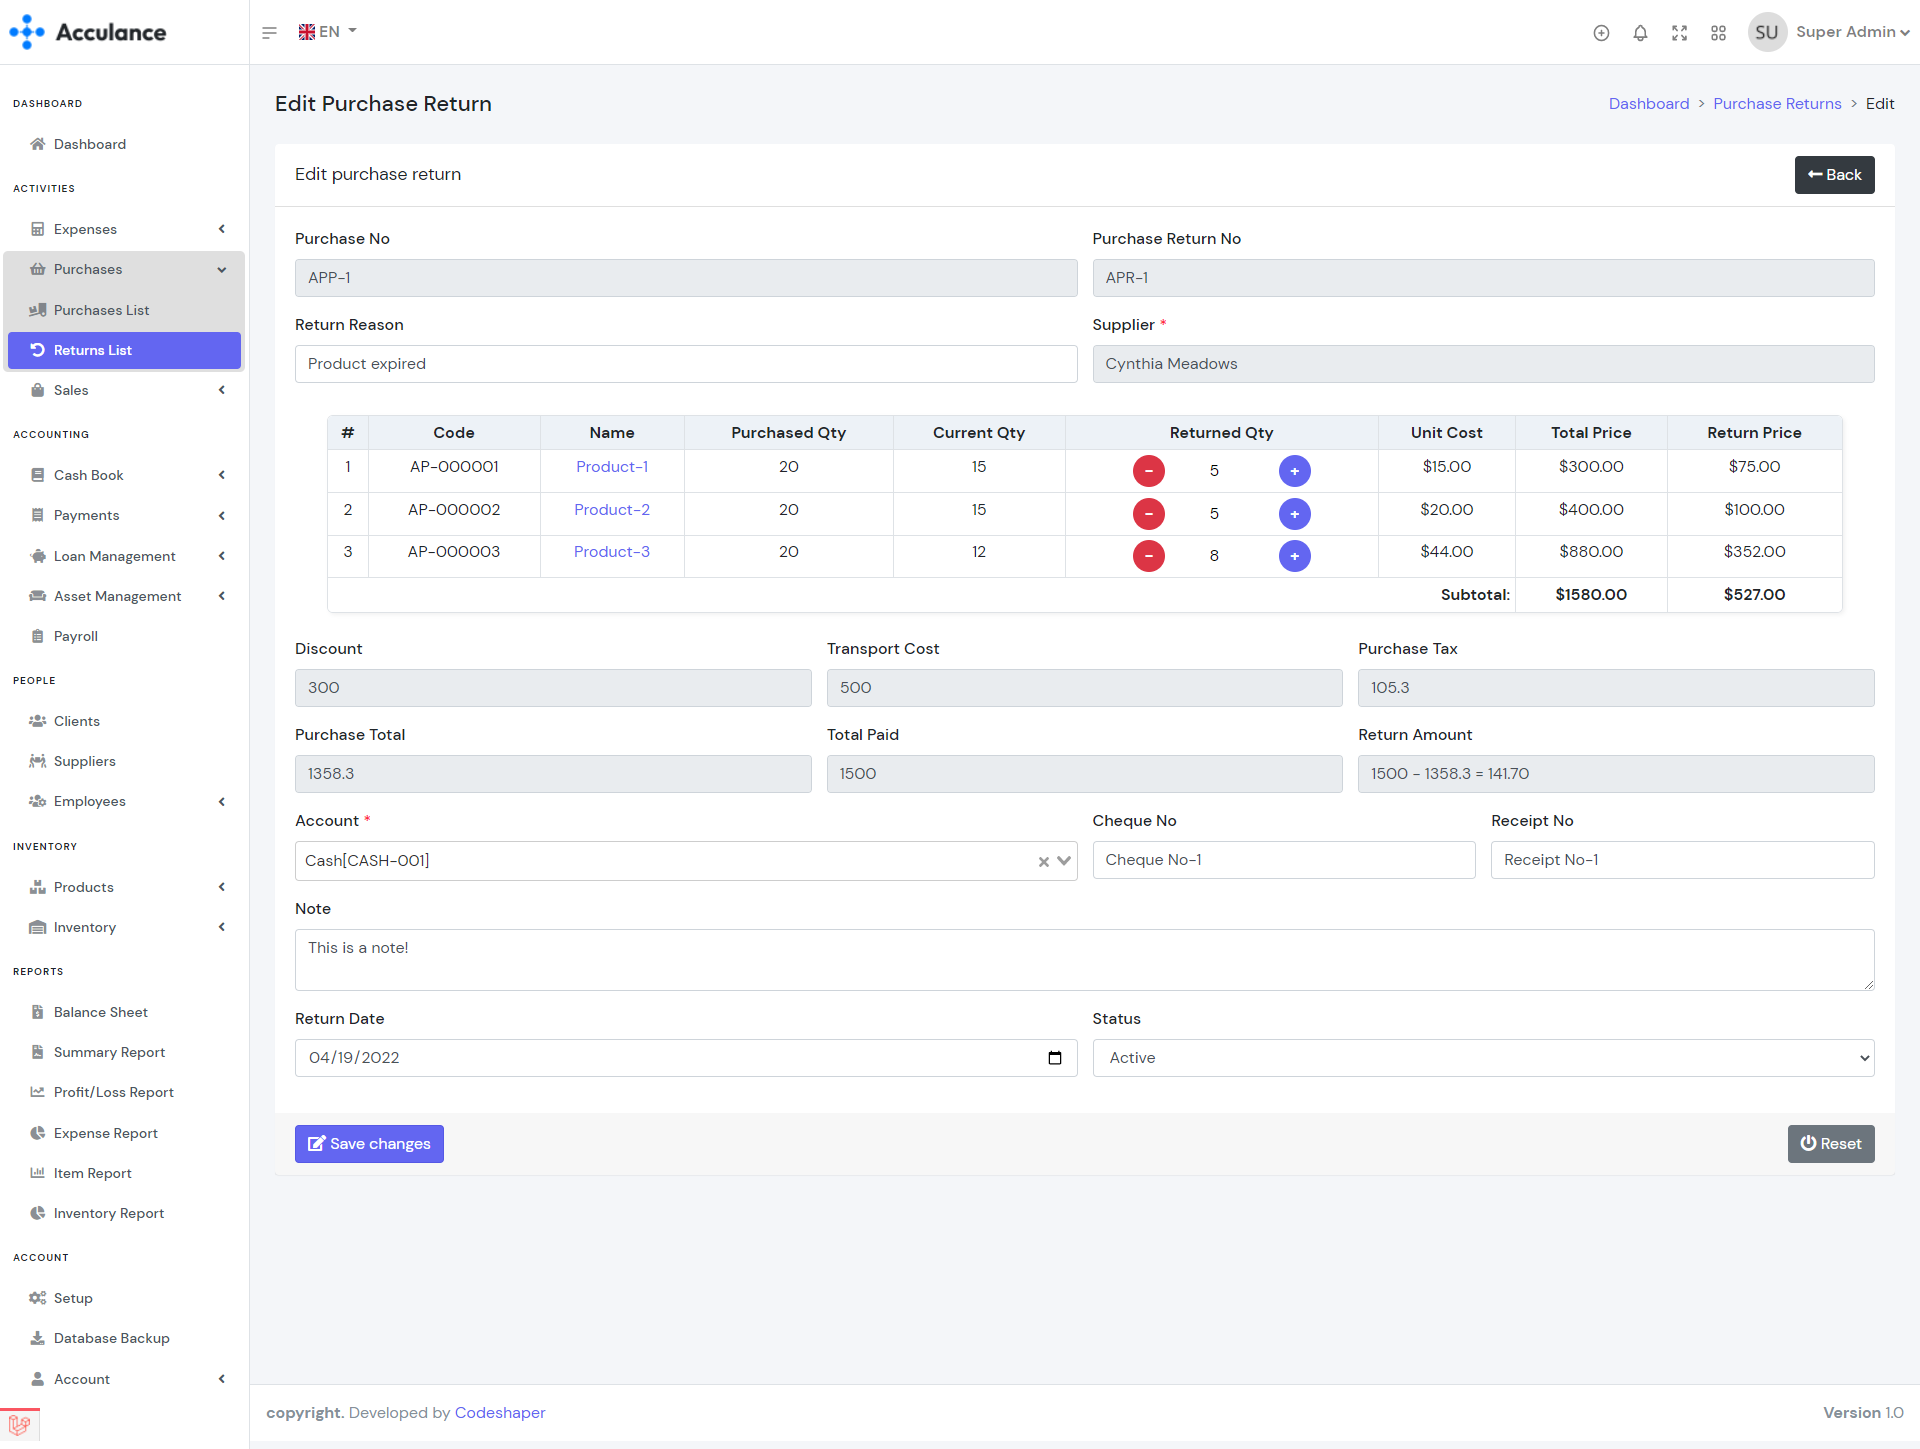
Edit Purchase Return
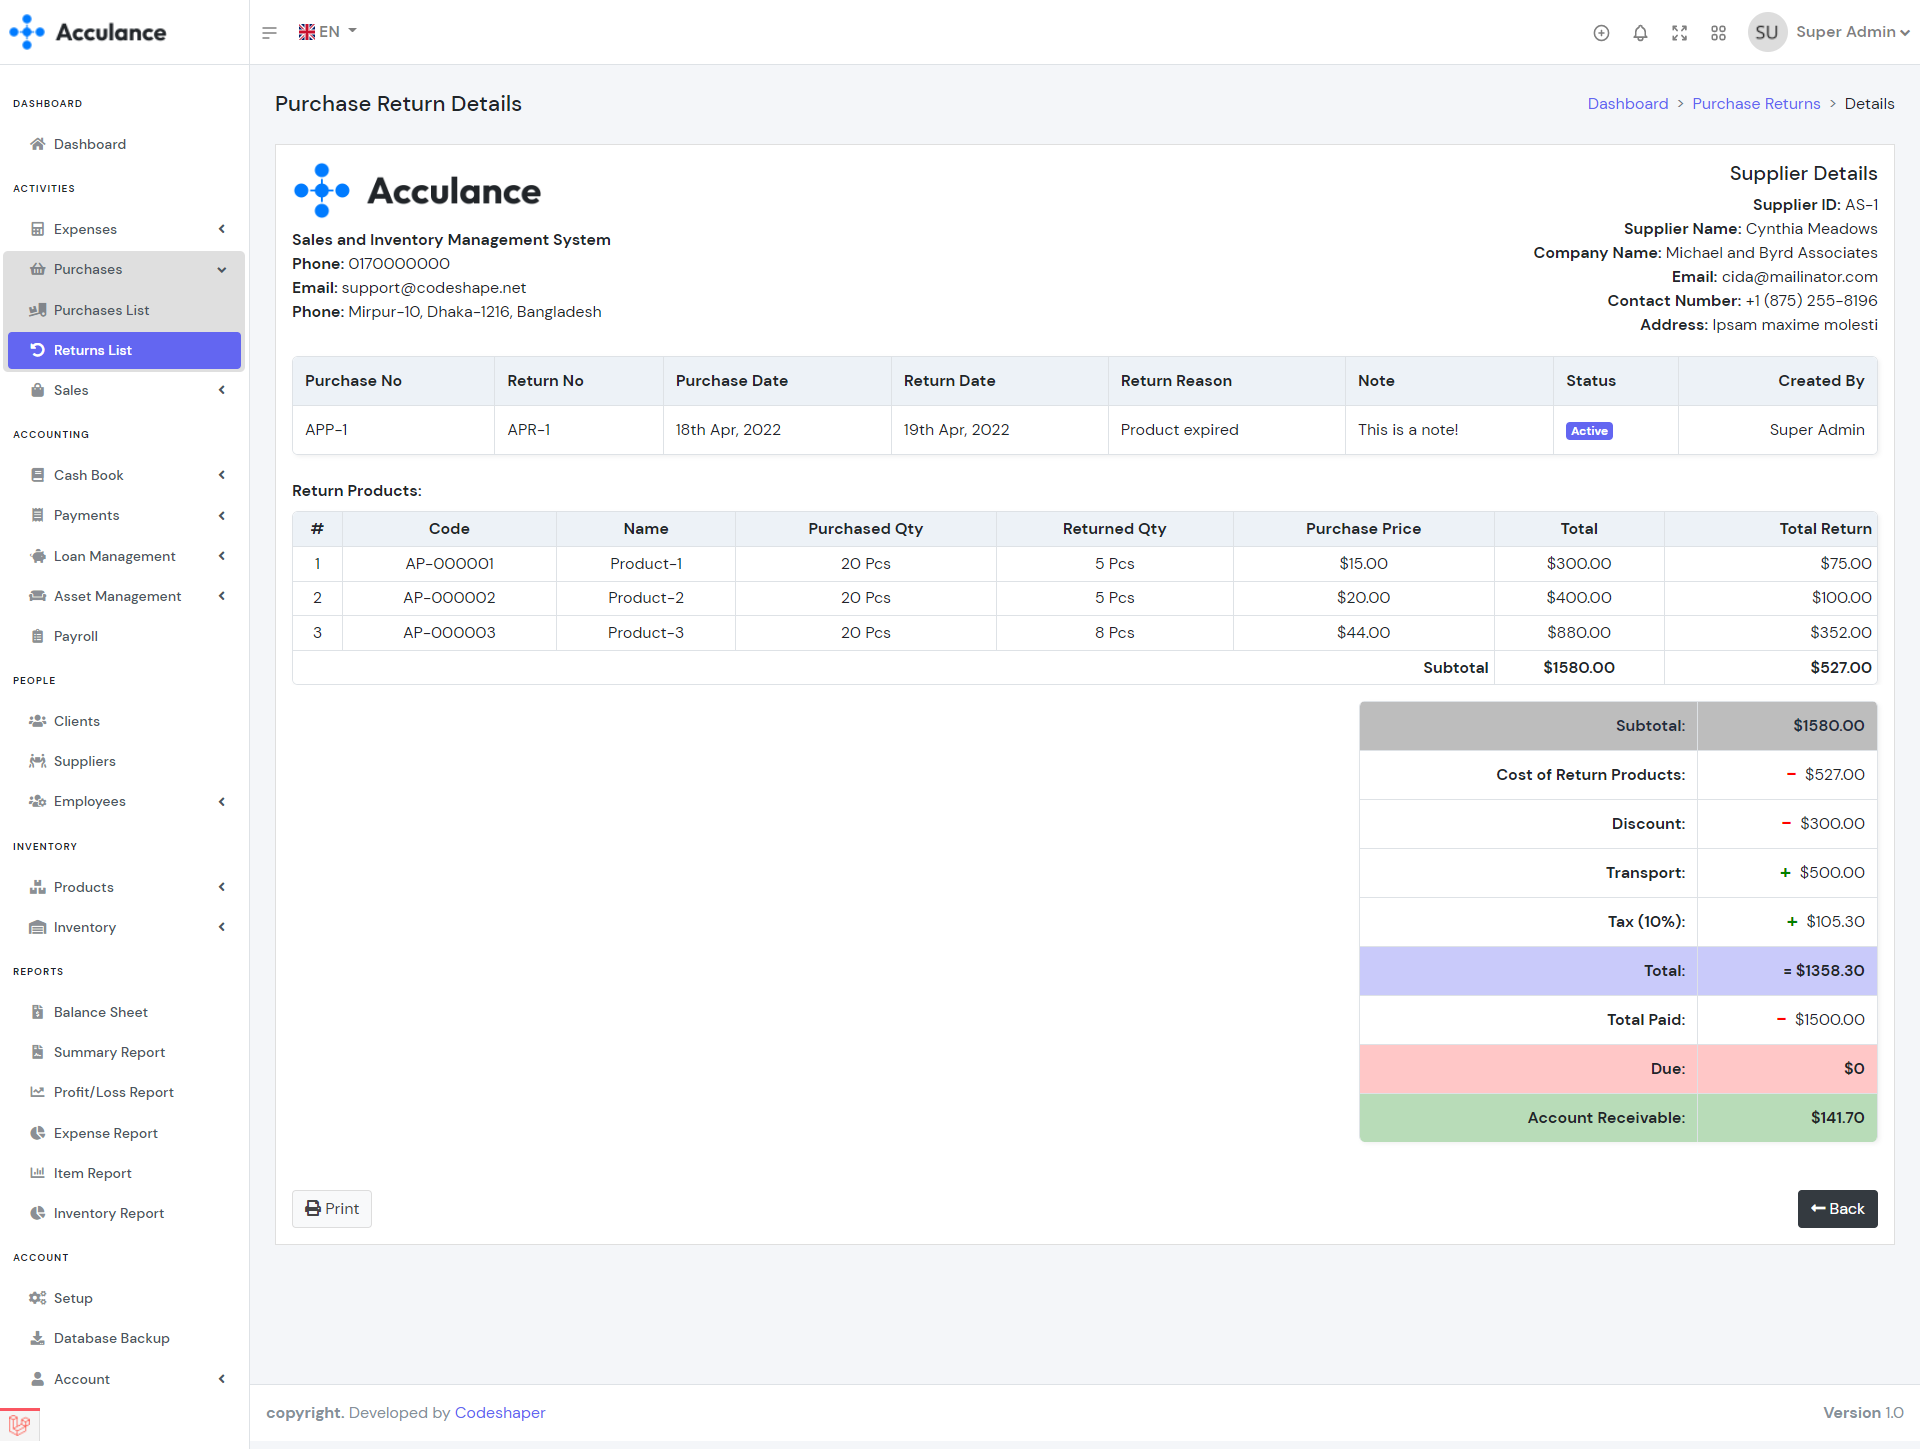
Purchase Return Details
Note: A purchase can have only one purchase invoice return(One-to-one relationship between Purchases and Purchase Returns).
Quotations
Quotation management helps to improve your sales. You can create a quotation and then send the quotation to your client. Later if you get approval for the quotation you will be able to create a sell from directly the quotation. A quotation will not have any impact on the inventory. In order to create a quotation, you need to create Client, Products, Purchases, and VAT Rates, first.
| Required fields to create a quotation |
|---|
| Client => Client to whom you are sending the quotation. Select a client from the list. |
| Select Products => Products that you want to include in the quotation. You can select single or multiple products from the list. After selecting a product add the quantity and the price. |
| Quotation Tax => Tax that you want to use for this quotation. Select a tax rate from the list. |

Quotations List

Create Quotation

Edit Quotation
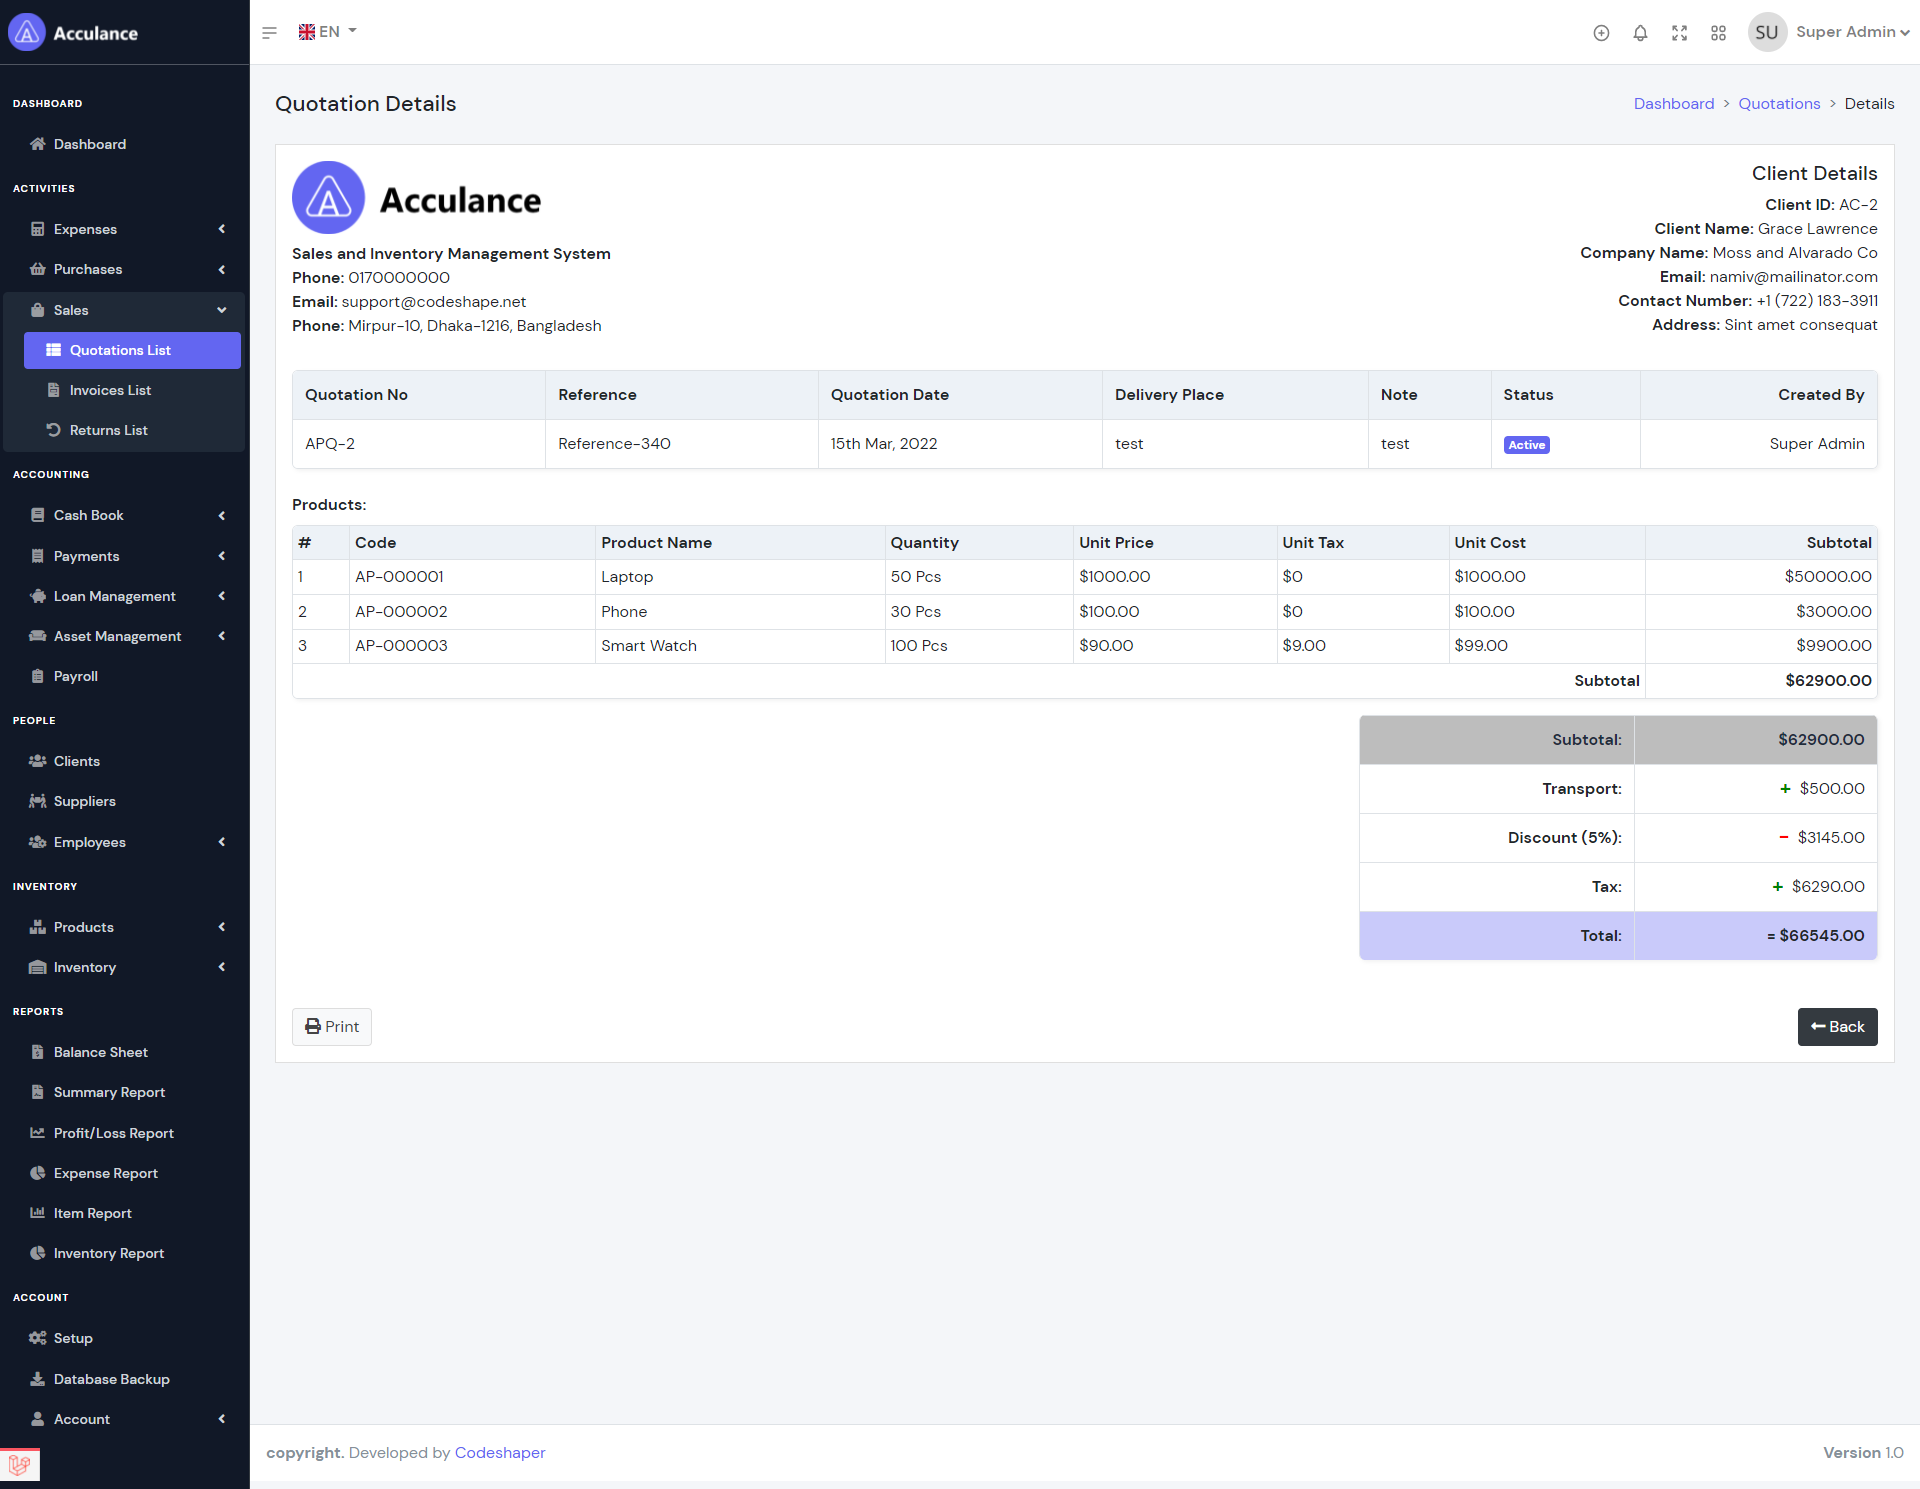
Quotation Details
Note: A purchase can have only one damage purchase(One-to-one relationship between Purchases and Damage Purchases).
Invoices
Invoices can be referred to as sales. The invoices module allows you to manage sales for your products. By creating invoices the stock quantity of products will be decreased and by deleting invoices the stock quantity of products will be increased. When creating an invoice you can add a payment directly from the create page or you can do it later from the payments module. In order to create an invoice, you need to create Clients, Products, VAT Rates, and Accounts first.
| Required fields to create an invoice |
|---|
| Client => Client to whom you are selling. Select a client from the list. |
| Select Products => Products that you want to sell. You can select single or multiple products from the list. After selecting a product add the quantity and the price. |
| Invoice Tax => Tax that you want to use for this invoice. Select a tax rate from the list. |
| Account(If you wish to add payment) => The account that you want to use for this invoice payment. Select an account from the list. |
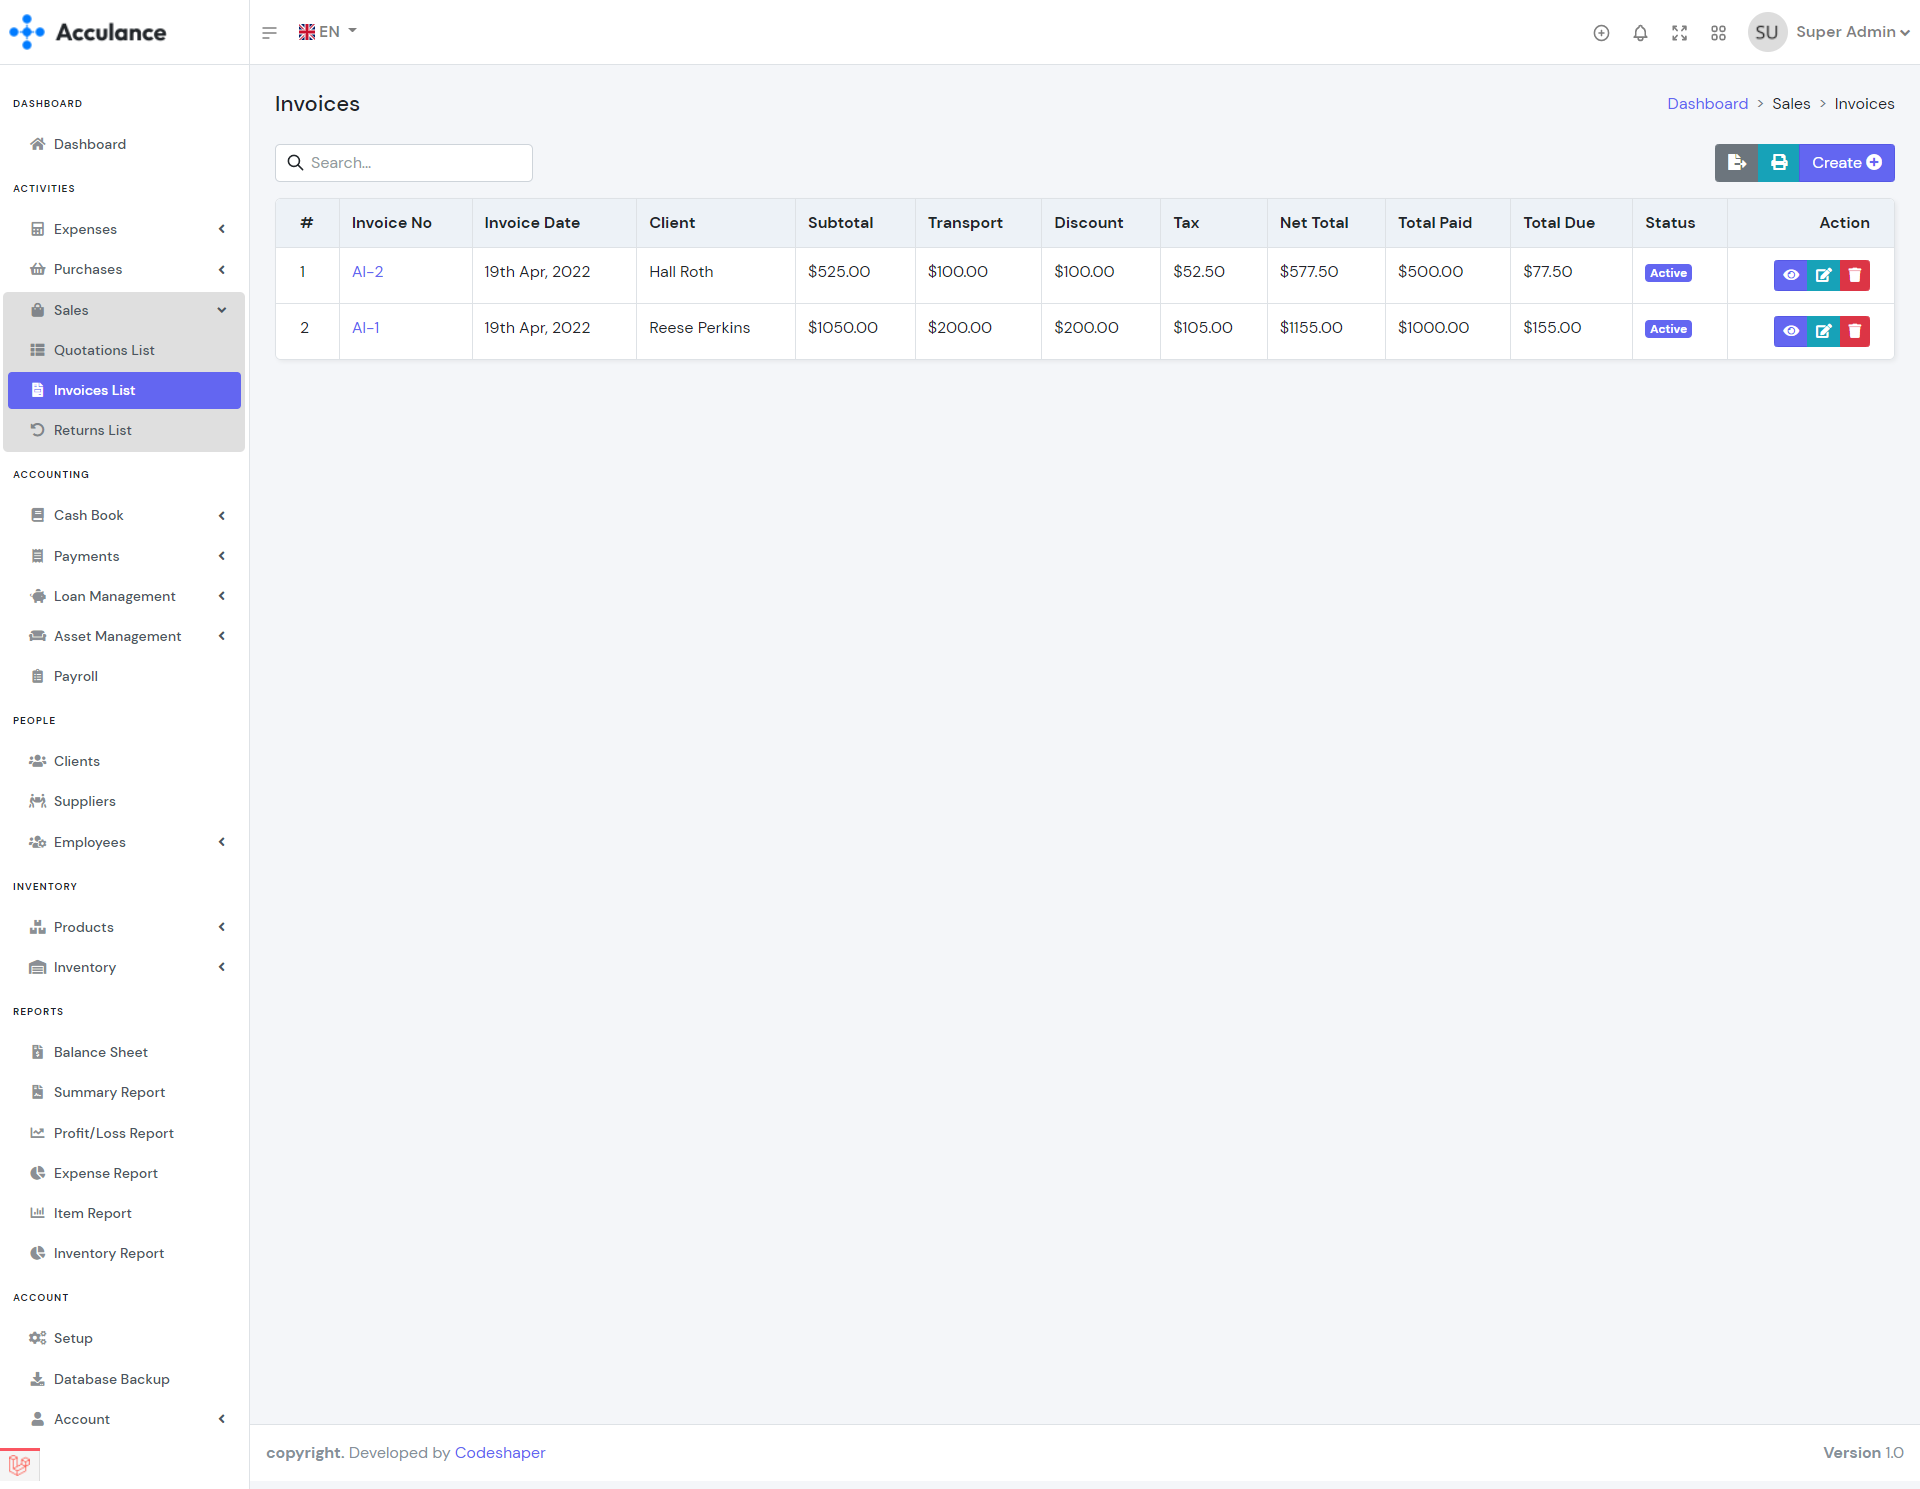
Invoice List
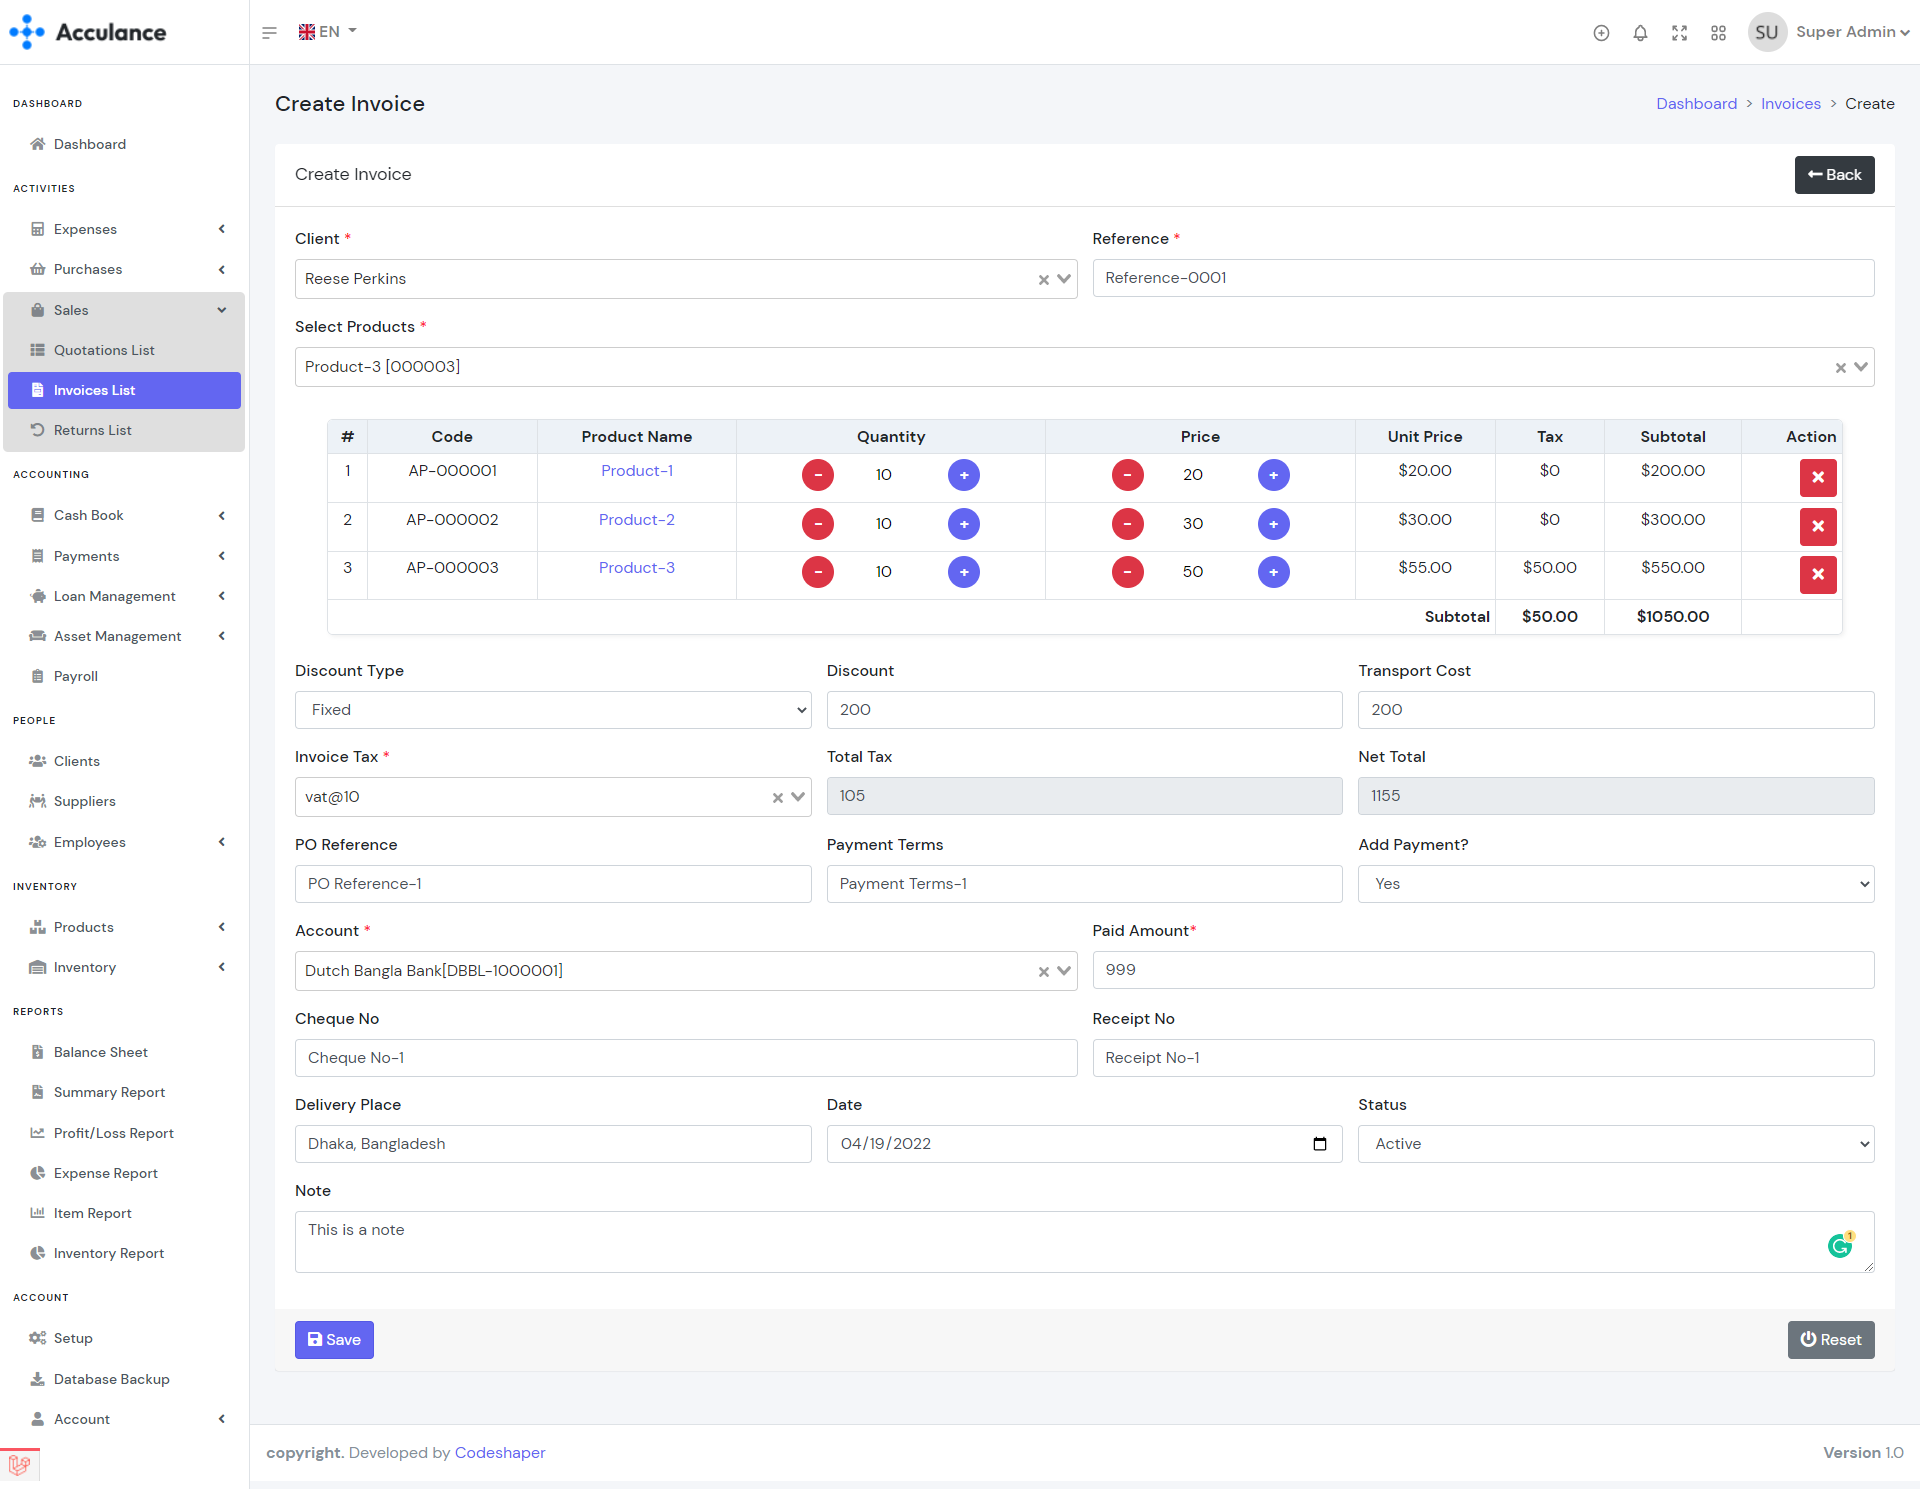
Create Invoice
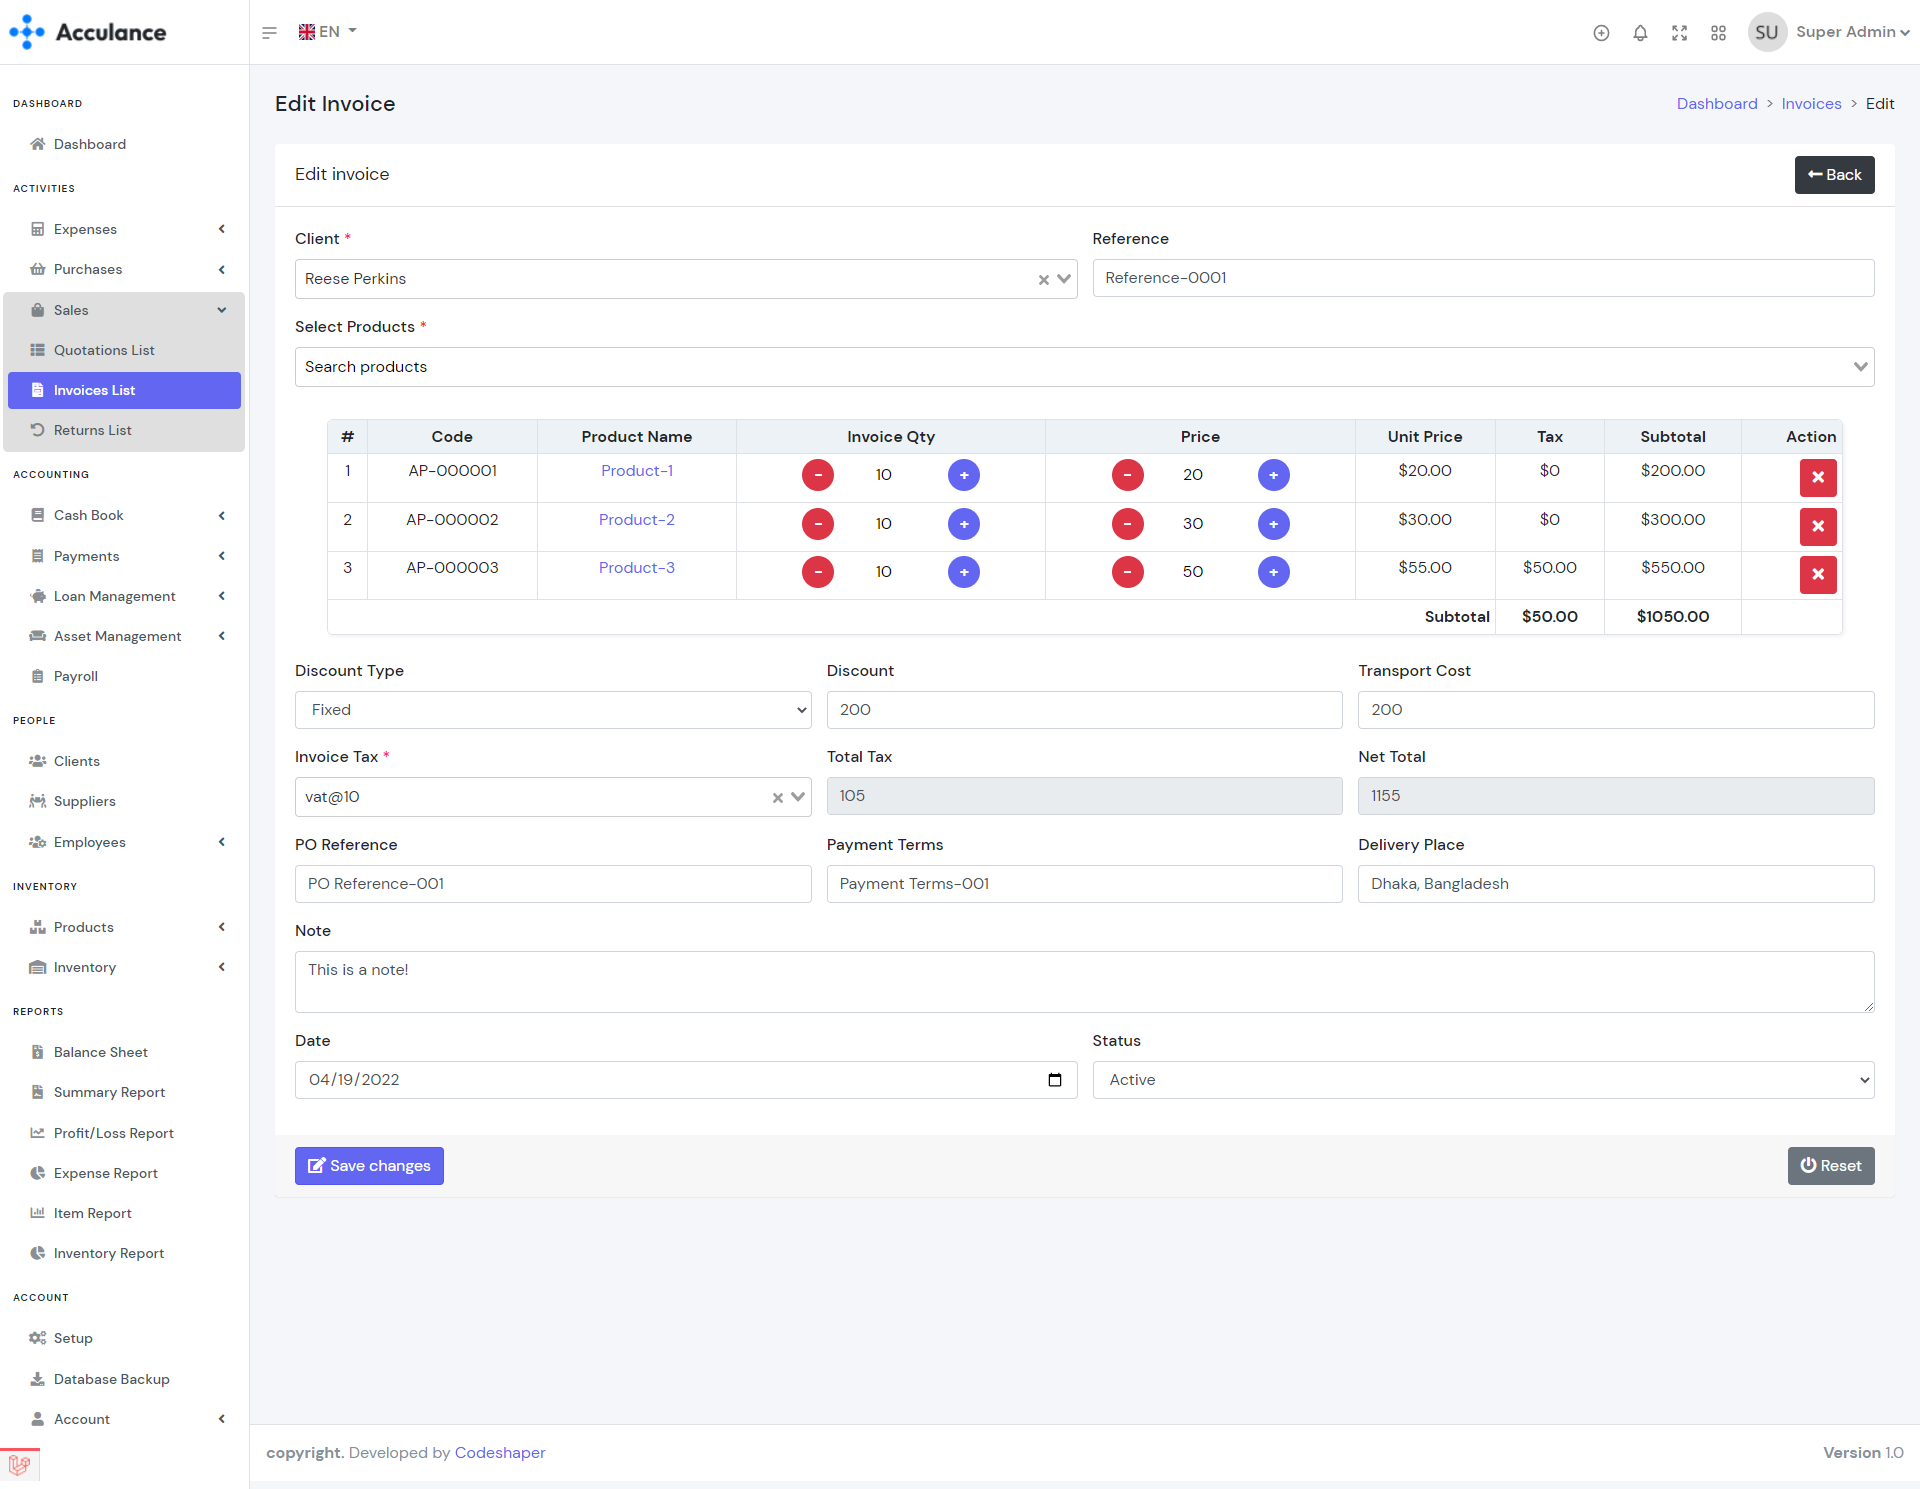
Edit Invoice
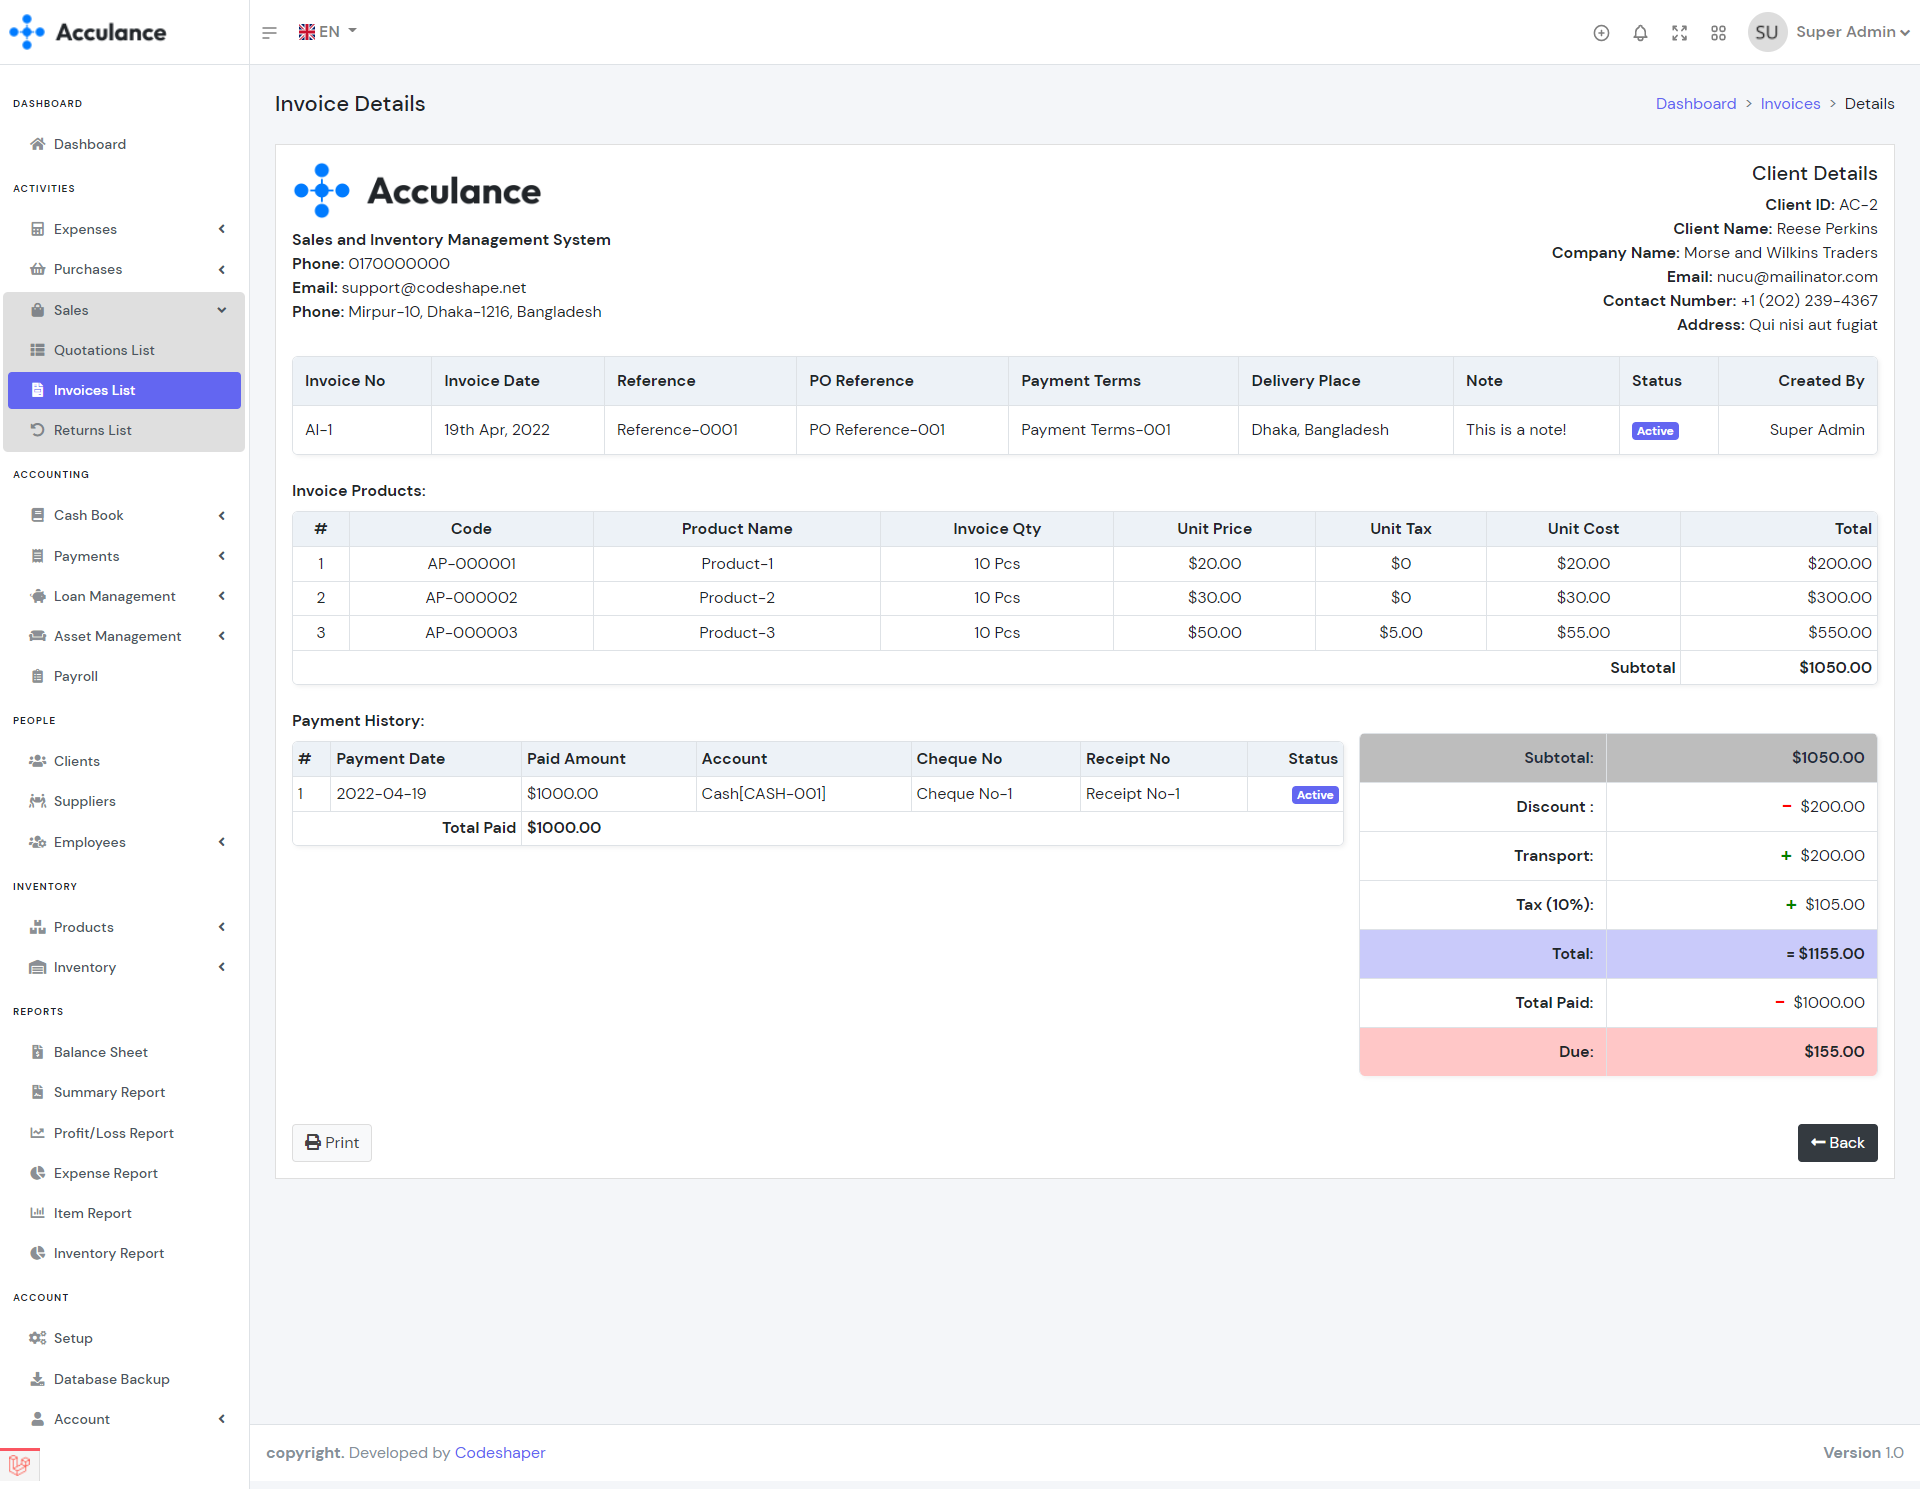
Invoice Details
Note: This is a relational module. If you delete any invoice then the invoice return and invoice payments will be deleted automatically. Deleting any invoice will increase the stock quantity and will delete the invoice payments which have an impact on the accounts that you used to receive the payments. So we recommend you to use the delete option very carefully.
Invoice Return
Invoice Return module allow you to manage products return for any invoice. By creating invoice returns the stock quantity of products will be increased and by deleting purchases the stock quantity of products will be decreased. You can create a maximum of one return from any specific invoice. The cost of return products will be adjusted with the invoice due automatically. If the cost of return products is greater than due then the due will be adjusted and the reaming amount will be deducted from the account as Account Payable.
| Required fields to create a invoice return |
|---|
| Supplier => Supplier to whom you are returning. Select a supplier from the list. |
| Select Products (Optional) => Products that you want to return. It will filter your purchases and will show the specific purchases that contain the selected products. It helps when you forgot any purchase number. |
| Purchases => List of the purchases for the selected supplier. You can select any purchase from the list and it will show you all the products for the selected purchase. |
| Account(If cost of return product greater than due) => The account that you want to use to sent the Account Payable. Select an account from the list. |
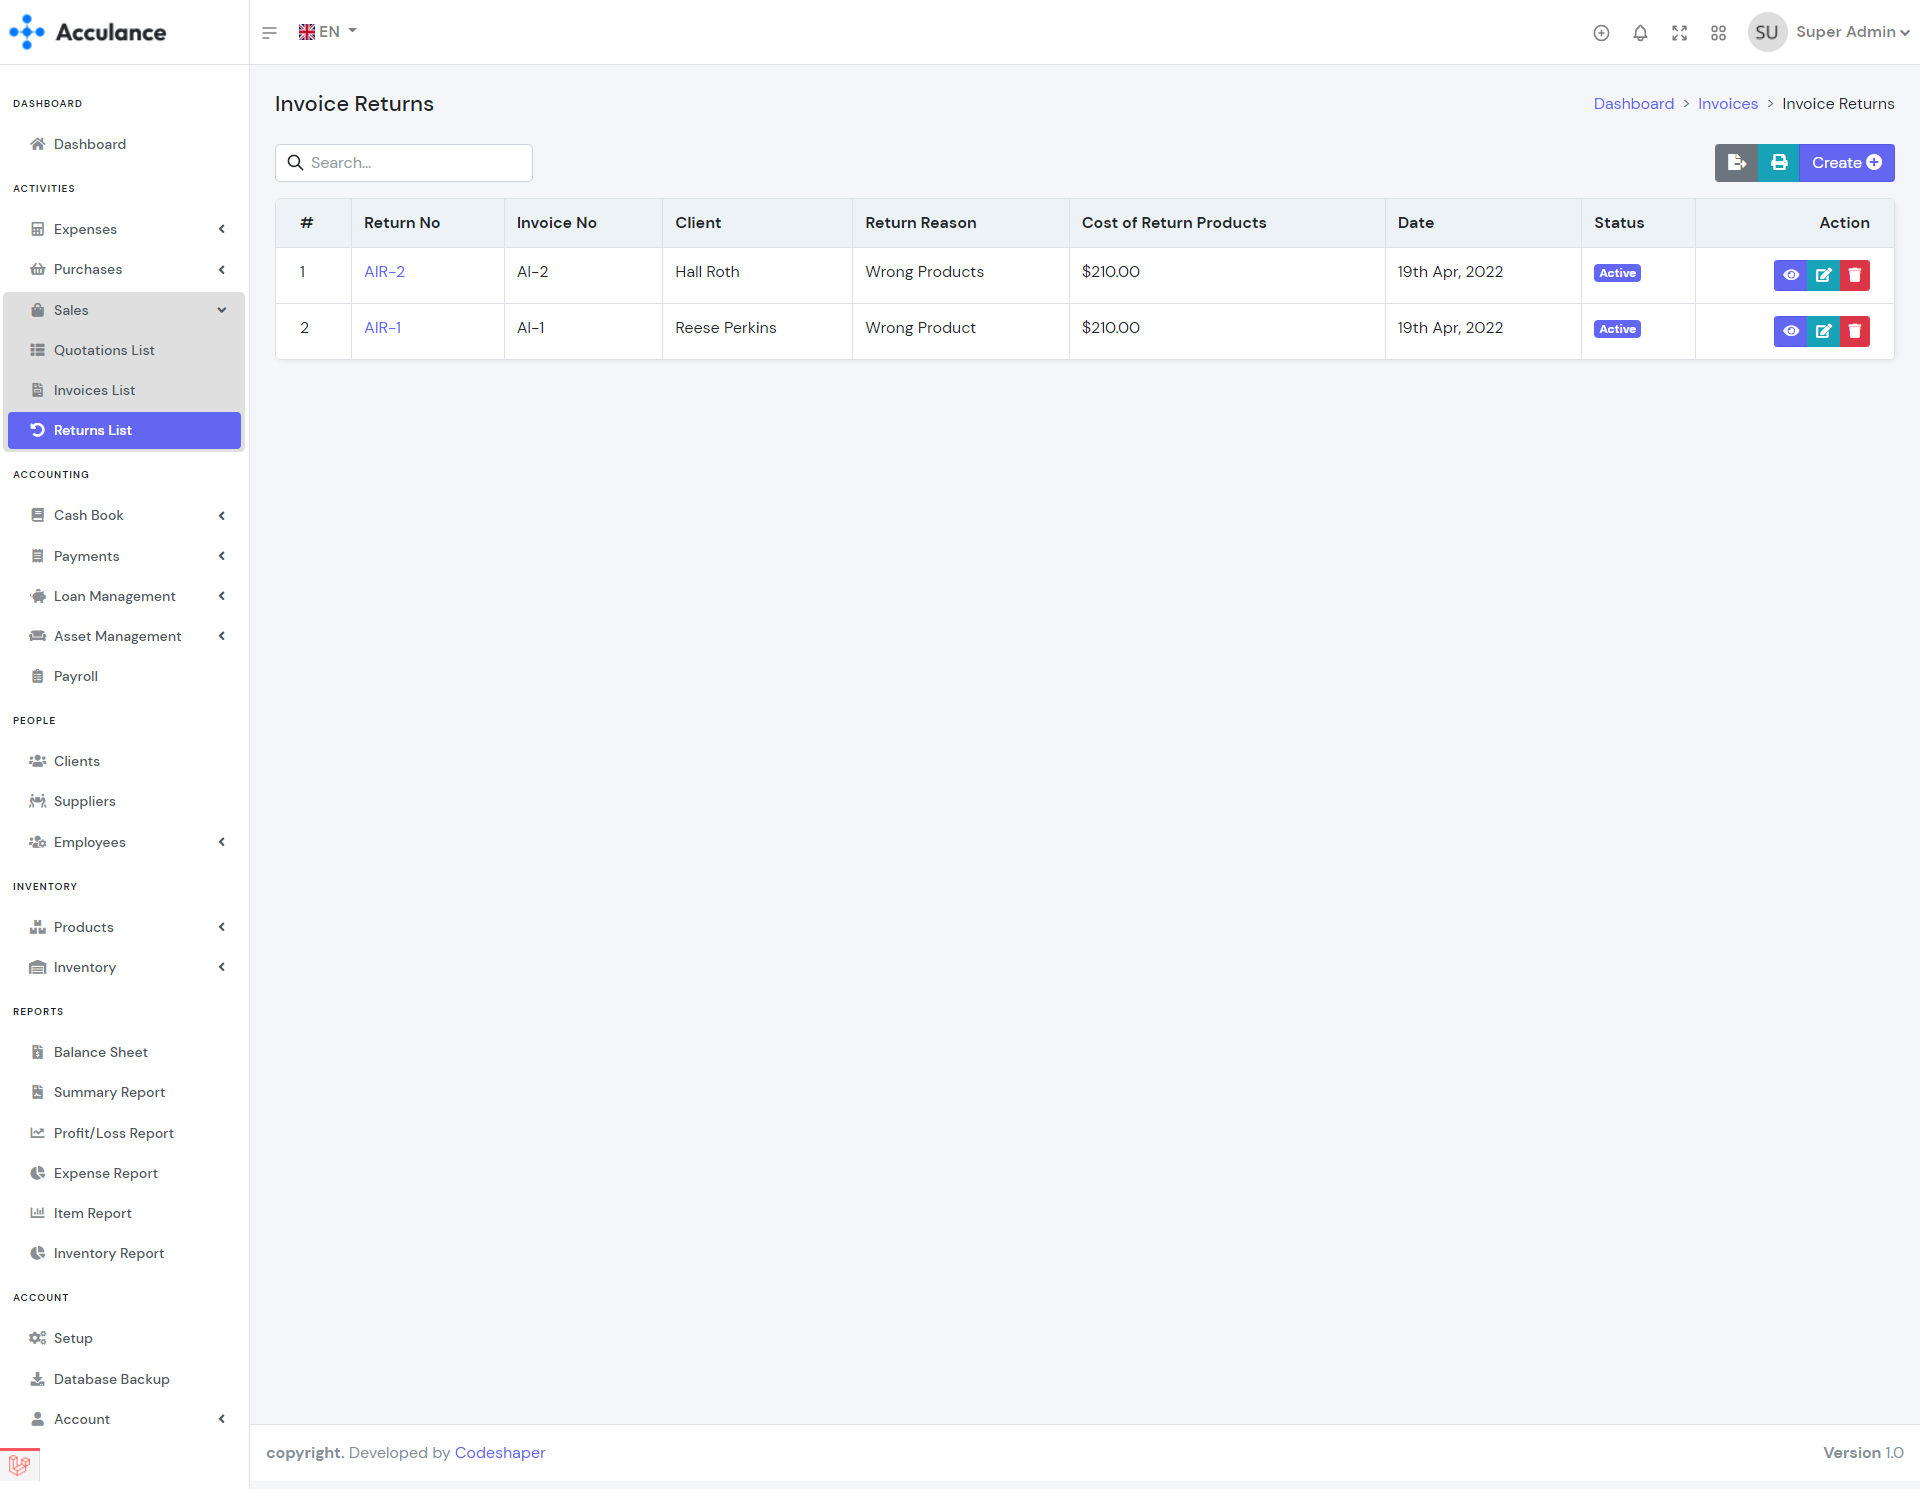
Invoice Return List
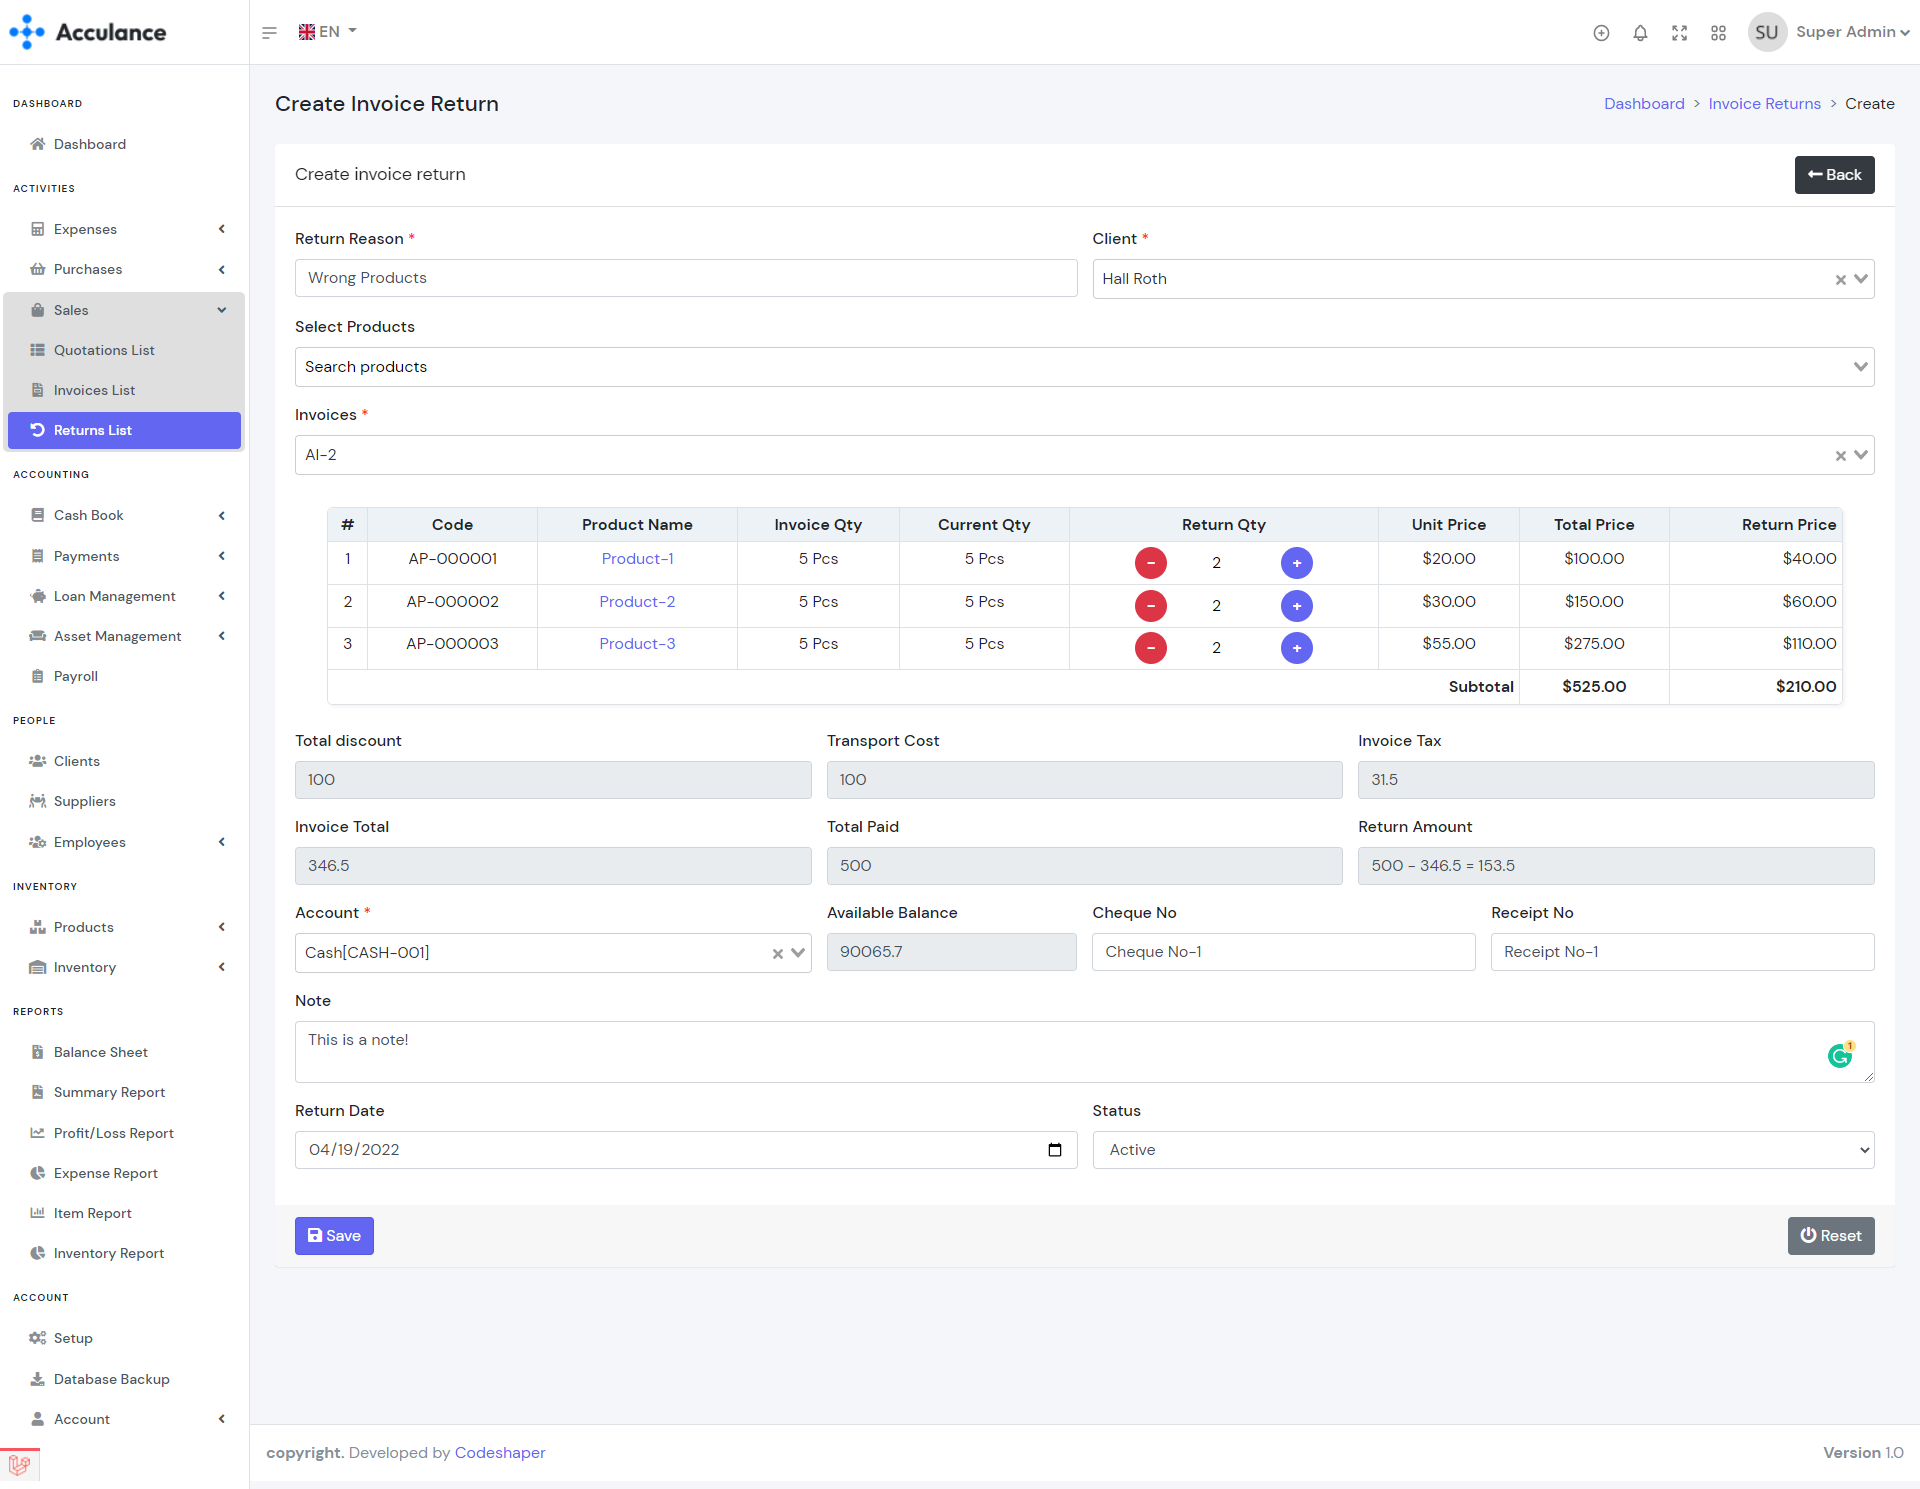
Create Invoice Return
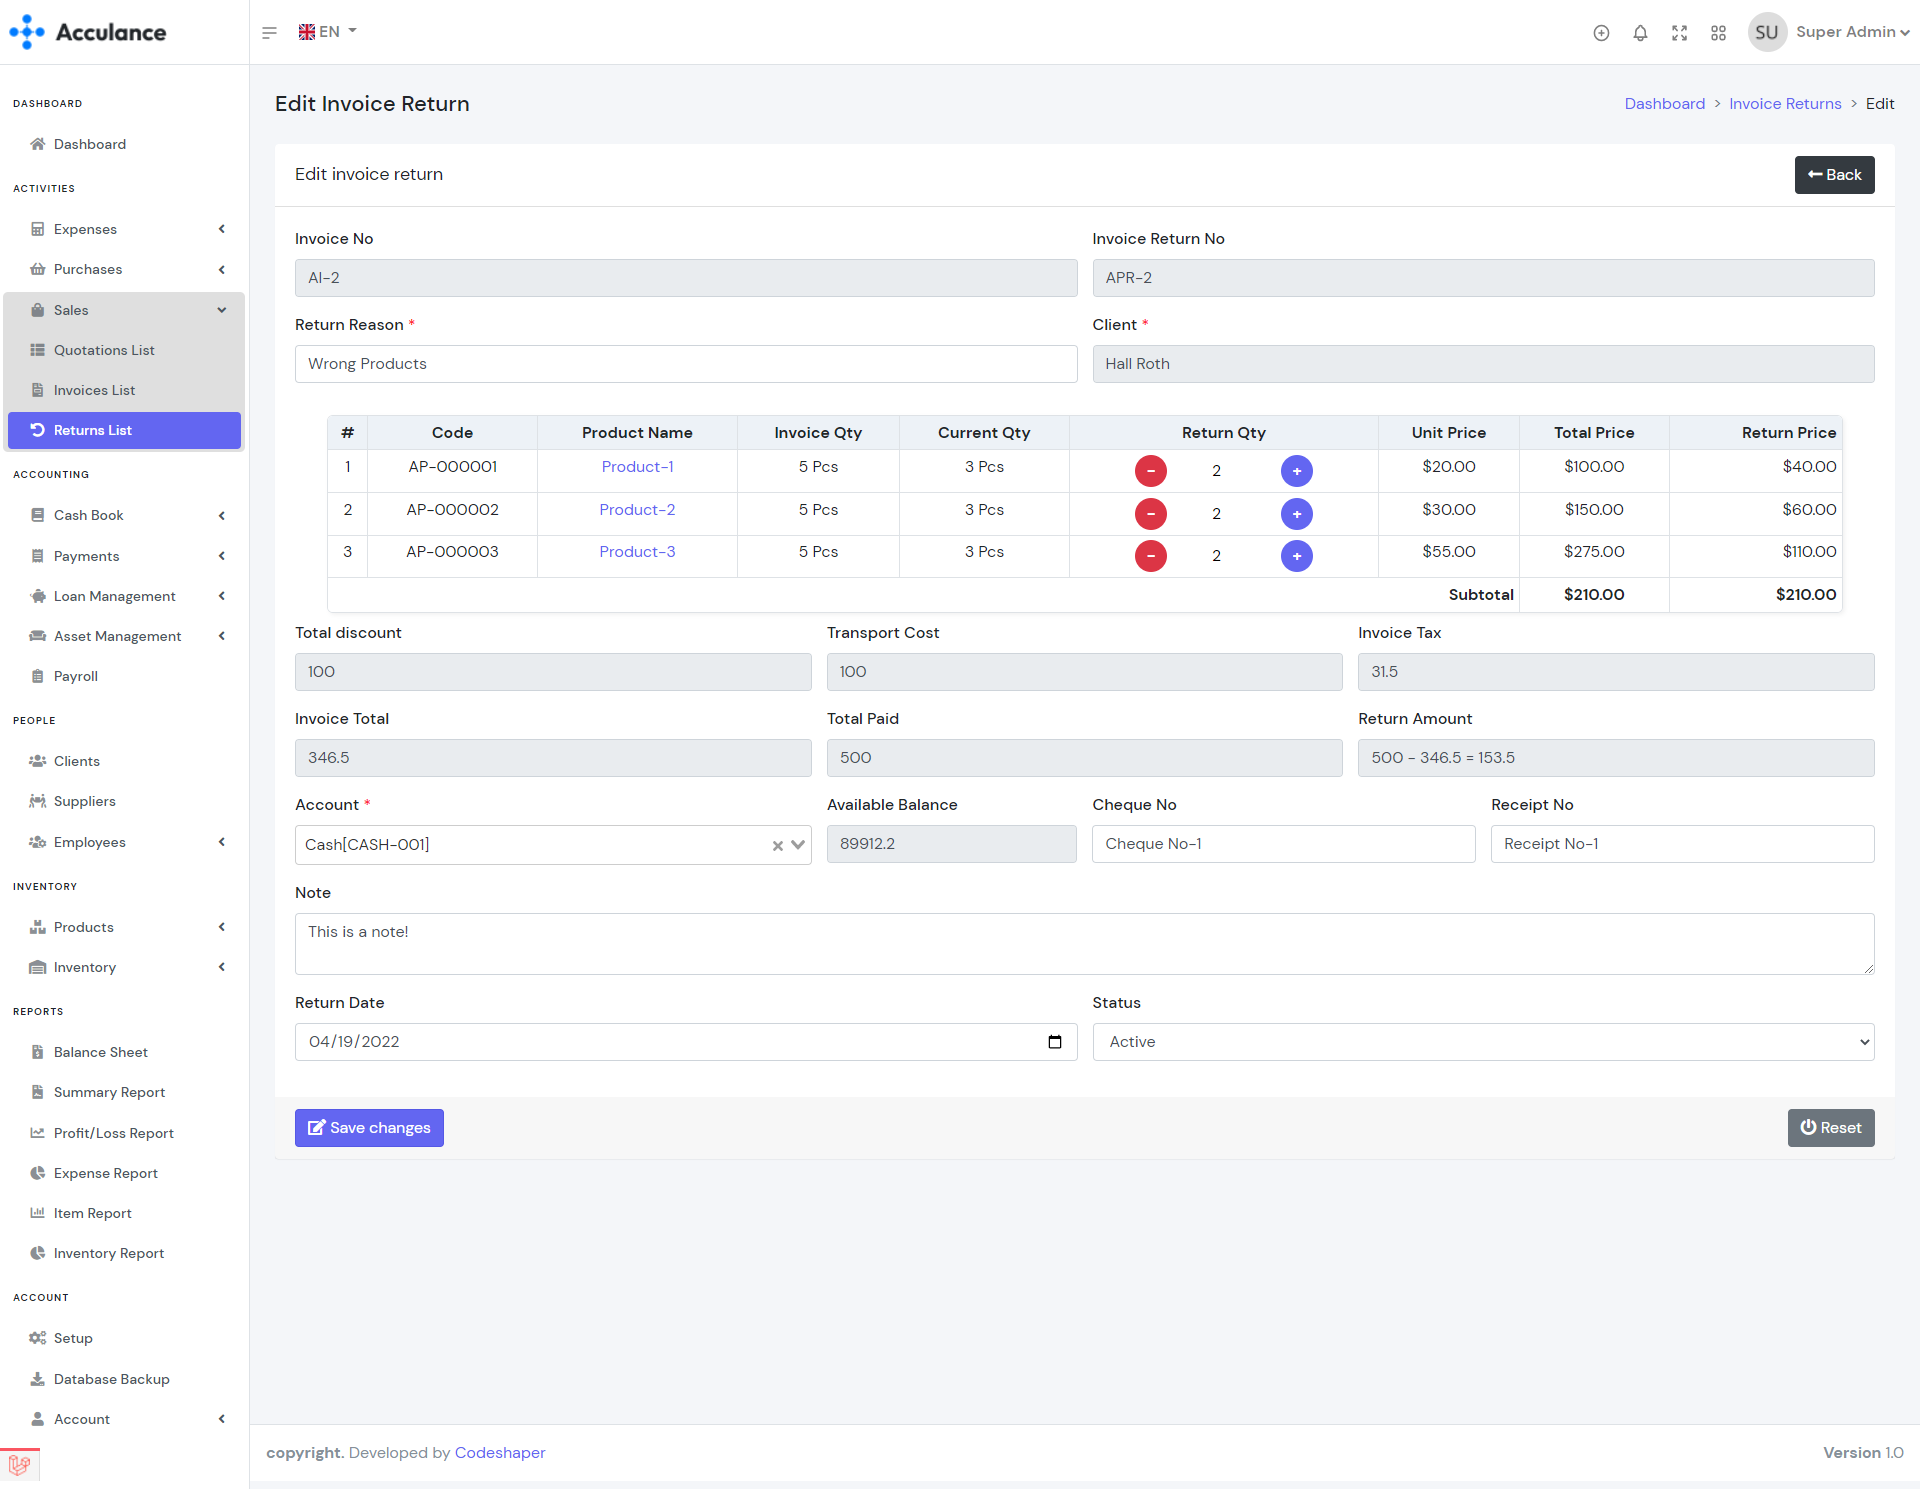
Edit Invoice Return
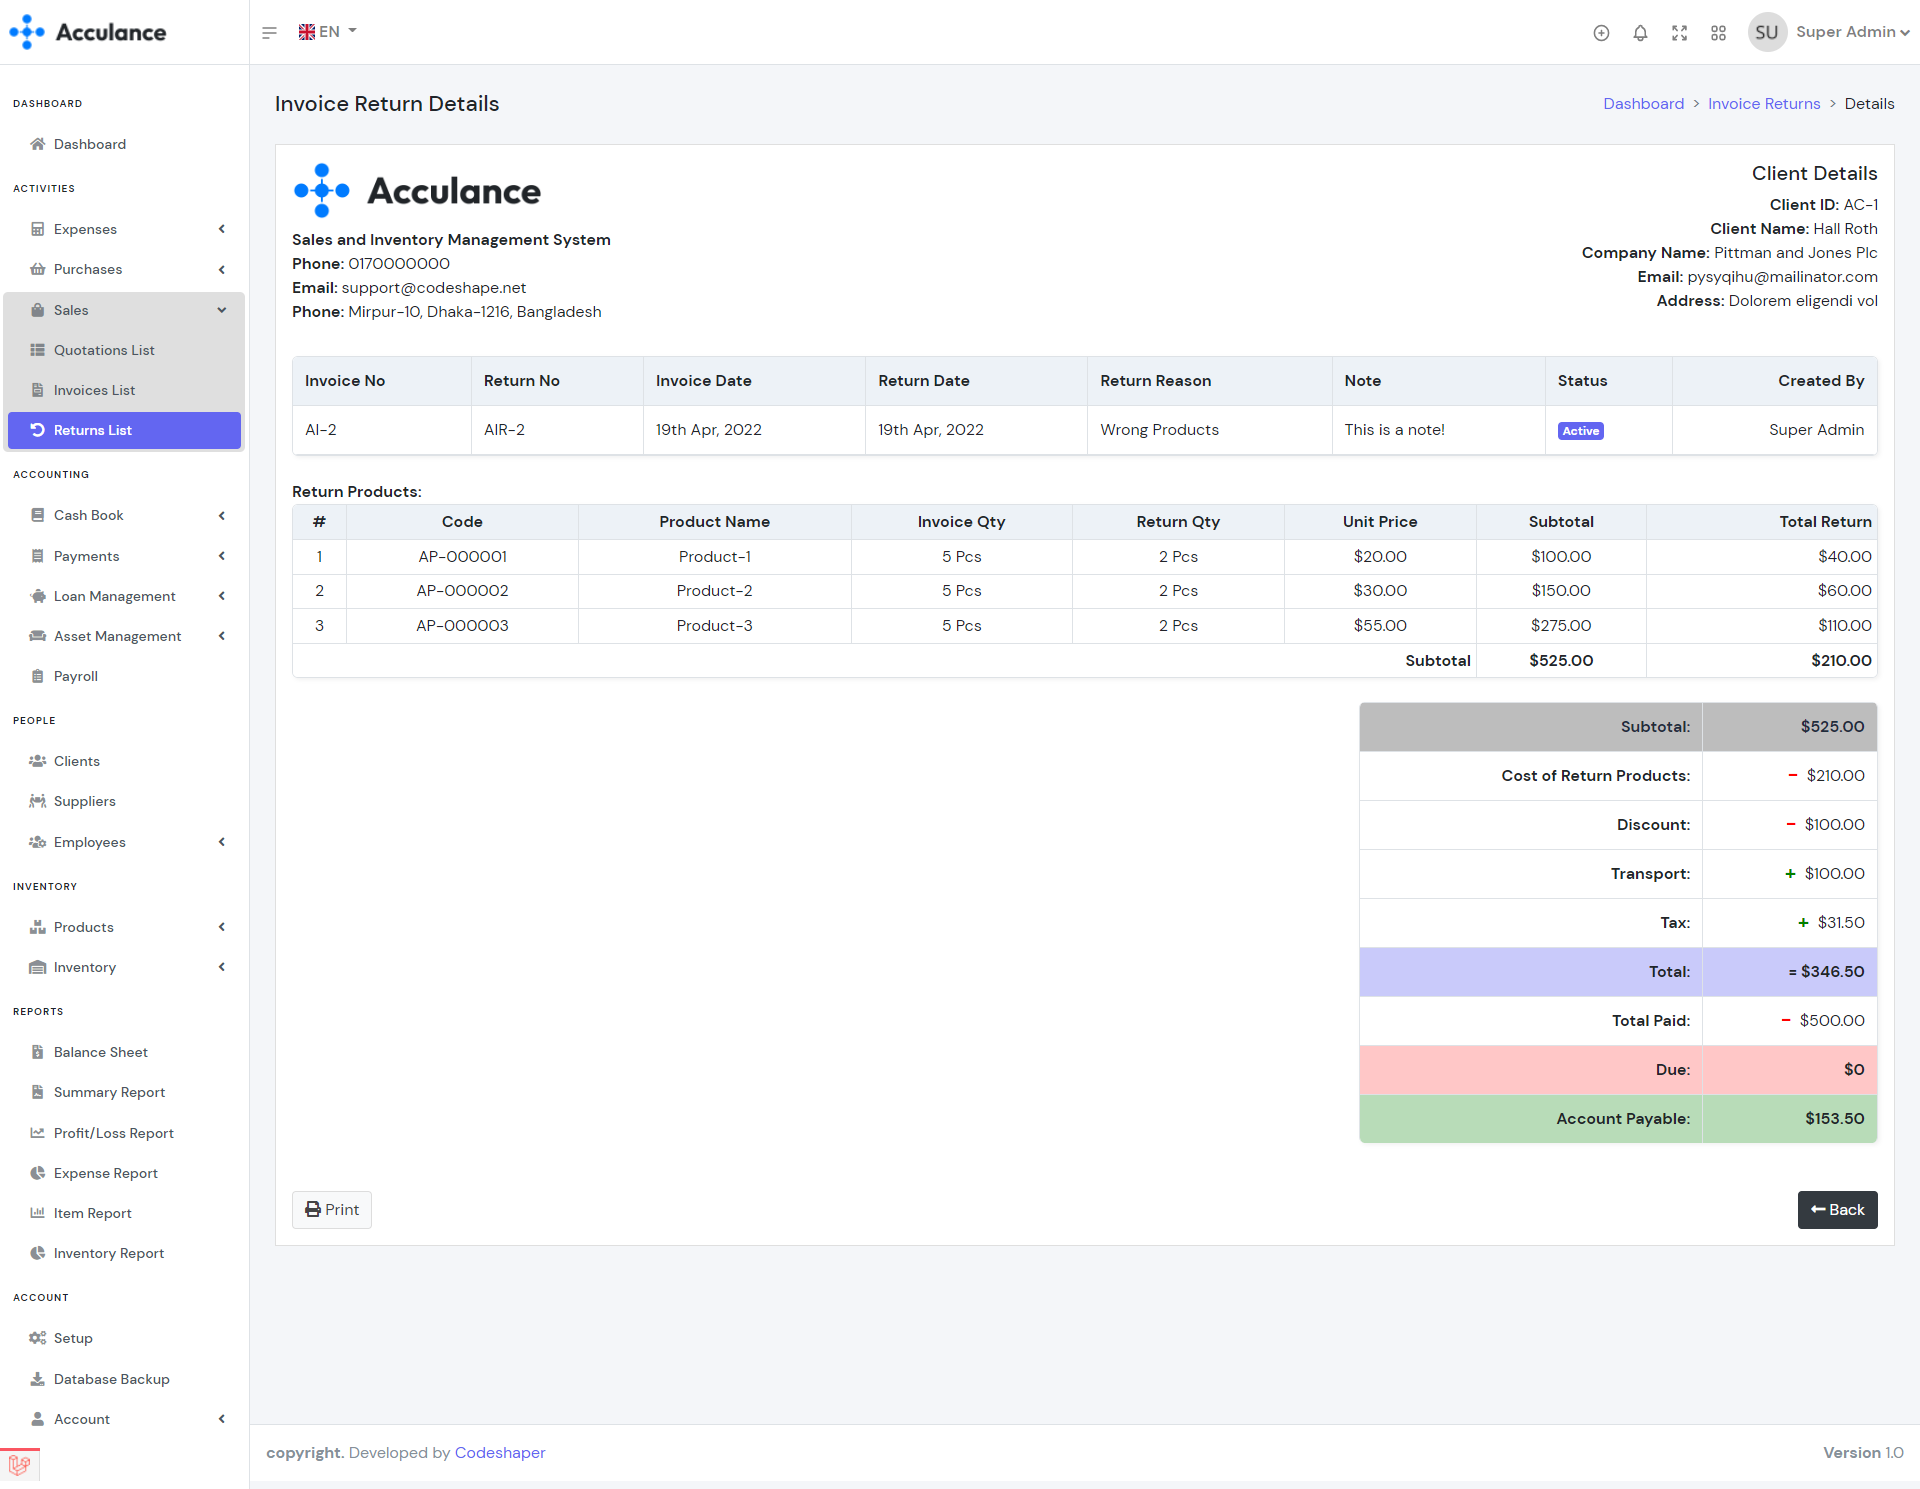
Invoice Return Details
Note: A invoice can have only one invoice return(One-to-one relationship between Invoices and Invoice Returns).
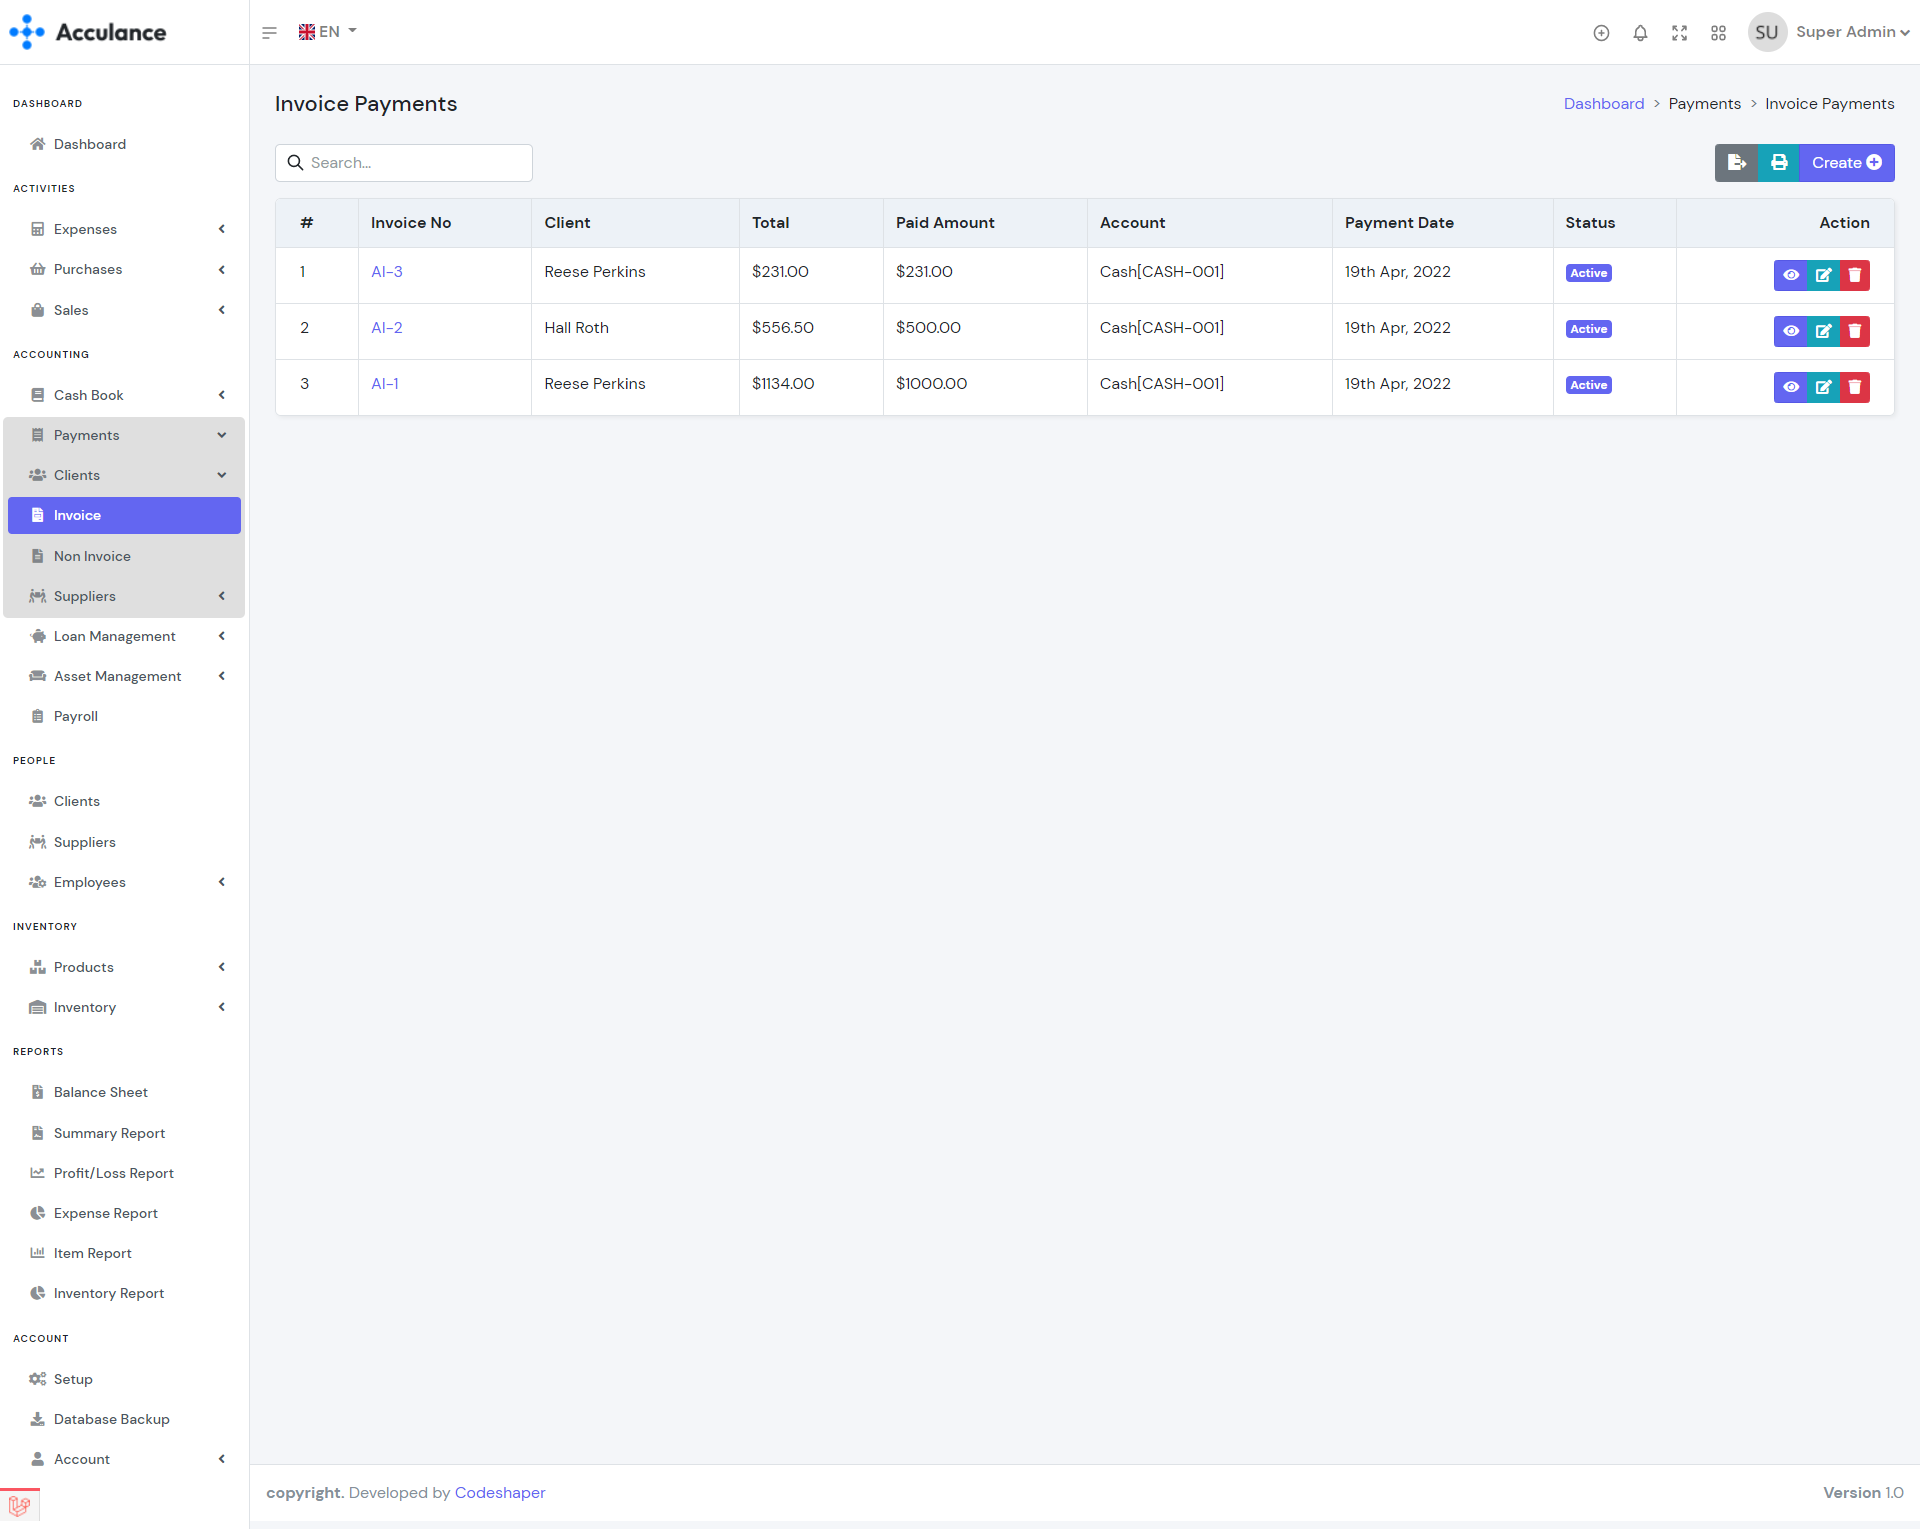
Invoice Payments
Invoice payments module allows you to manage invoice payments. Using this module you can create payments for invoices. While creating invoice payments you can select single or multiple invoices and add payments for the selected invoices. In order to create invoice payments, you must create invoices first.
| Required fields to create a invoice payment |
|---|
| Client => Client from whom you want to receive invoice payment. Select a client from the list. |
| Select Invoice =>Invoices for which you want to receive payments. After selecting a client you will see the due invoices of the selected client. Select at least one invoice from the list. |
| Account => The receiving account. The total amount will be added to the selected account. Select an account from the list. |
Create Invoice Payment

Invoice Payment Create
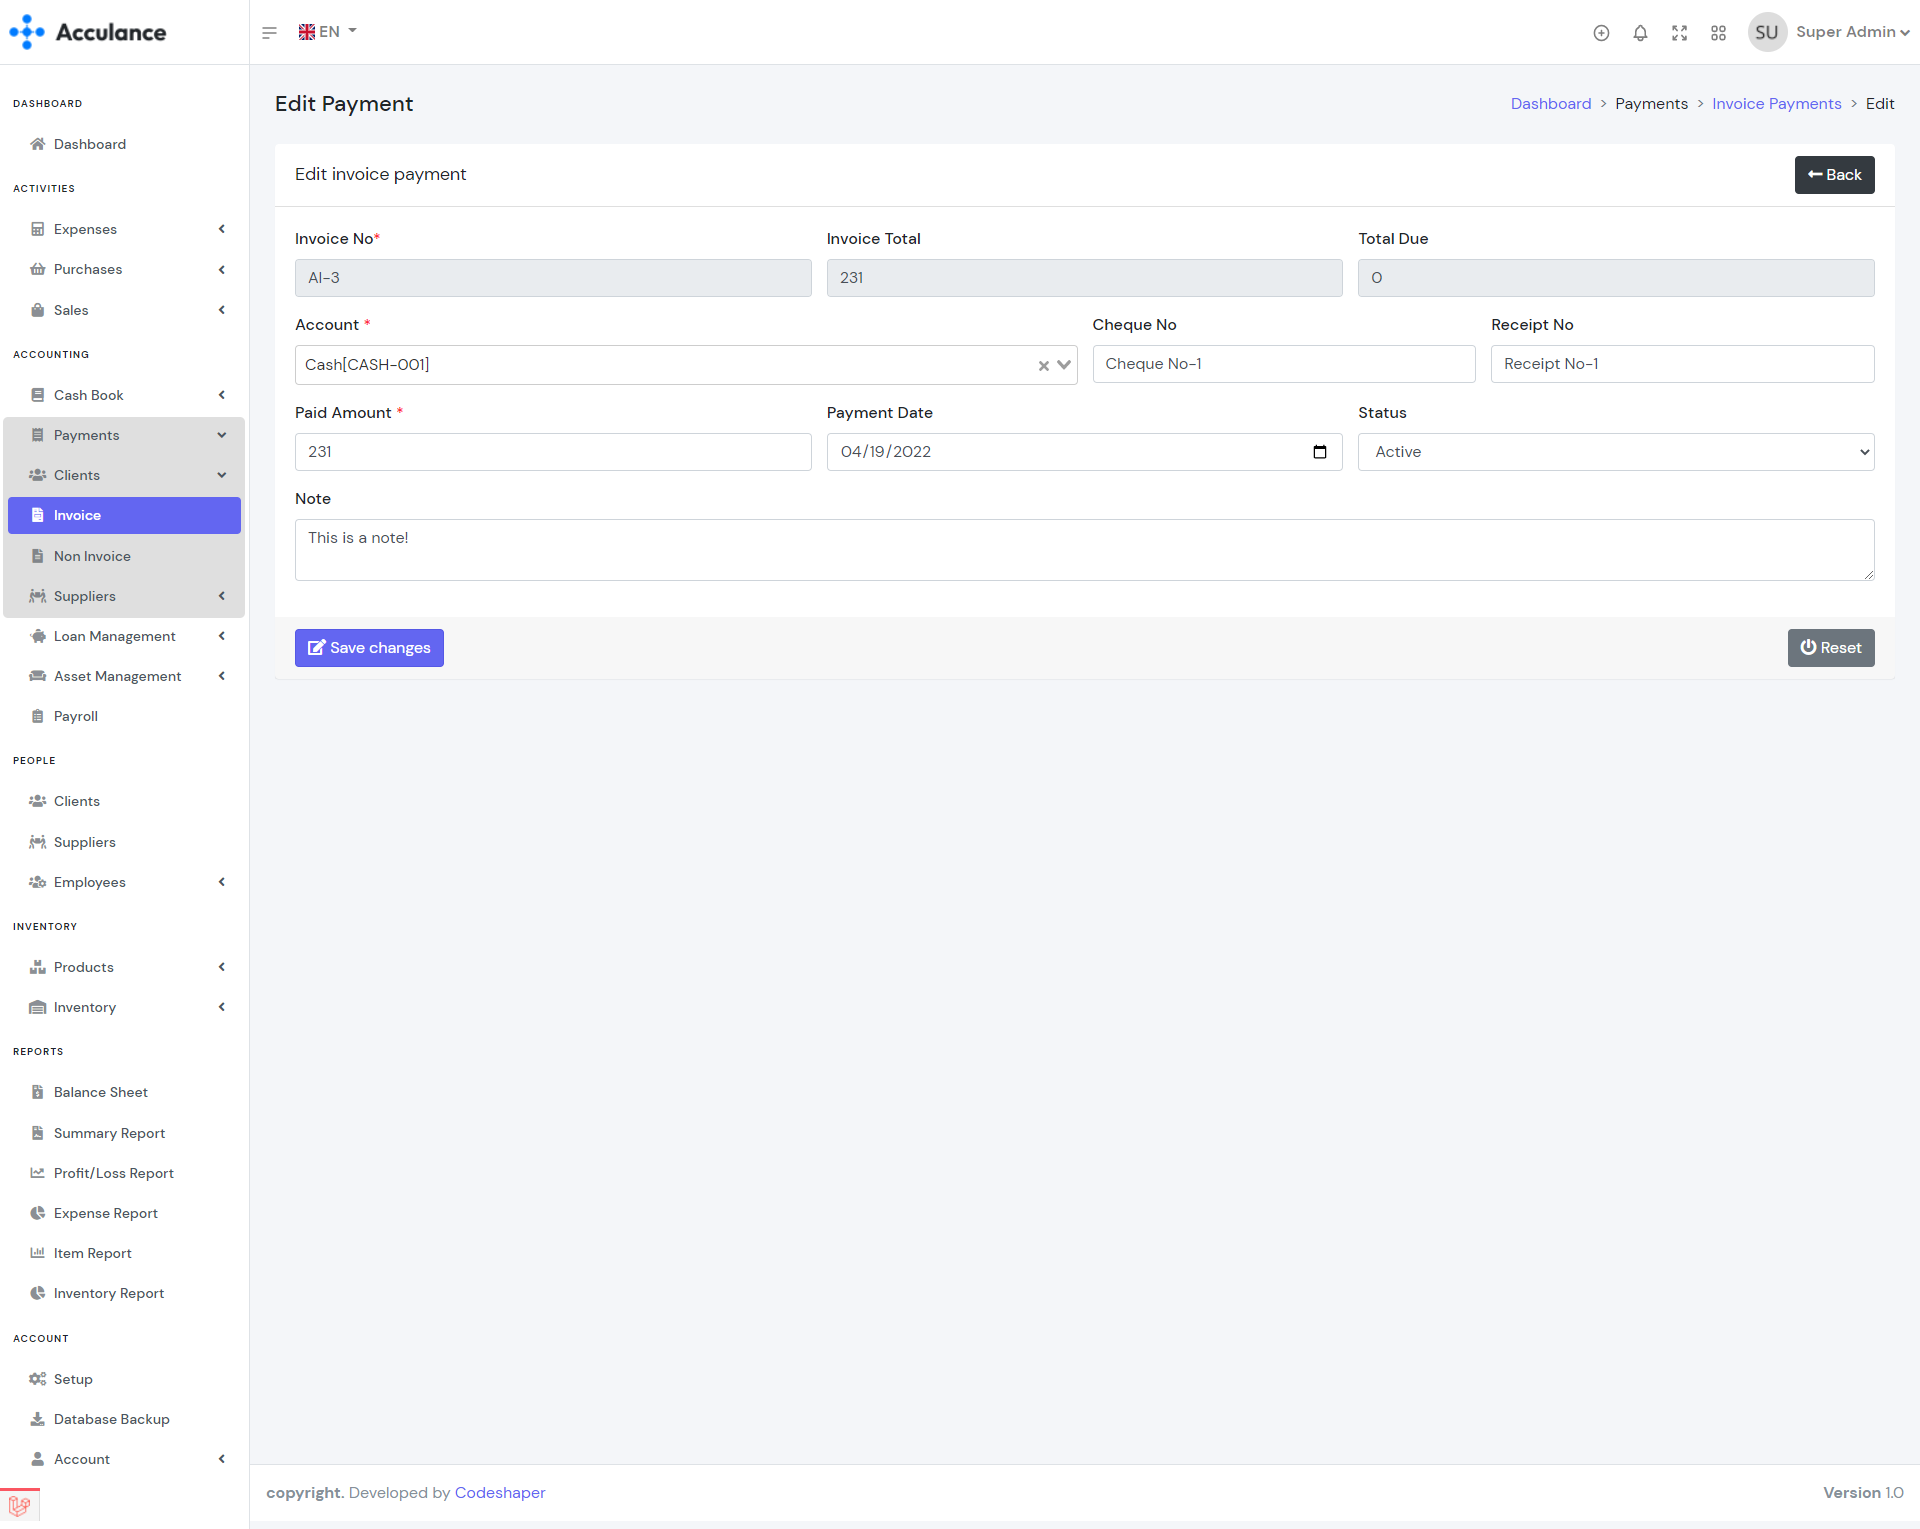
Edit Invoice Payment
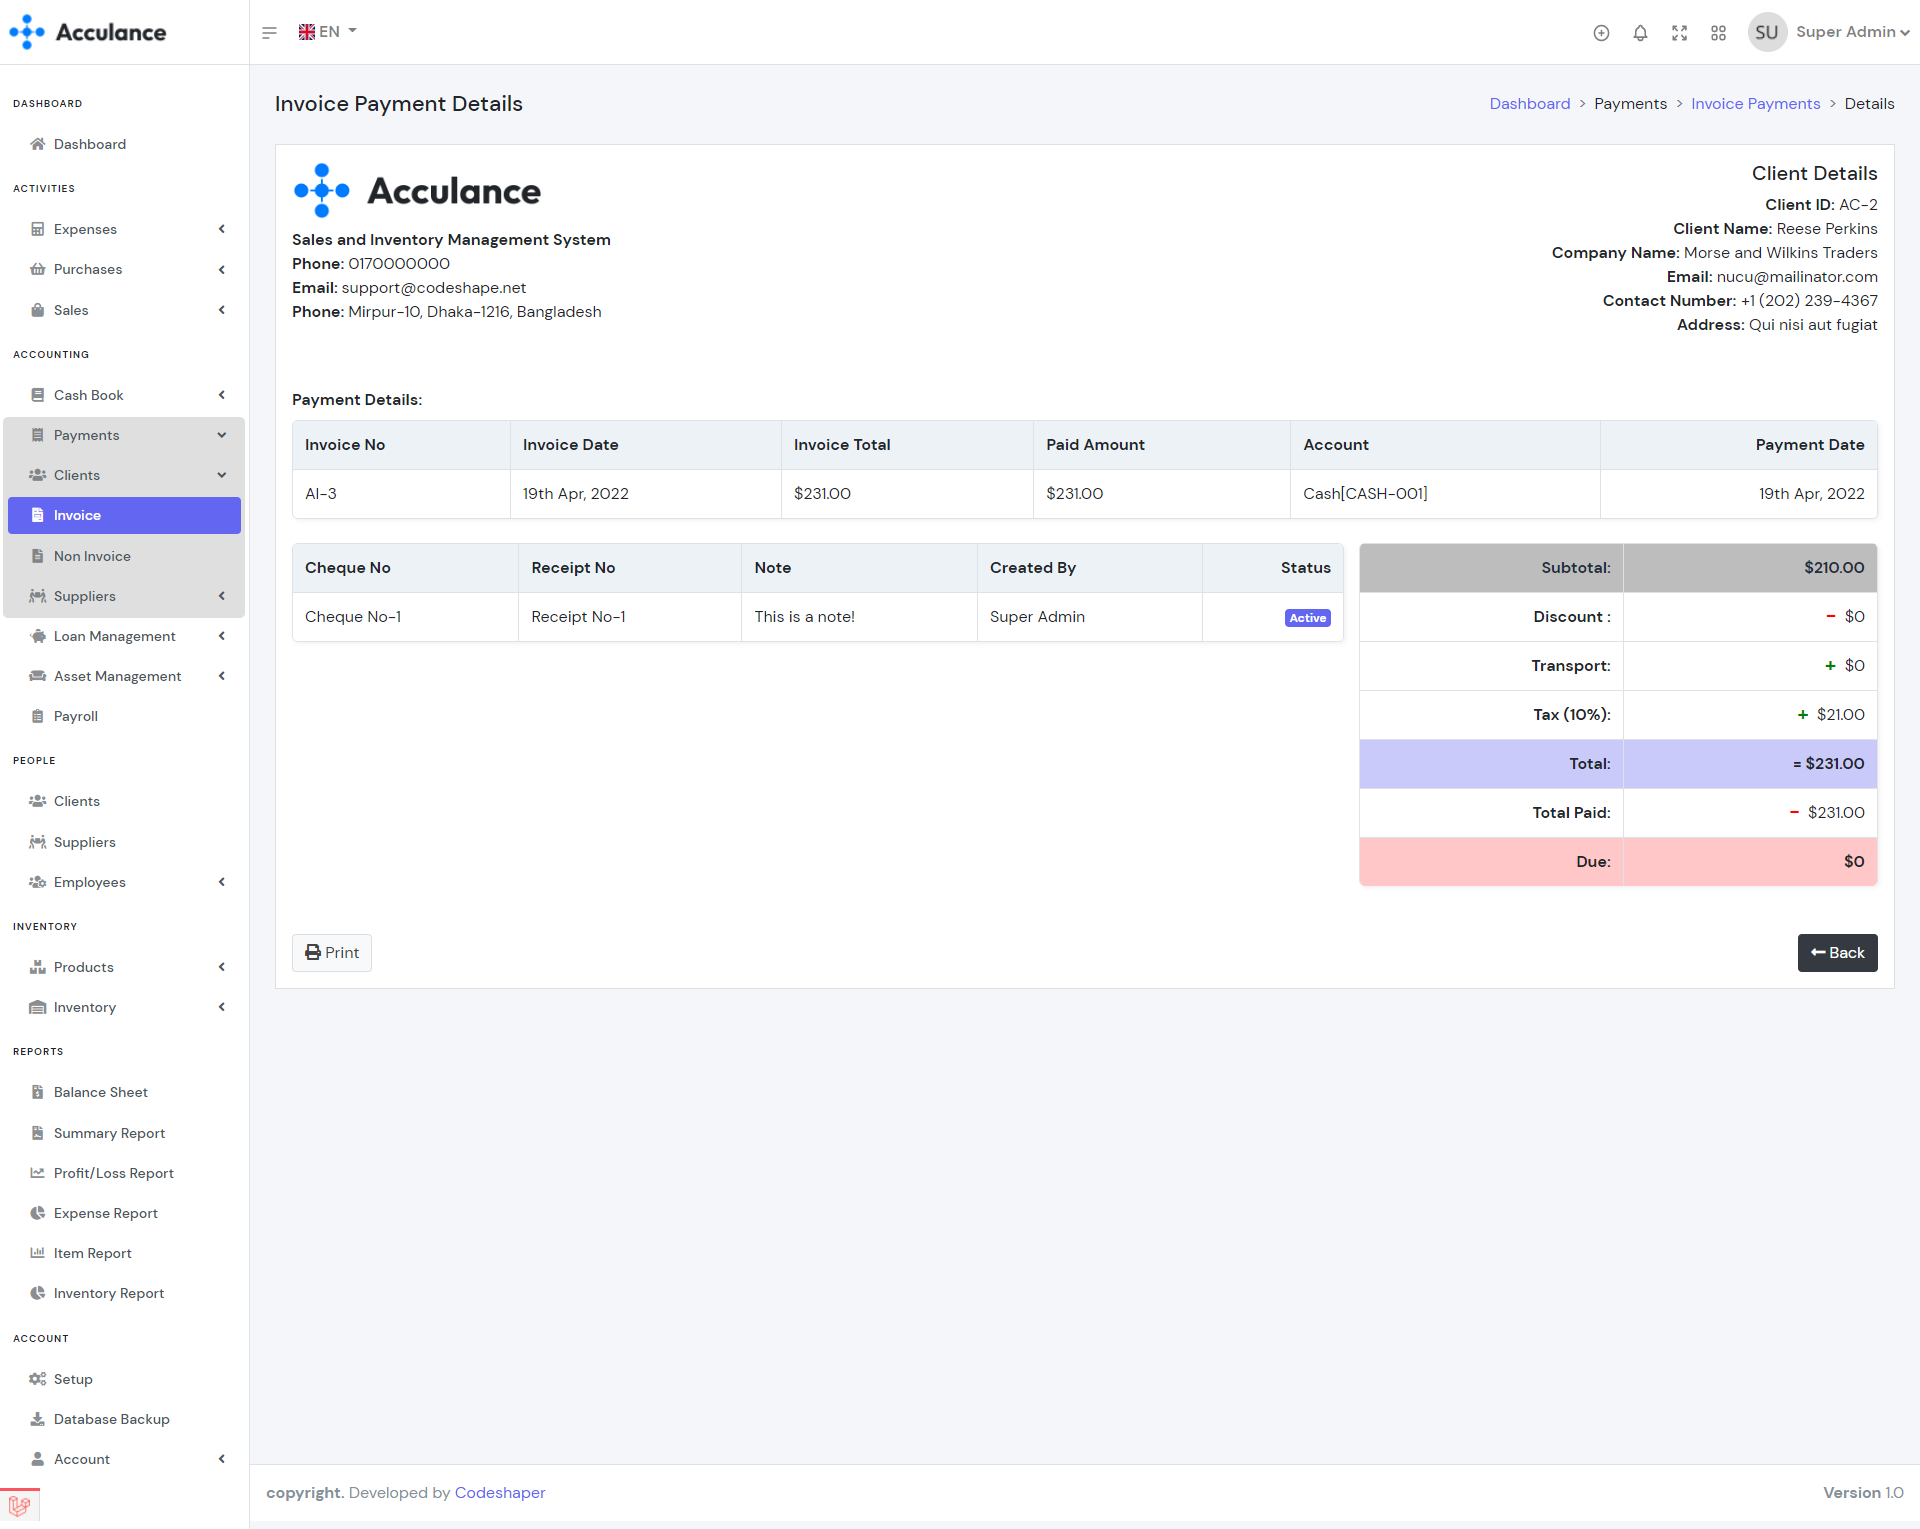
Invoice Payment Details
Note: If you delete any invoice payment then the invoice due will be adjusted automatically. Deleting any invoice payment will deduct the amount from the account balance. So we recommend you to use the delete option very carefully.
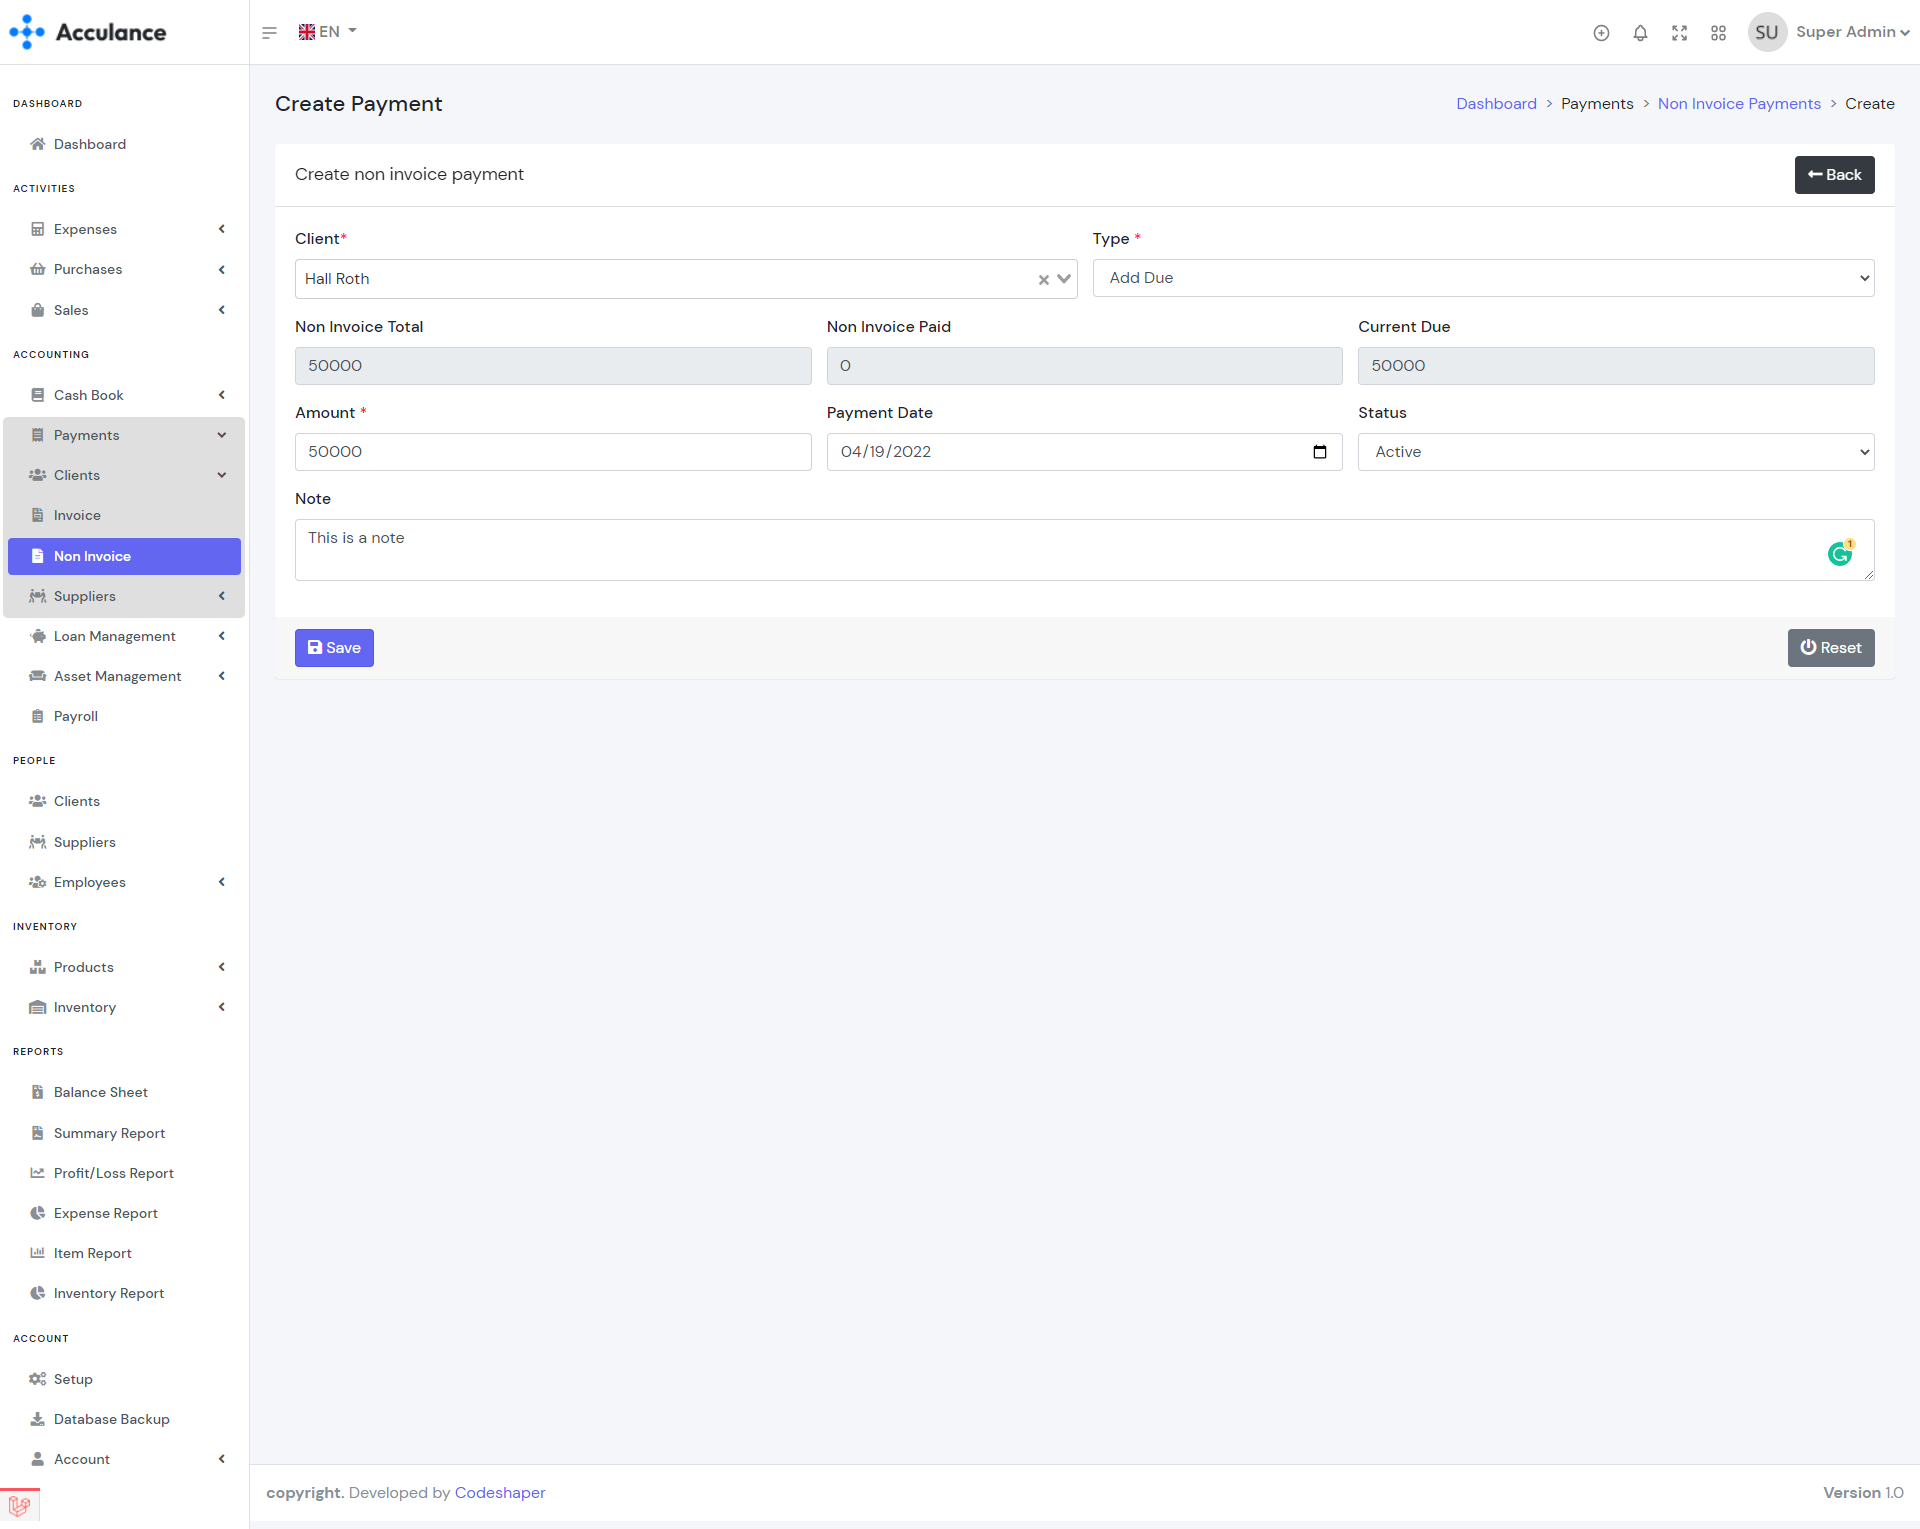
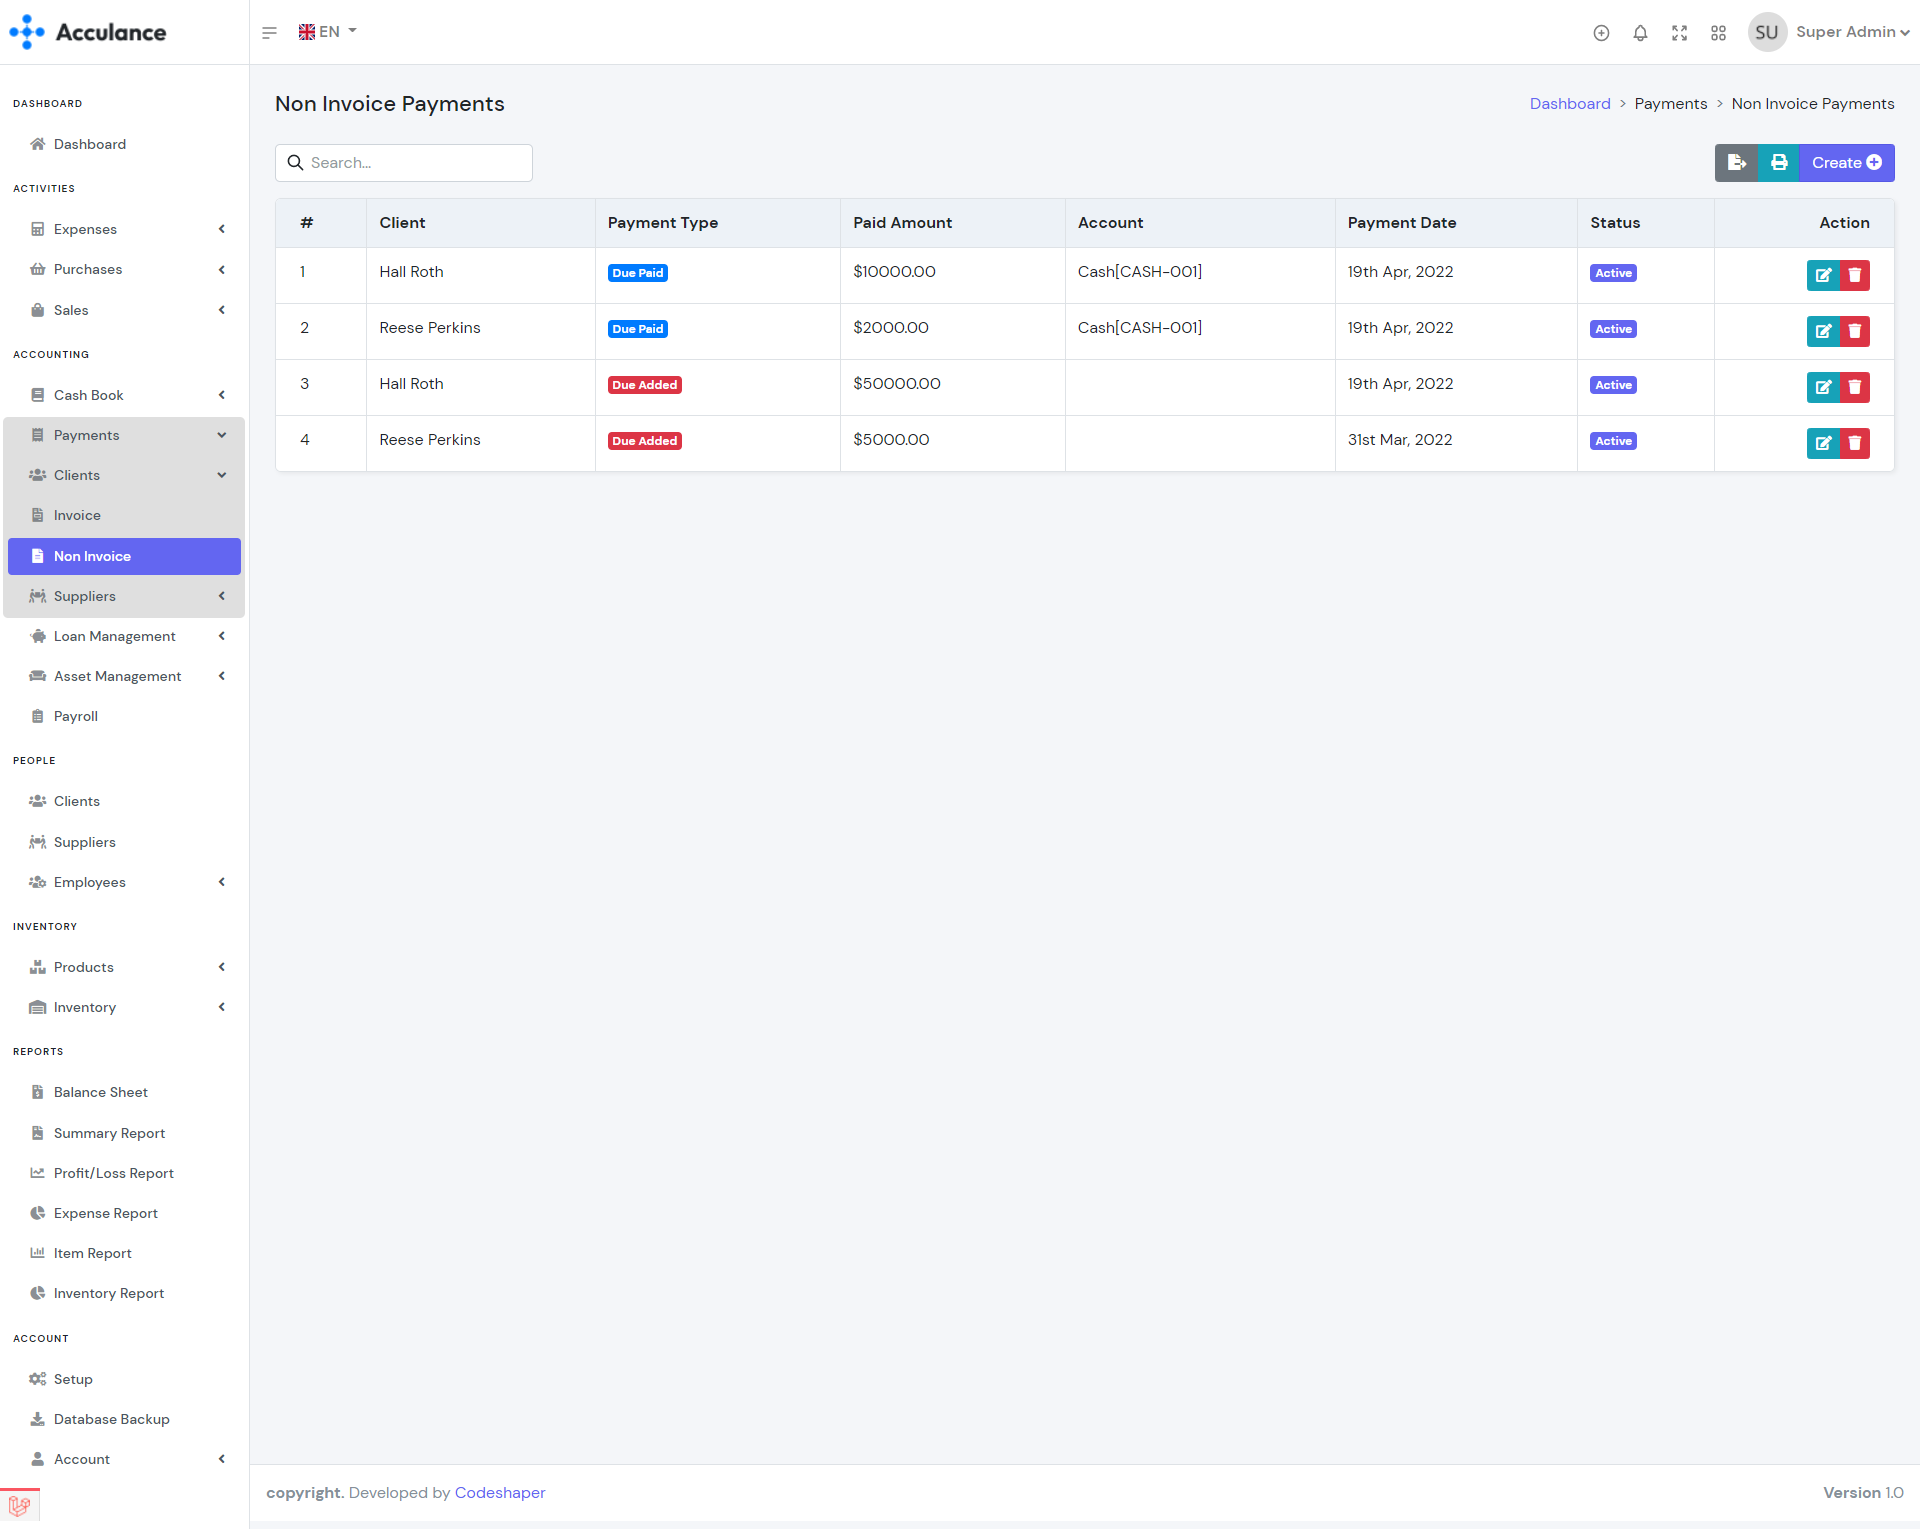
Non Invoice Payments
Non Invoice payments module helps you manage non-invoice dues and payments for your clients. Using this module you can bring your client dues and payments from your previous software to Acculance. You must create a non-invoice due first in order to create non-invoice payments.
| Required fields to create a non-invoice payment |
|---|
| Client => Client from whom you want to add due or receive invoice payment. Select a client from the list. |
| Type => If you want to add non-invoice due then select due otherwise select add payment to receive payment. |
| Amount => Due amount or the receiving amount. |
| Account(If you select add payment) => The receiving account. The amount will be added to the selected account. Select an account from the list. |
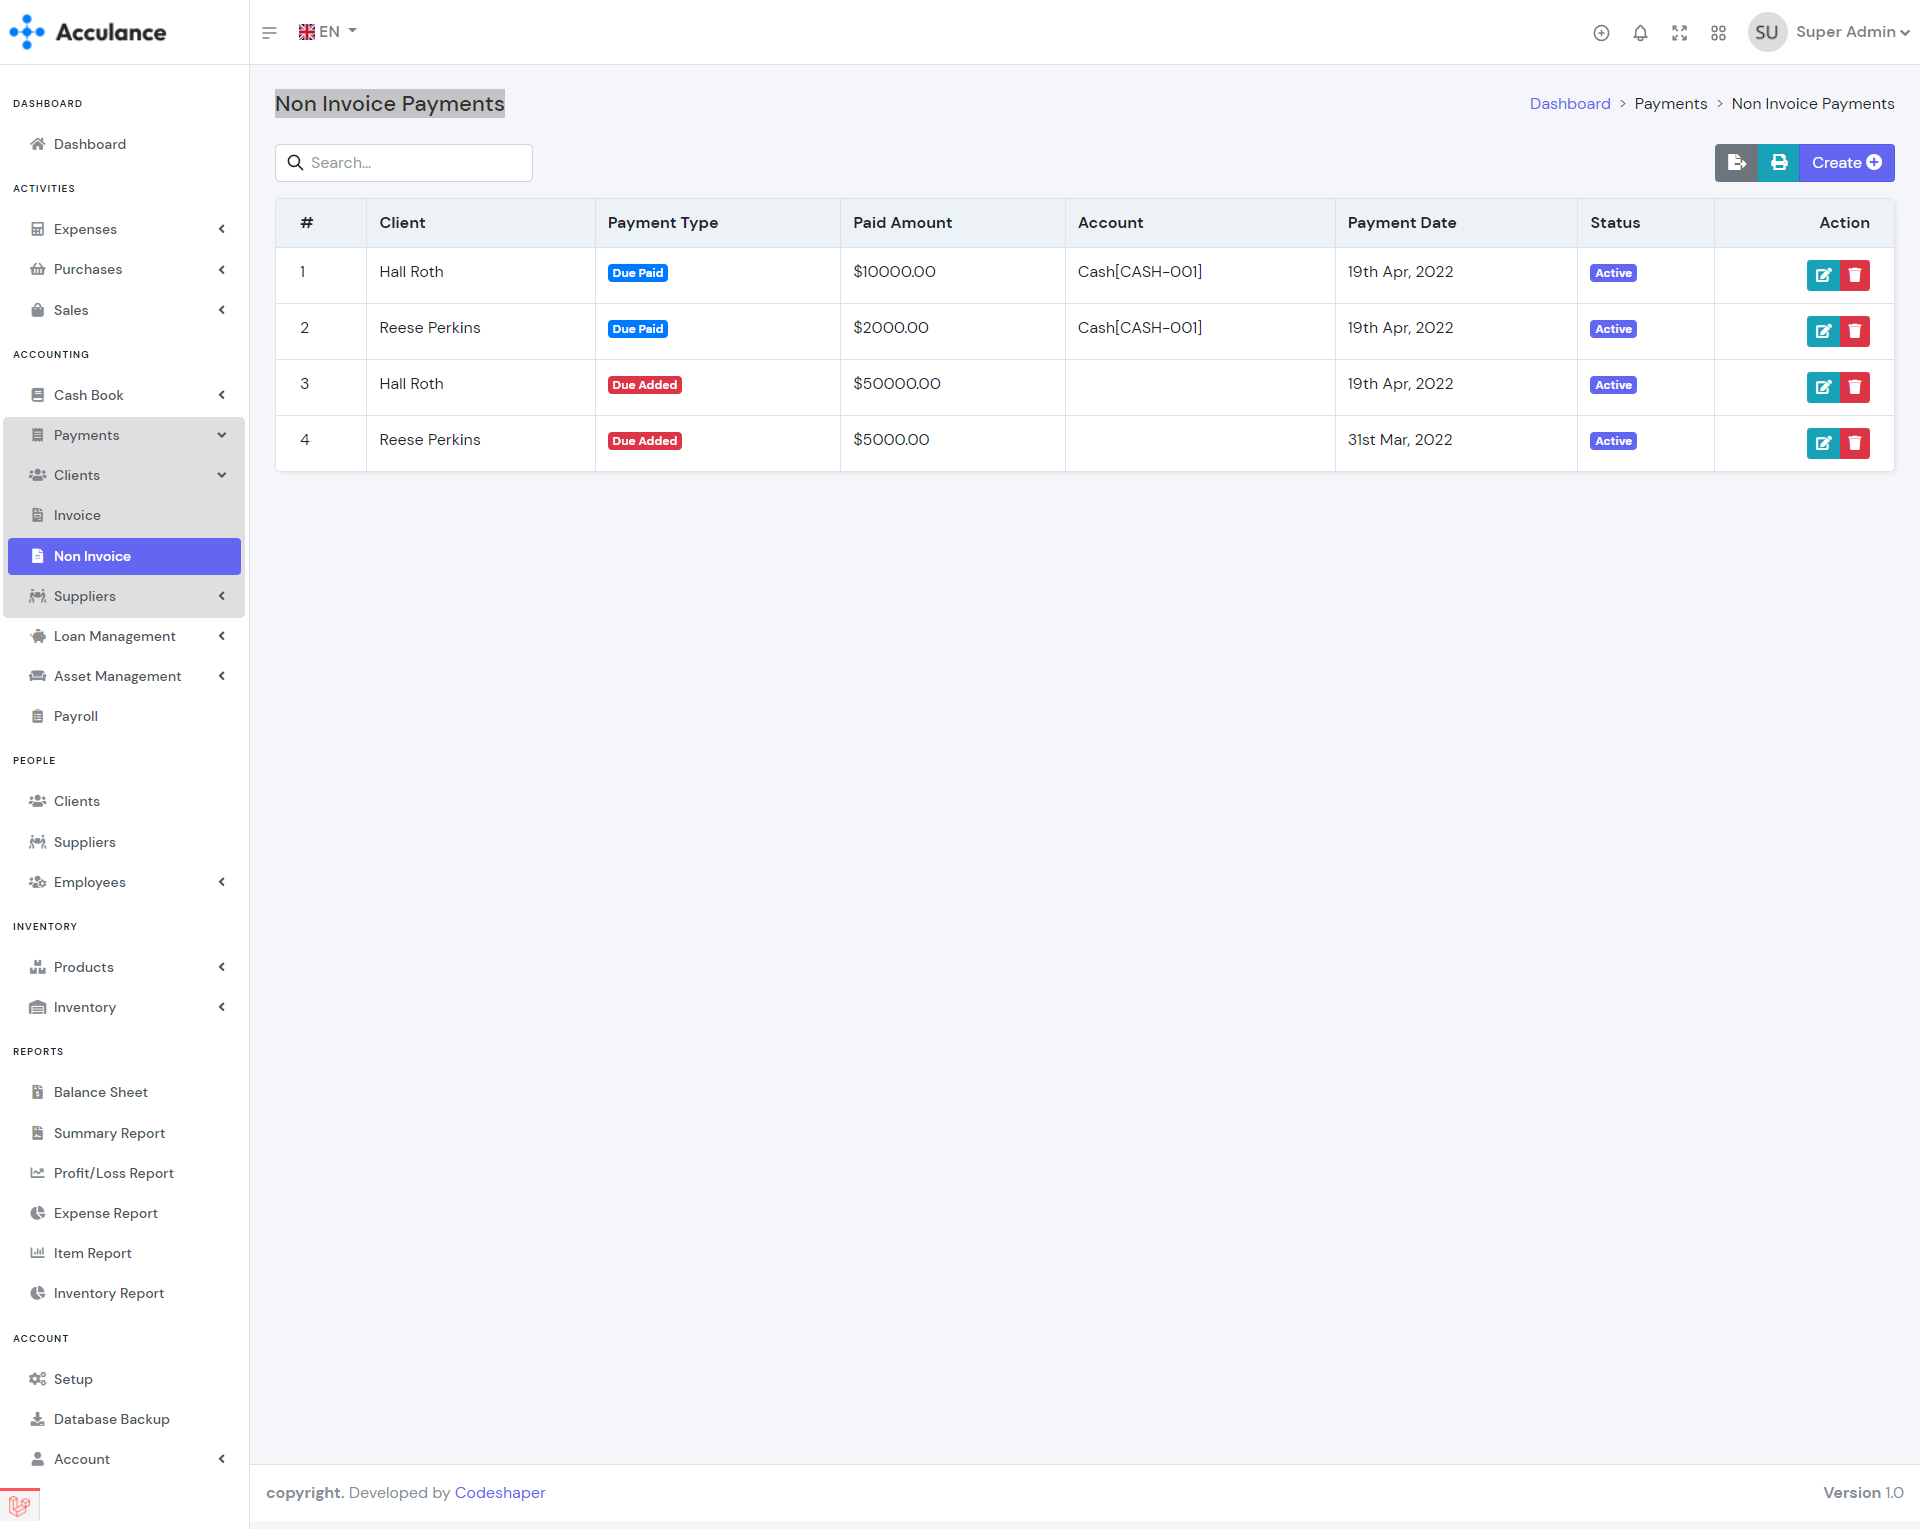
Non Invoice Payments List
Create Non Invoice Payment
Edit Non Invoice Payment
Note: In order to delete any non-invoice client due, you need to delete the non-invoice payments first. Deleting any non-invoice payment will deduct the amount from the account balance. So we recommend you to use the delete option very carefully.
Purchase Payments
Purchase payments module allows you to manage purchase payments. Using this module you can create payments for purchases. While creating purchase payments you can select single or multiple purchases and sent payments for the selected purchases. In order to create purchase payments, you must create purchases first.
| Required fields to create a purchase payment |
|---|
| Supplier => Supplier to whom you want to sent purchase payment. Select a supplier from the list. |
| Select Purchase =>Purchases for which you want to sent payments. After selecting a supplier you will see the due purchases of the selected supplier. Select at least one purchase from the list. |
| Account => The paying account. The total amount will be sent from the selected account. Select an account from the list. The available balance must be greater than the Total Payment. |
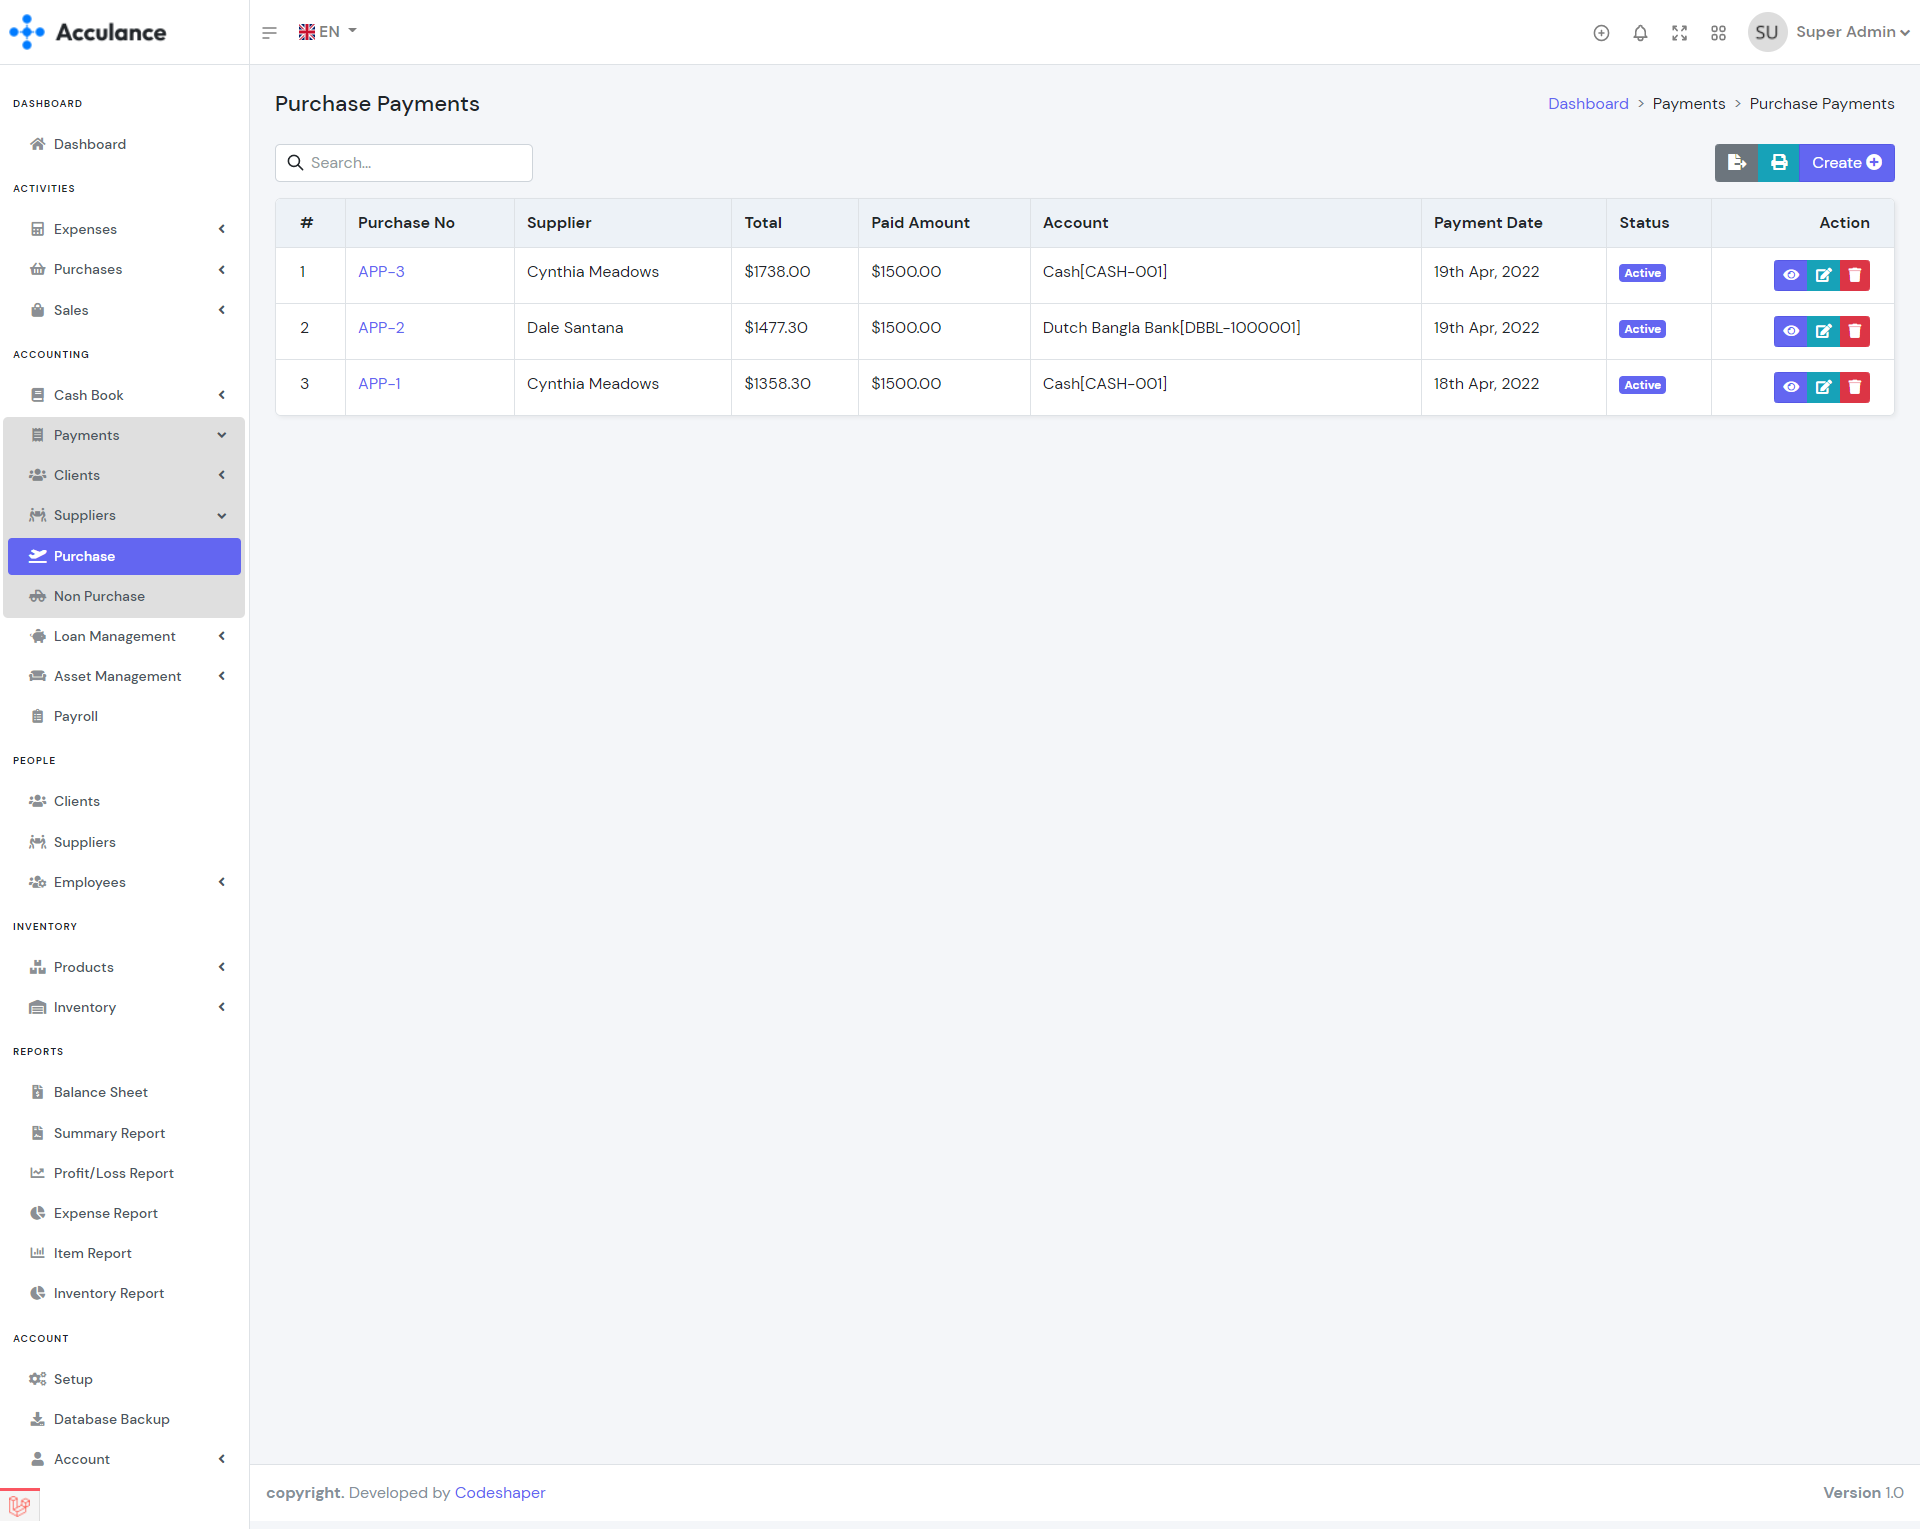
Purchase Payments List
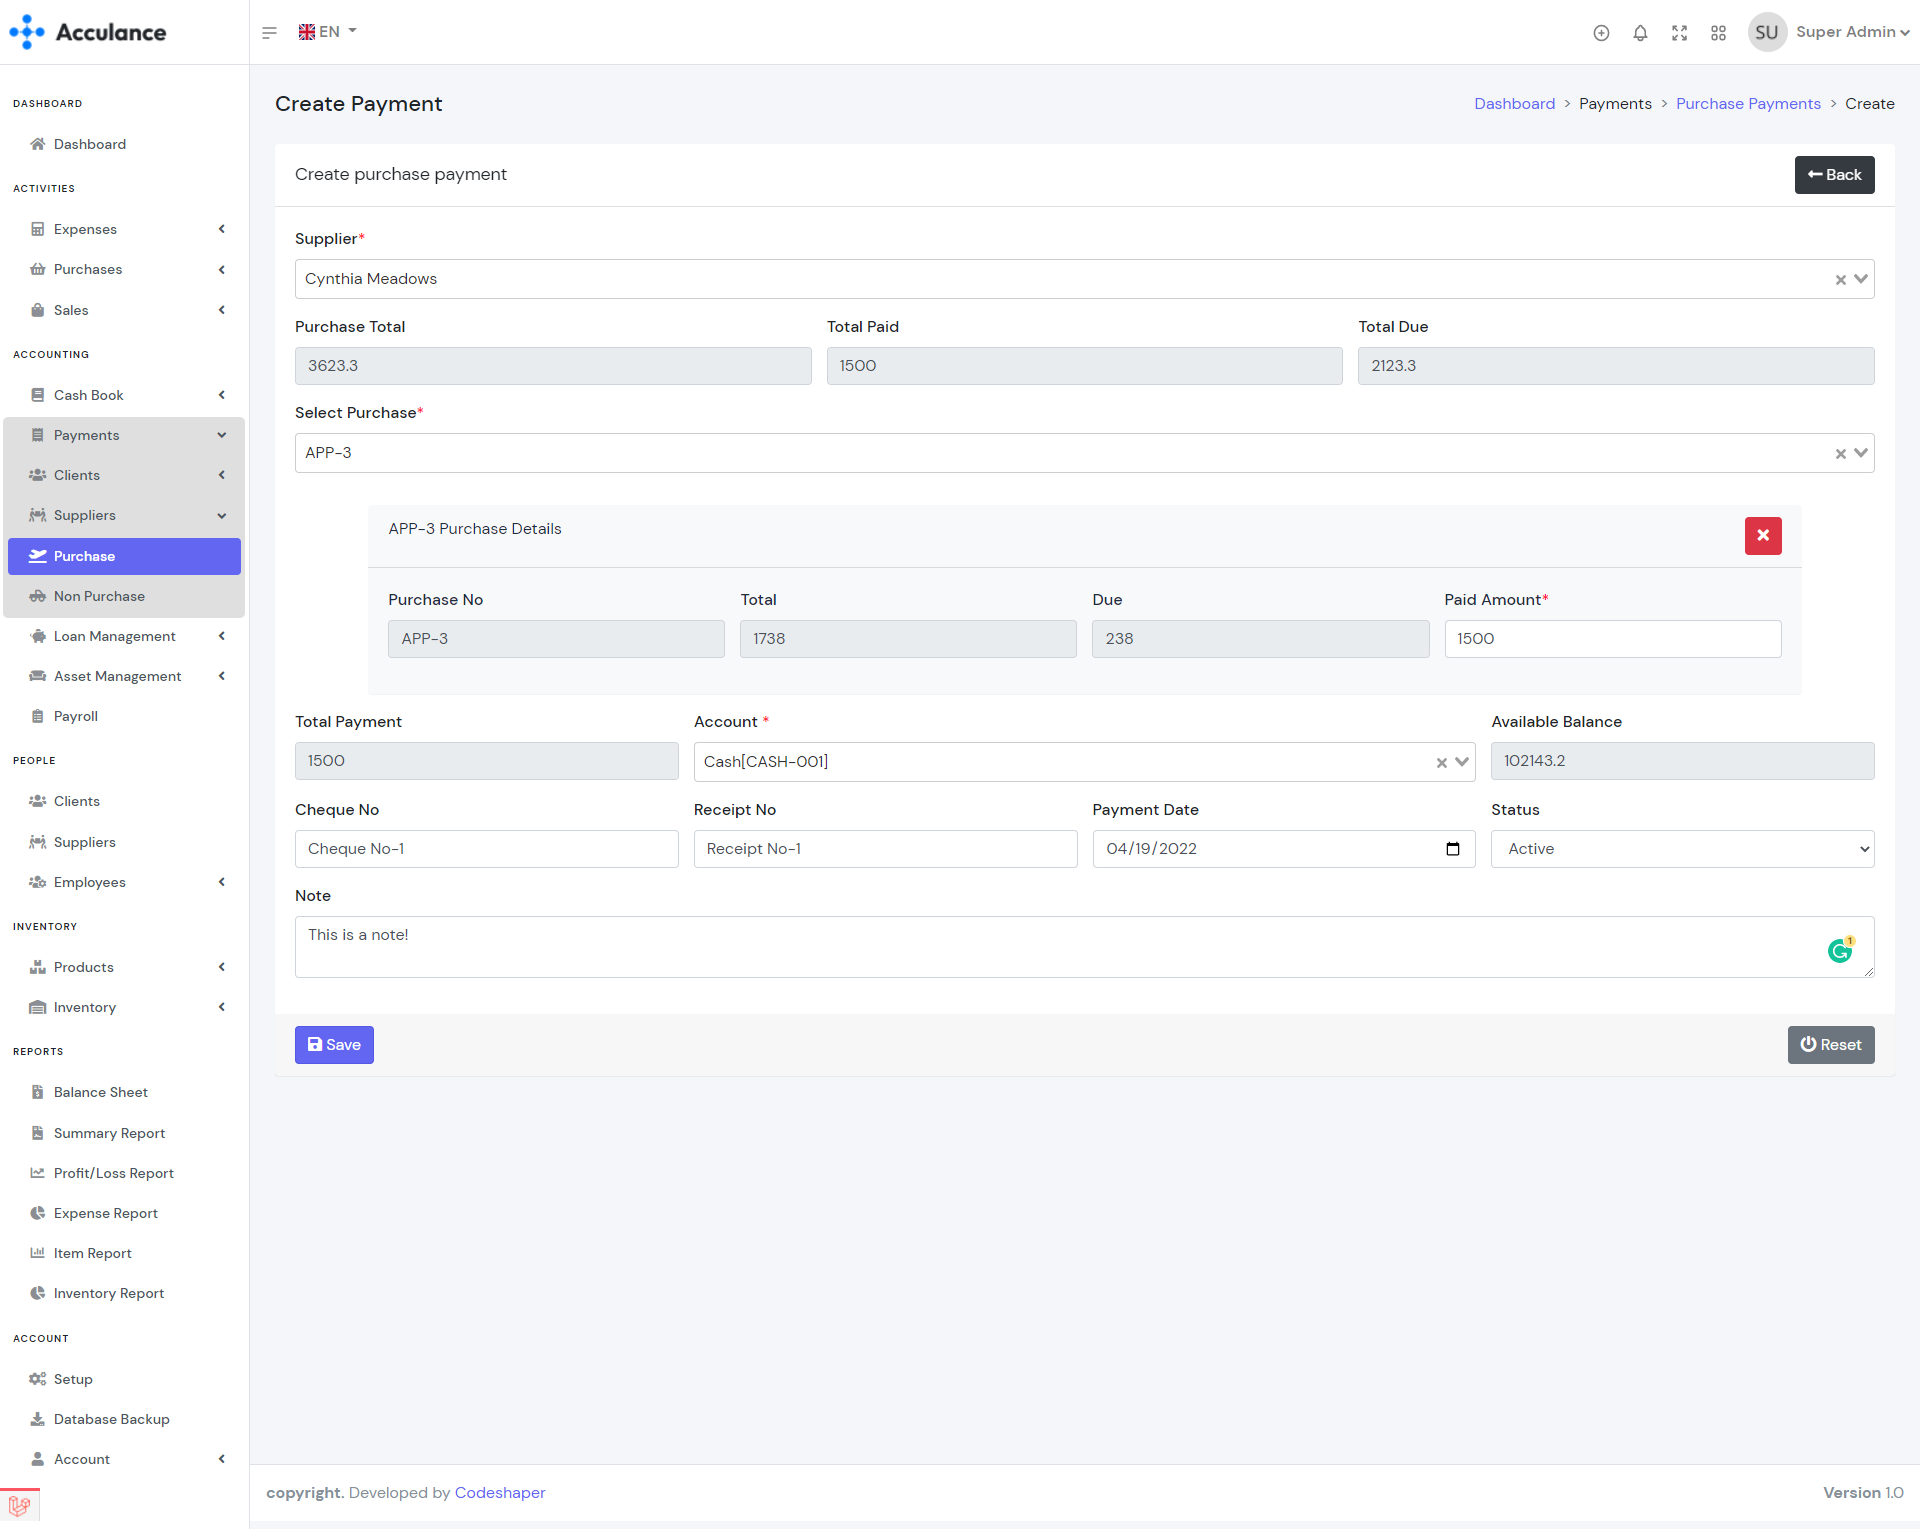
Create Purchase Payment
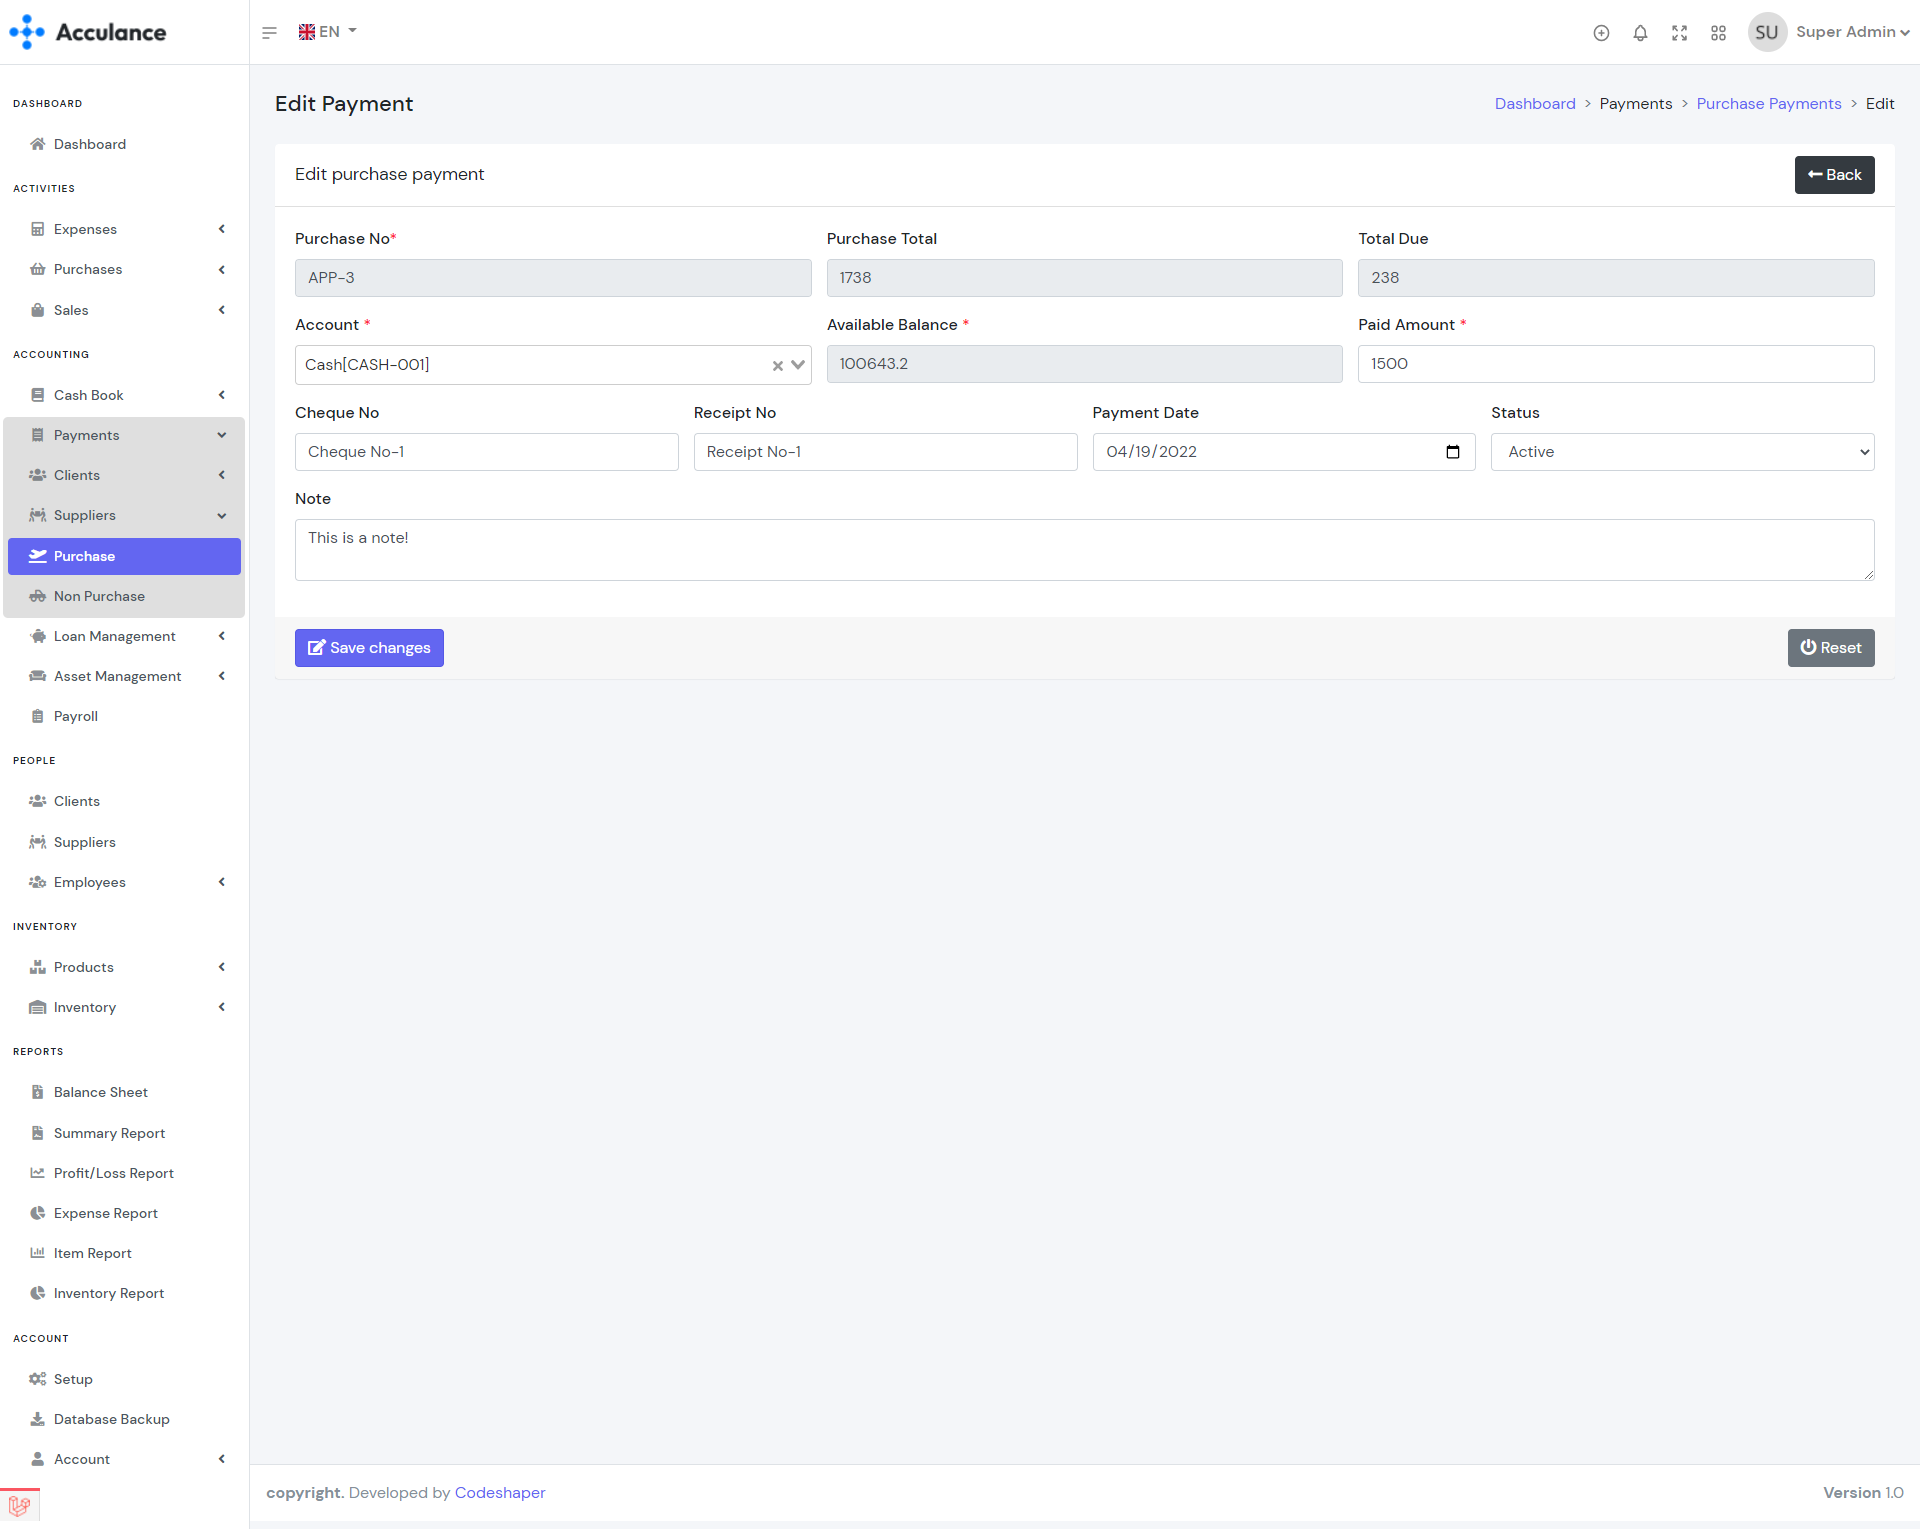
Edit Purchase Payment
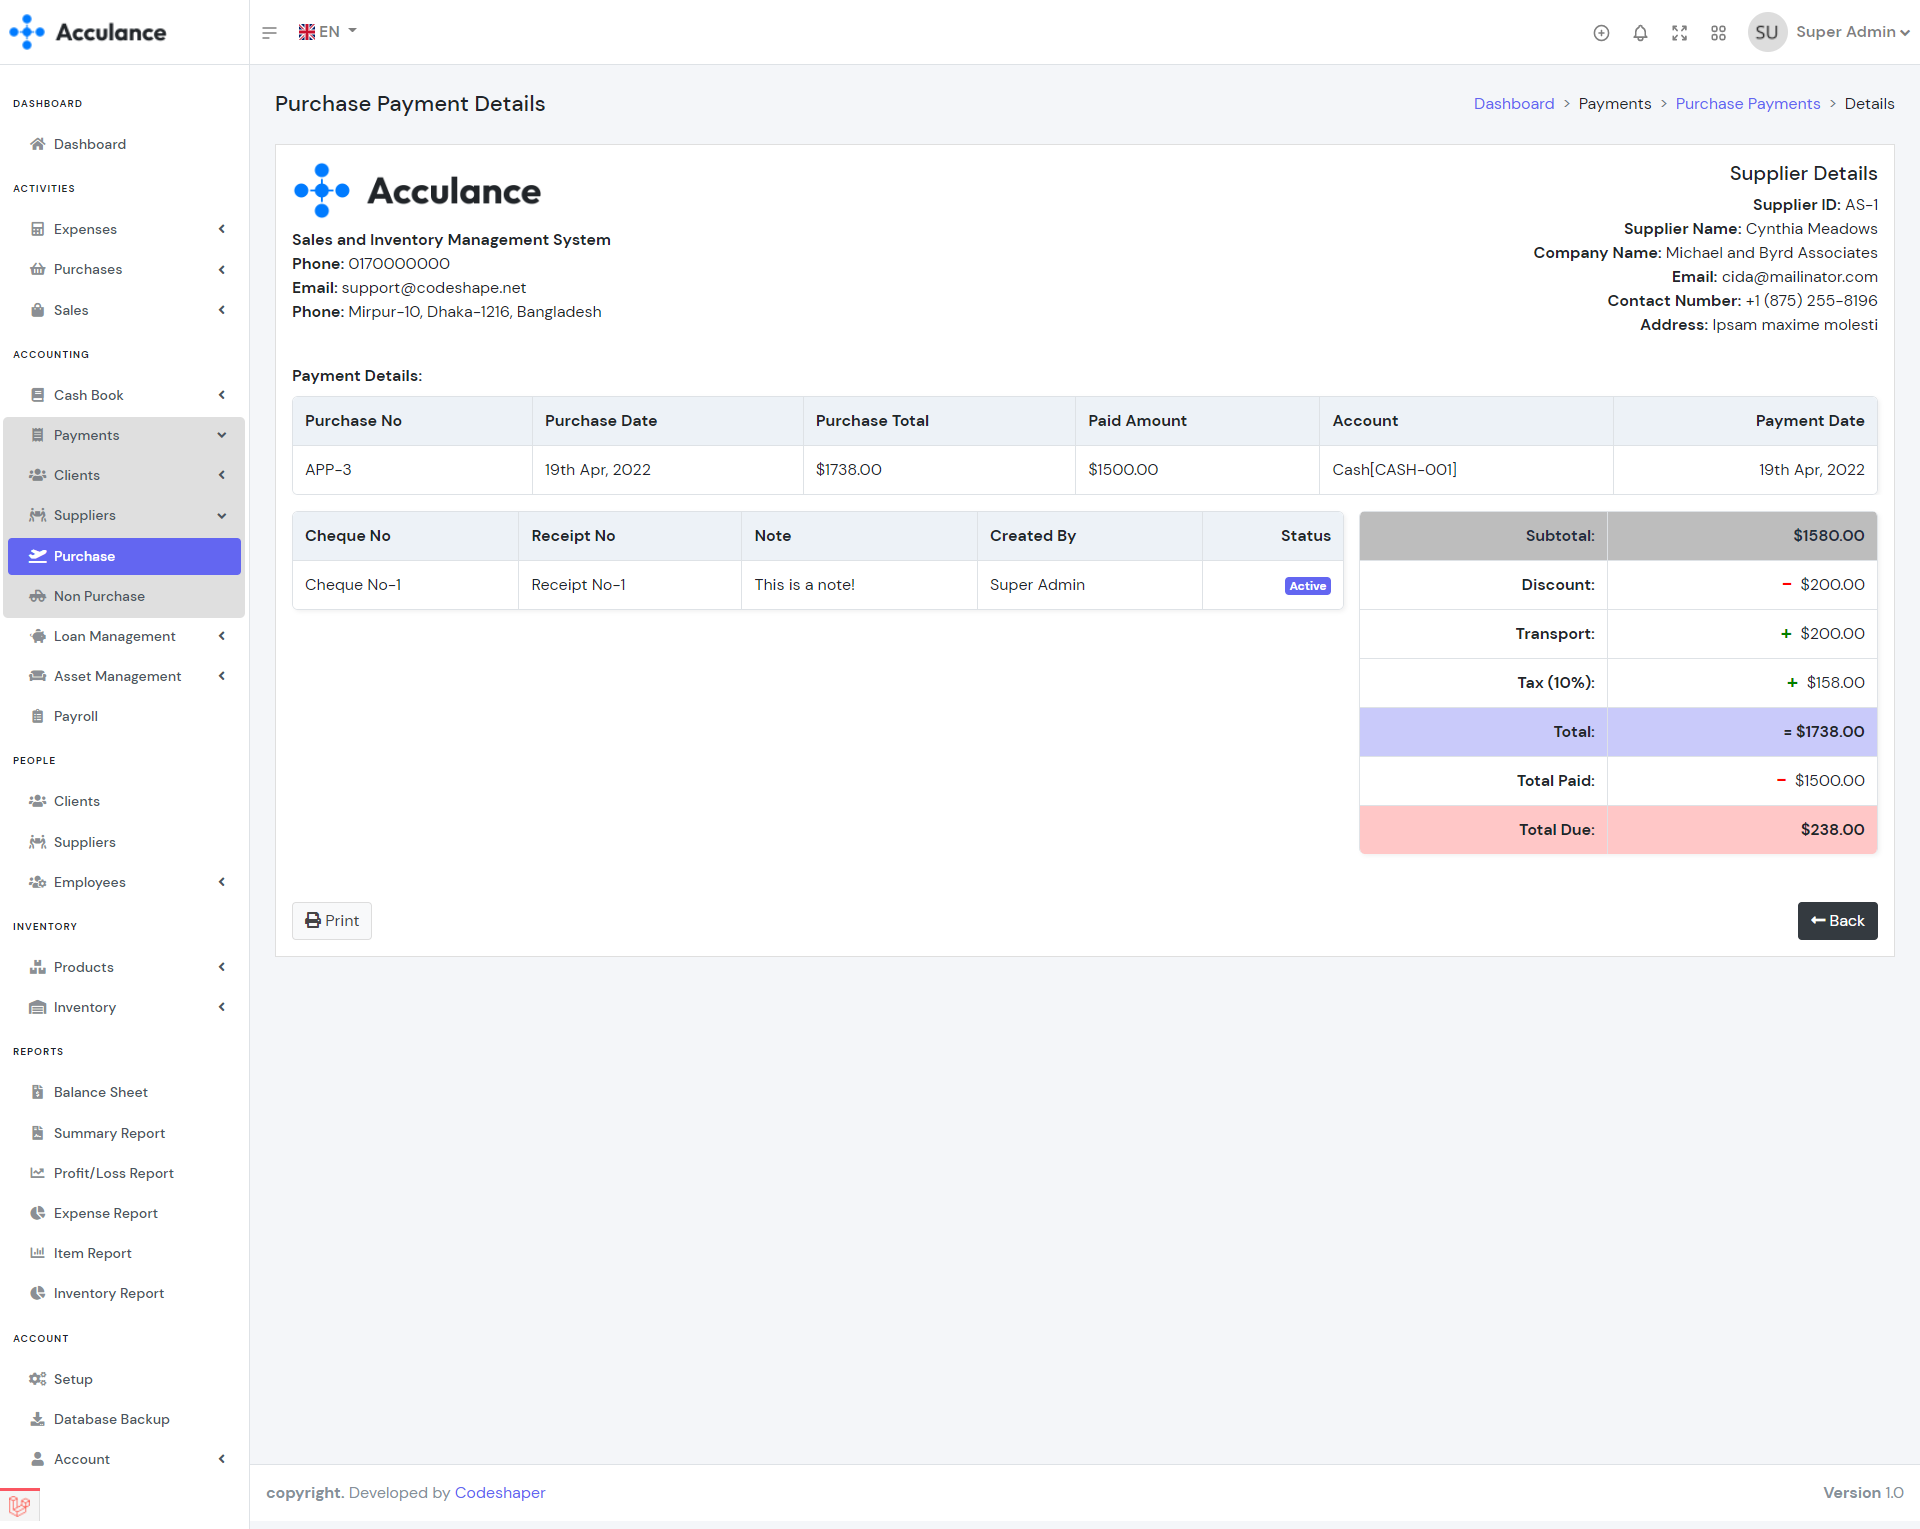
Purchase Payment Details
Note: If you delete any purchase payment then the purchase due will be adjusted automatically. Deleting any invoice payment will add the amount from the account balance. So we recommend you to use the delete option very carefully.
Non Purchase Payments
Non Purchase payments module helps you manage non-purchase dues and payments for your suppliers. Using this module you can bring your supplier dues and payments from your previous software to Acculance. You must create a non-purchase due first in order to create non-purchase payments.
| Required fields to create a non-purchase payment |
|---|
| Supplier => Client to whom you want to add due or sent purchase payment. Select a supplier from the list. |
| Type => If you want to add non-purchase due then select due otherwise select add payment to sent payment. |
| Amount => Due amount or the paying amount. |
| Account(If you select add payment) => The paying account. The amount will be deducted from the selected account. Select an account from the list. The available balance must be greater than the paying amount. |
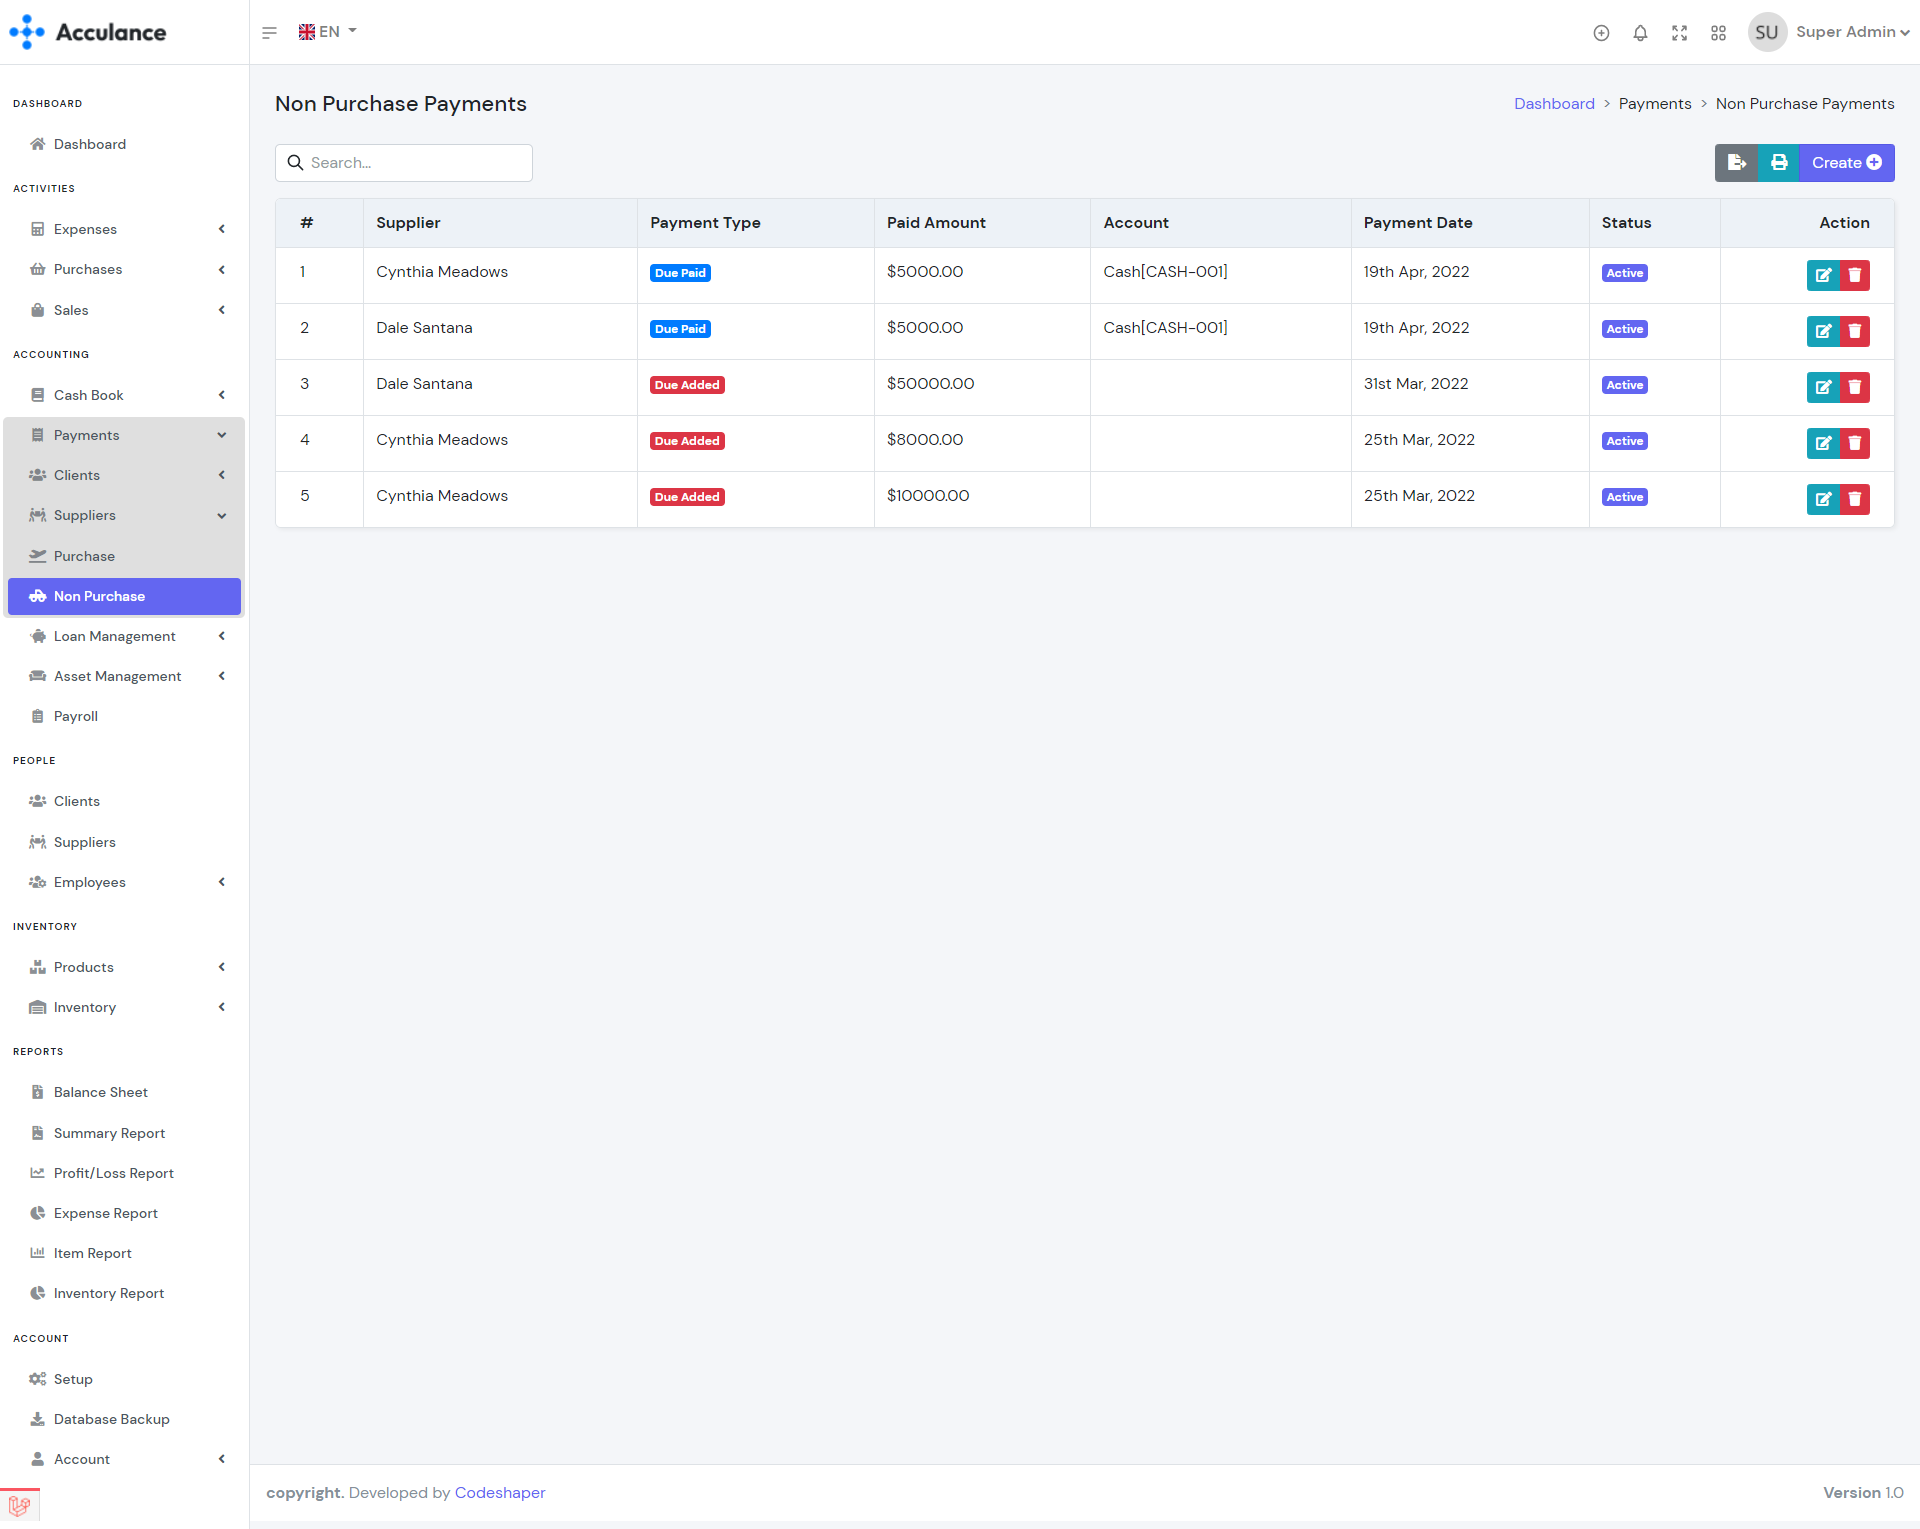
Non Purchase Payments List
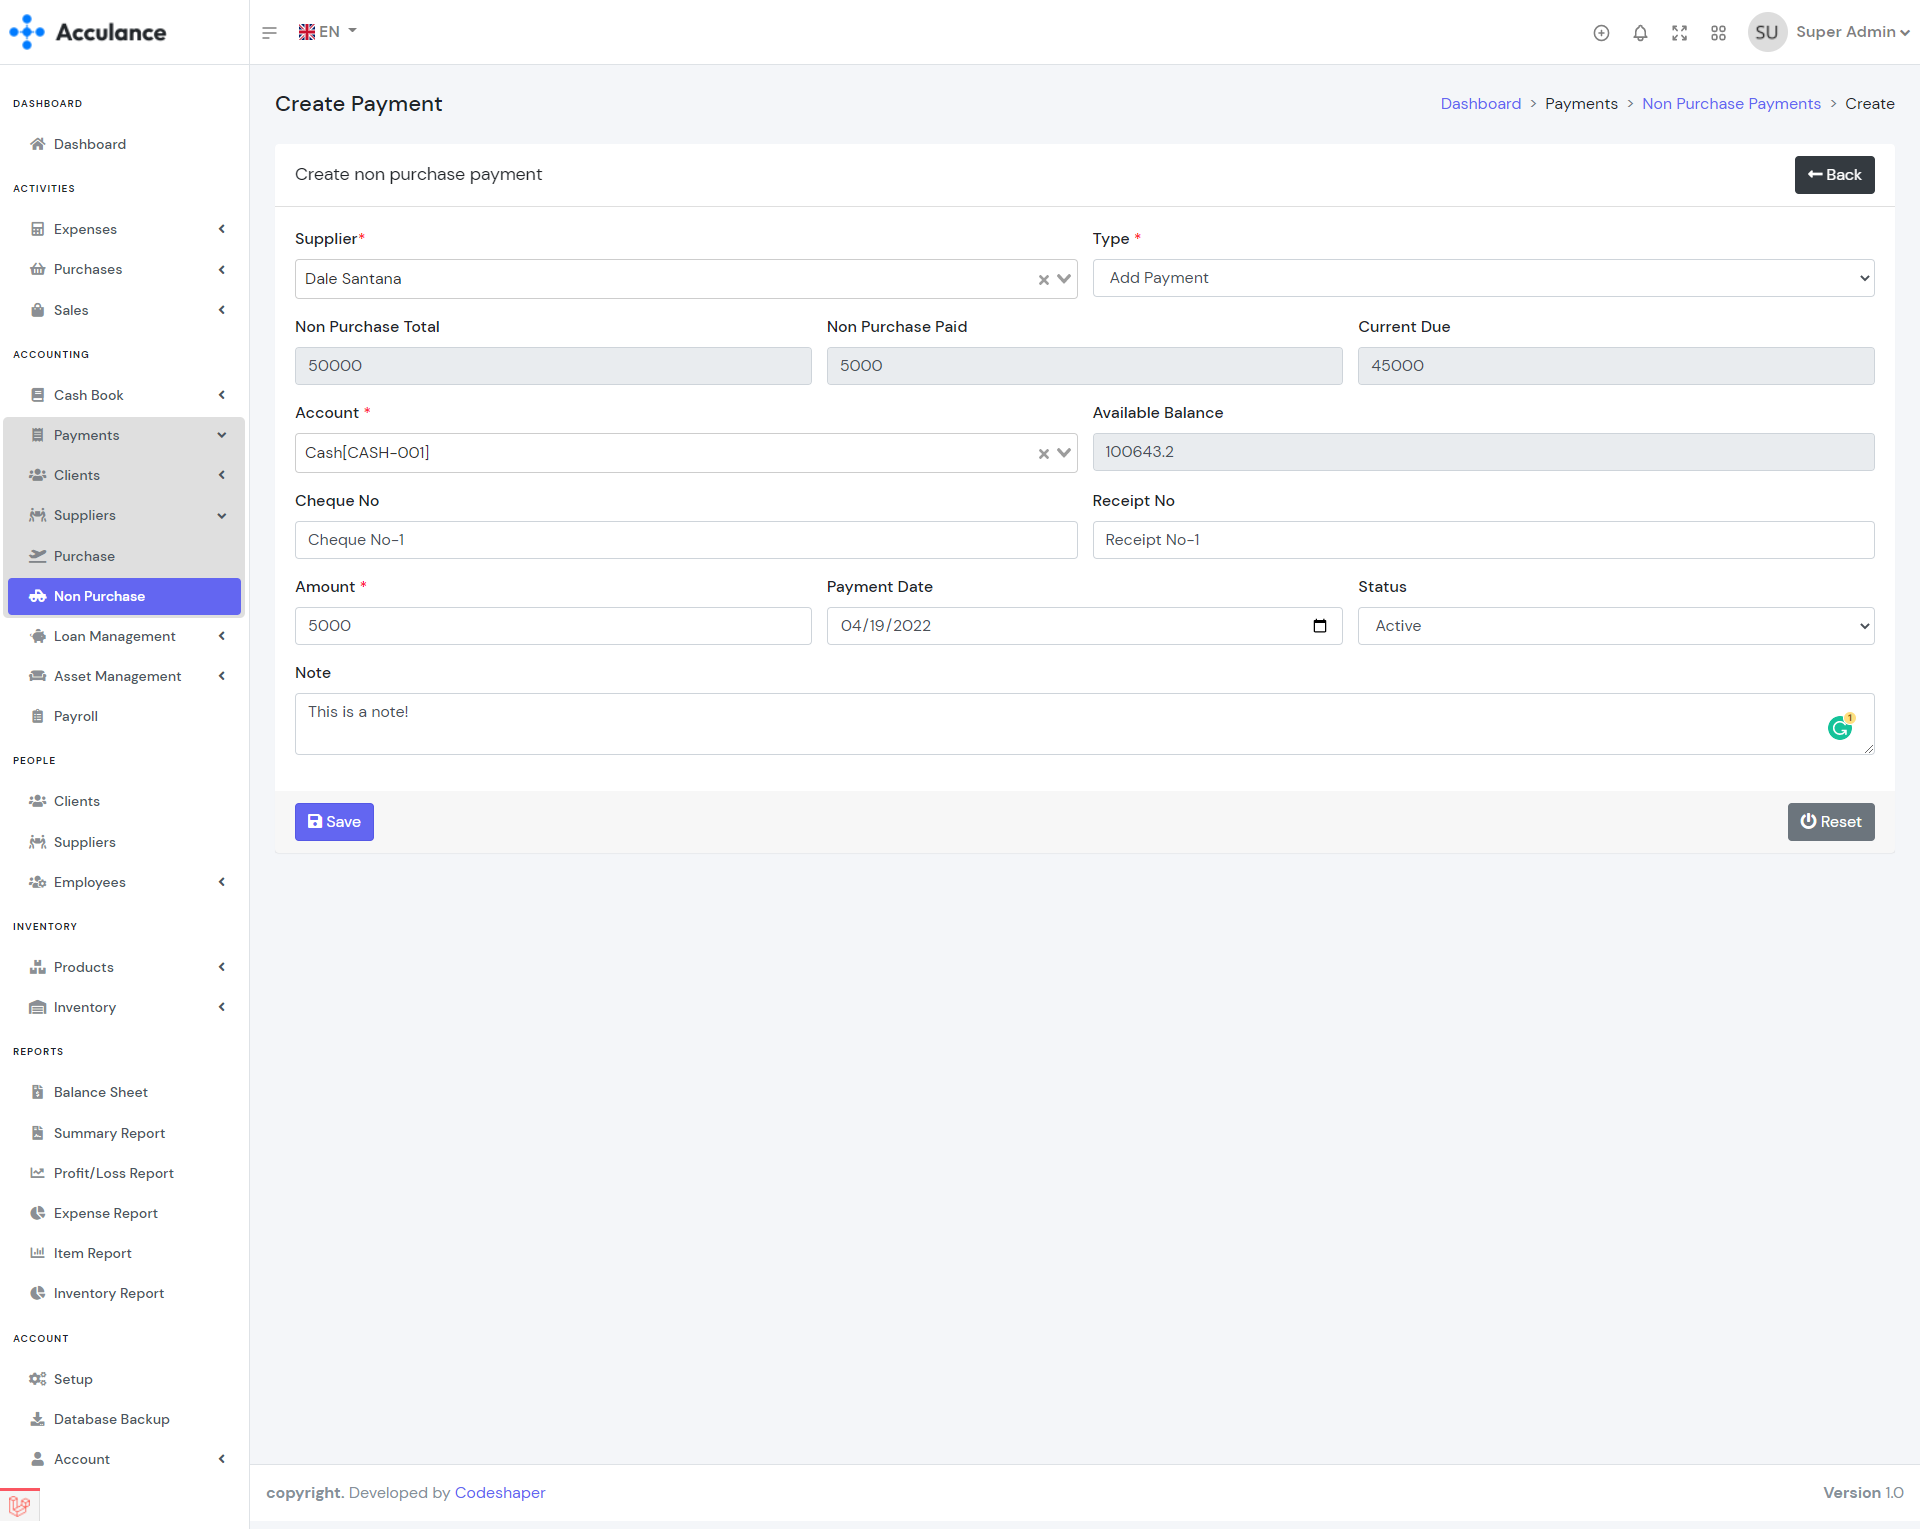
Create Non Purchase Payment
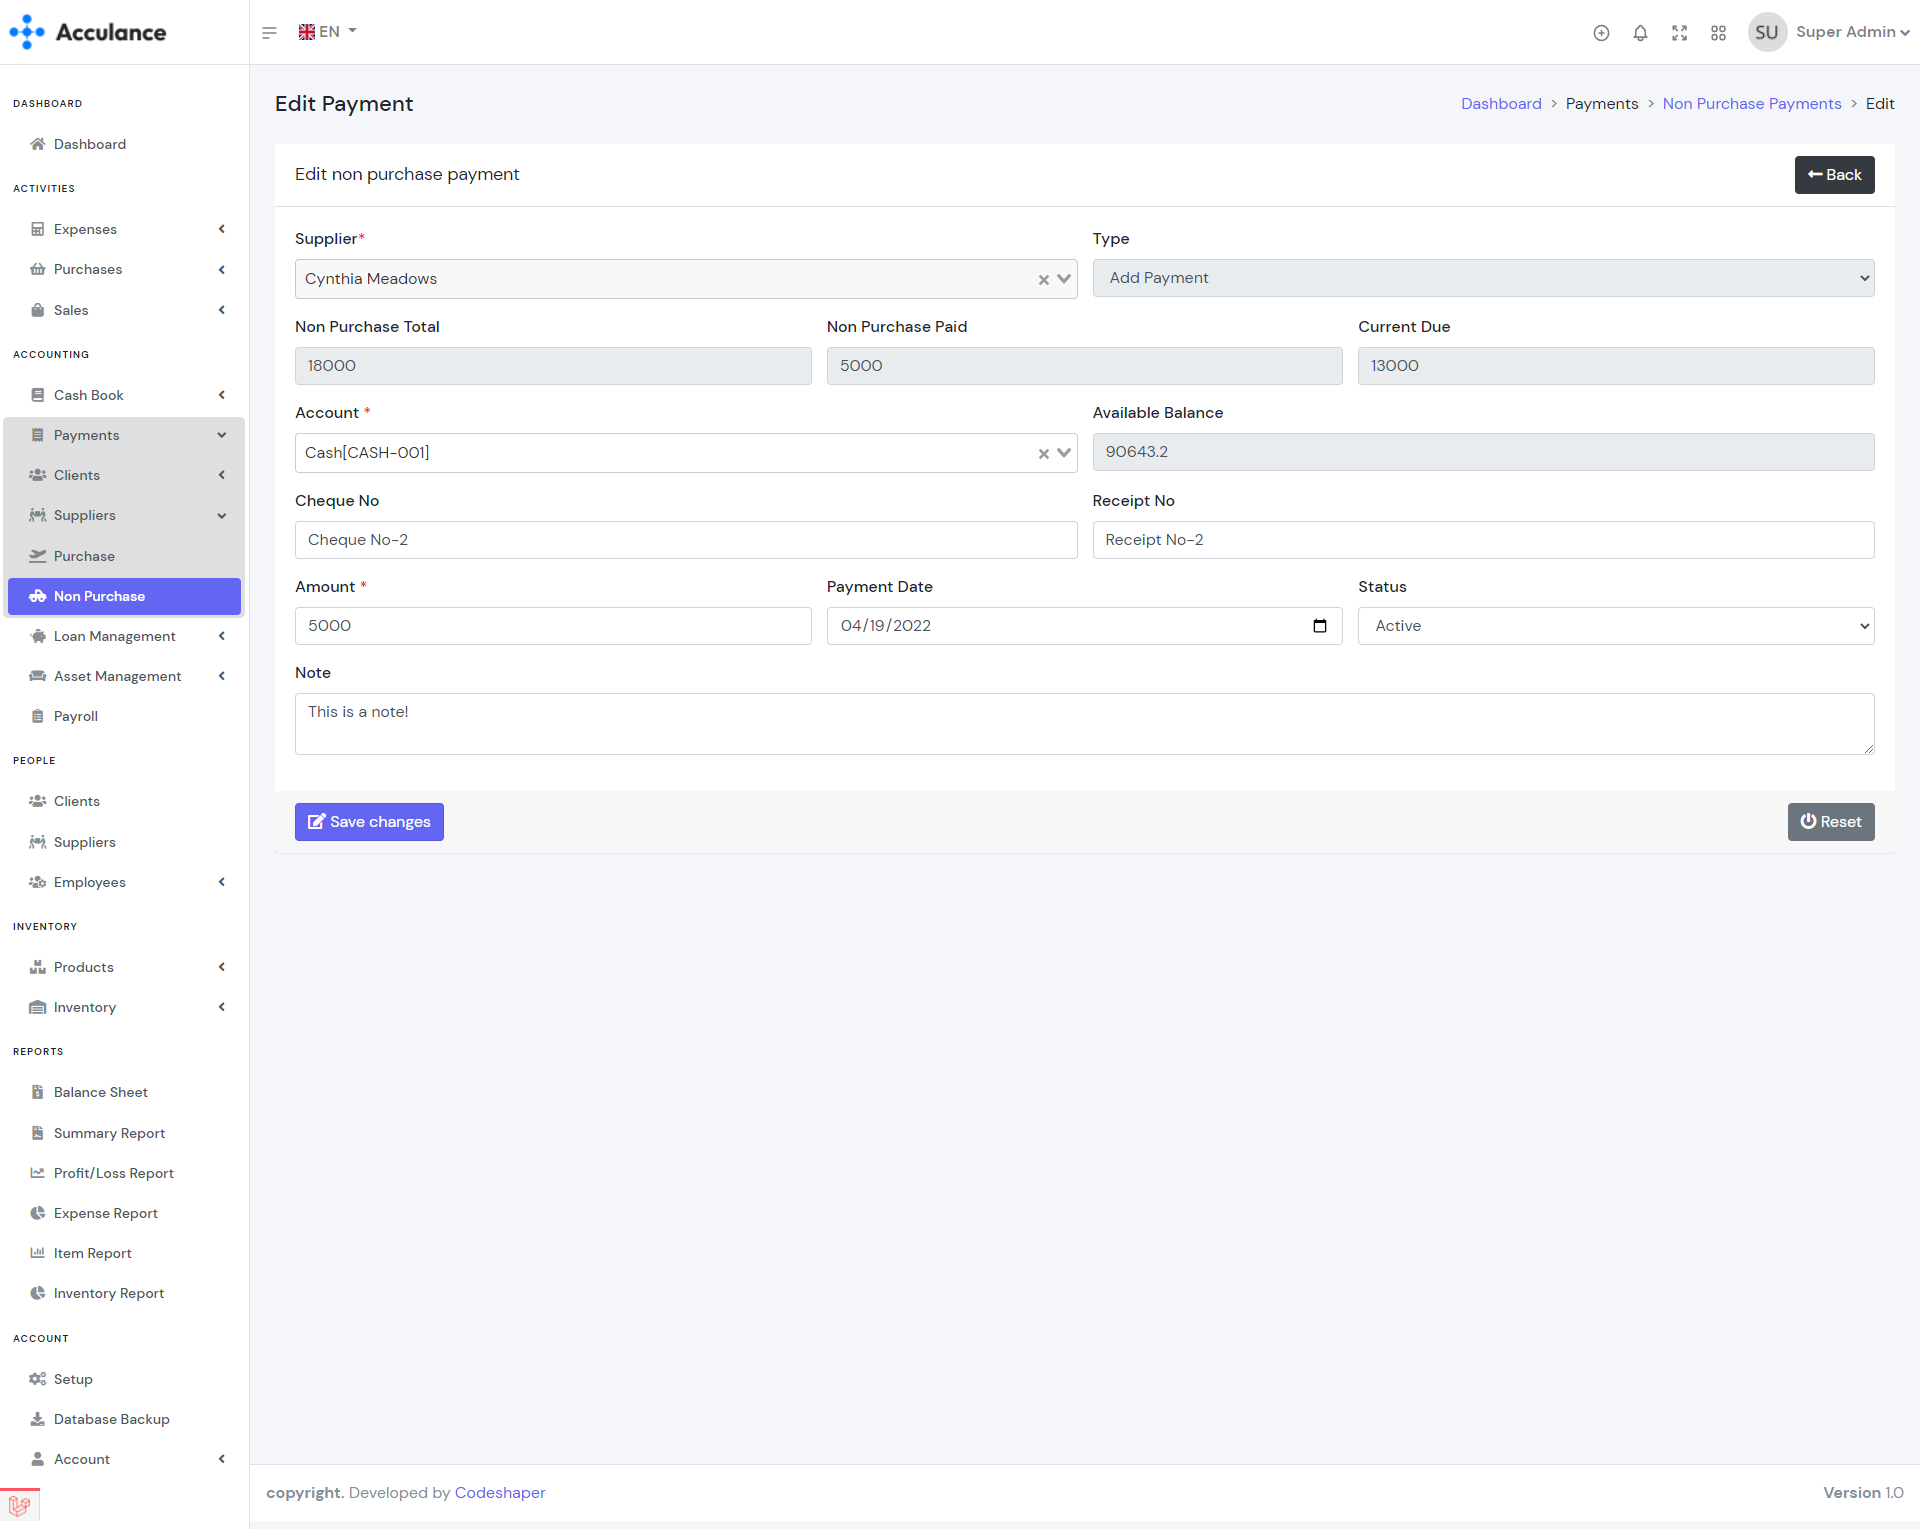
Edit Non Purchase Payment
Note: In order to delete any non-purchase supplier due, you need to delete the non-purchase payments first. Deleting any non-purchase payment will add the amount to the account balance. So we recommend you to use the delete option very carefully.
Loan Authorities
Loan authorities module allows you to add loan provider authorities. Loan authorities can be Bank, NGO, family members, friends, etc. After creating Loan authorities you will be able to ass loan from these authorities.
| Required fields to create a loan authority |
|---|
| Name => Name of the loan authority. It can be a Bank name, NGO name, Family member name, Friend name, etc. |
| Contact Number => Contact number of the loan authority. |
| Cash Credit (CC) Loan Limit => A cash credit comes with a borrowing limit determined by the creditworthiness of the borrower. A company can withdraw funds up to its established borrowing limit. You can write the limit here. |
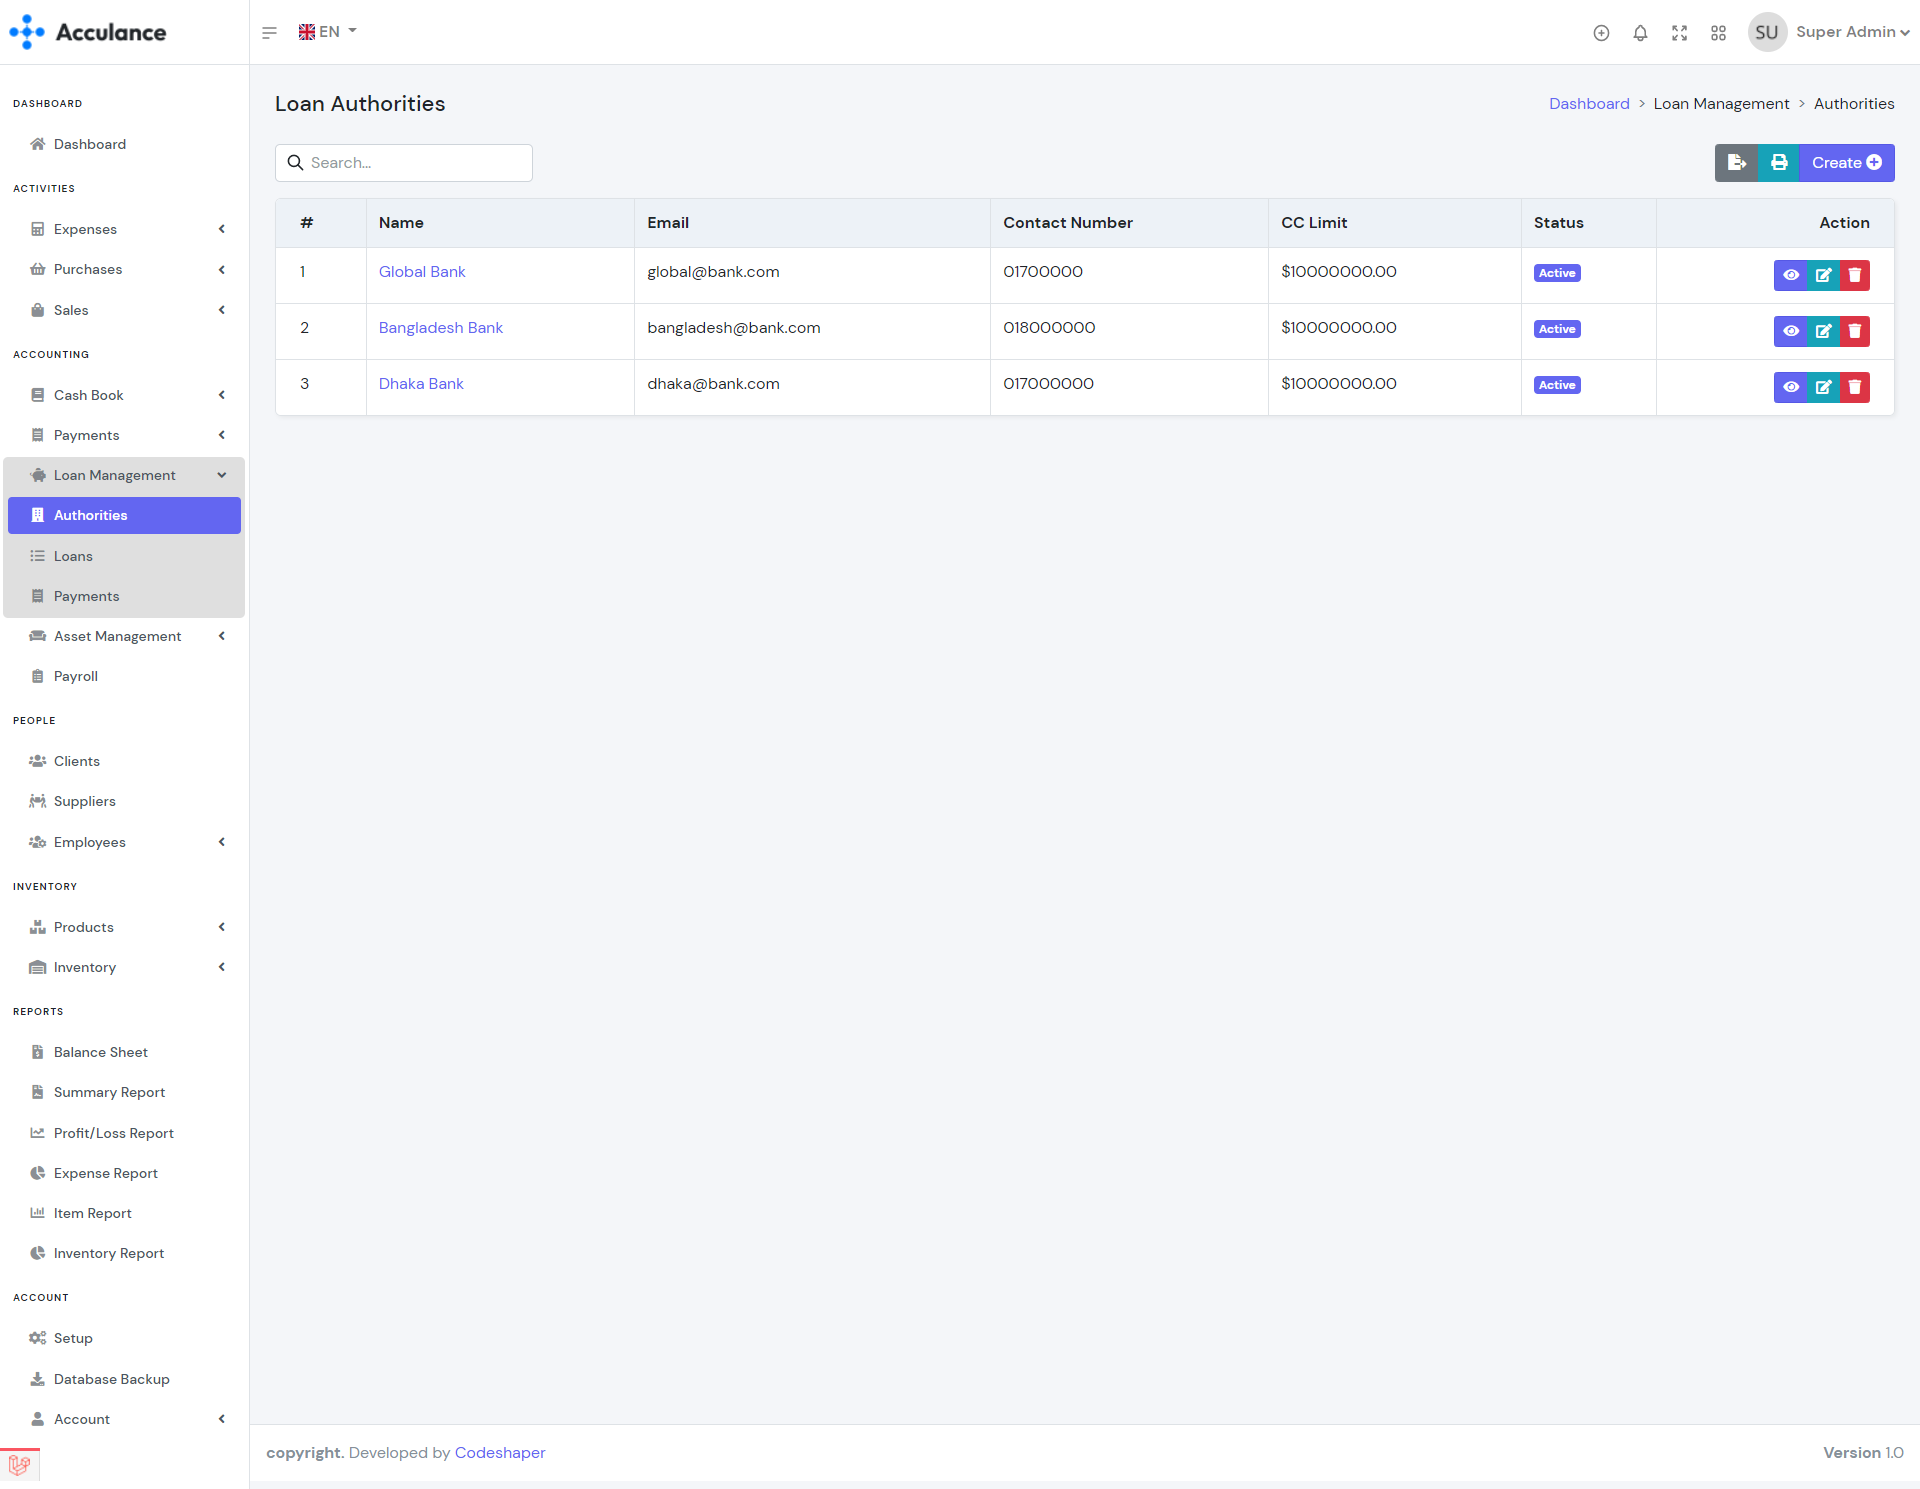
Loan Authorities List
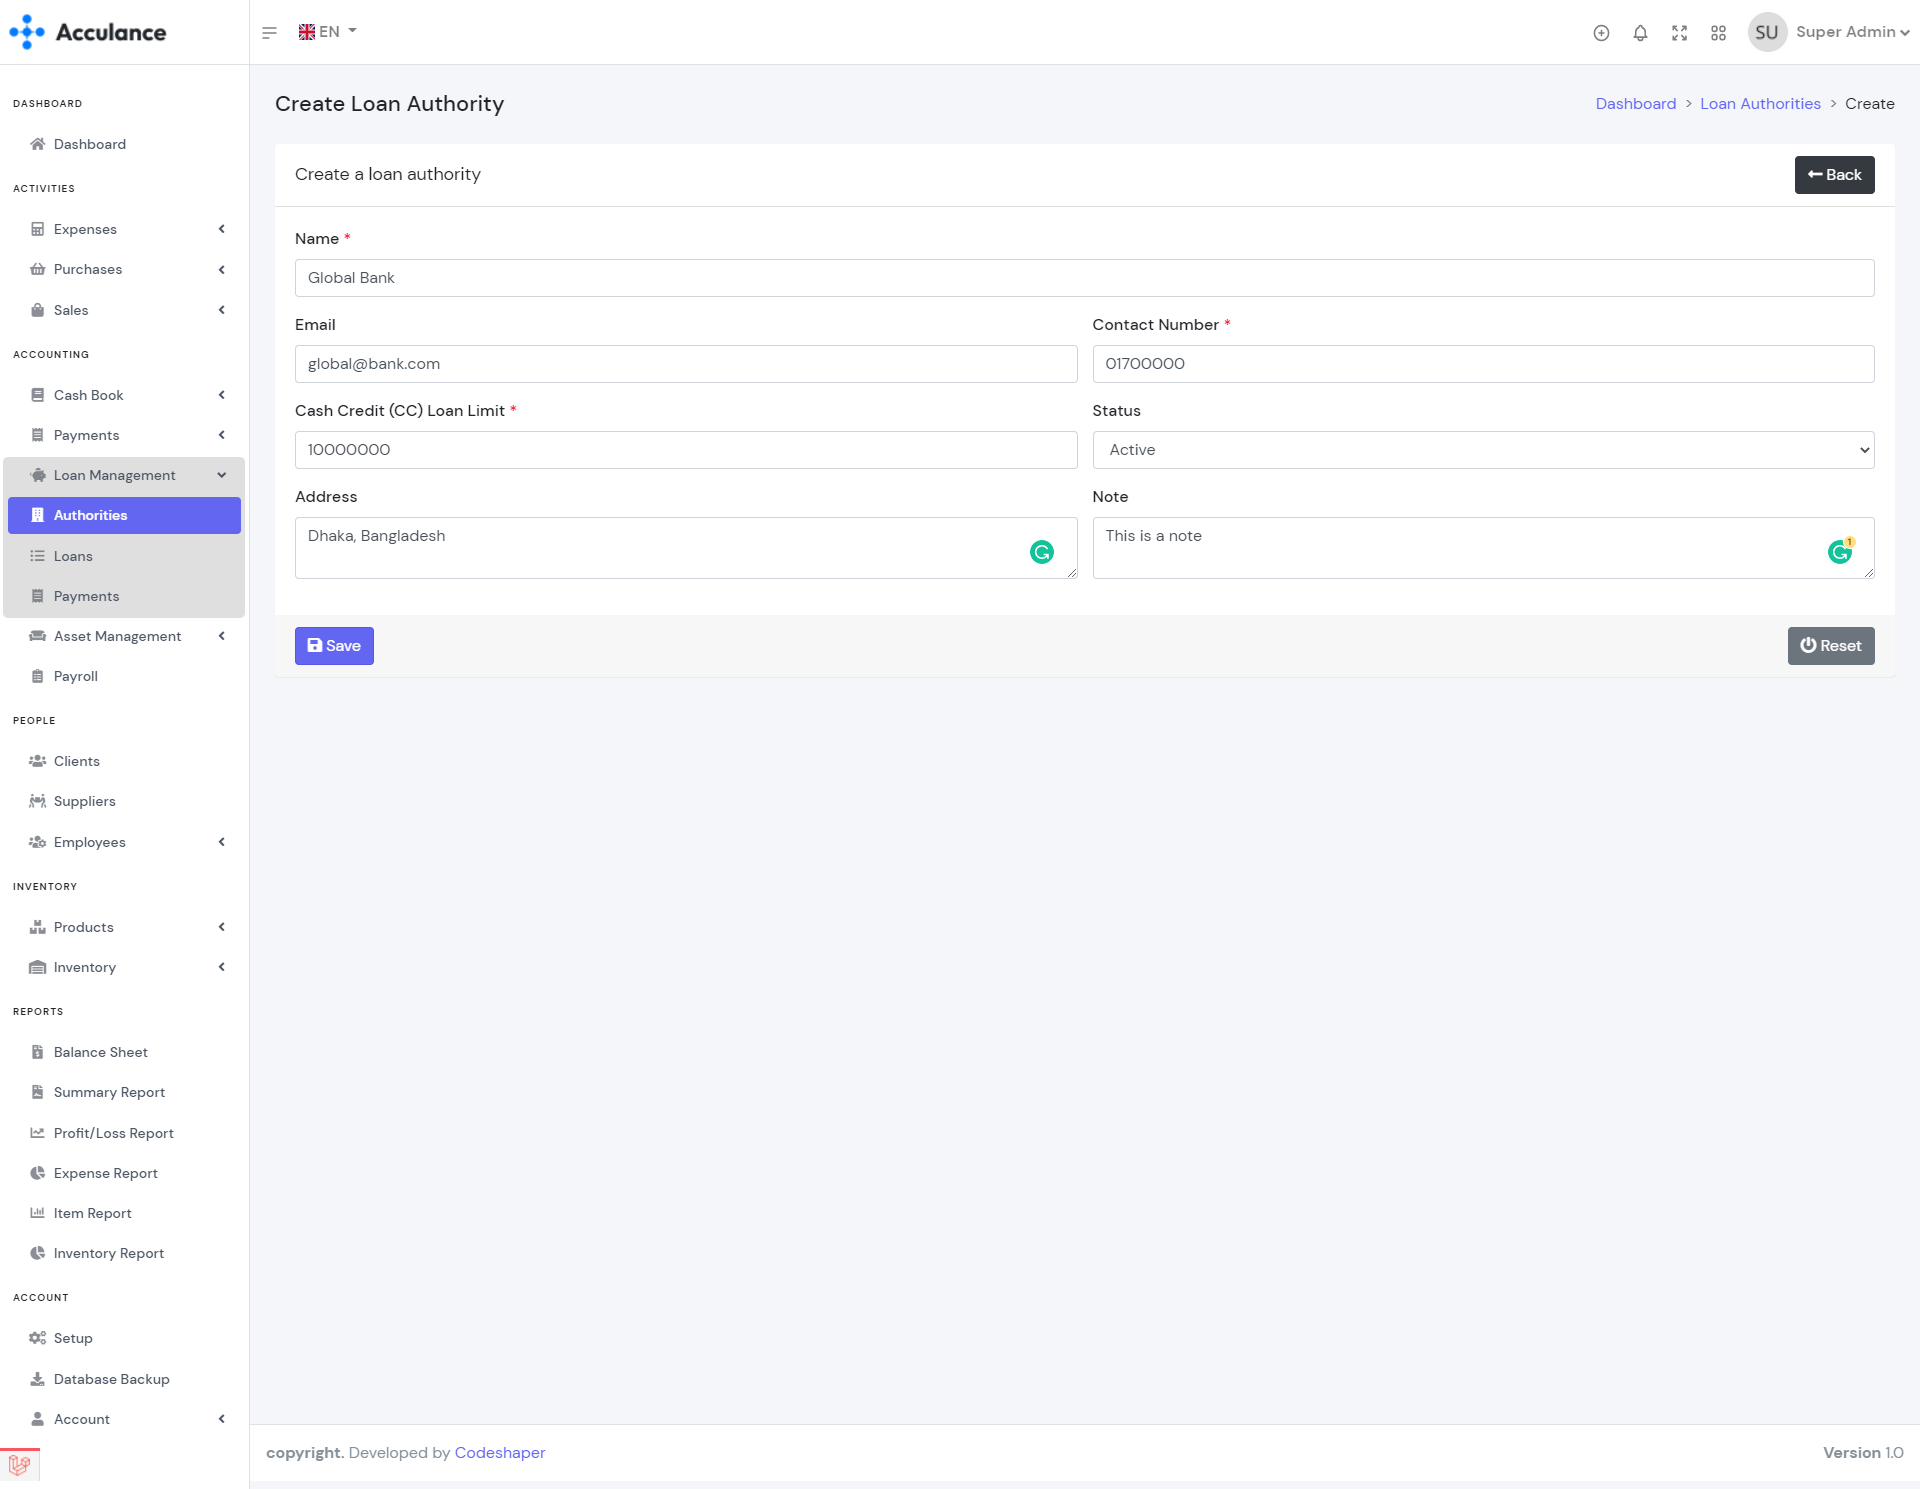
Create Loan Authority
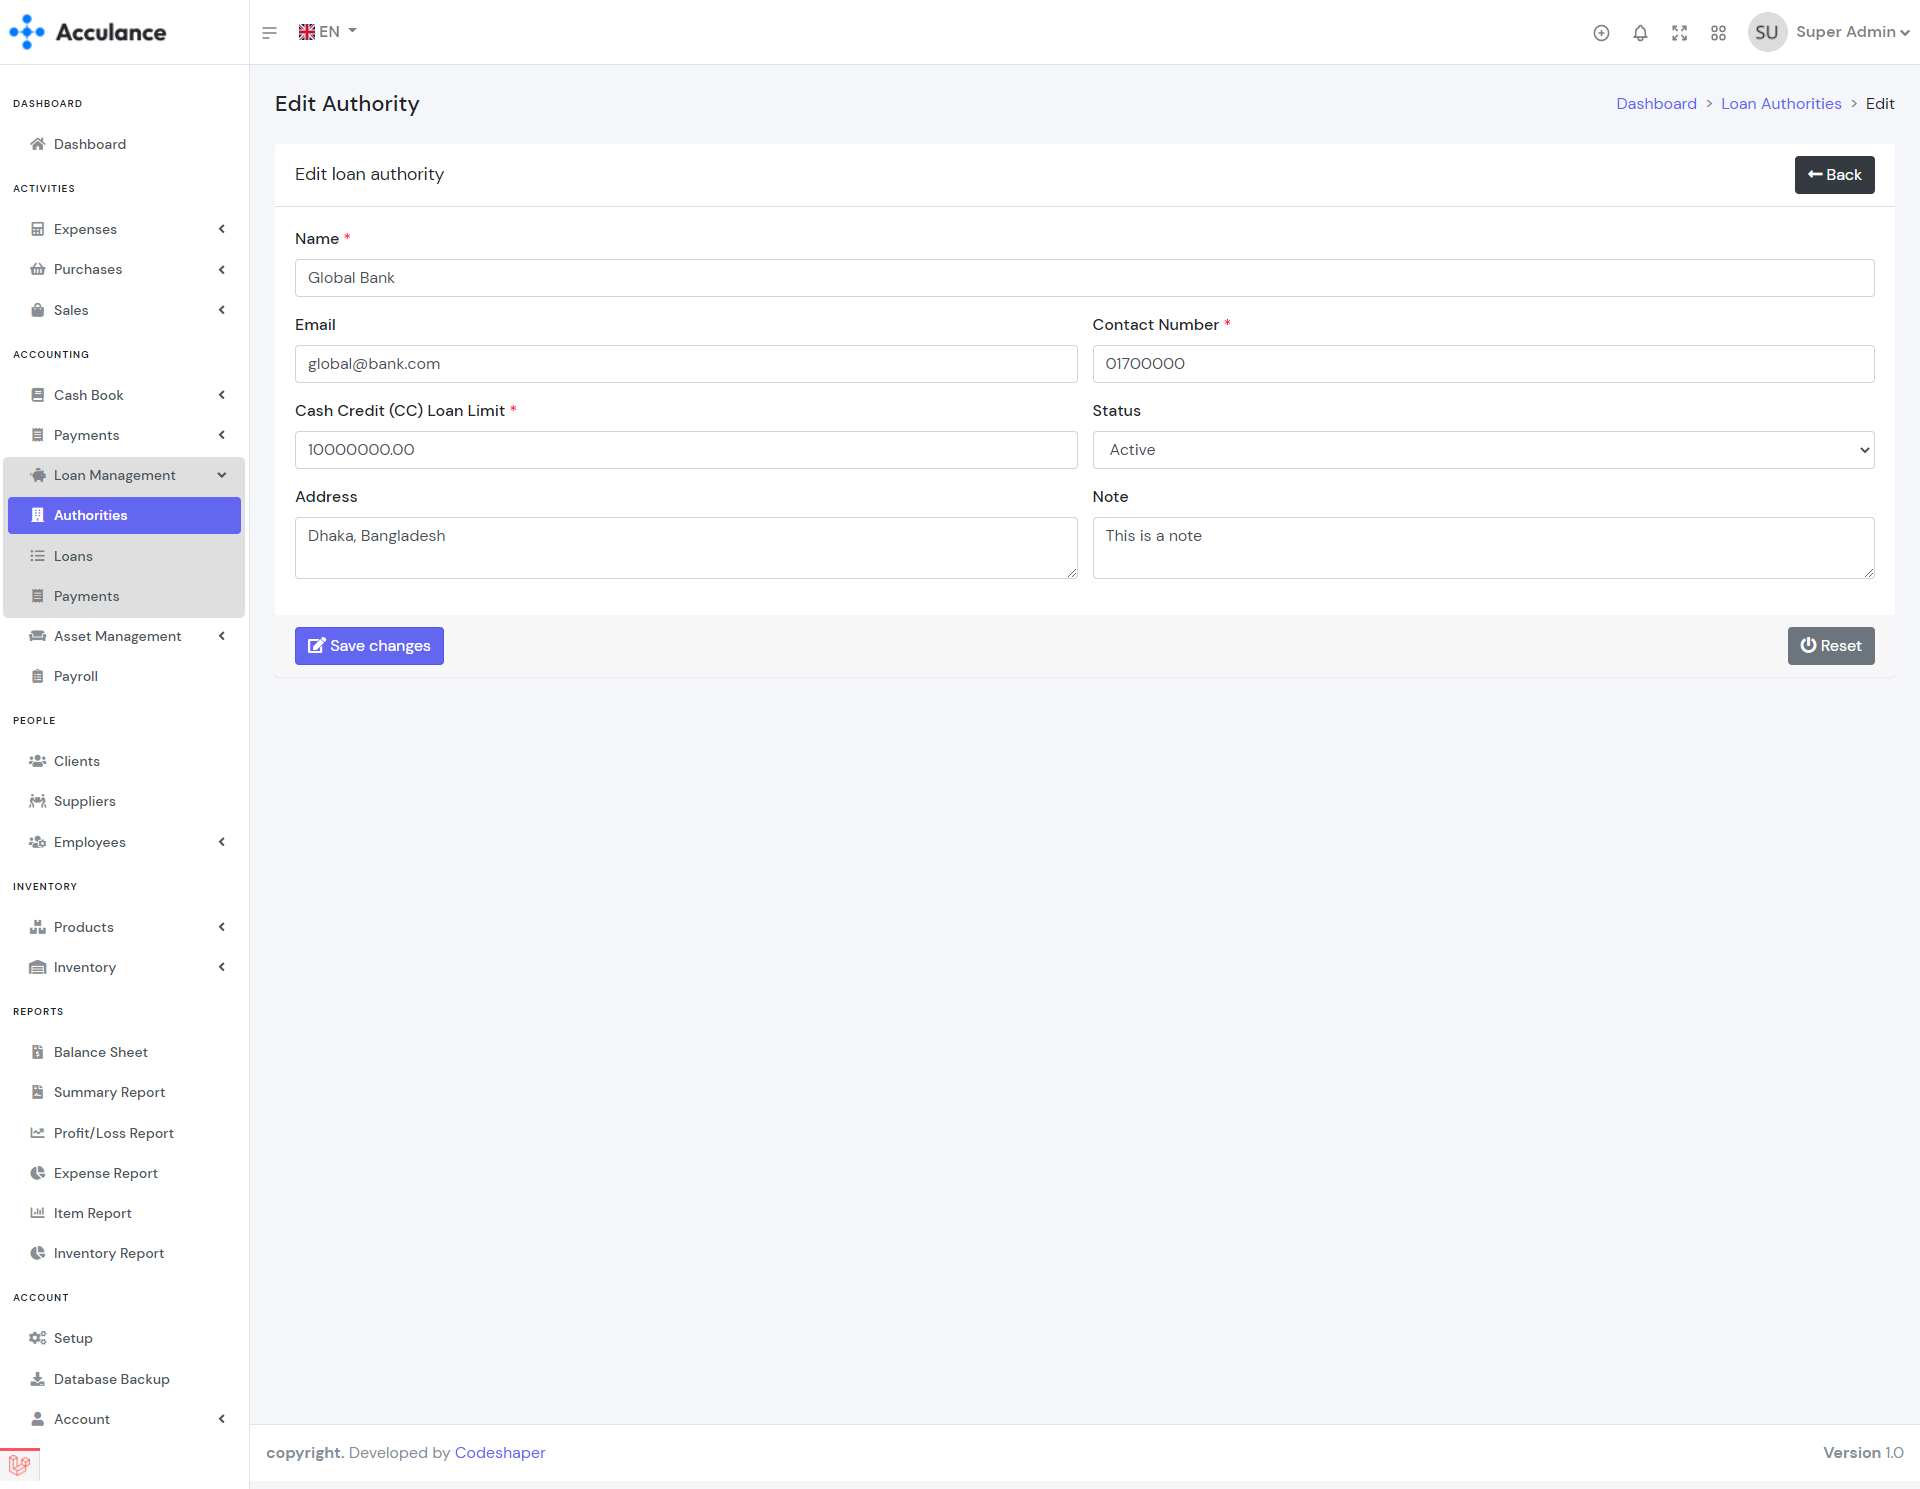
Edit Authority
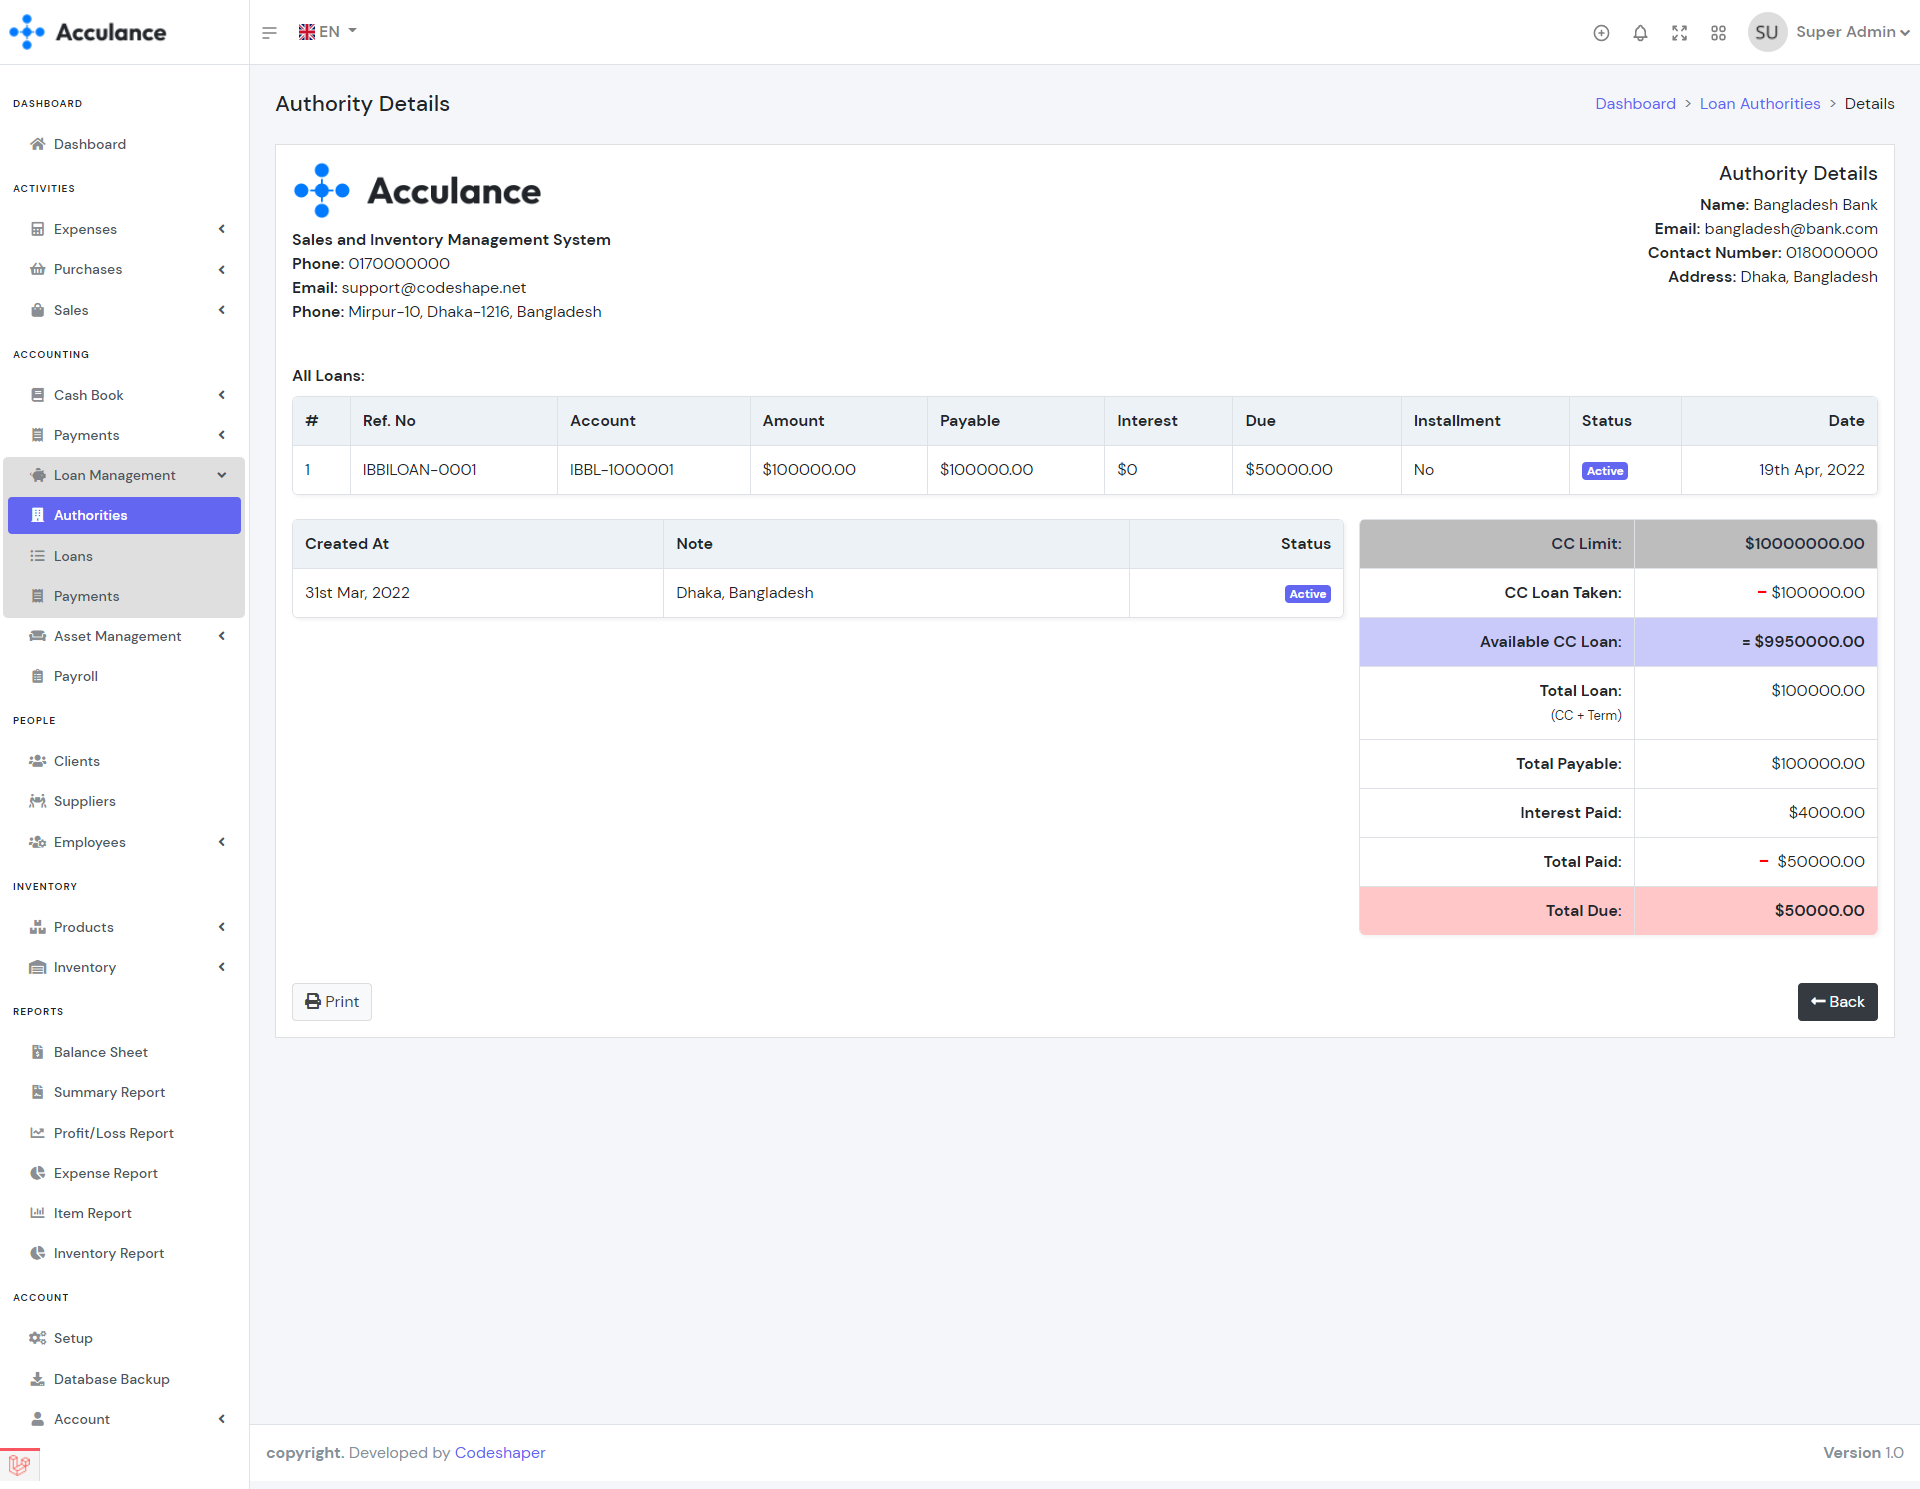
Authority Details
Note: In order to delete any authority, you need to delete the loans for this authority first. Deleting any authority will deelete the loans and the account balance. So we recommend you to use the delete option very carefully.
Loans
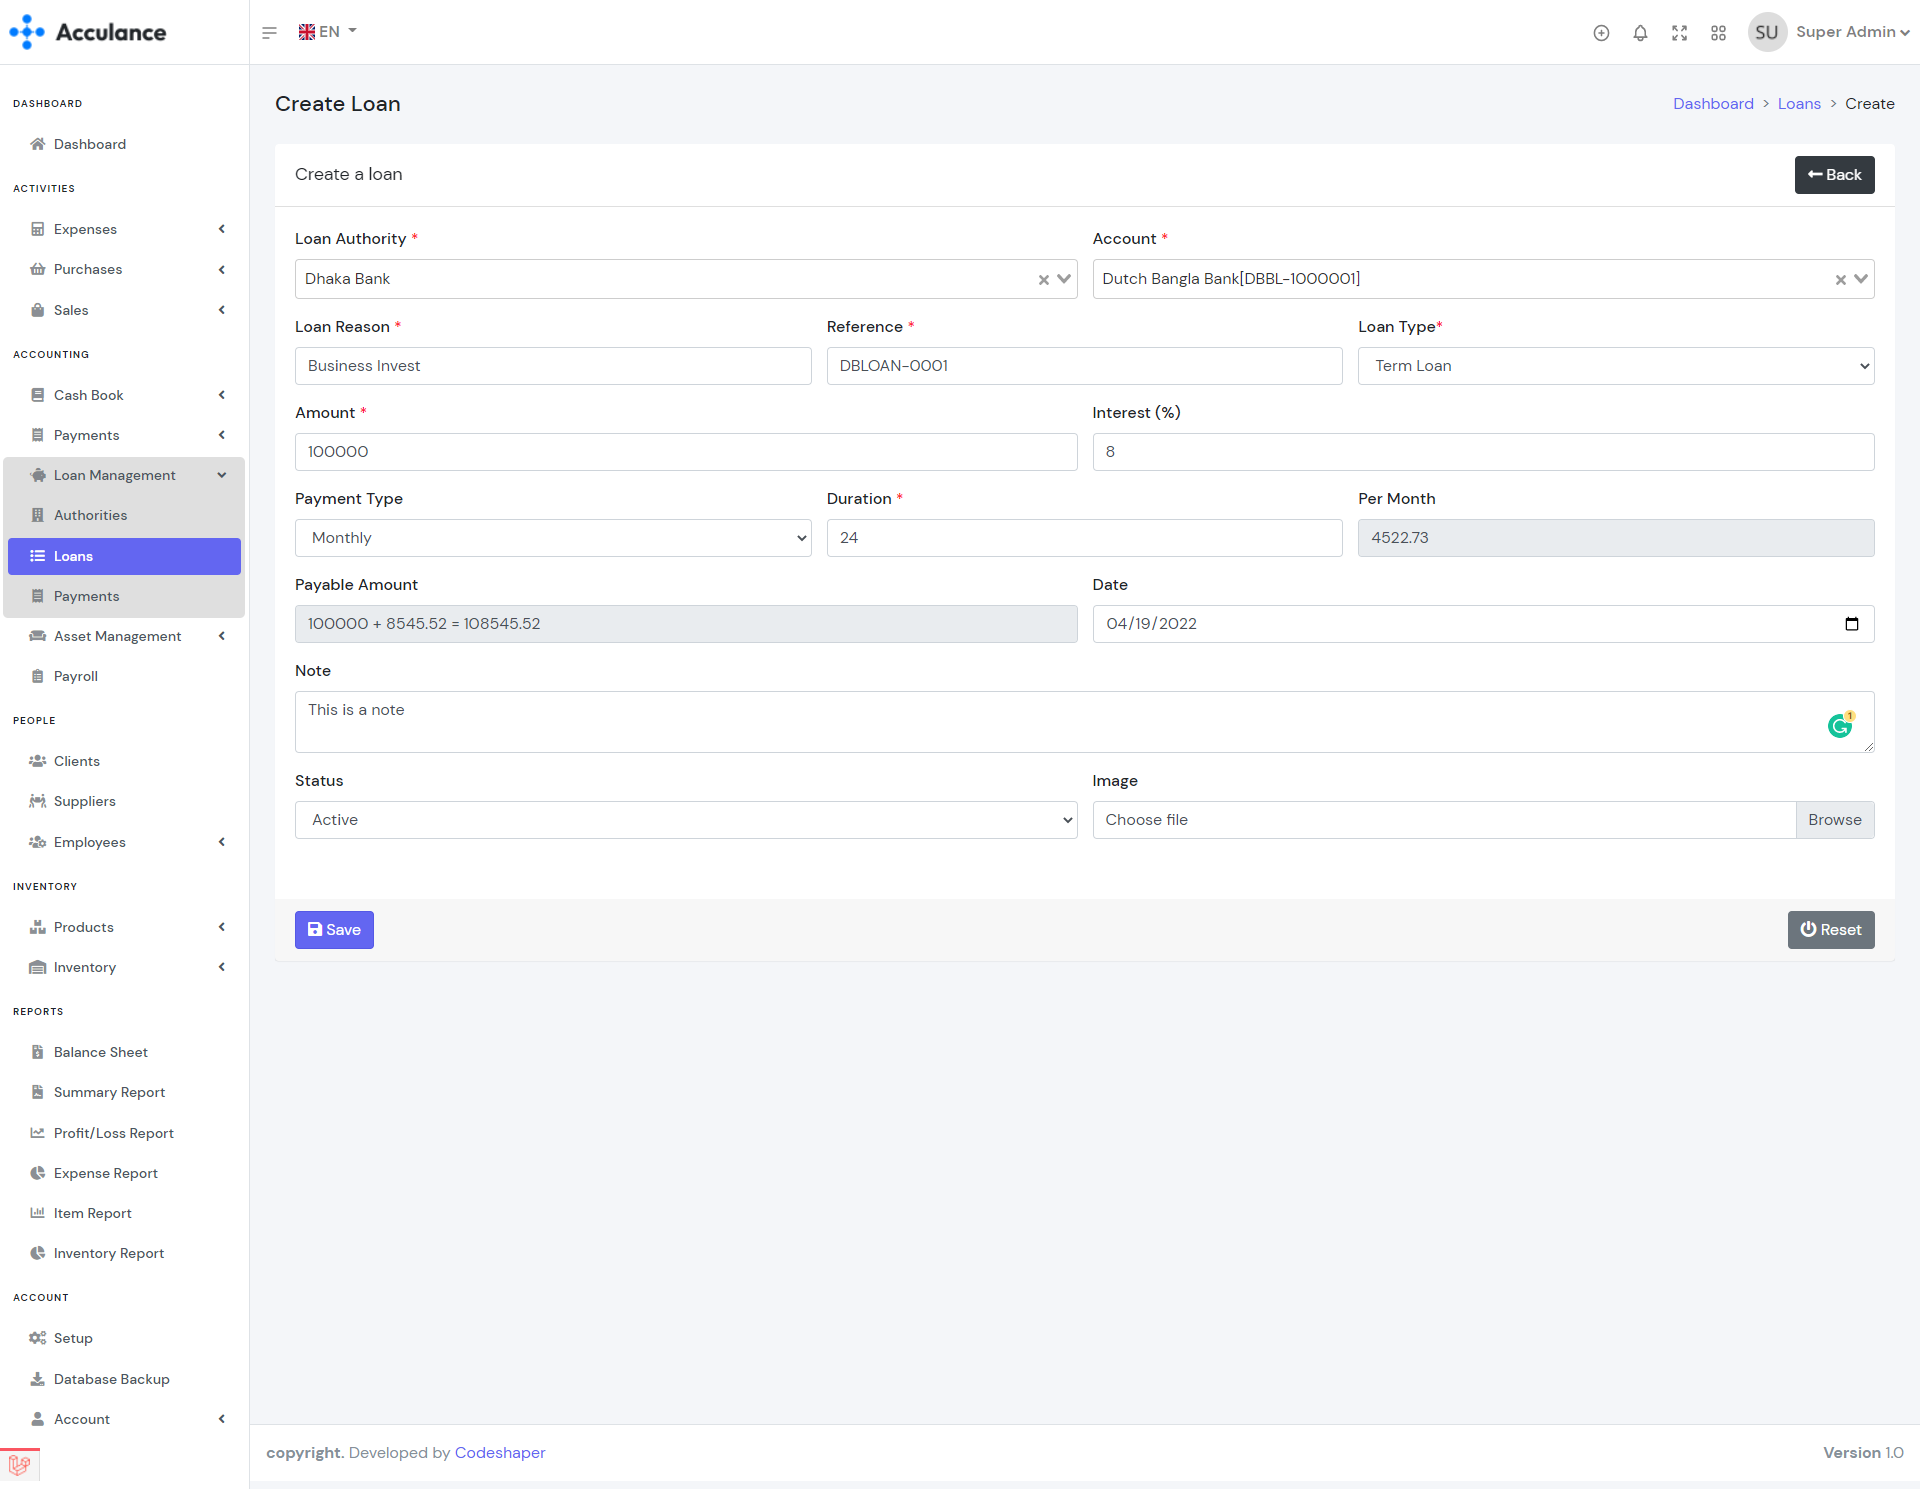
Loans module helps you to add loans to your account. Using this module you can manage your bank loan calculations and keep track of the loan payments. After adding a loan the loan amount will be added to the selected account. Acculance will allow you to create 2 types of loans and these are CC loans and Term loans. For a CC loan, you will pay the interest manually while paying the loan payment. For the term loan, the monthly payment rate and interest will be calculated automatically. You must create at least loan authority first in order to create any loan.
| Required fields to create a loan |
|---|
| Loan Authority => Authority who is providing the loan.. Select a authority from the list. |
| Account => The receiving account. The loan amount will be added to the selected account. Select an account from the list. |
| Loan Reason => Reason for your loan. You can add any reason as plain text. |
| Reference => Reference for the loan. Please use a meaningful reference because you will need to use this reference later in the loan payments module to select the loan. |
| Amount => Loan amount. The amount will be added to the selected account. |
| Loan Type => Type of the loan. There are 2 types of loans available in the sytem. If you are willing to add a term loan then select term loan otherwise select CC loan. |
| Payment Type(If term loan is selected.) => Loan payment type. You can select daily, monthly or yearly payment type trom the select box. |
| Duration(If term loan is selected.) => Duration of the loan. Enter the duration based on payment type. For example, if your loan duration is 2 years and you are selecting payment type monthly then you need to enter 24 in the duration input field. |
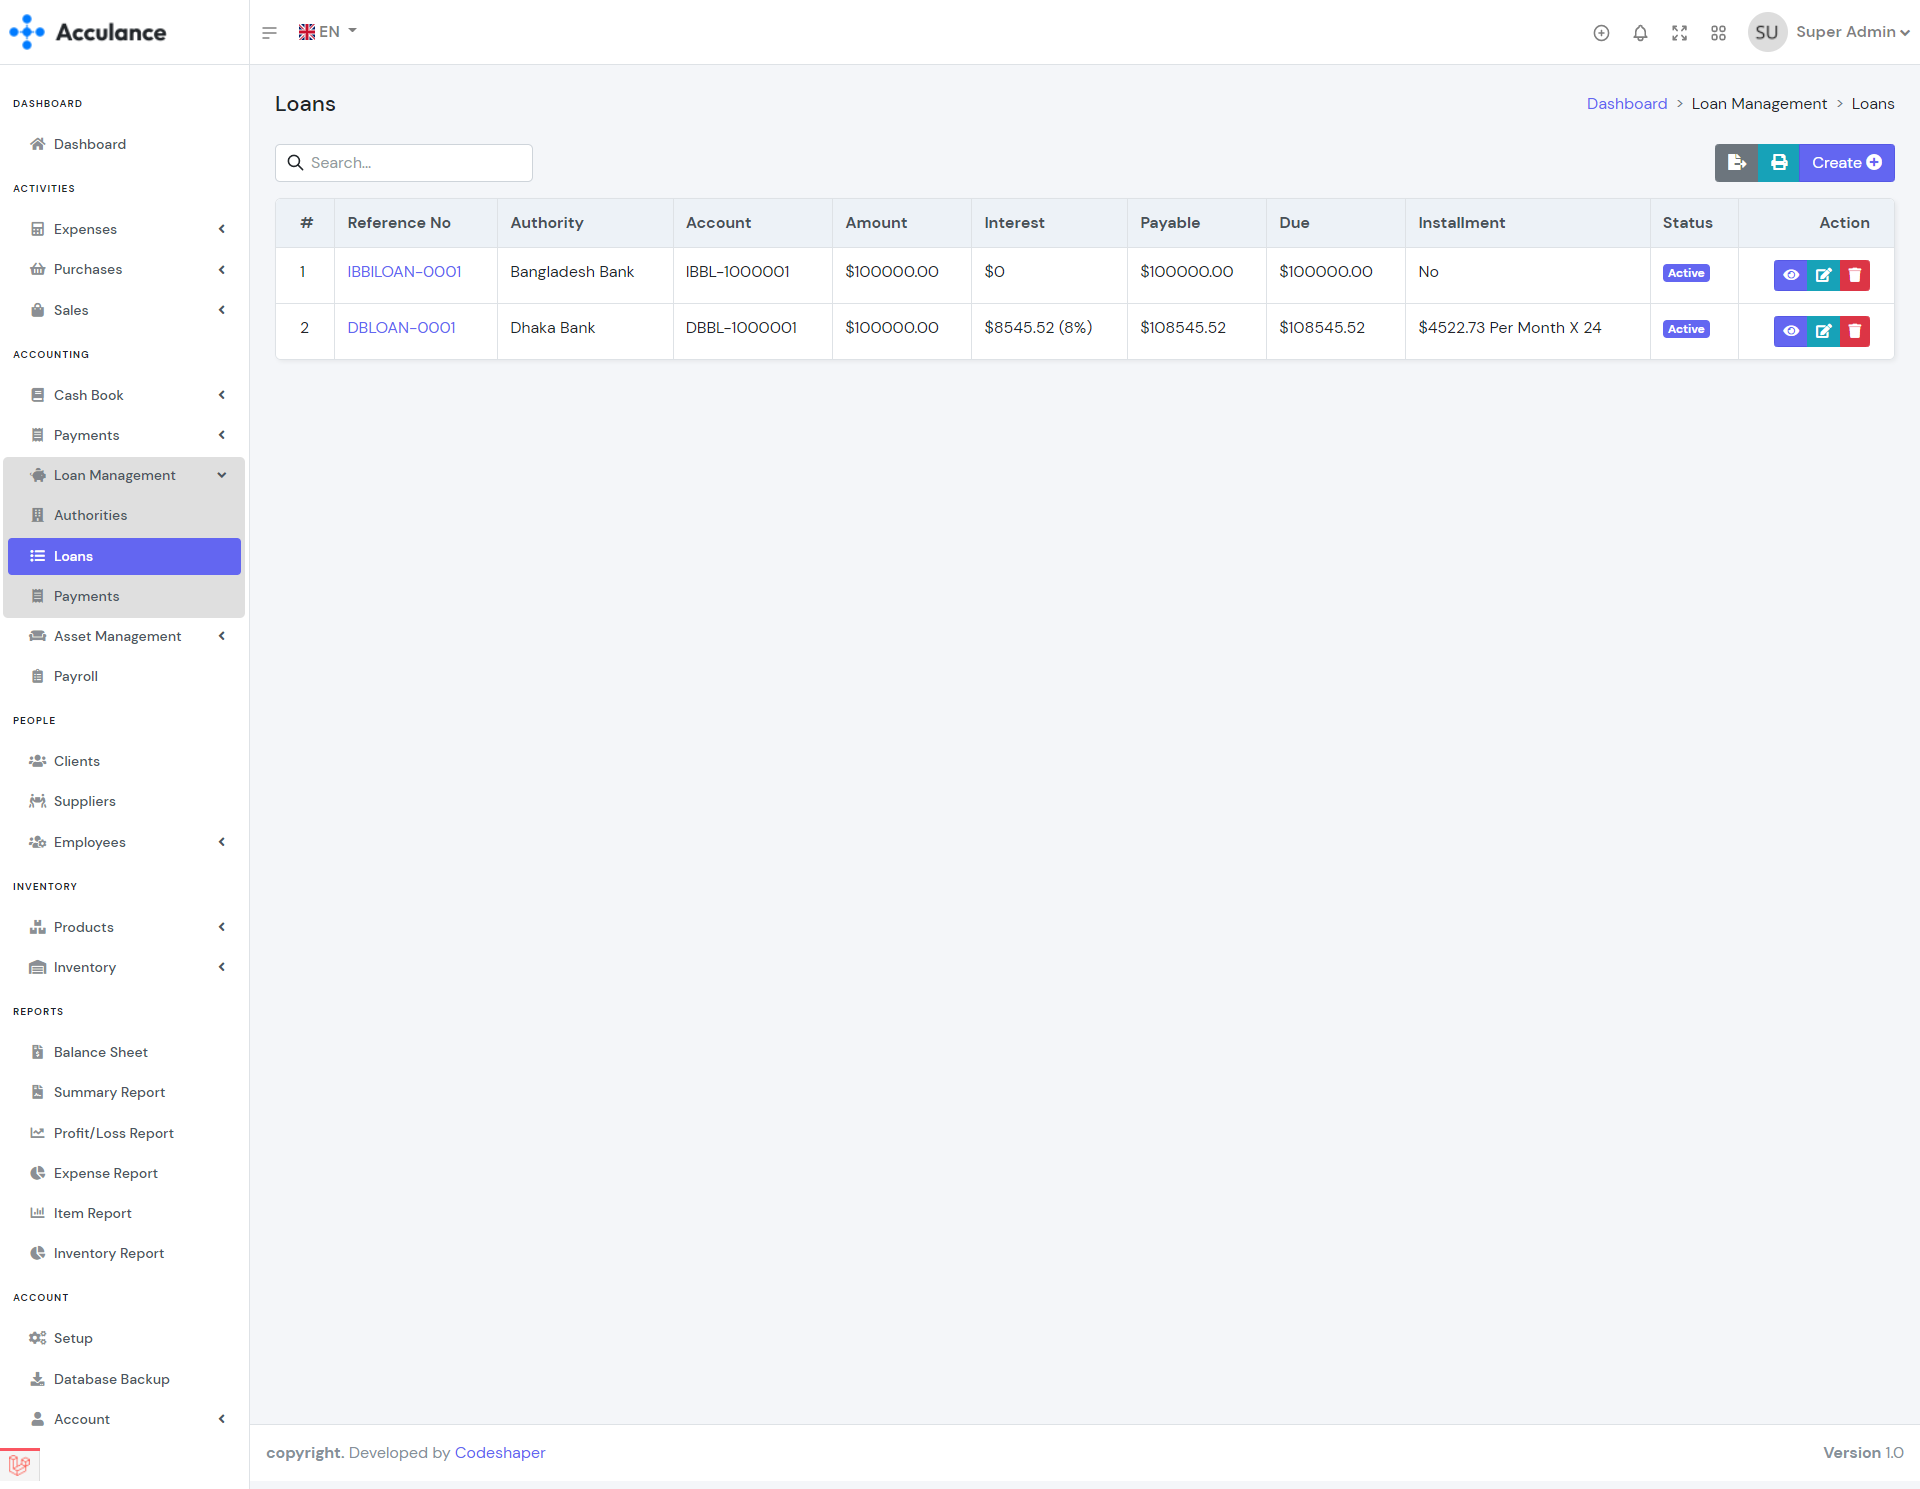
Loans List
Create Loan
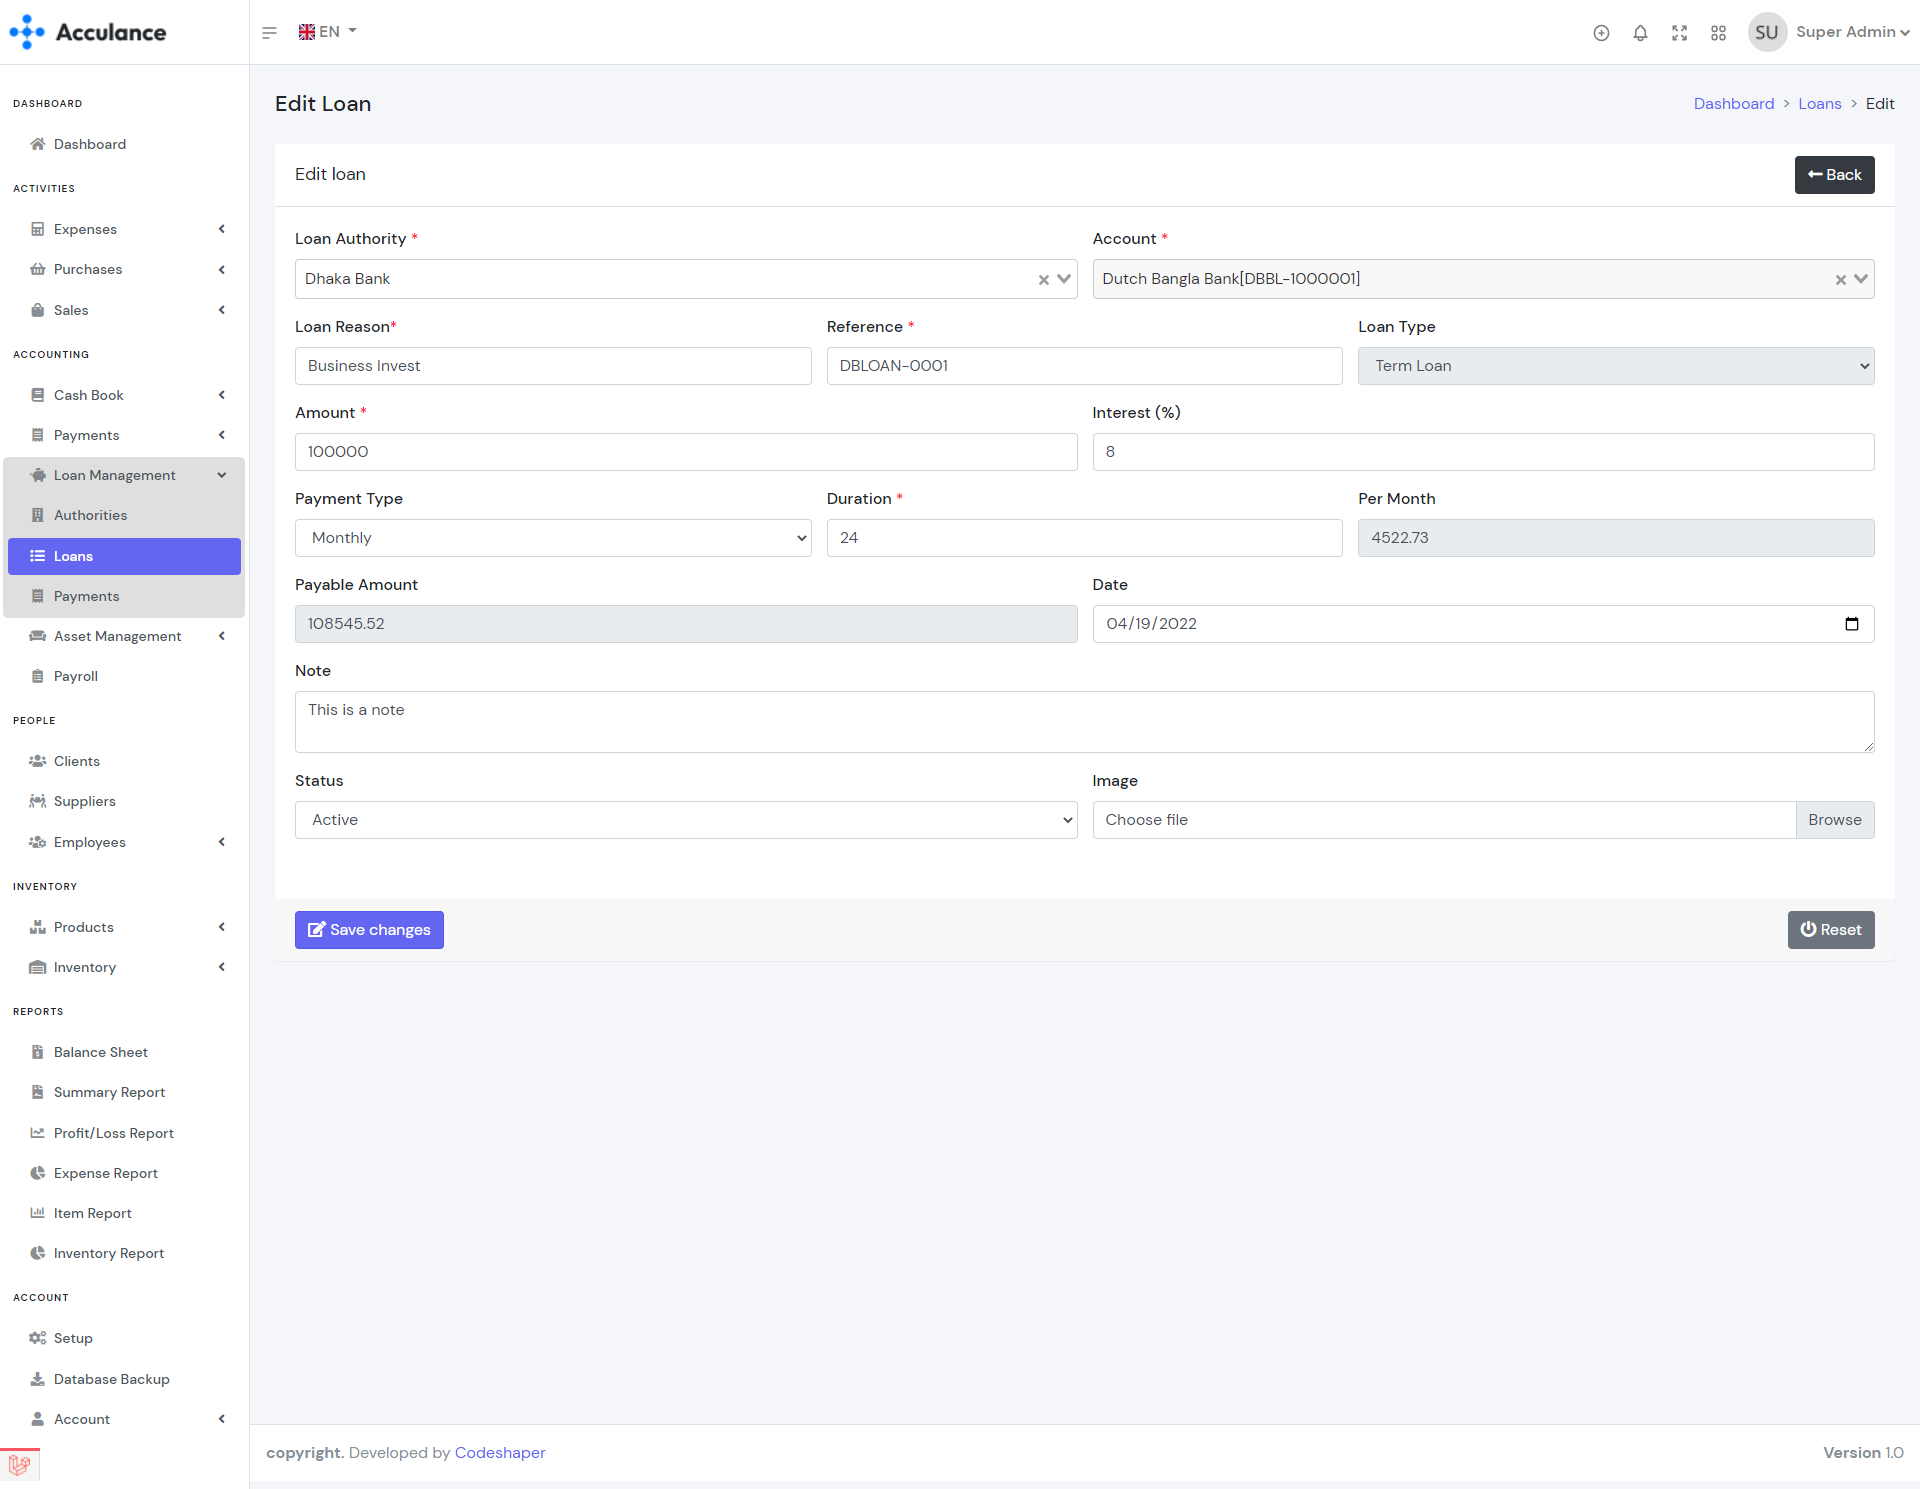
Edit Loan
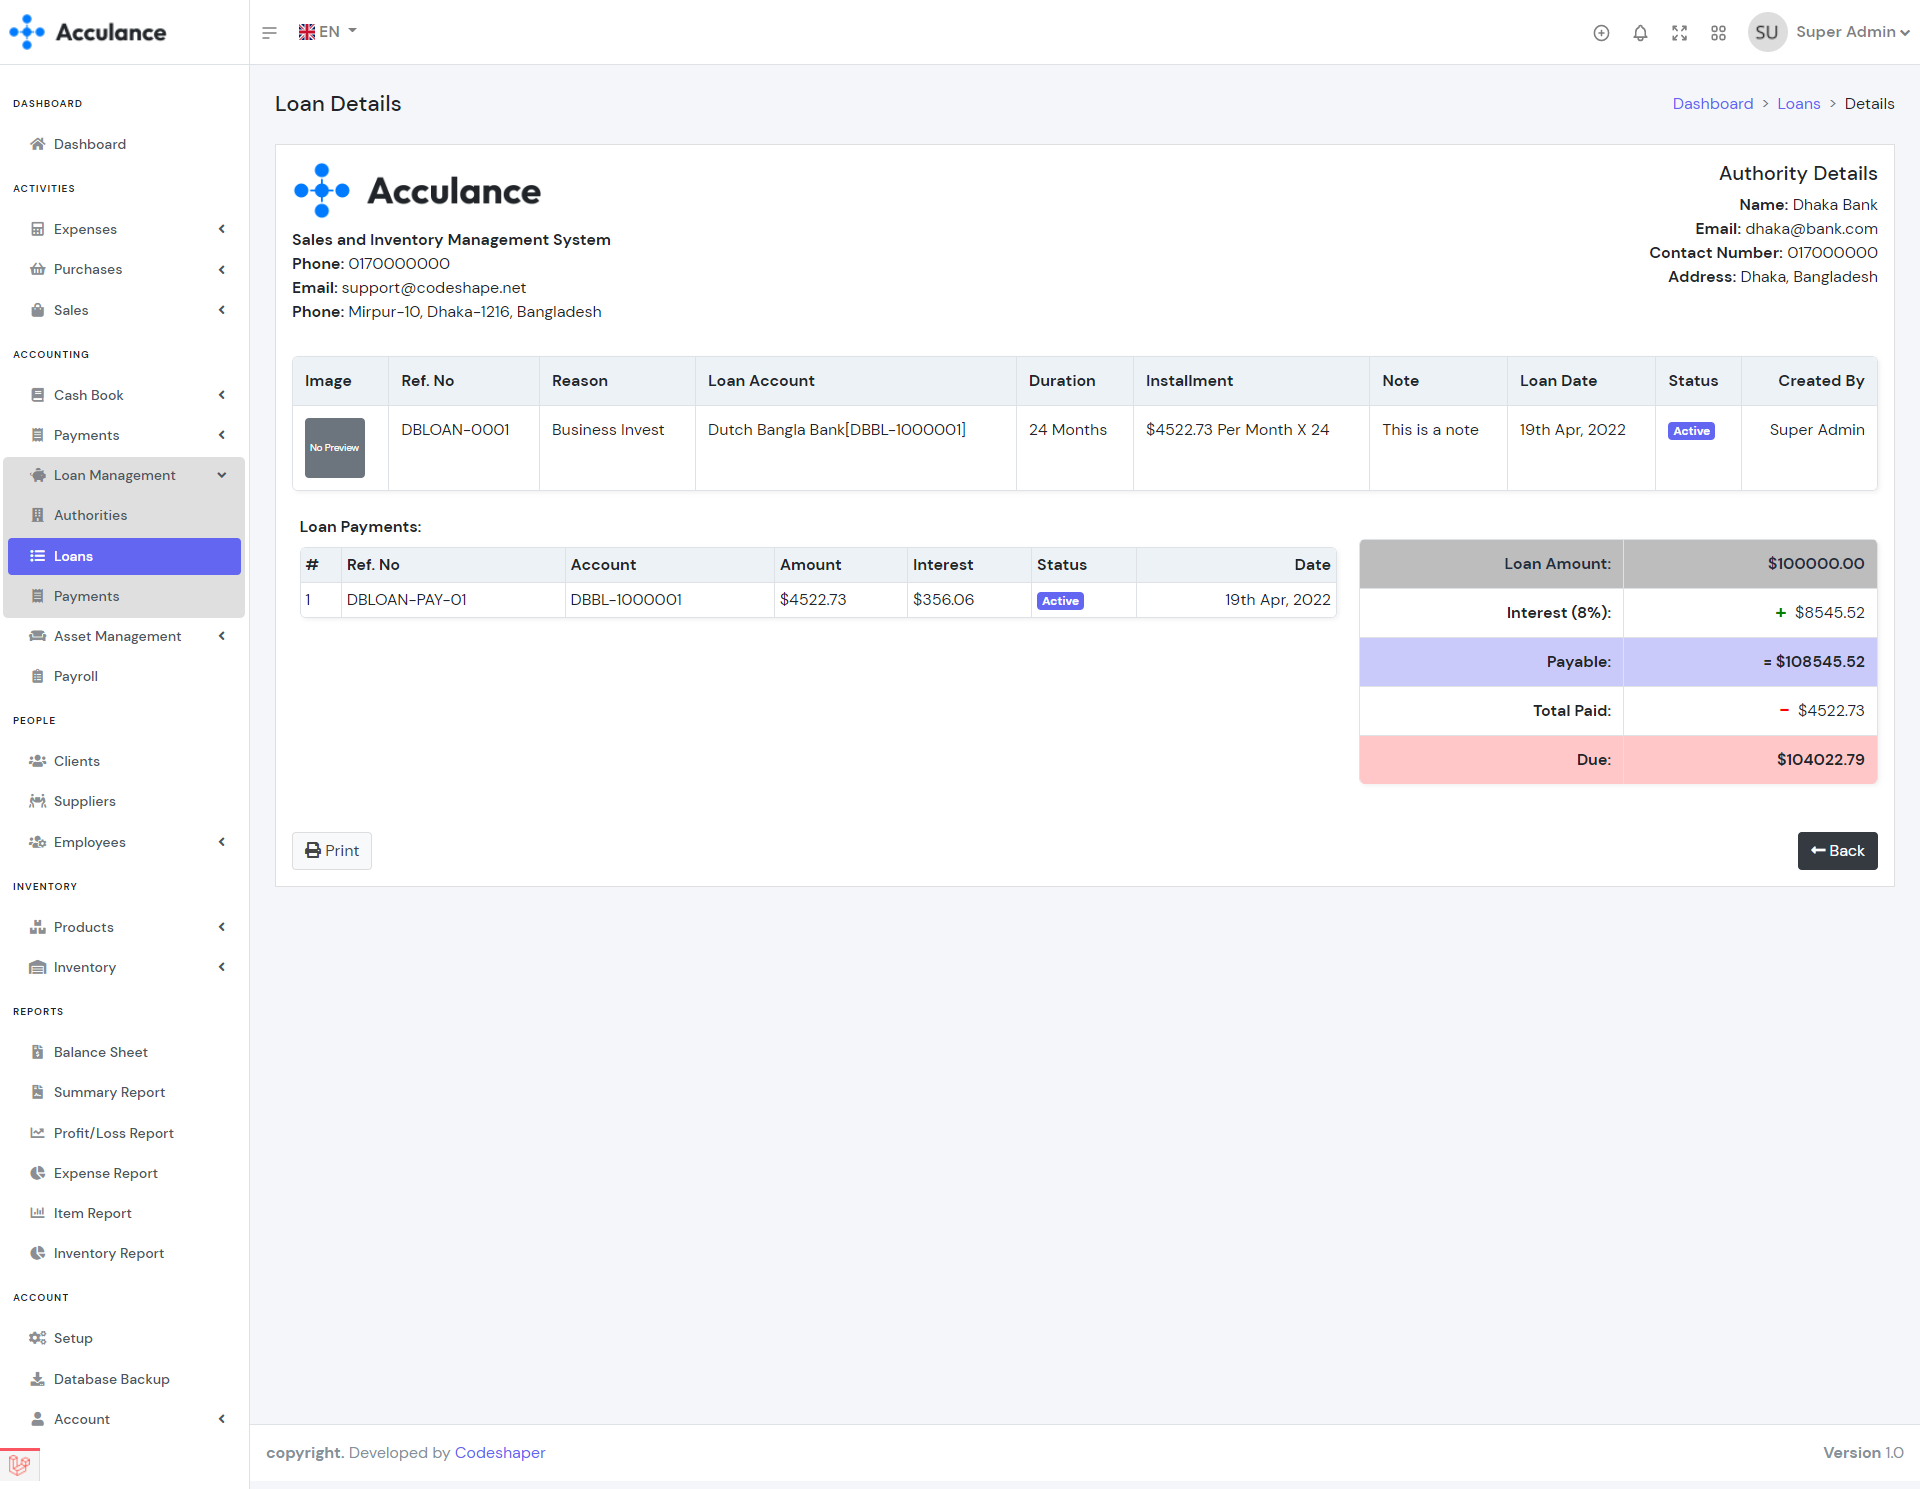
Loan Details
Note: In order to delete any loan, you need to delete the loan payments first. Deleting any loan will delete the loan payments and the balance from the account. So we recommend you to use the delete option very carefully.
Loan Payments
Loan payments module helps add payments for your loans. Using this module you can make payments for your unpaid loans. You must create loans first in order to create loan payments.
| Required fields to create a loan payment |
|---|
| Loan => Client to whom you want to add due or sent purchase payment. Select a supplier from the list. |
| Reference => Select a loan for which you want to make payment. Identify your loan by your loan reference. Select a loan from the list. |
| Account => The paying account. The payment amount will be sent from the selected account. Select an account from the list. The available balance must be greater than the Payment Amount. |
| Amount(If paying for a CC loan) => The paying amount. For the term loan, the amount will be calculated autometically. |

Loan Payments List
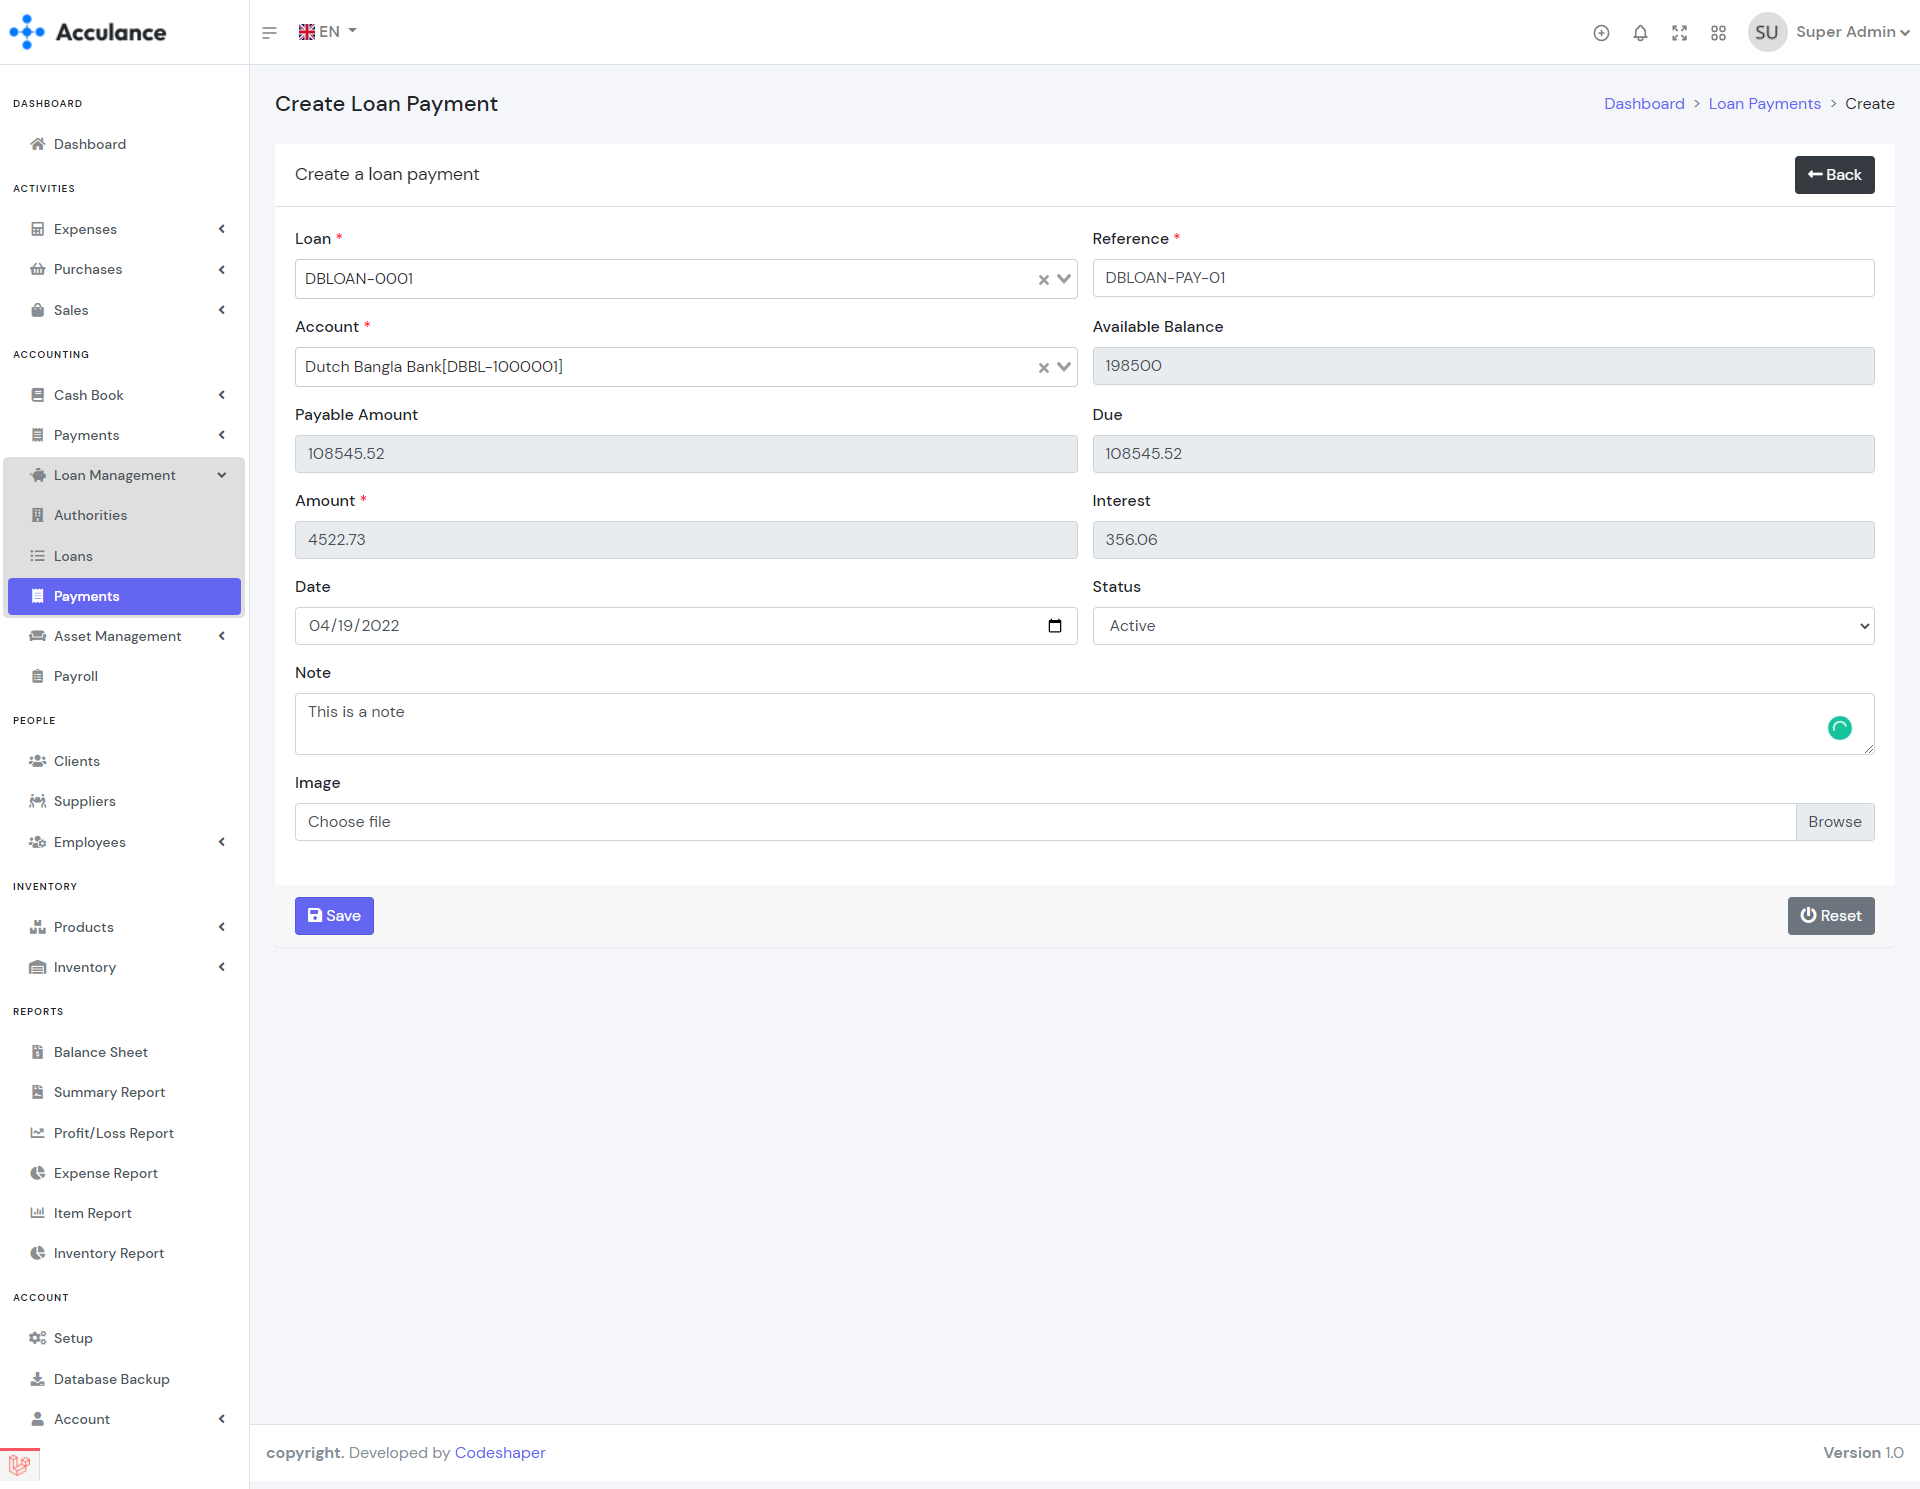
Create Loan Payment
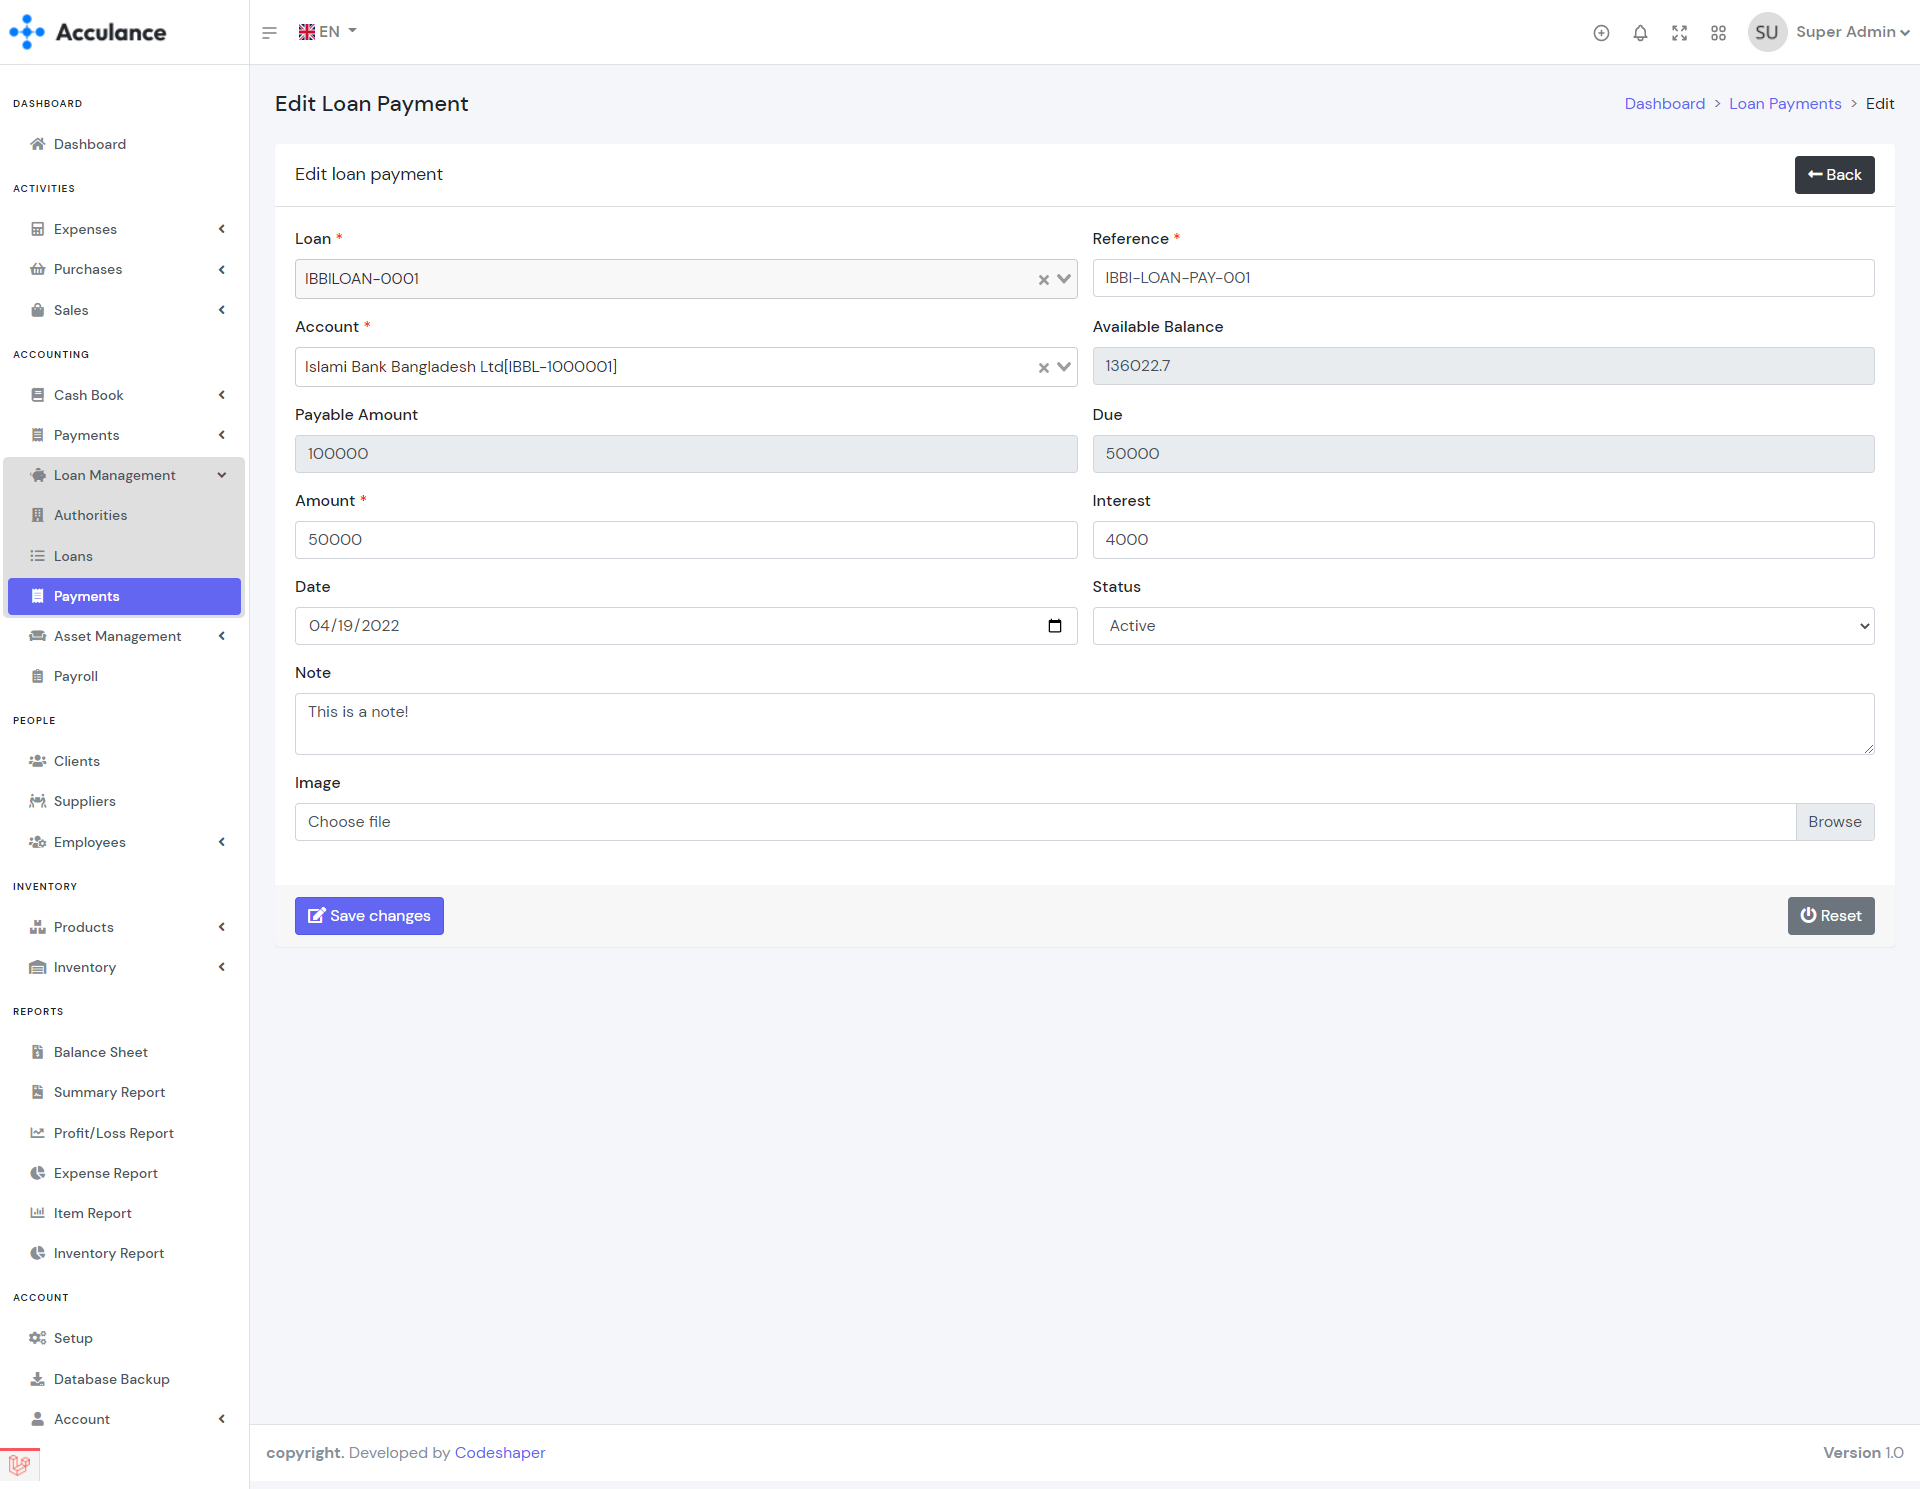
Edit Loan Payment
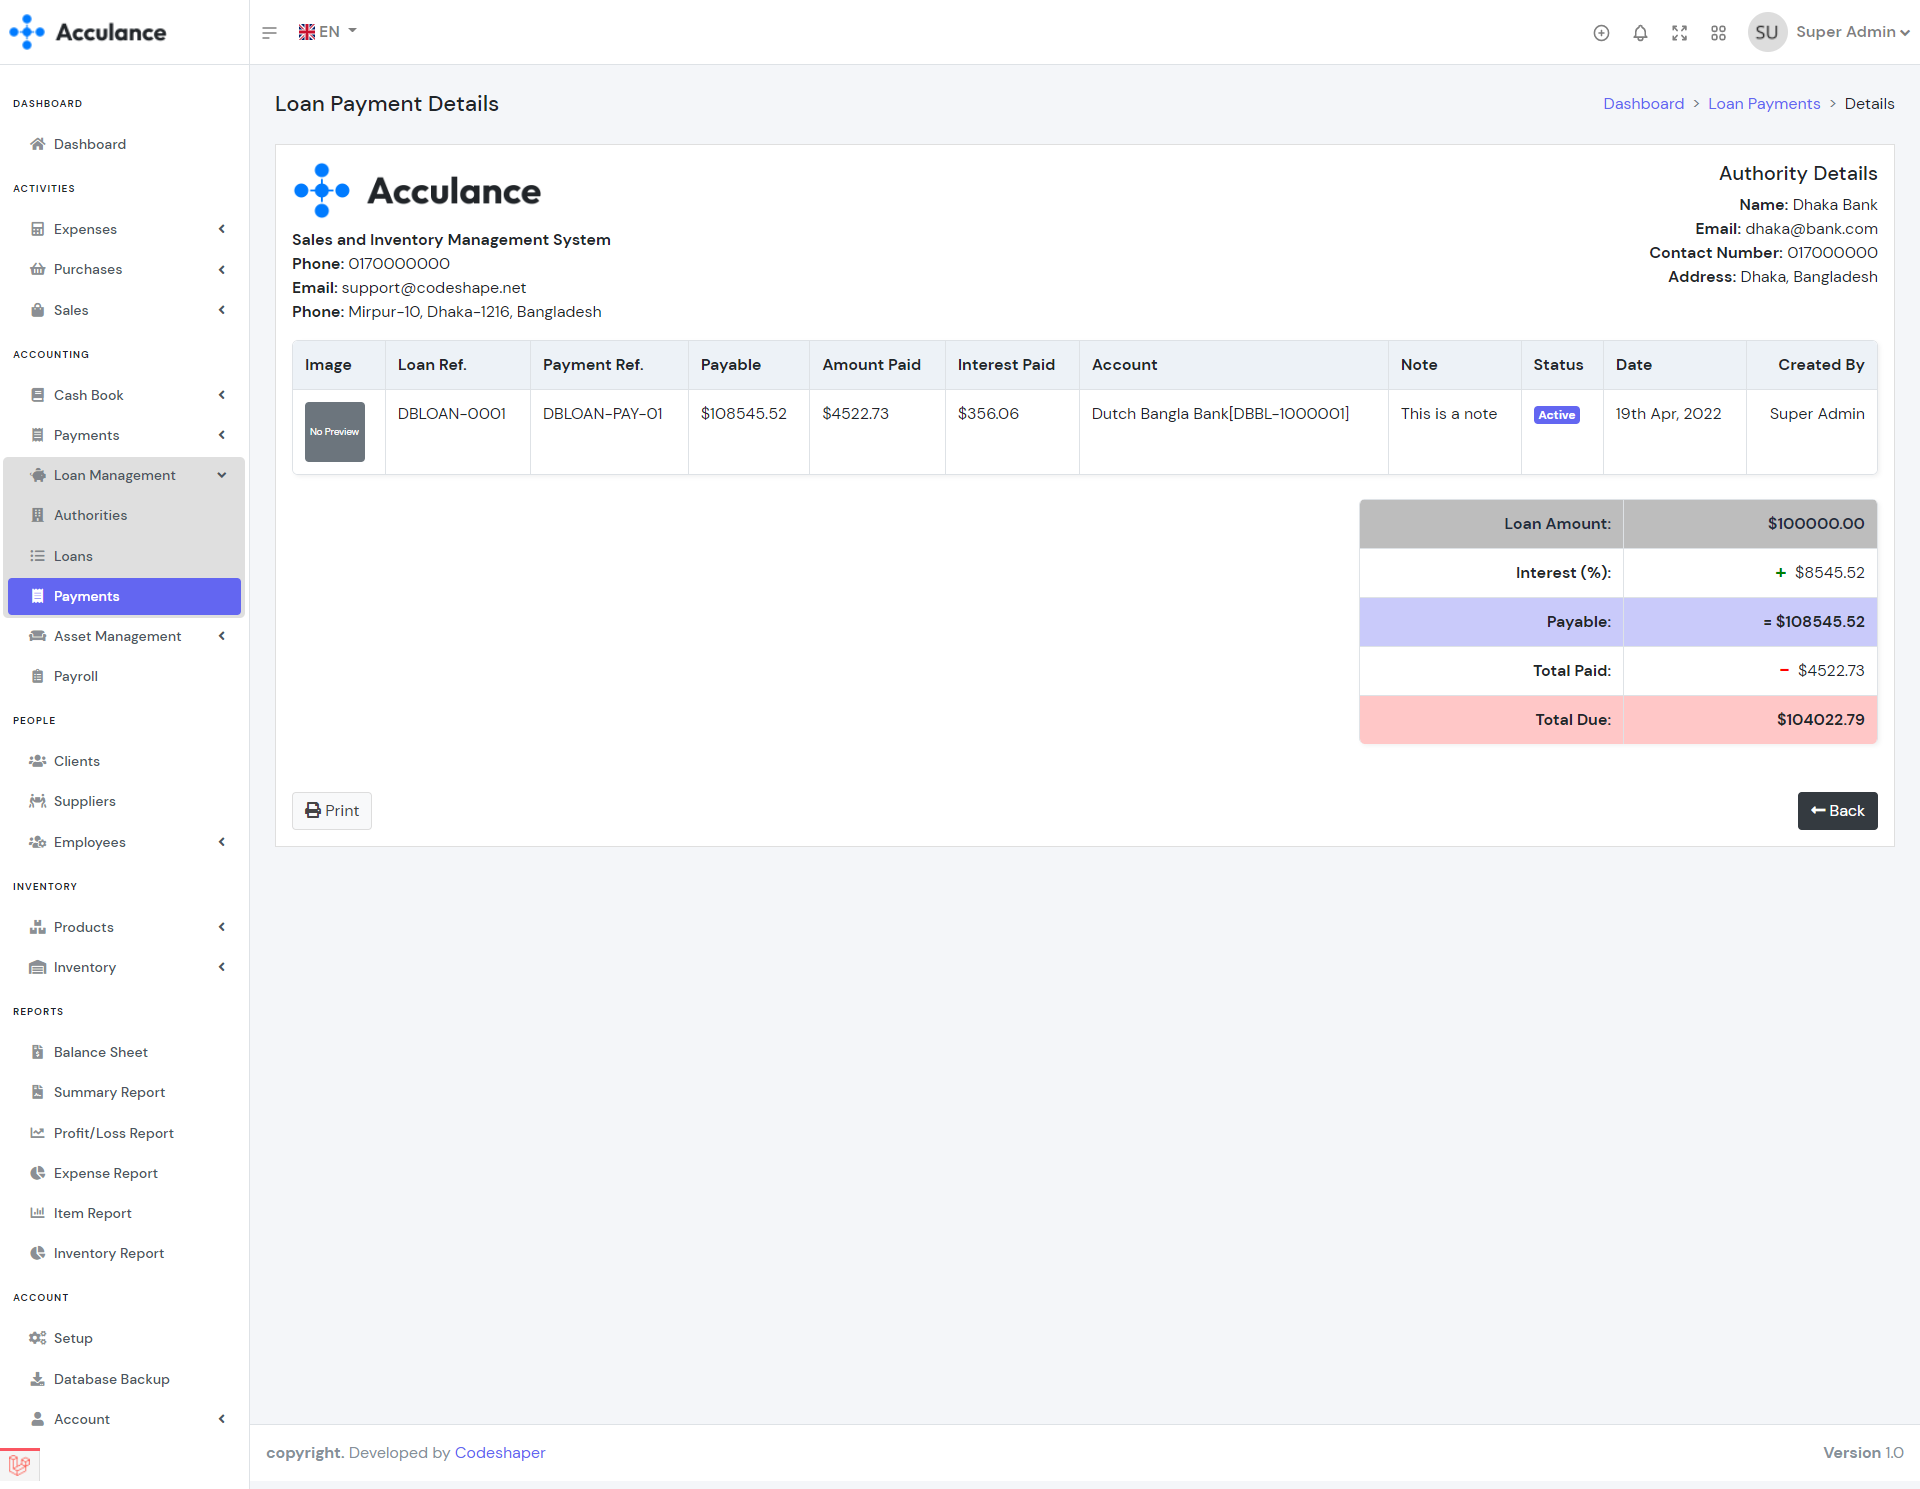
Loan Payment Details
Assets
Asset management module helps you manage your company assets and their deprecation. We have implemented straight line depreciation method to calculate the deprecation. You can also create assets without any deprecation. In order to create any asset, you need to create an asset type first.
| Required fields to create a loan payment |
|---|
| Asset Name => Name of the asset. You can enter any name. |
| Asset Type => Type(Category) of the asset. Select an asset type from the list. |
| Asset Cost => The current value of your asset. Enter a number as the asset cost. |
| Depreciation => If the asset has deprecation then select yes otherwise select no. |
| Depreciation Type(If the asset has deprecation) => Select a deprecation type. You can select yearly deprecation or monthly deprecation. |
| Salvage Value(If the asset has deprecation) => Salvage value is the estimated book value of an asset after depreciation is complete. |
| Useful Life(If the asset has deprecation) => The useful life of an asset is an accounting estimate of the number of years it is likely to remain in service for the purpose of cost-effective revenue generation. |
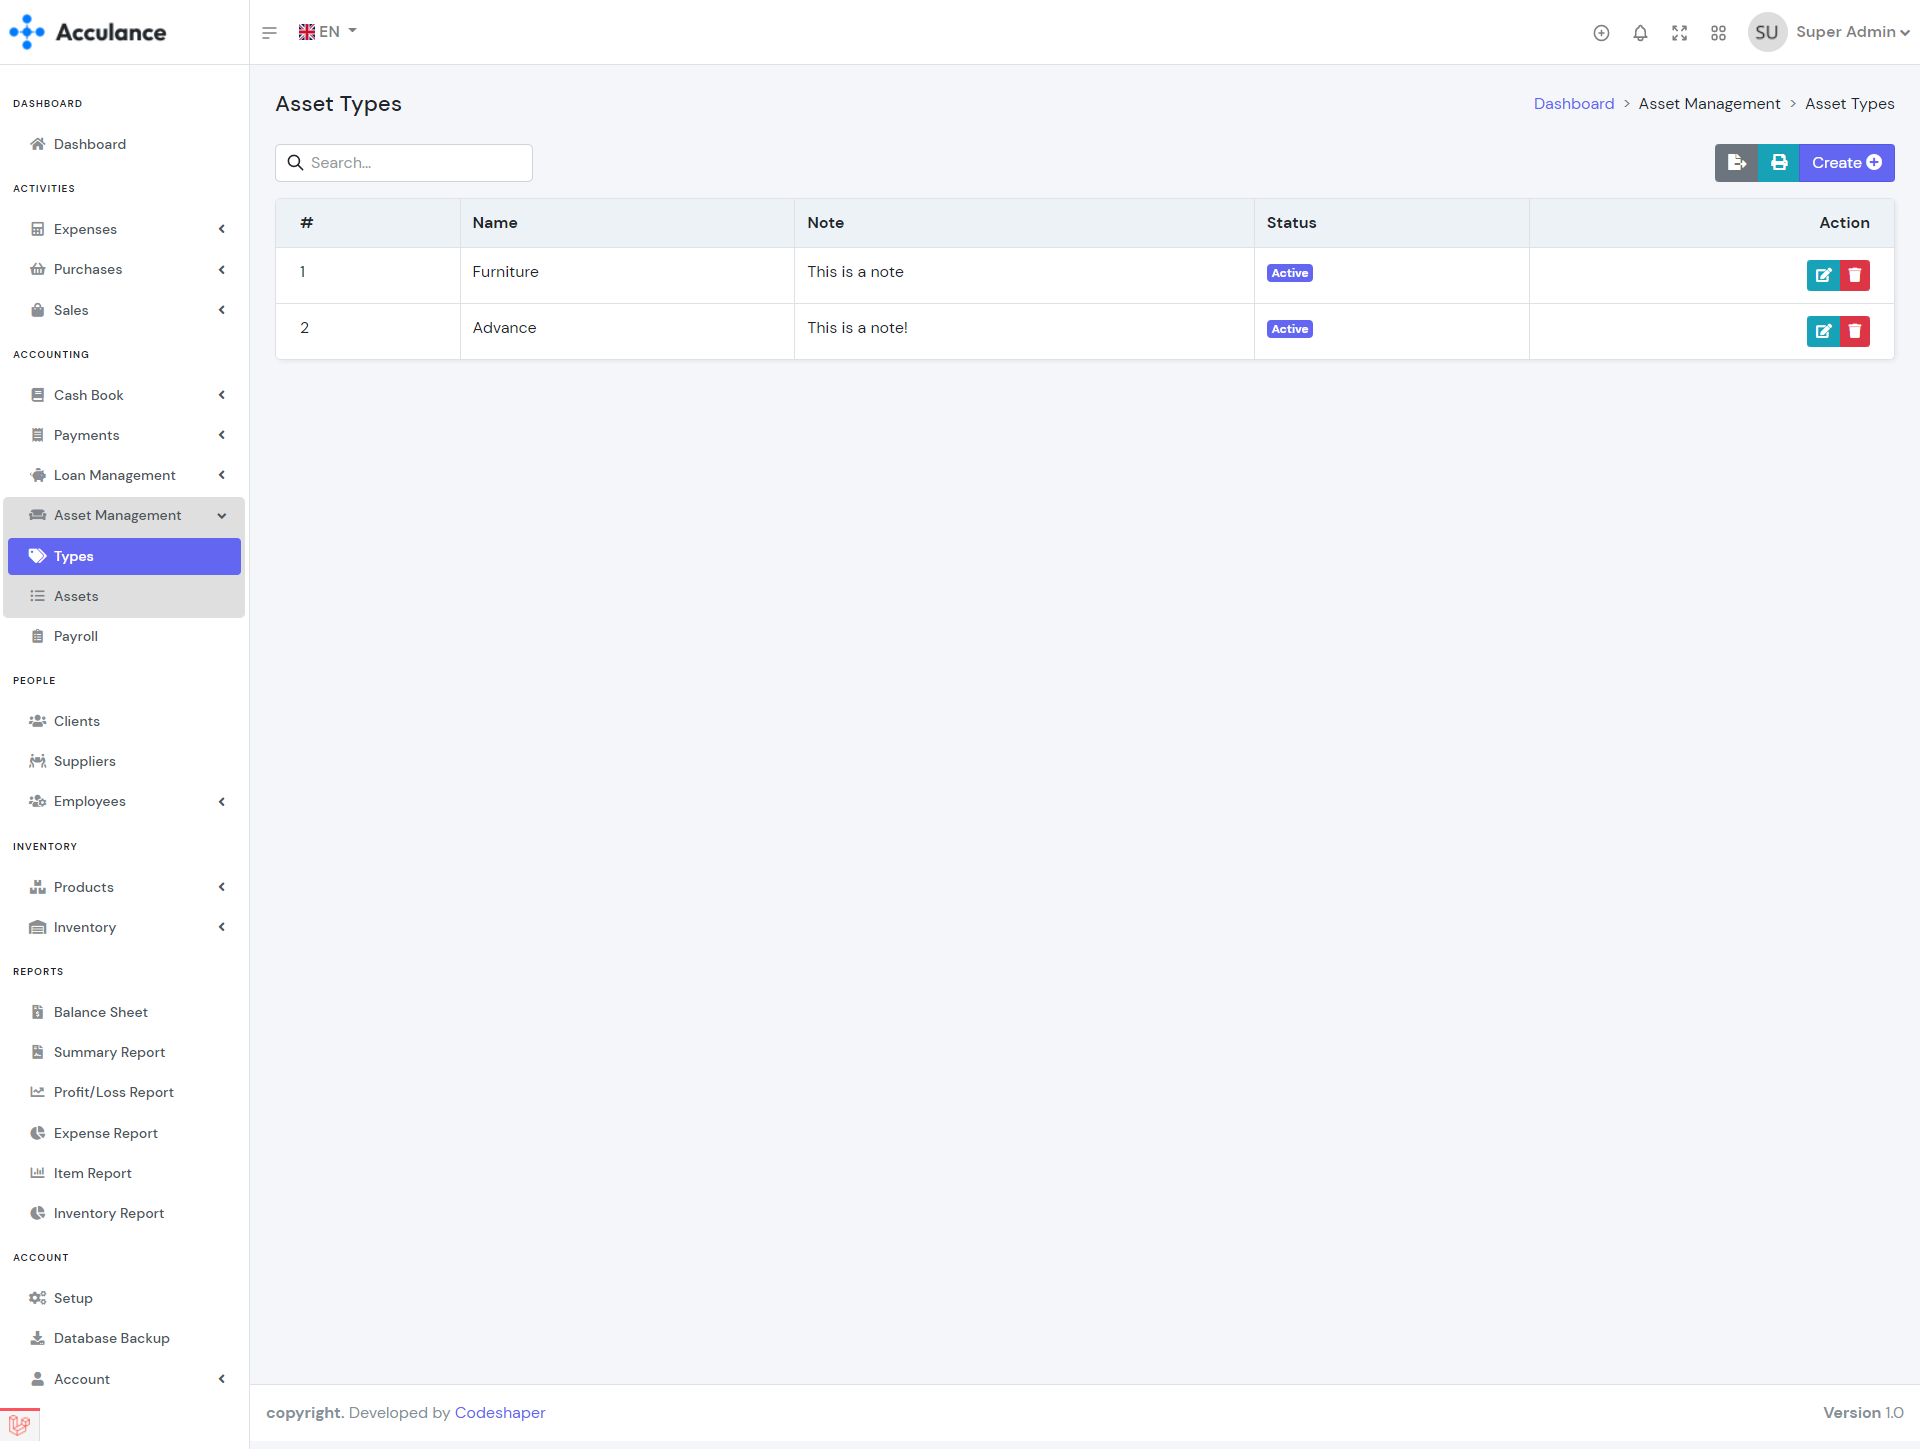
Asset Types List
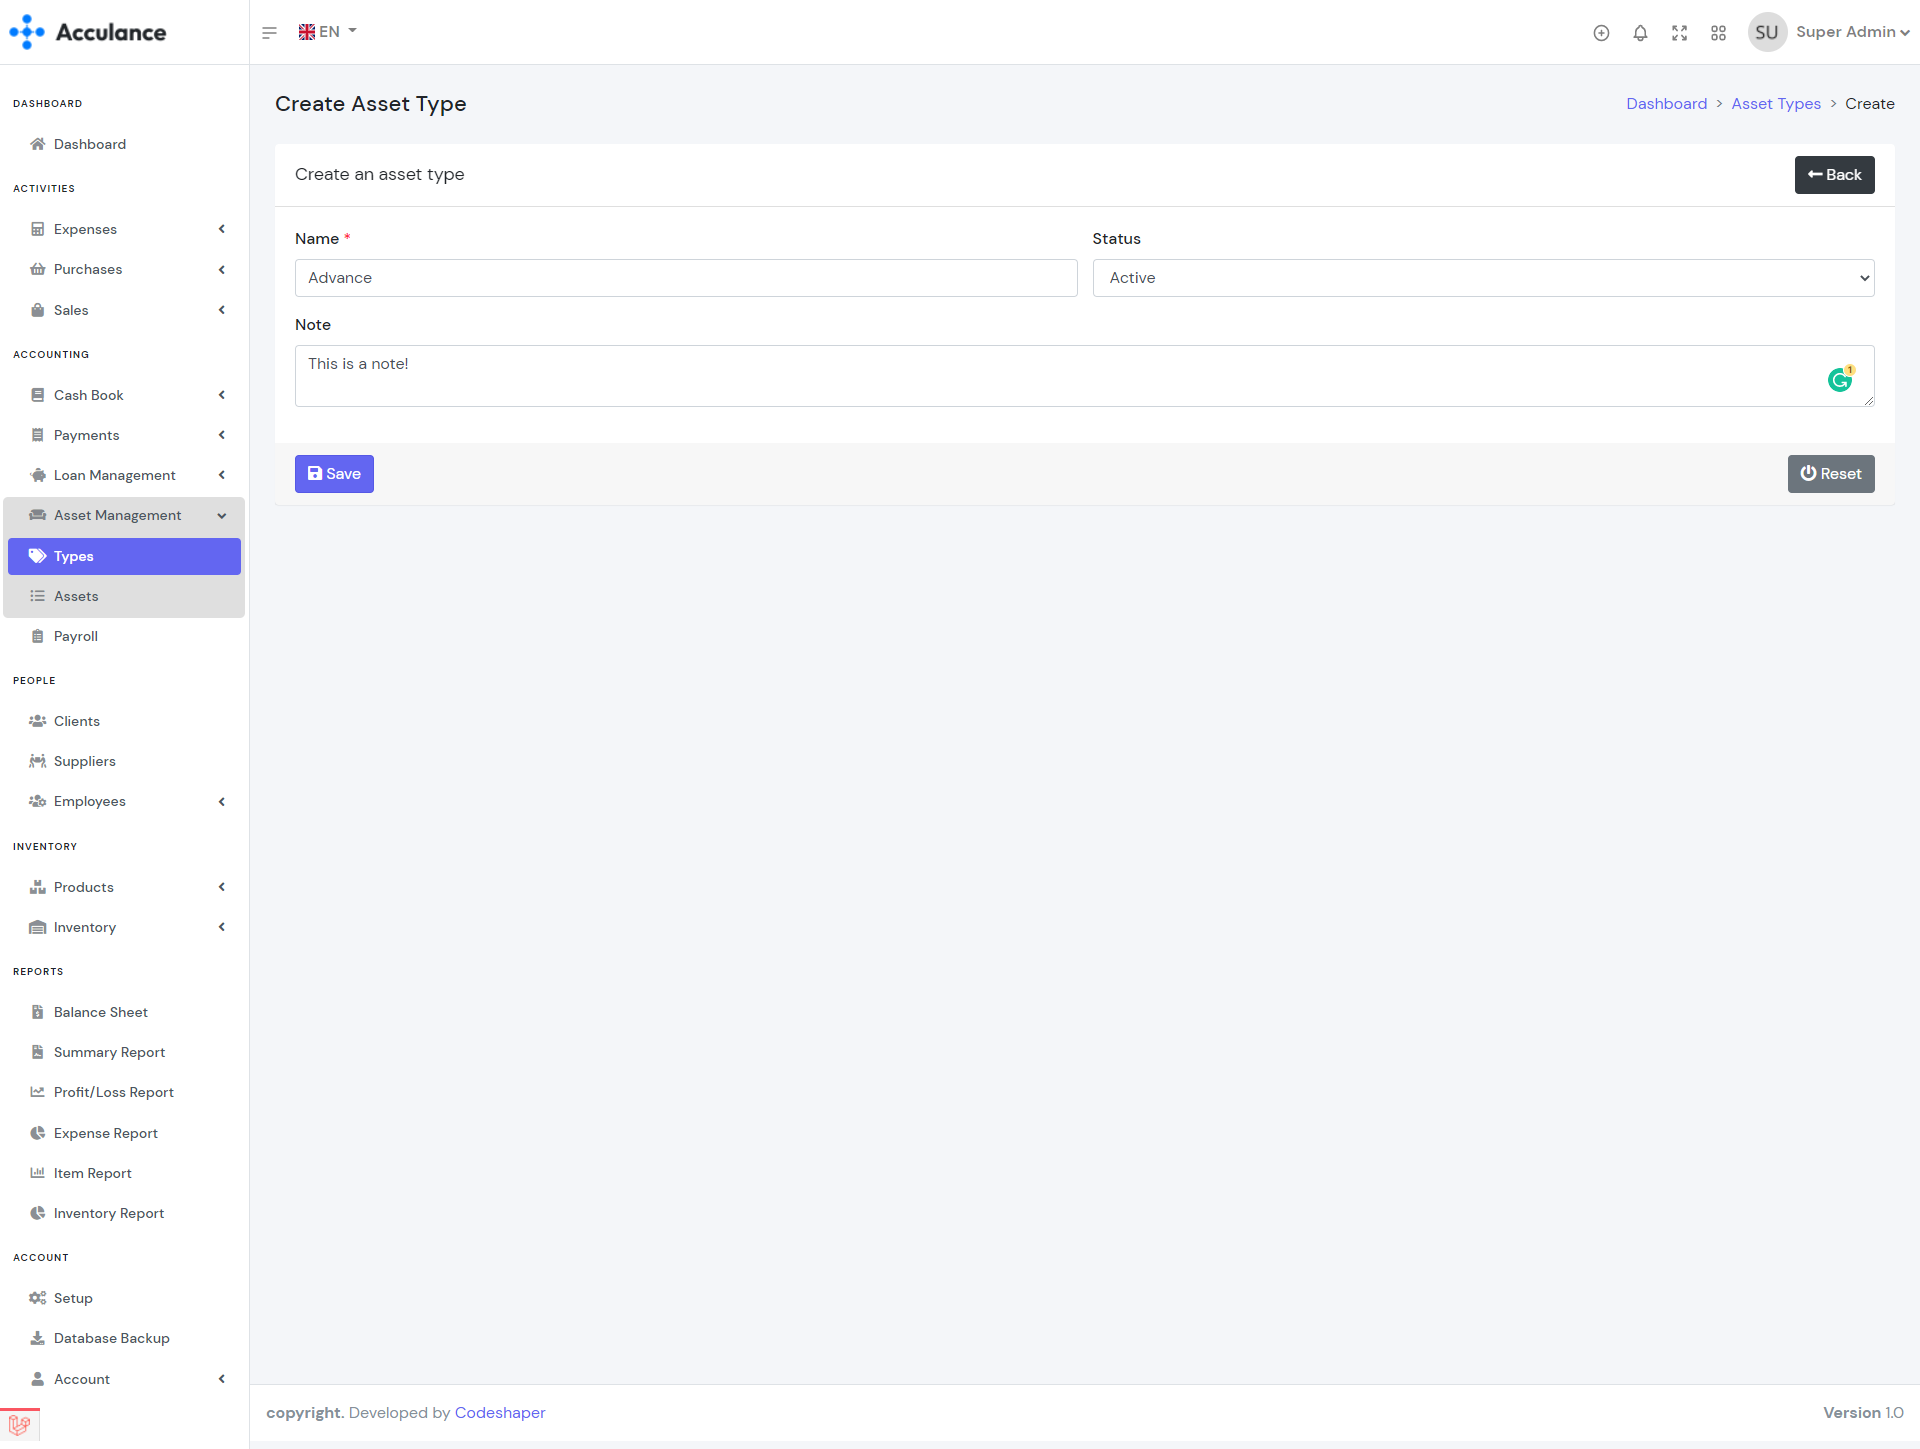
Create Asset Type
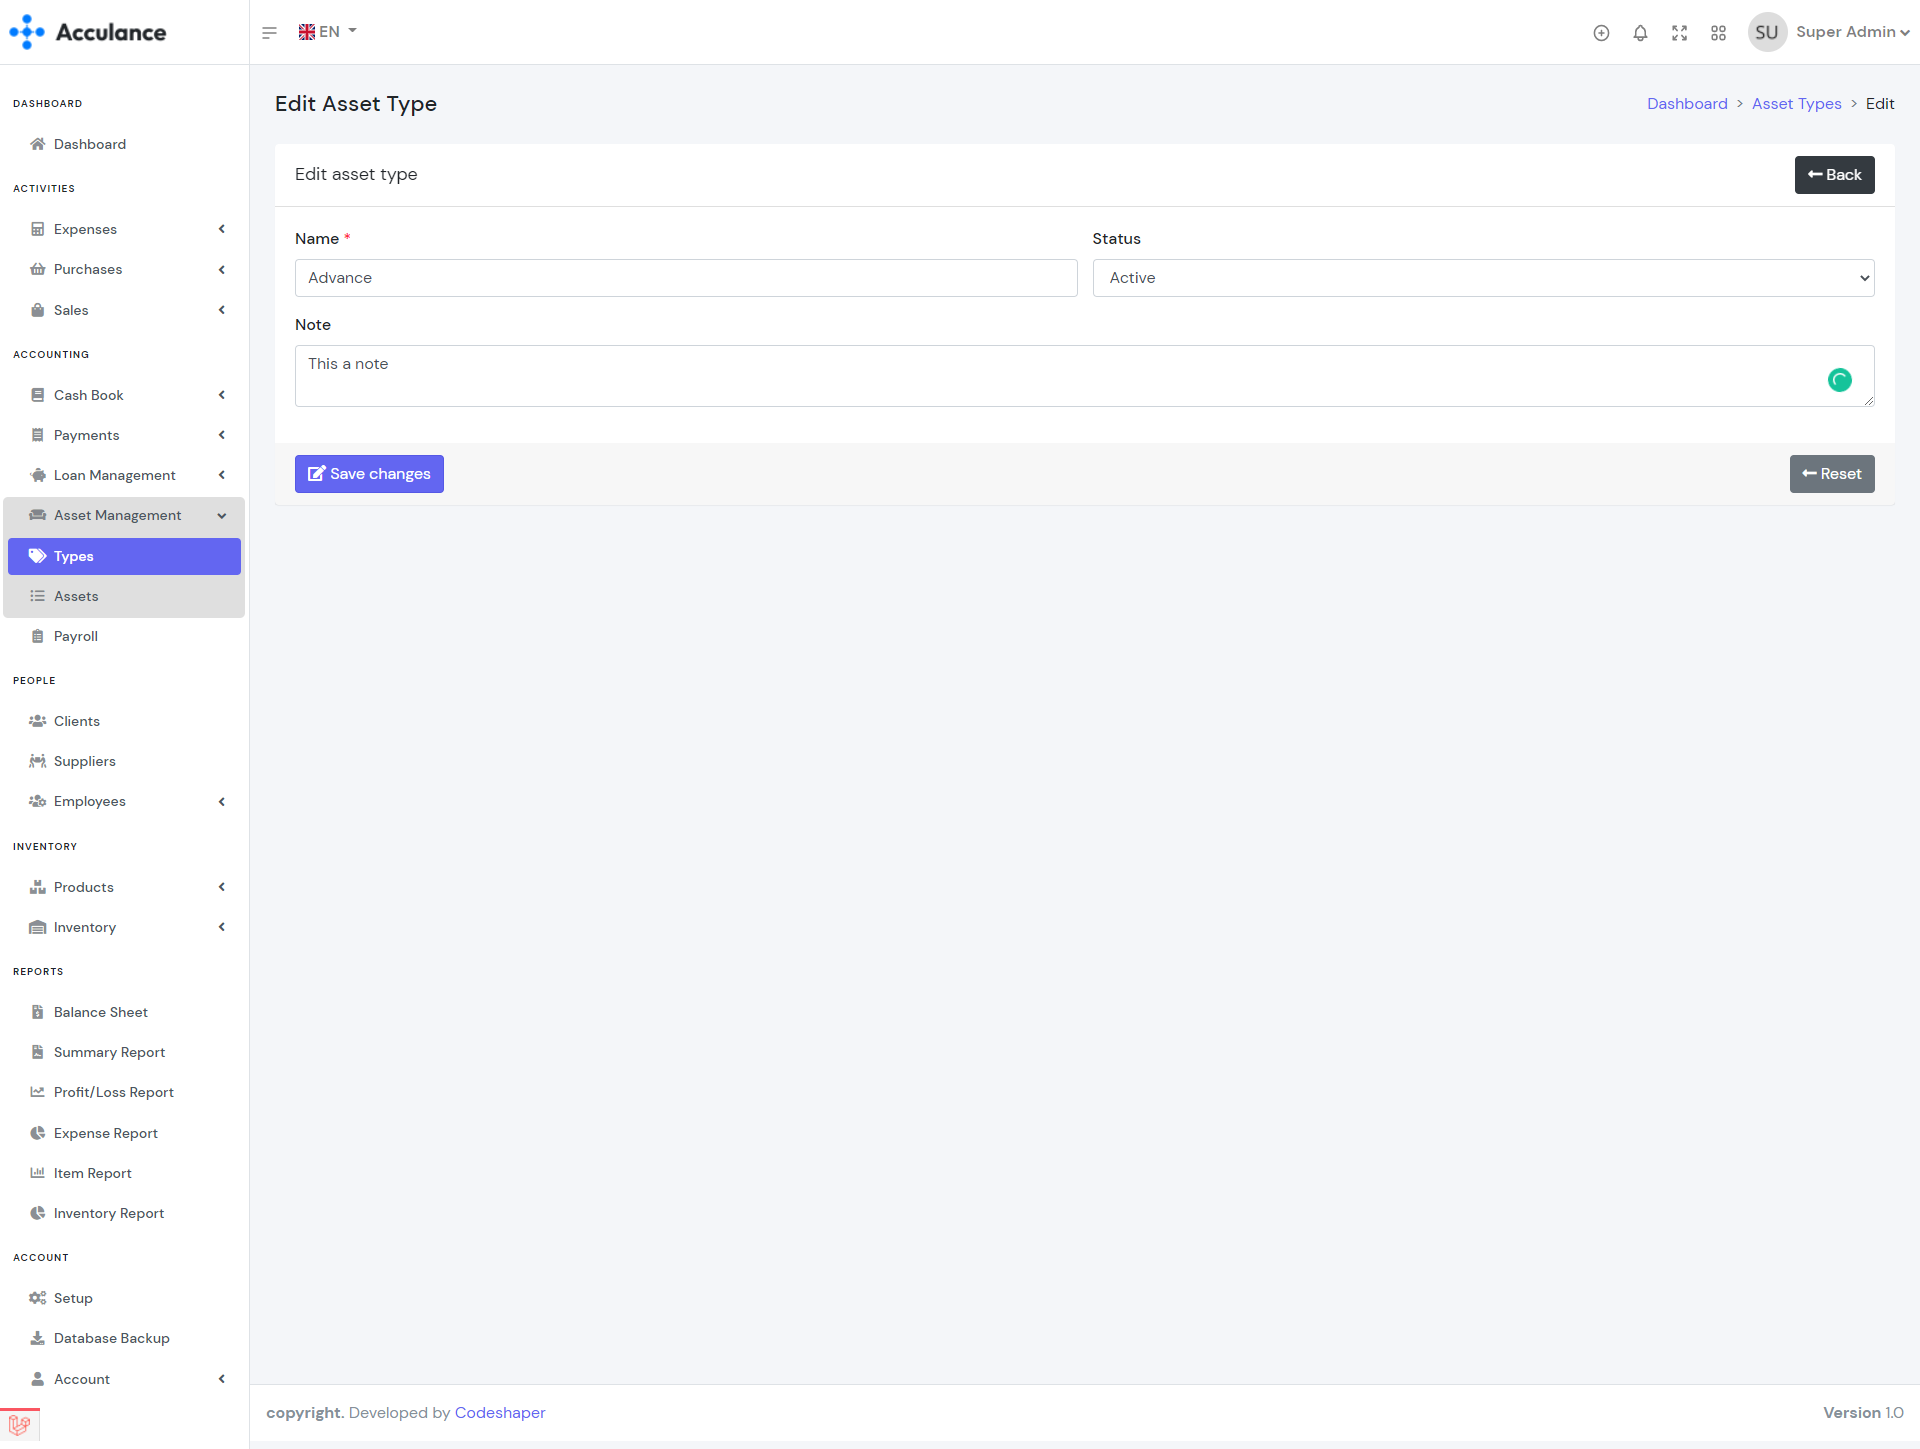
Edit Asset Type
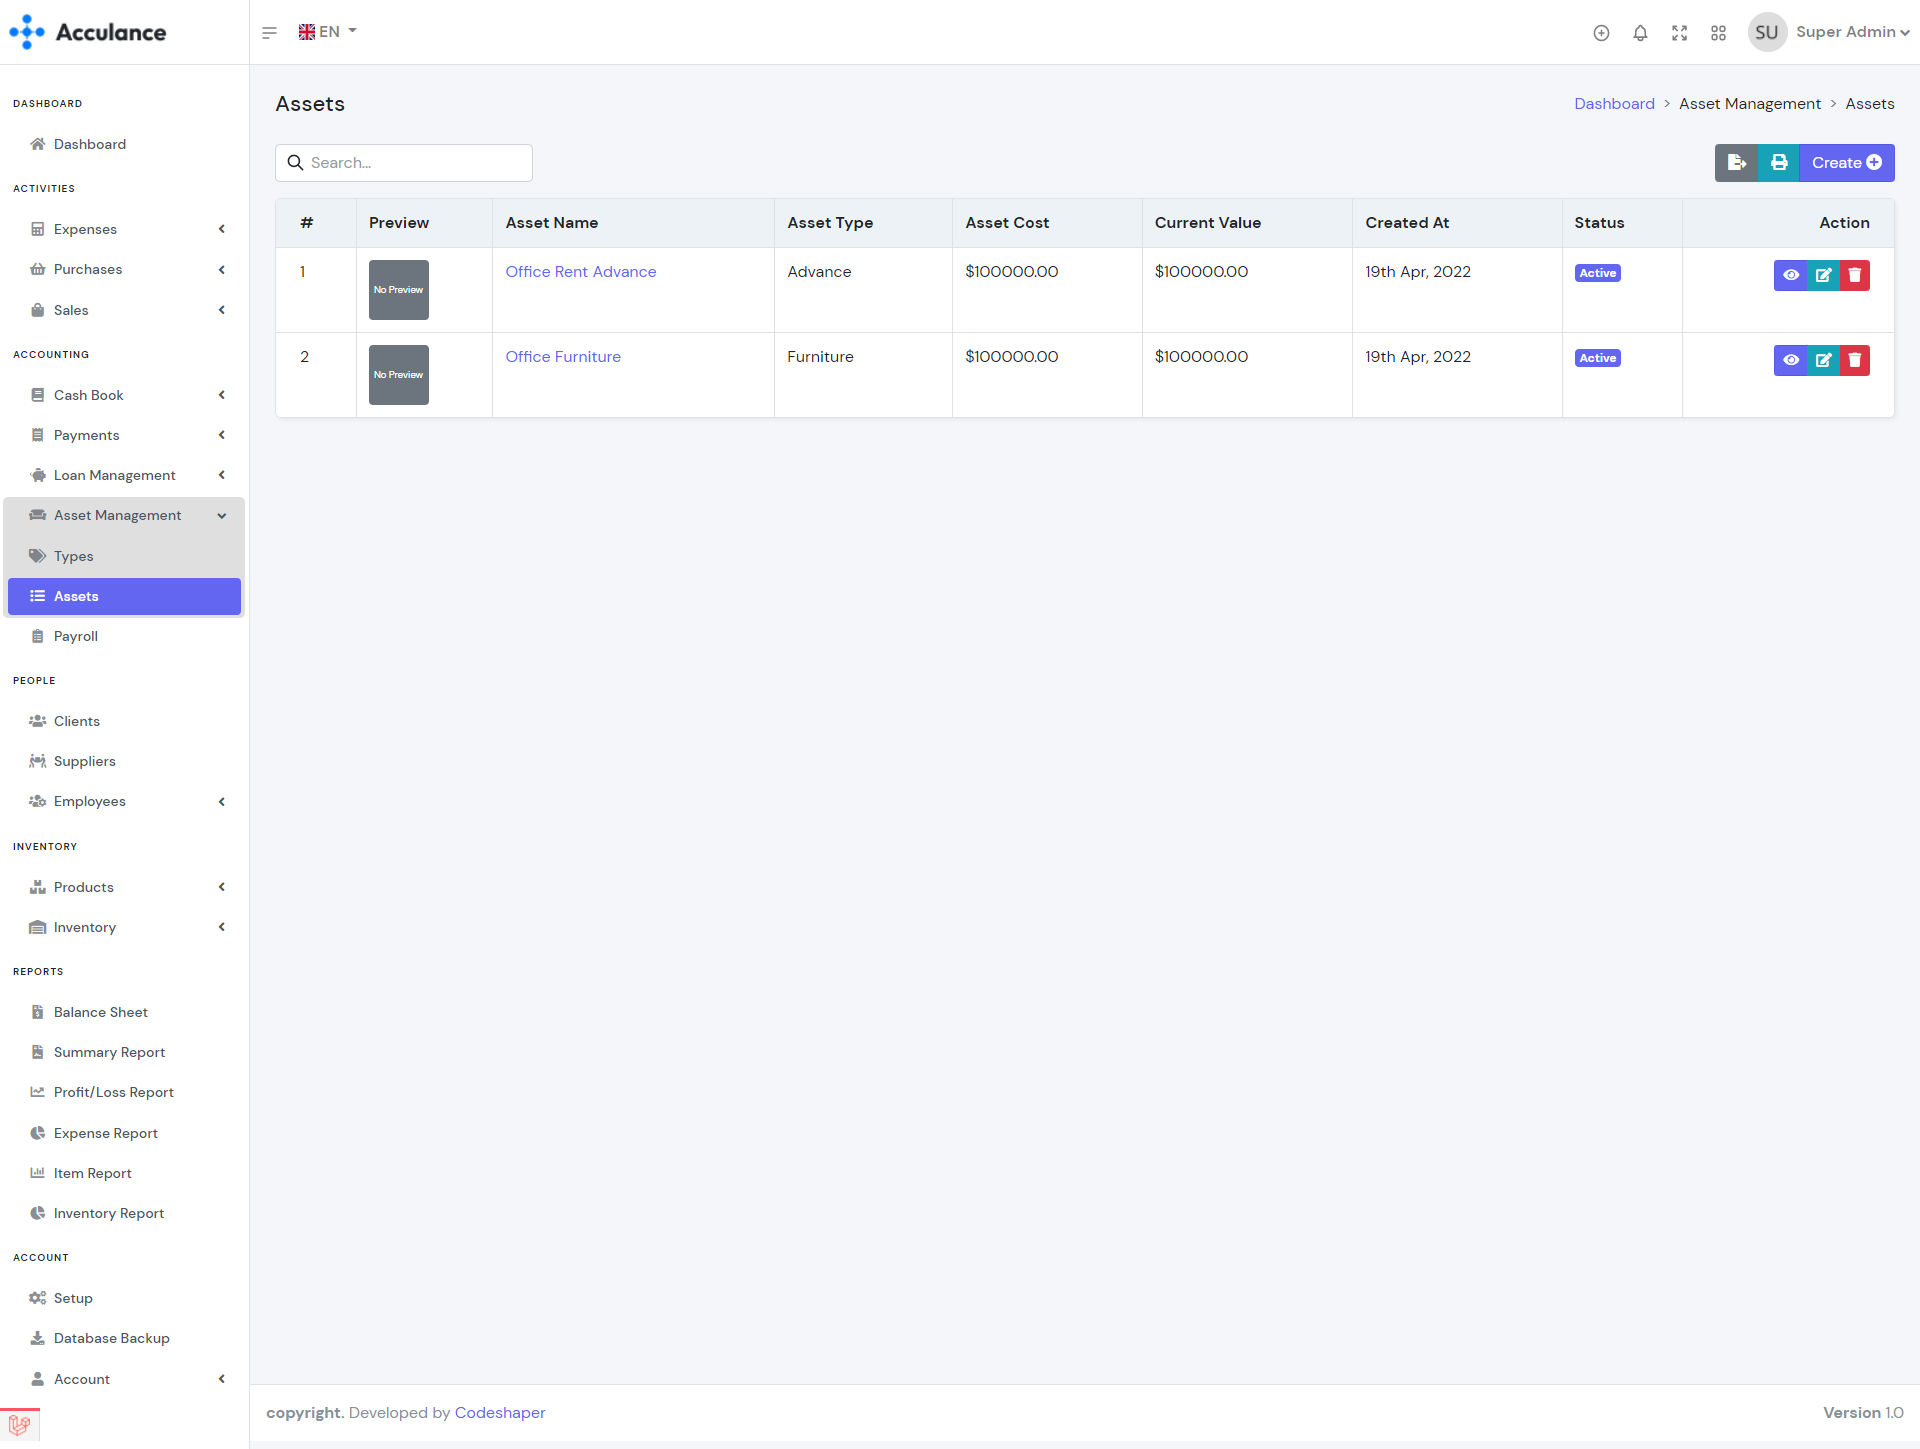
Assets List
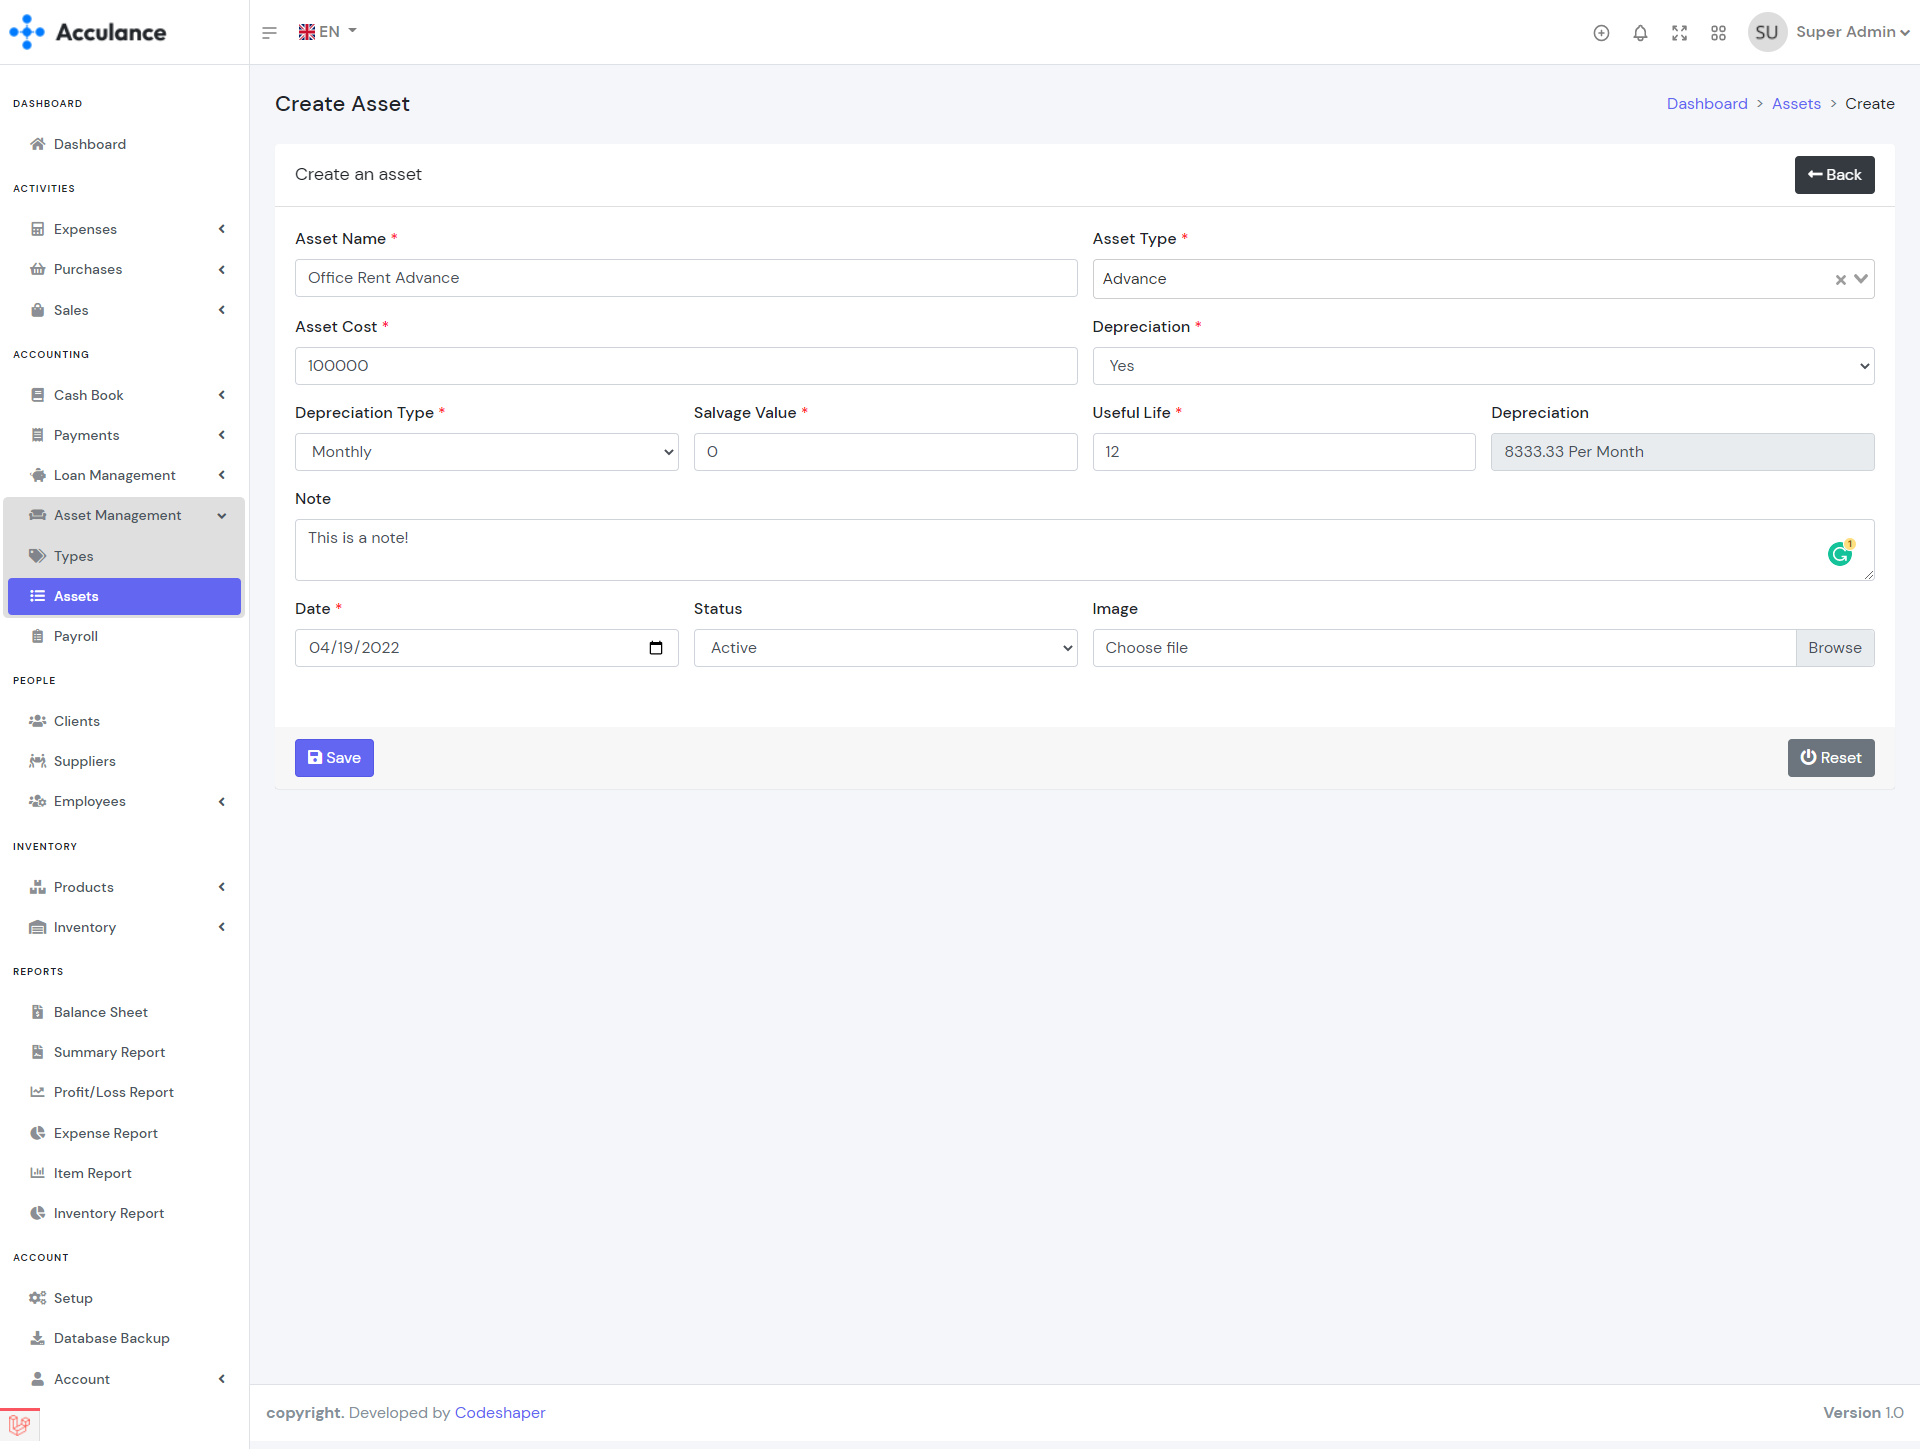
Create Asset
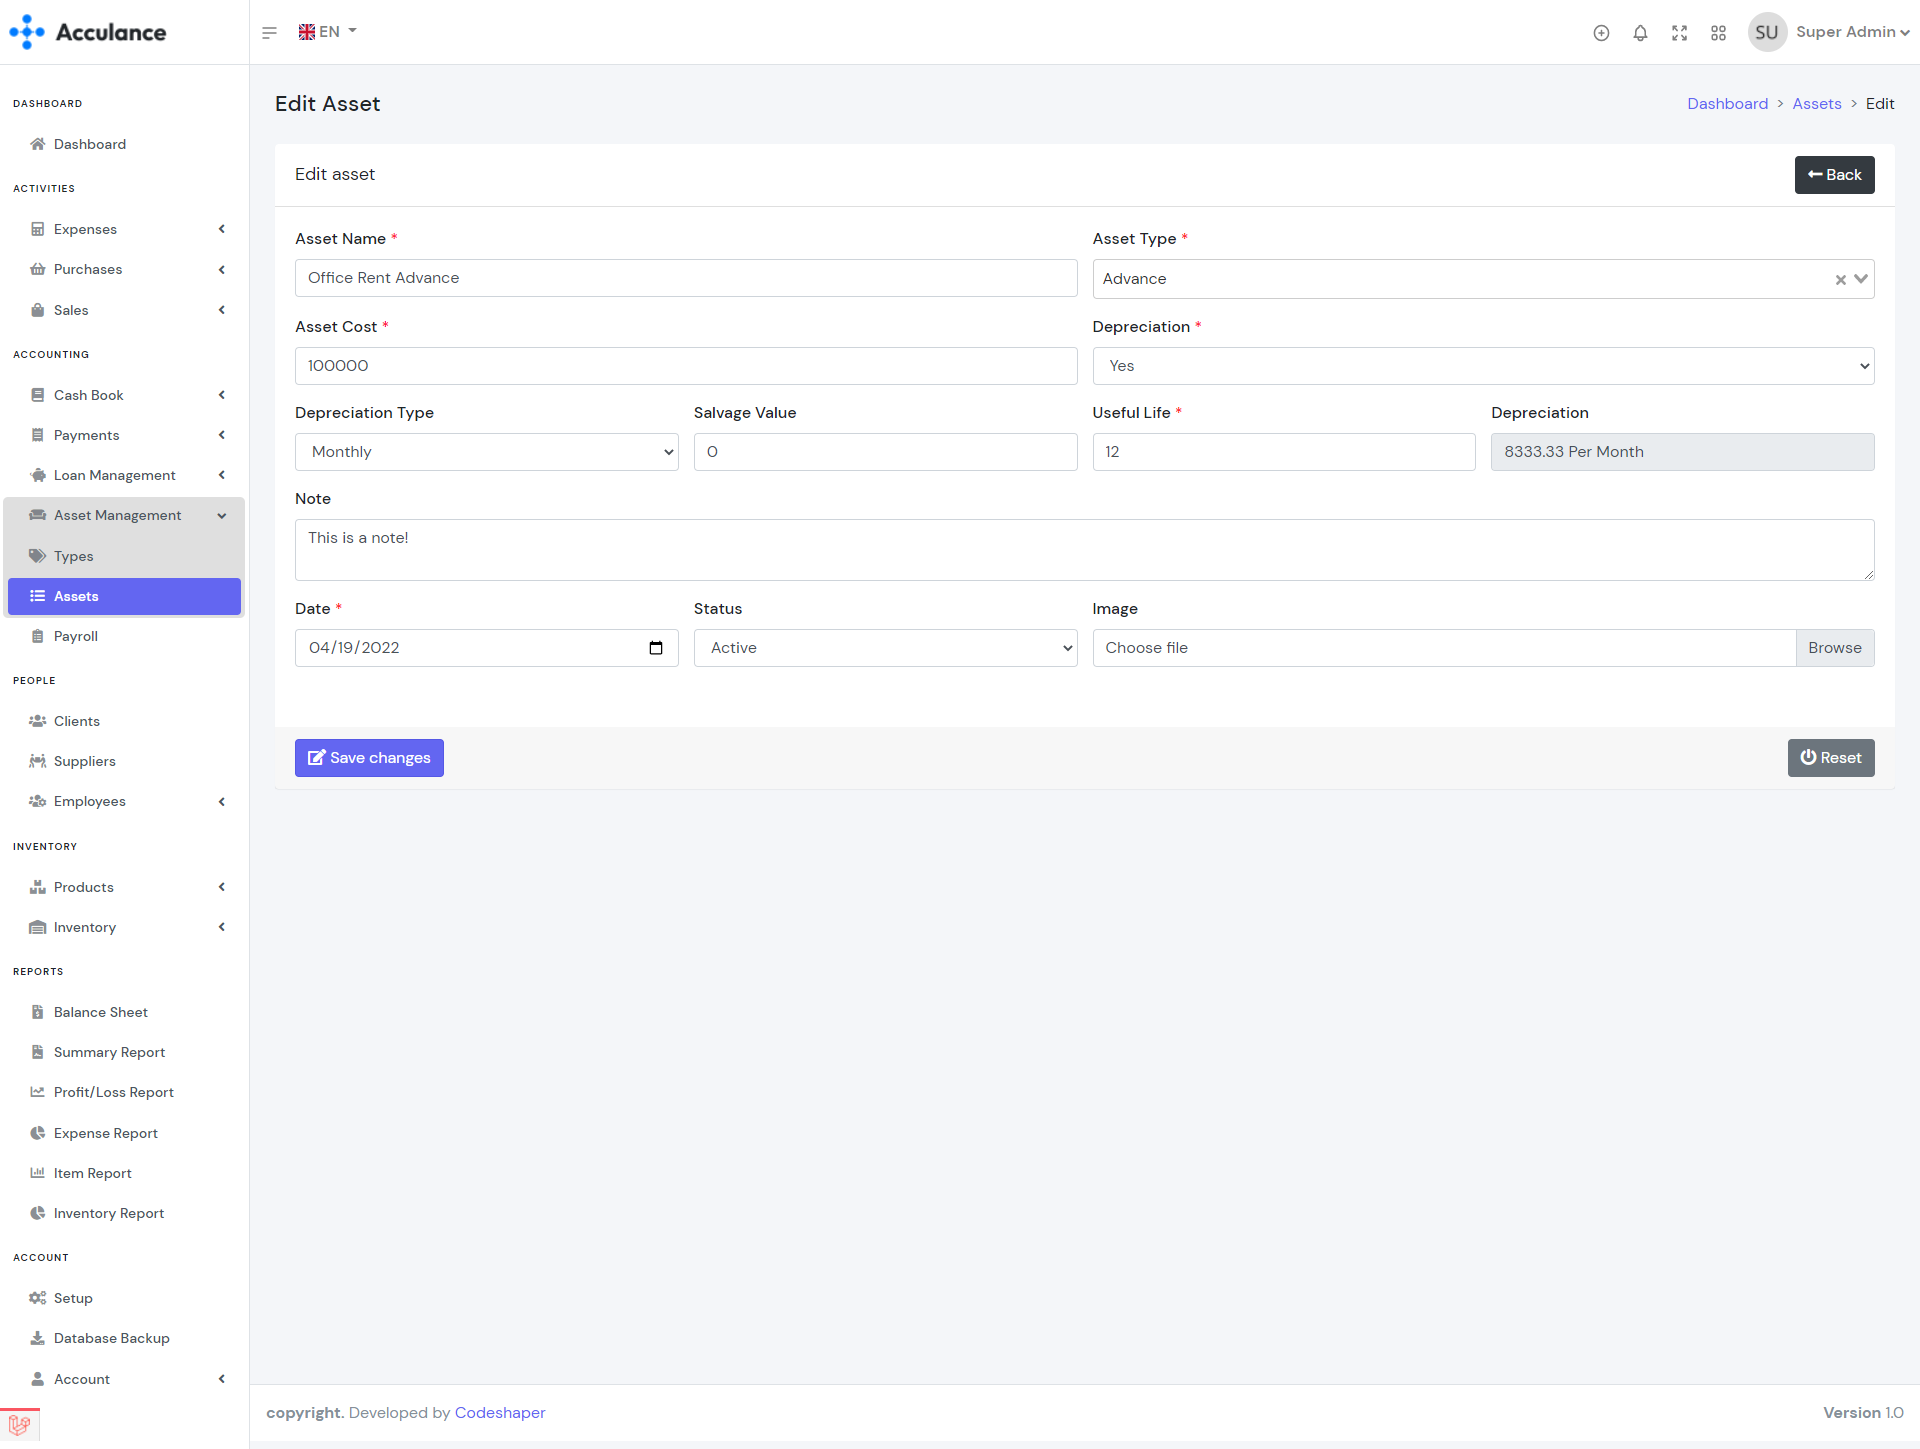
Edit Asset
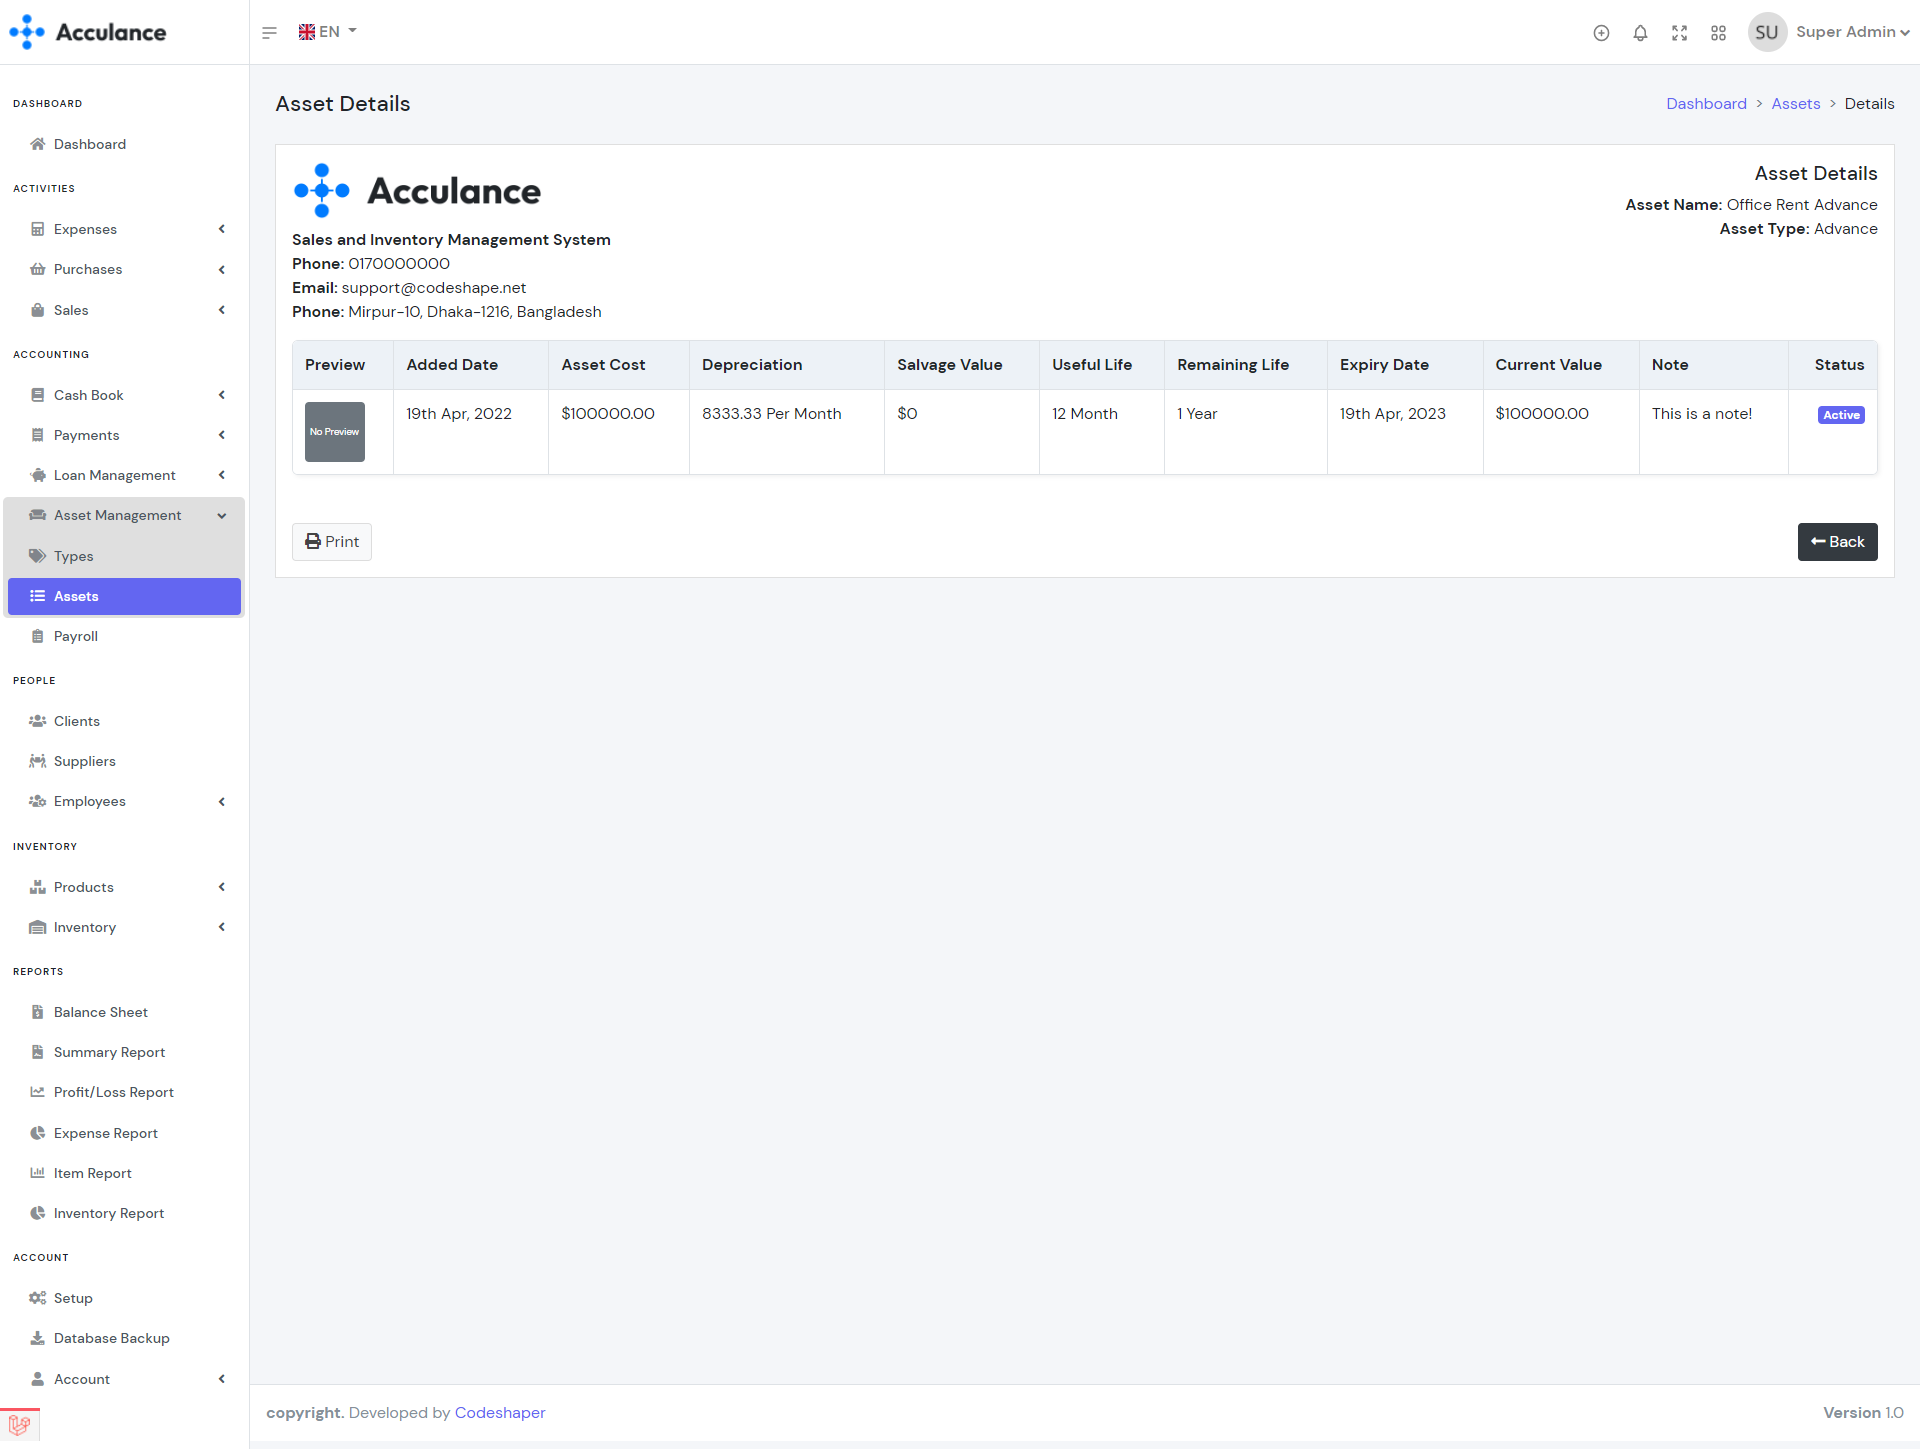
Asset Details
Payroll
Payroll module helps you manage your employee salaries and other payments. Using the payroll module you can generate monthly salaries for your employees.
| Required fields to create a payroll |
|---|
| Employee => Employee for whom you want to create payroll. Select an employee from the list. |
| Salary Month => Salaray month. Select a month from the list. |
| Account => The paying account. The total amount will be sent from the selected account. Select an account from the list. The available balance must be greater than the total amount. |
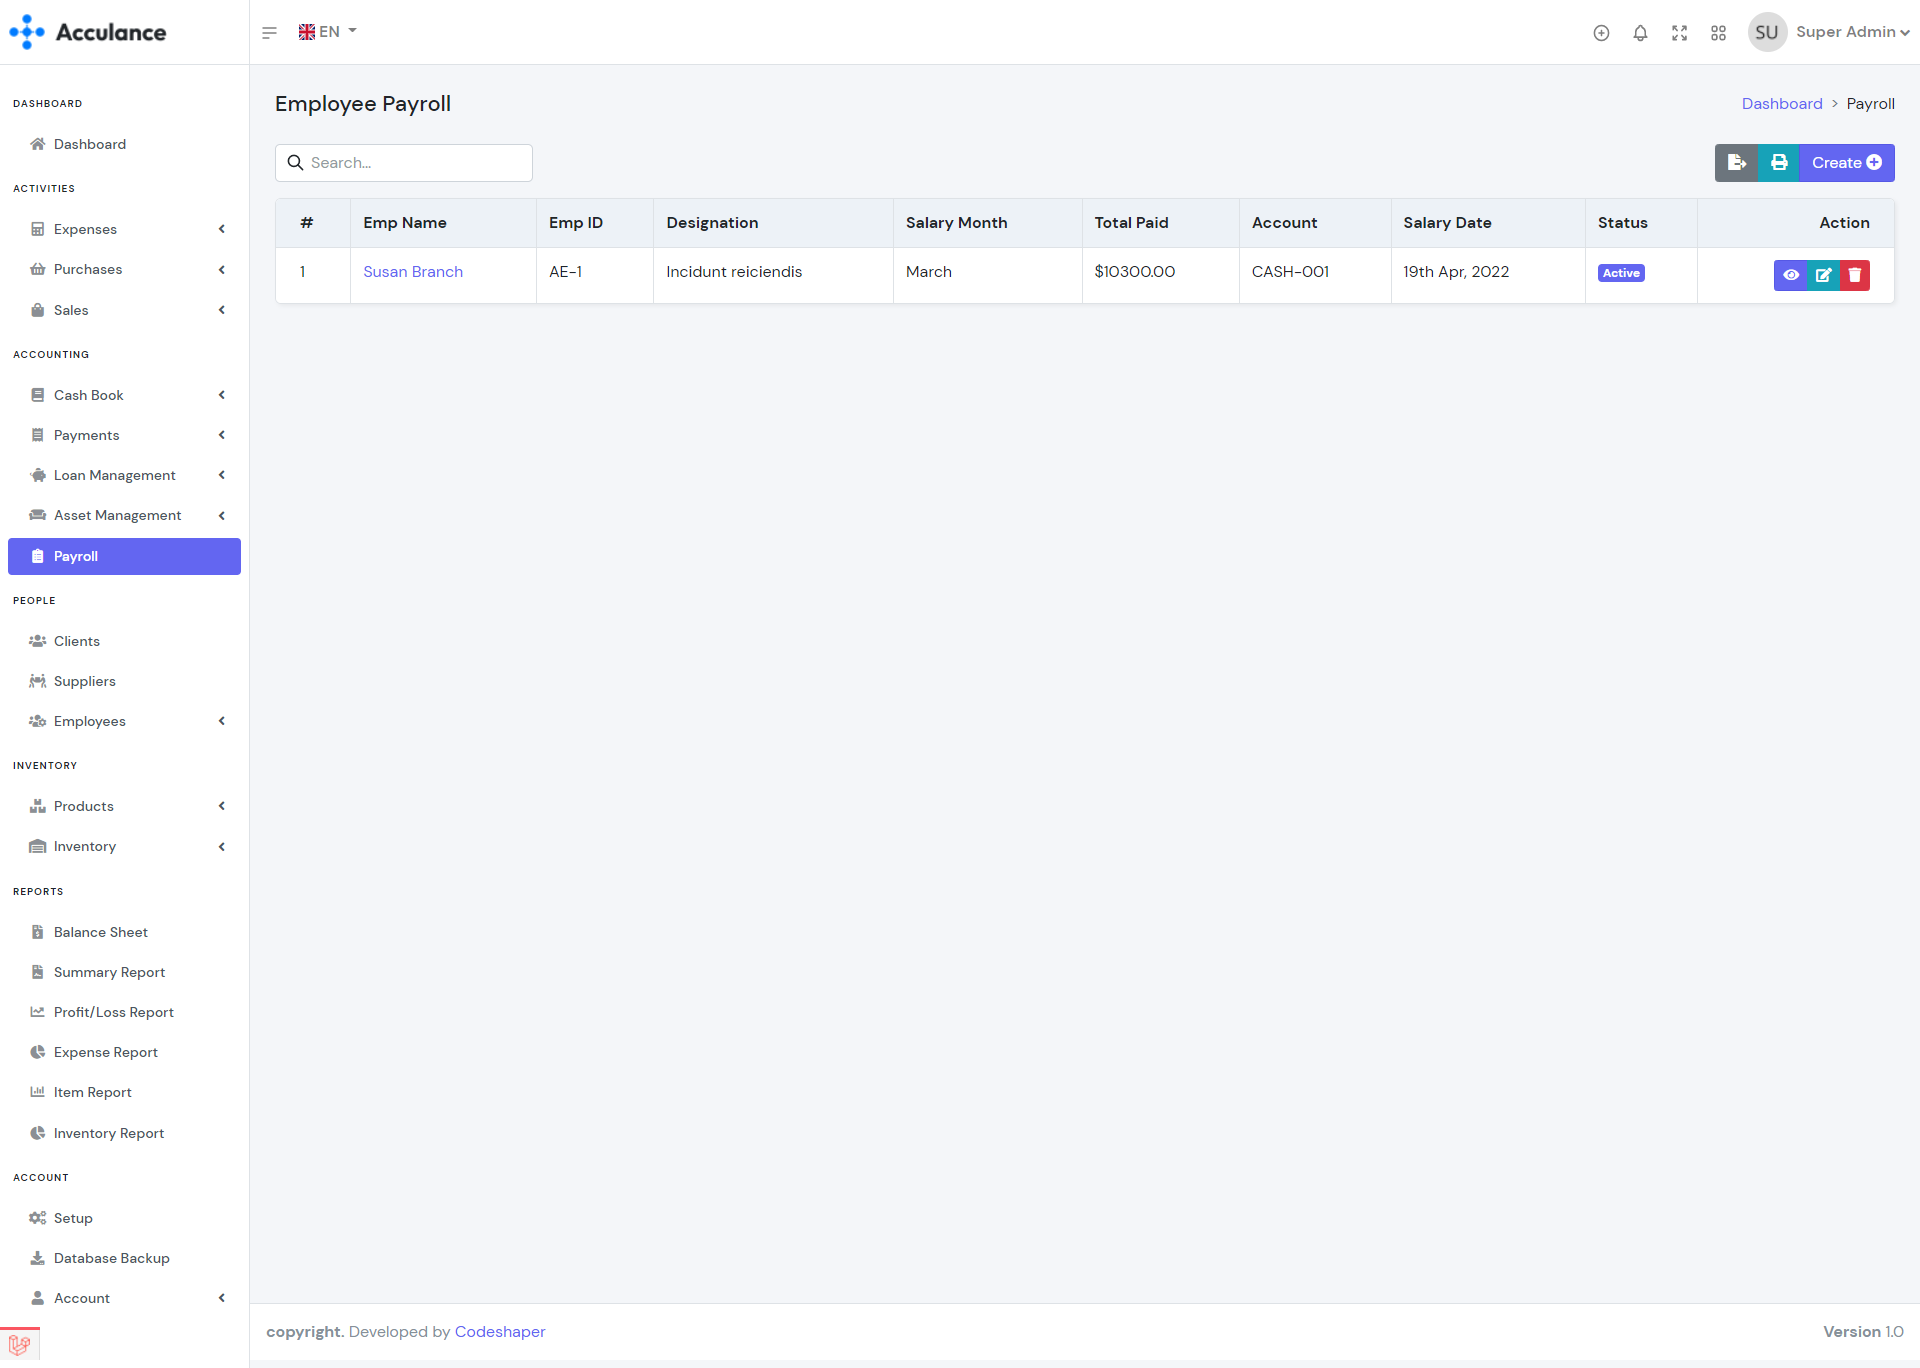
Employee Payroll List
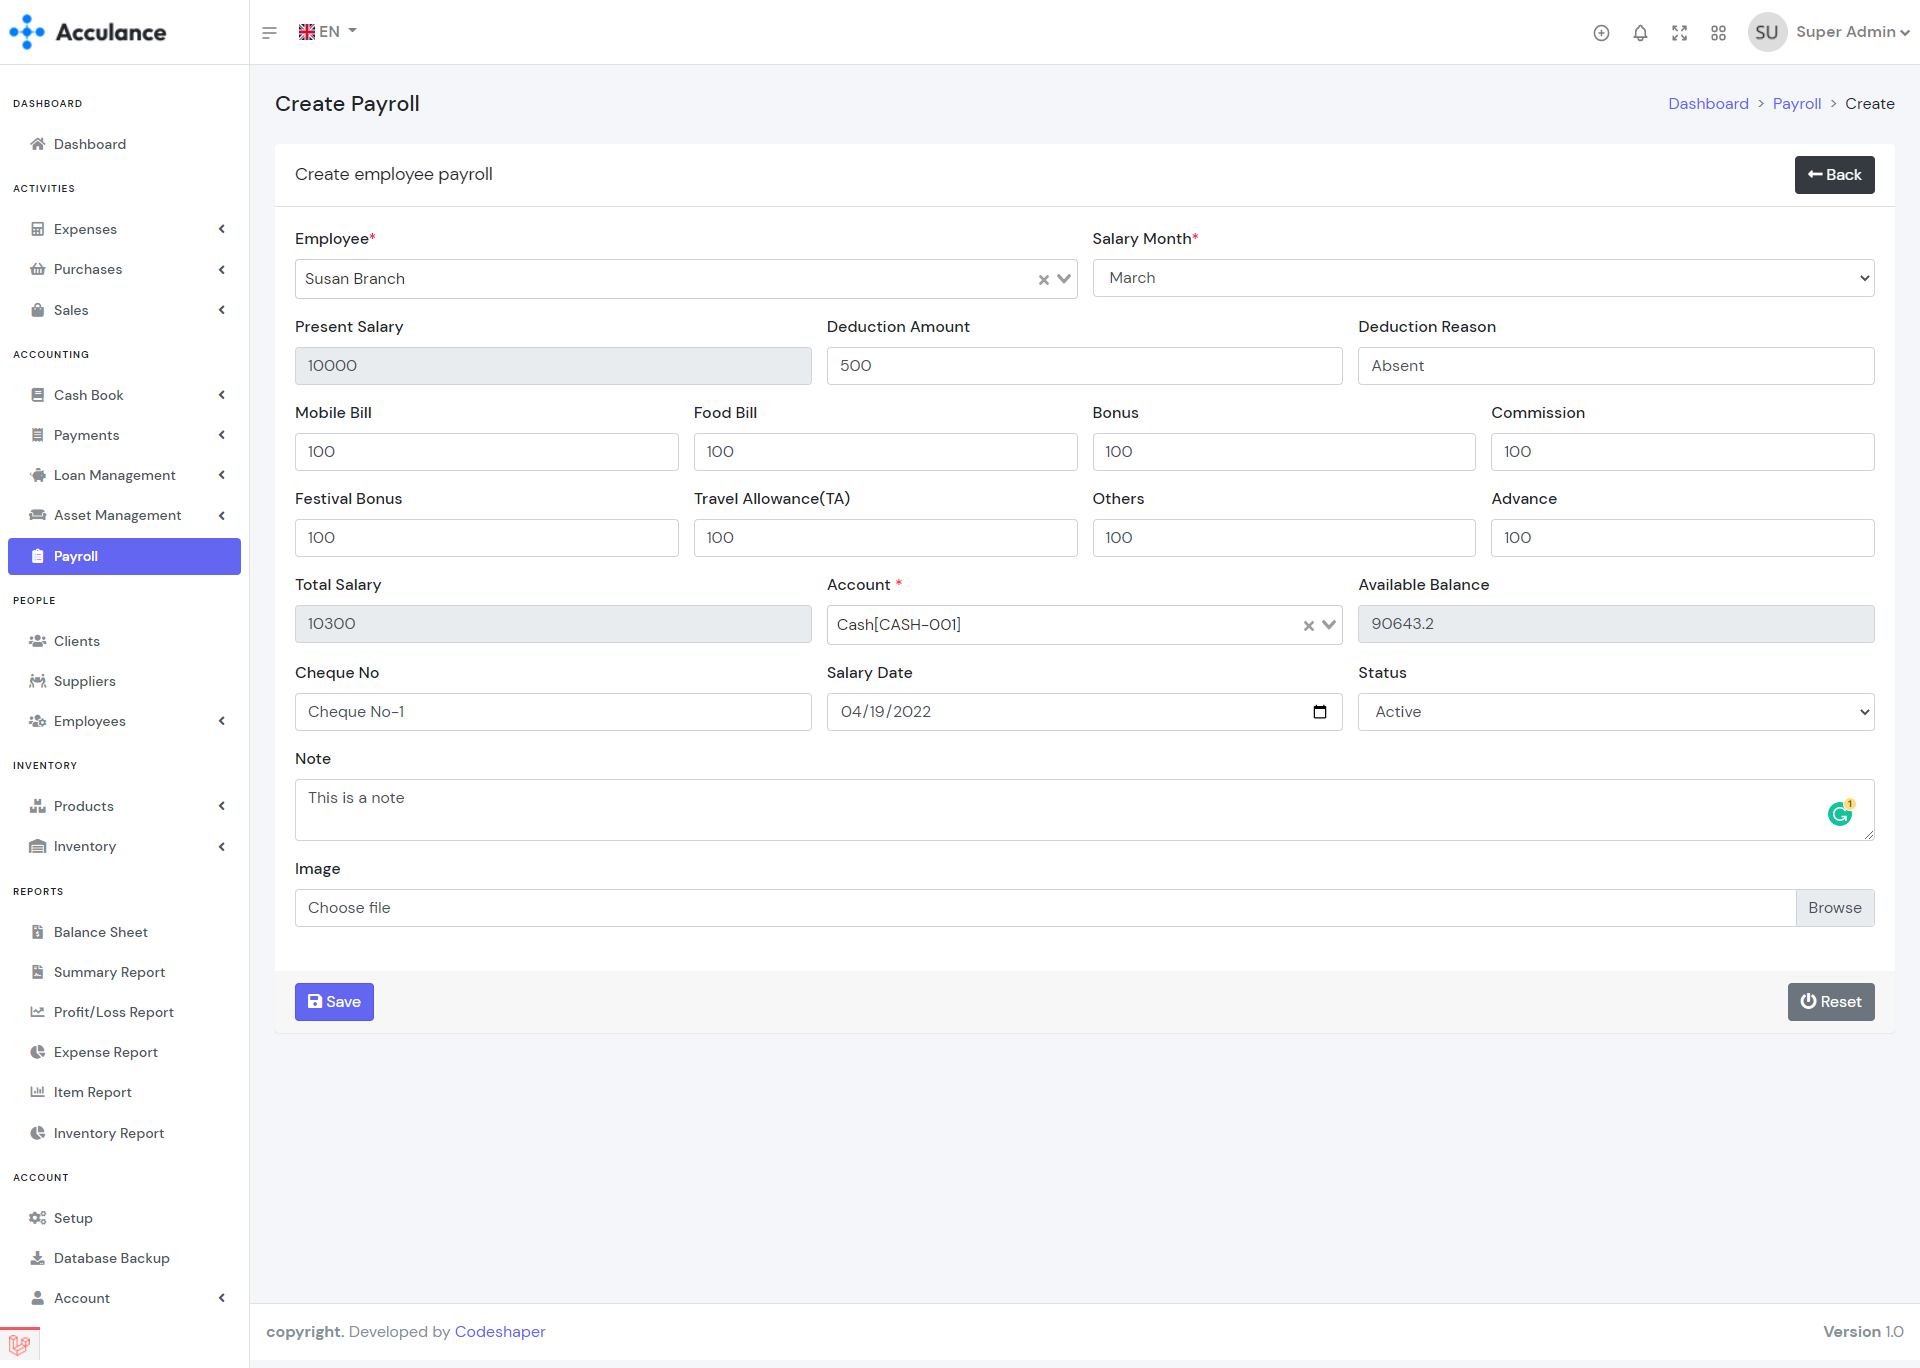
Create Payroll
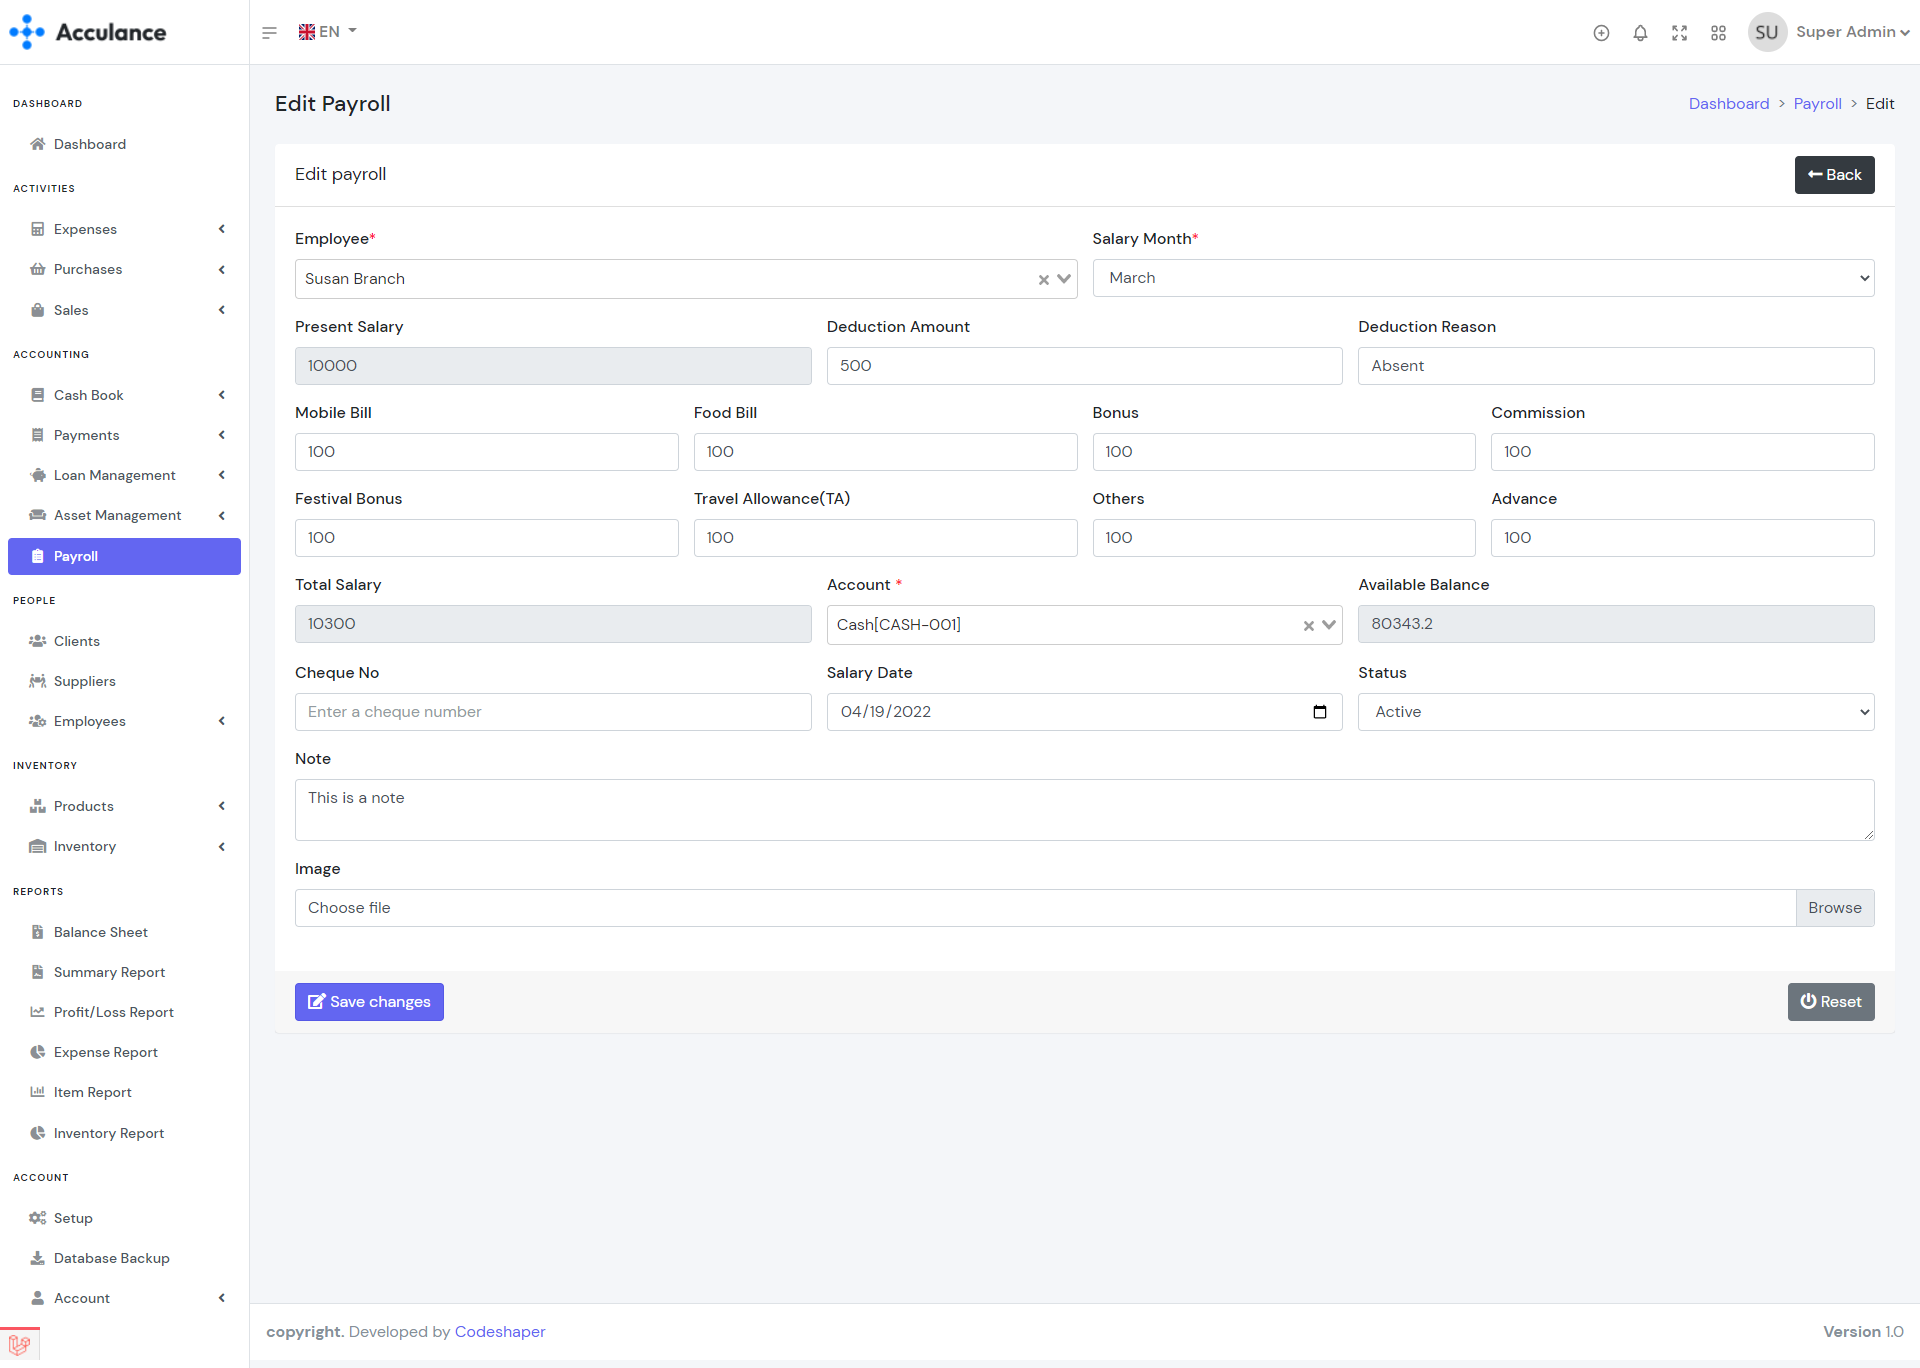
Edit Payroll
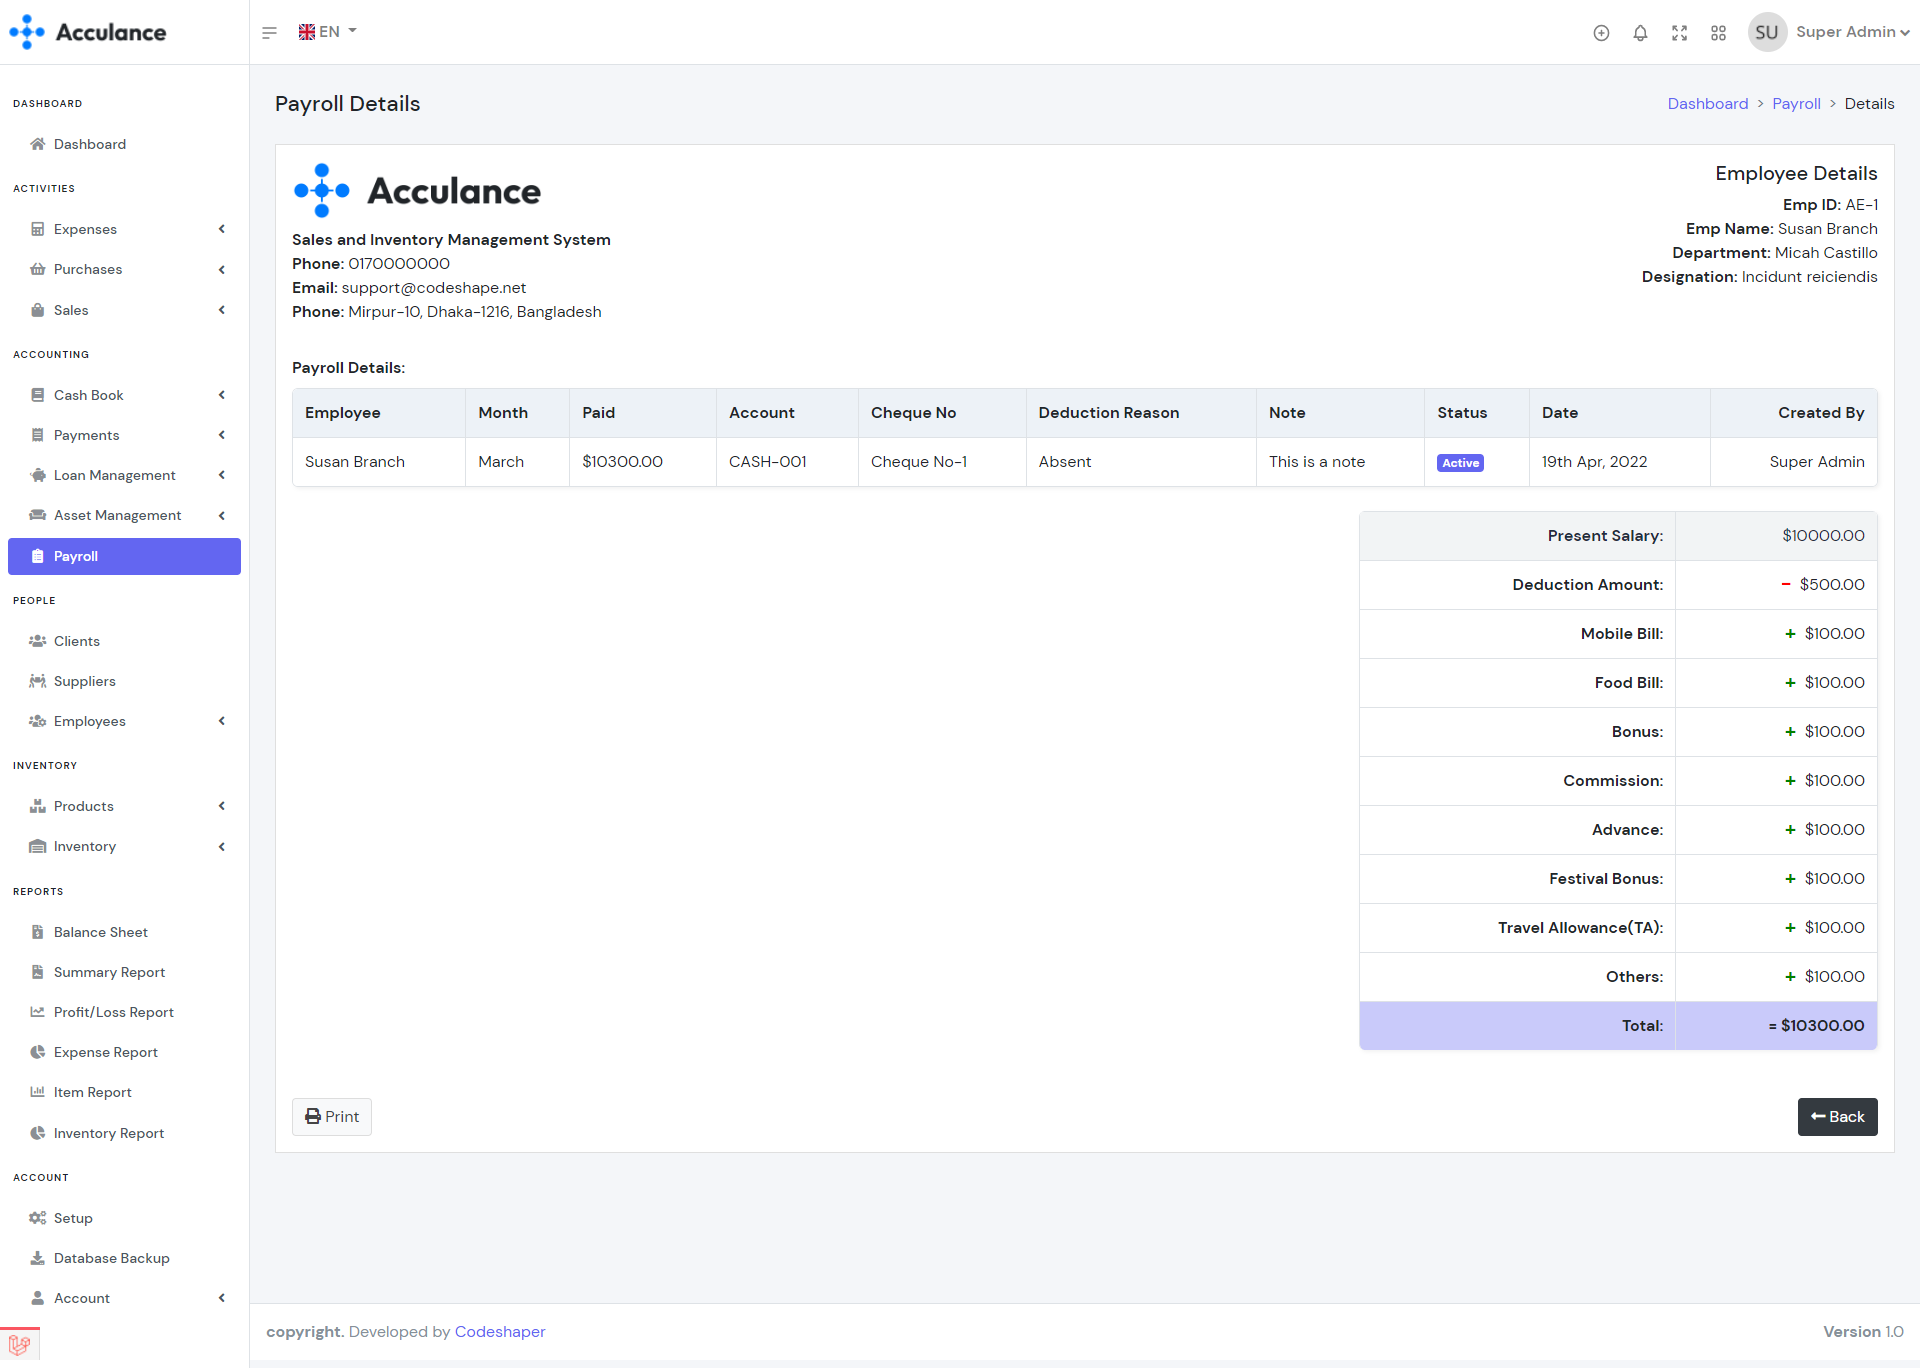
Payroll Details
Inventory
Inventory module helps you keep track of your product stocks. You can see the average purchase price, selling price, current stock, and inventory value. You can also see your inventory history(Stock In and Stock Outs) from this module.
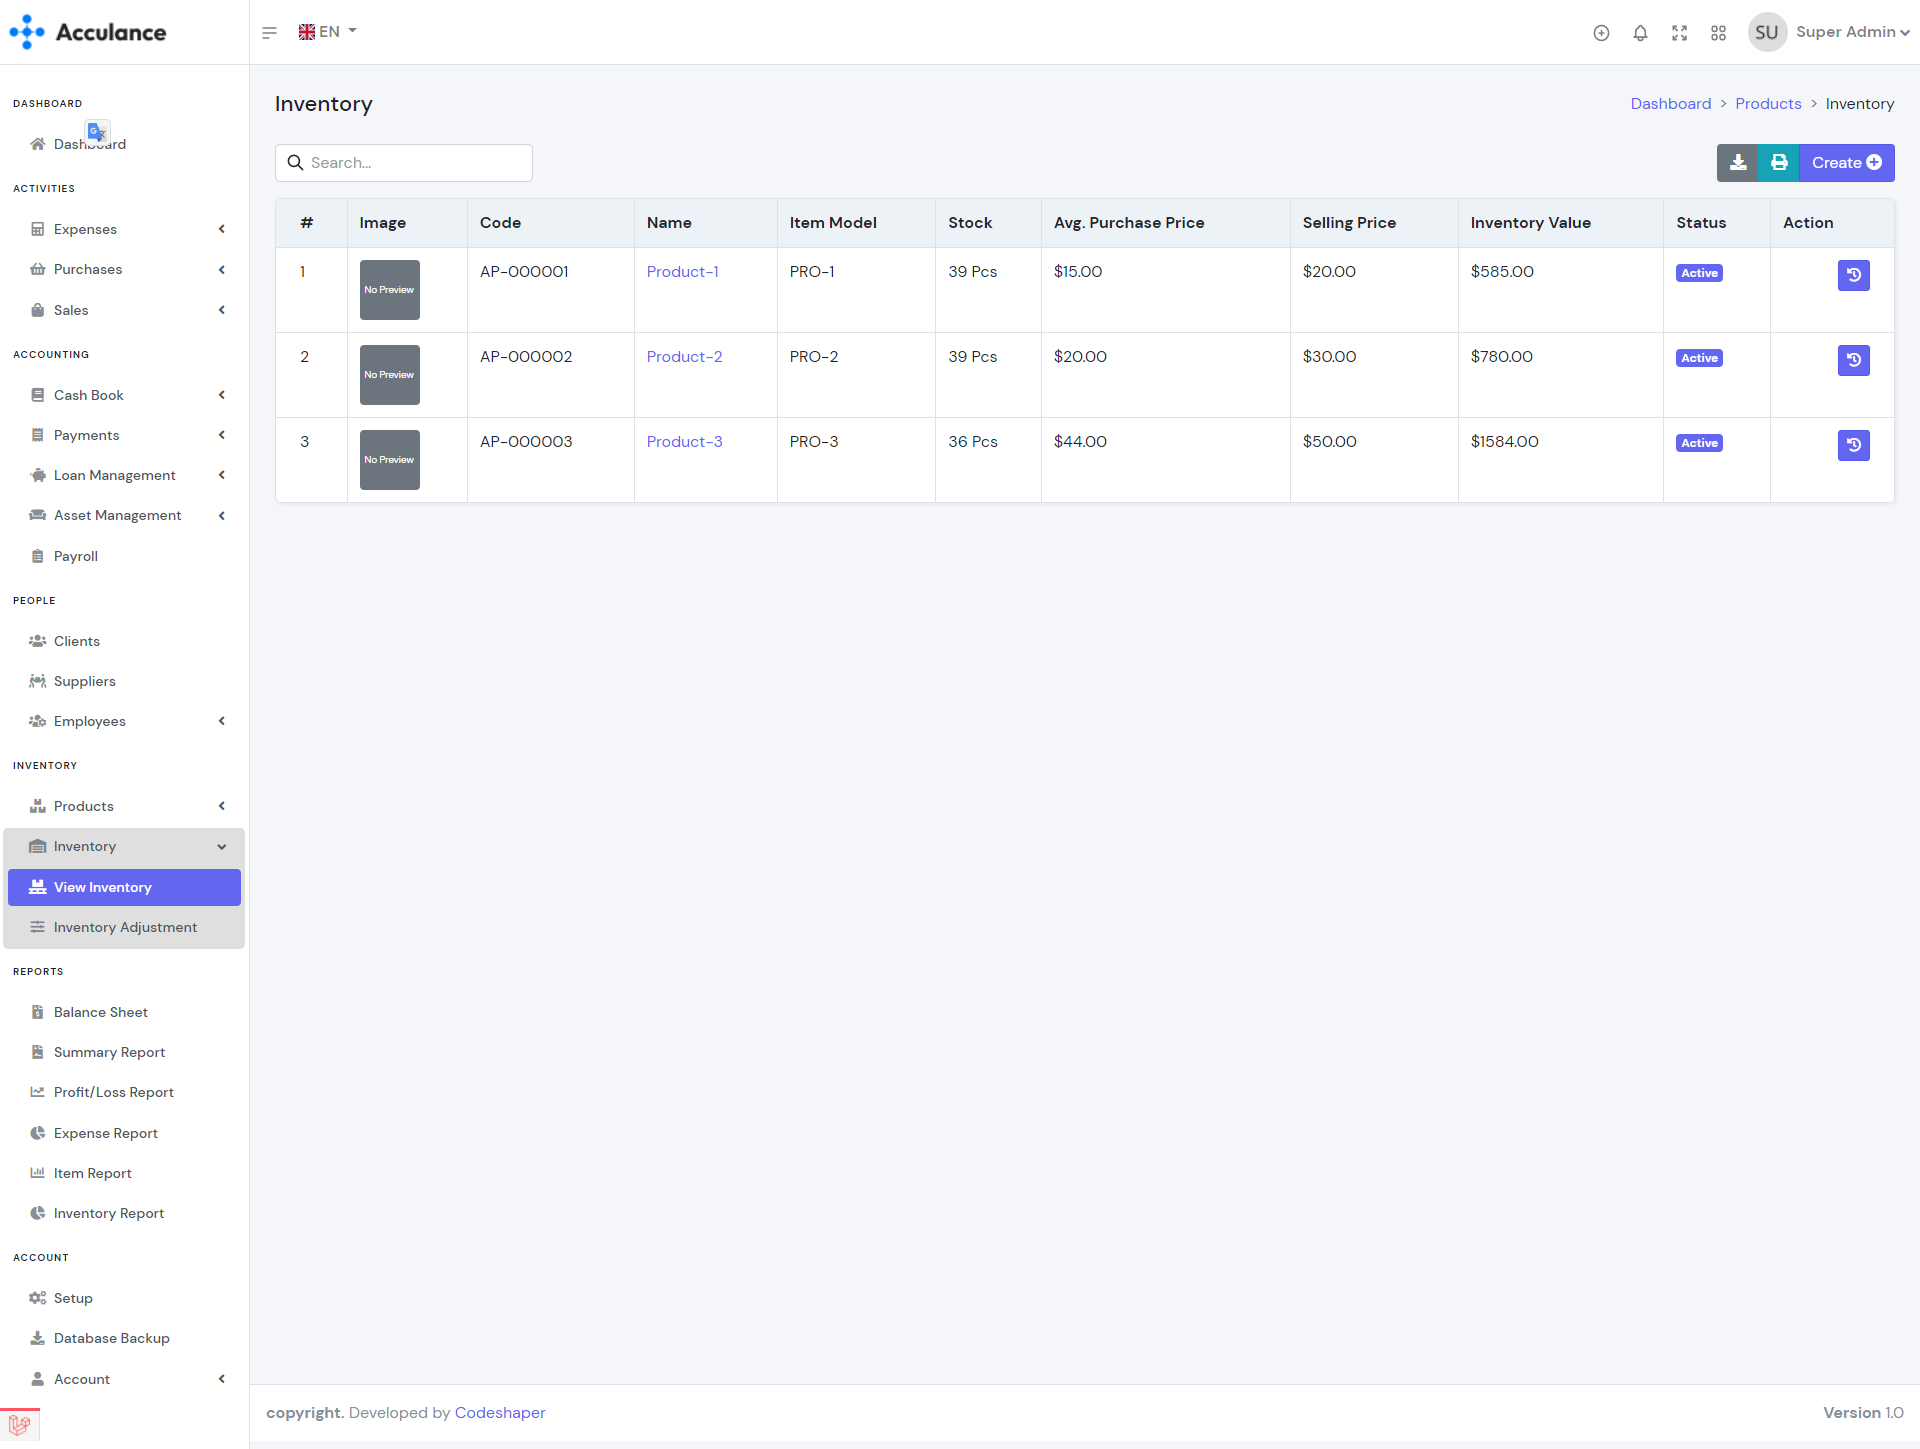
Inventory List
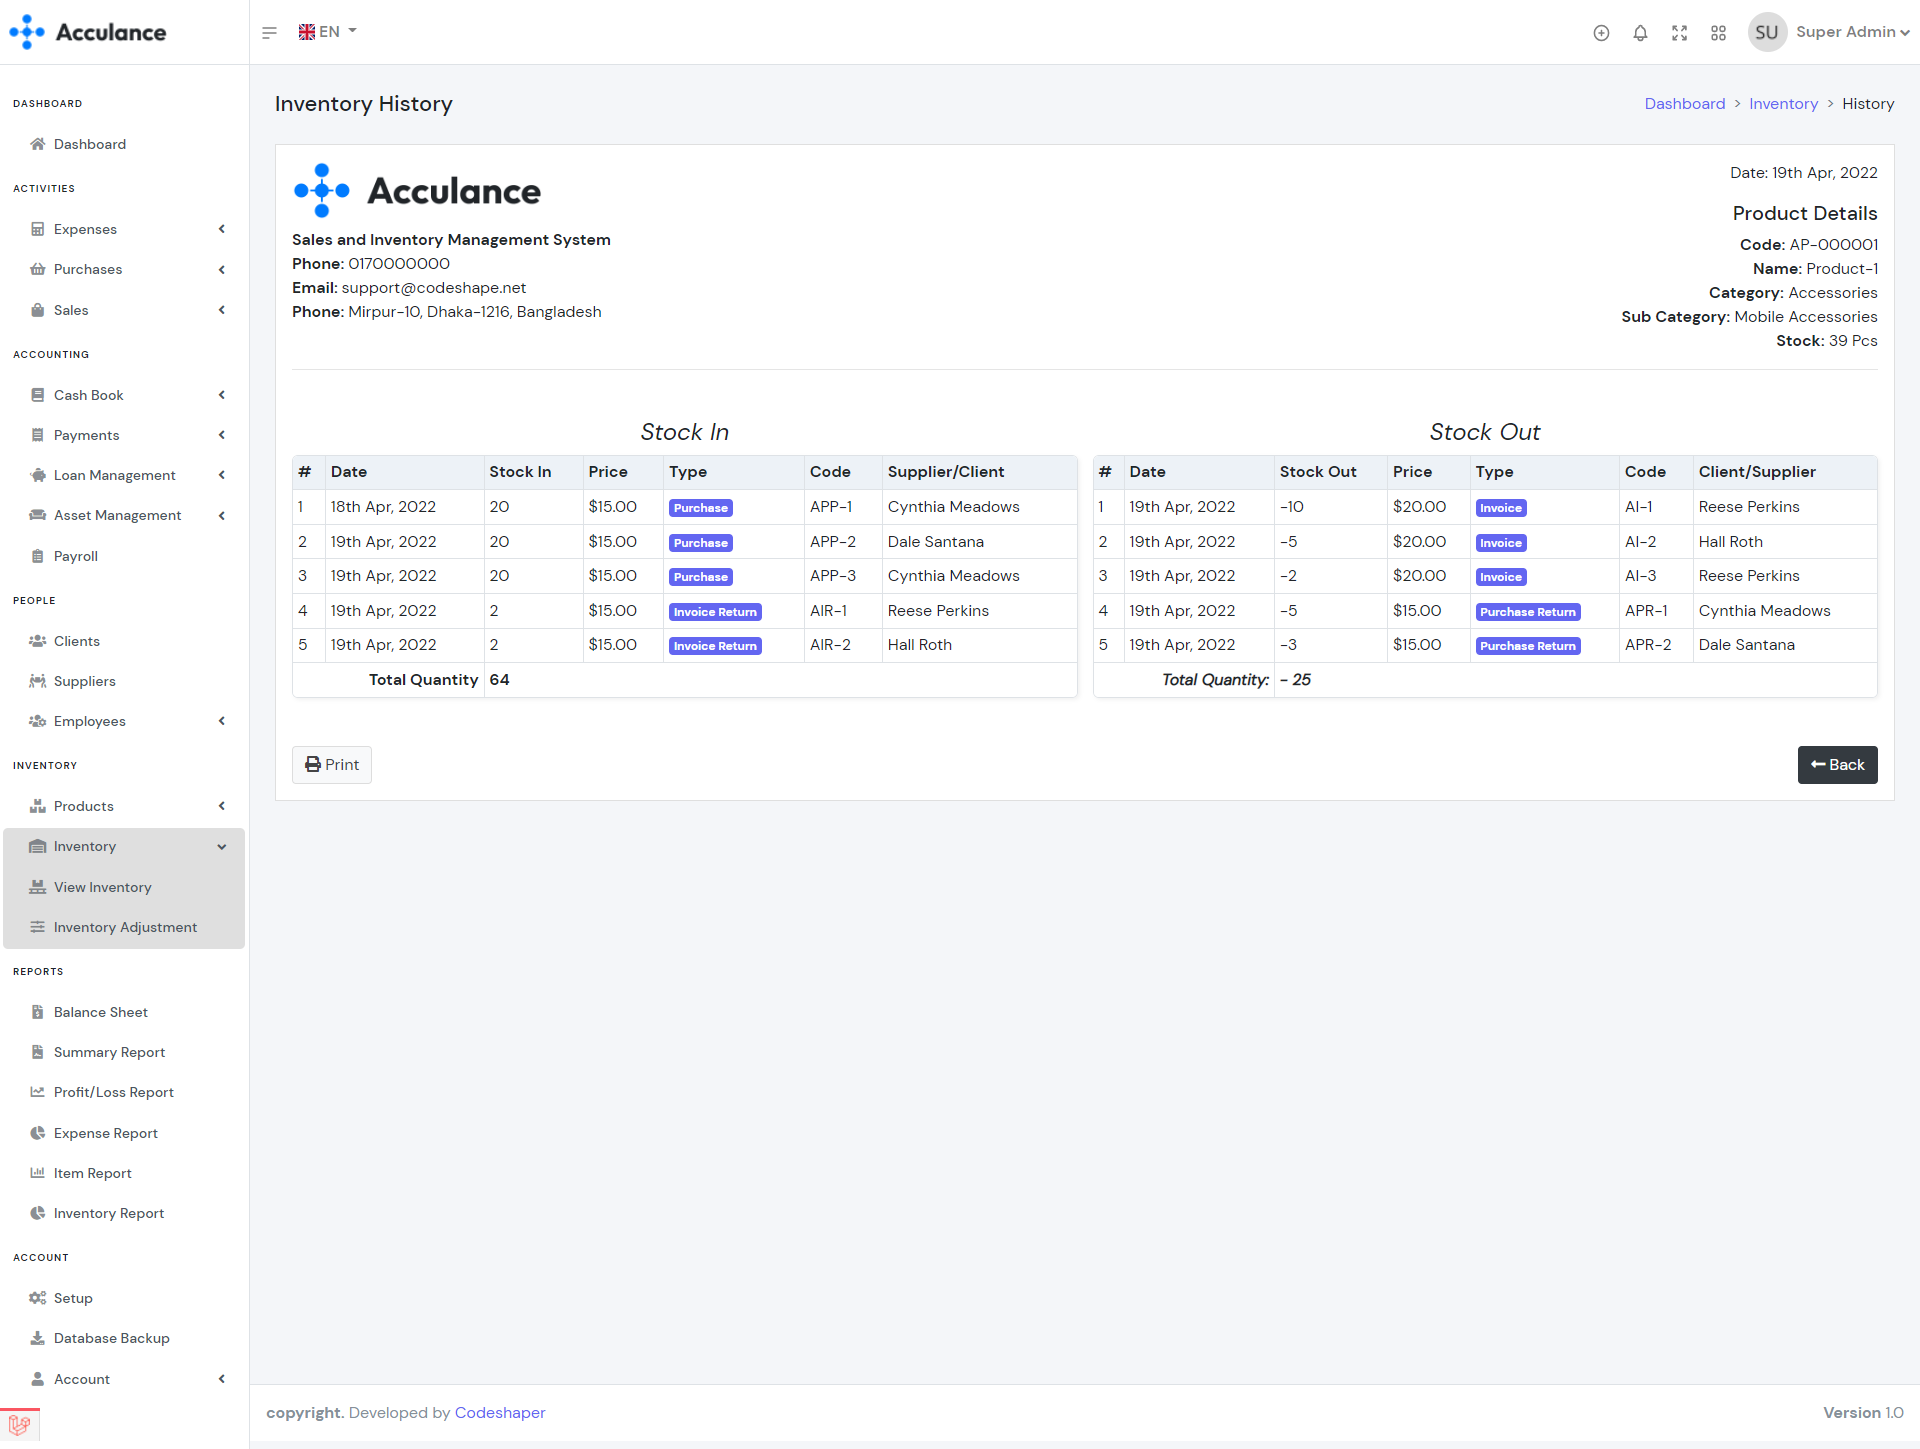
Inventory History
Inventory Adjustments
Inventory Adjustments module allows you to adjust your product stock. You can increase or decrease your current stock using this module. While creating an adjustment if you select increment the product stock will increase on the other hand if you select decrement then the product stock will decrease.
| Required fields to create an inventory adjustment |
|---|
| Employee => Employee for whom you want to create payroll. Select an employee from the list. |
| Salary Month => Salaray month. Select a month from the list. |
| Account => The paying account. The total amount will be sent from the selected account. Select an account from the list. The available balance must be greater than the total amount. |
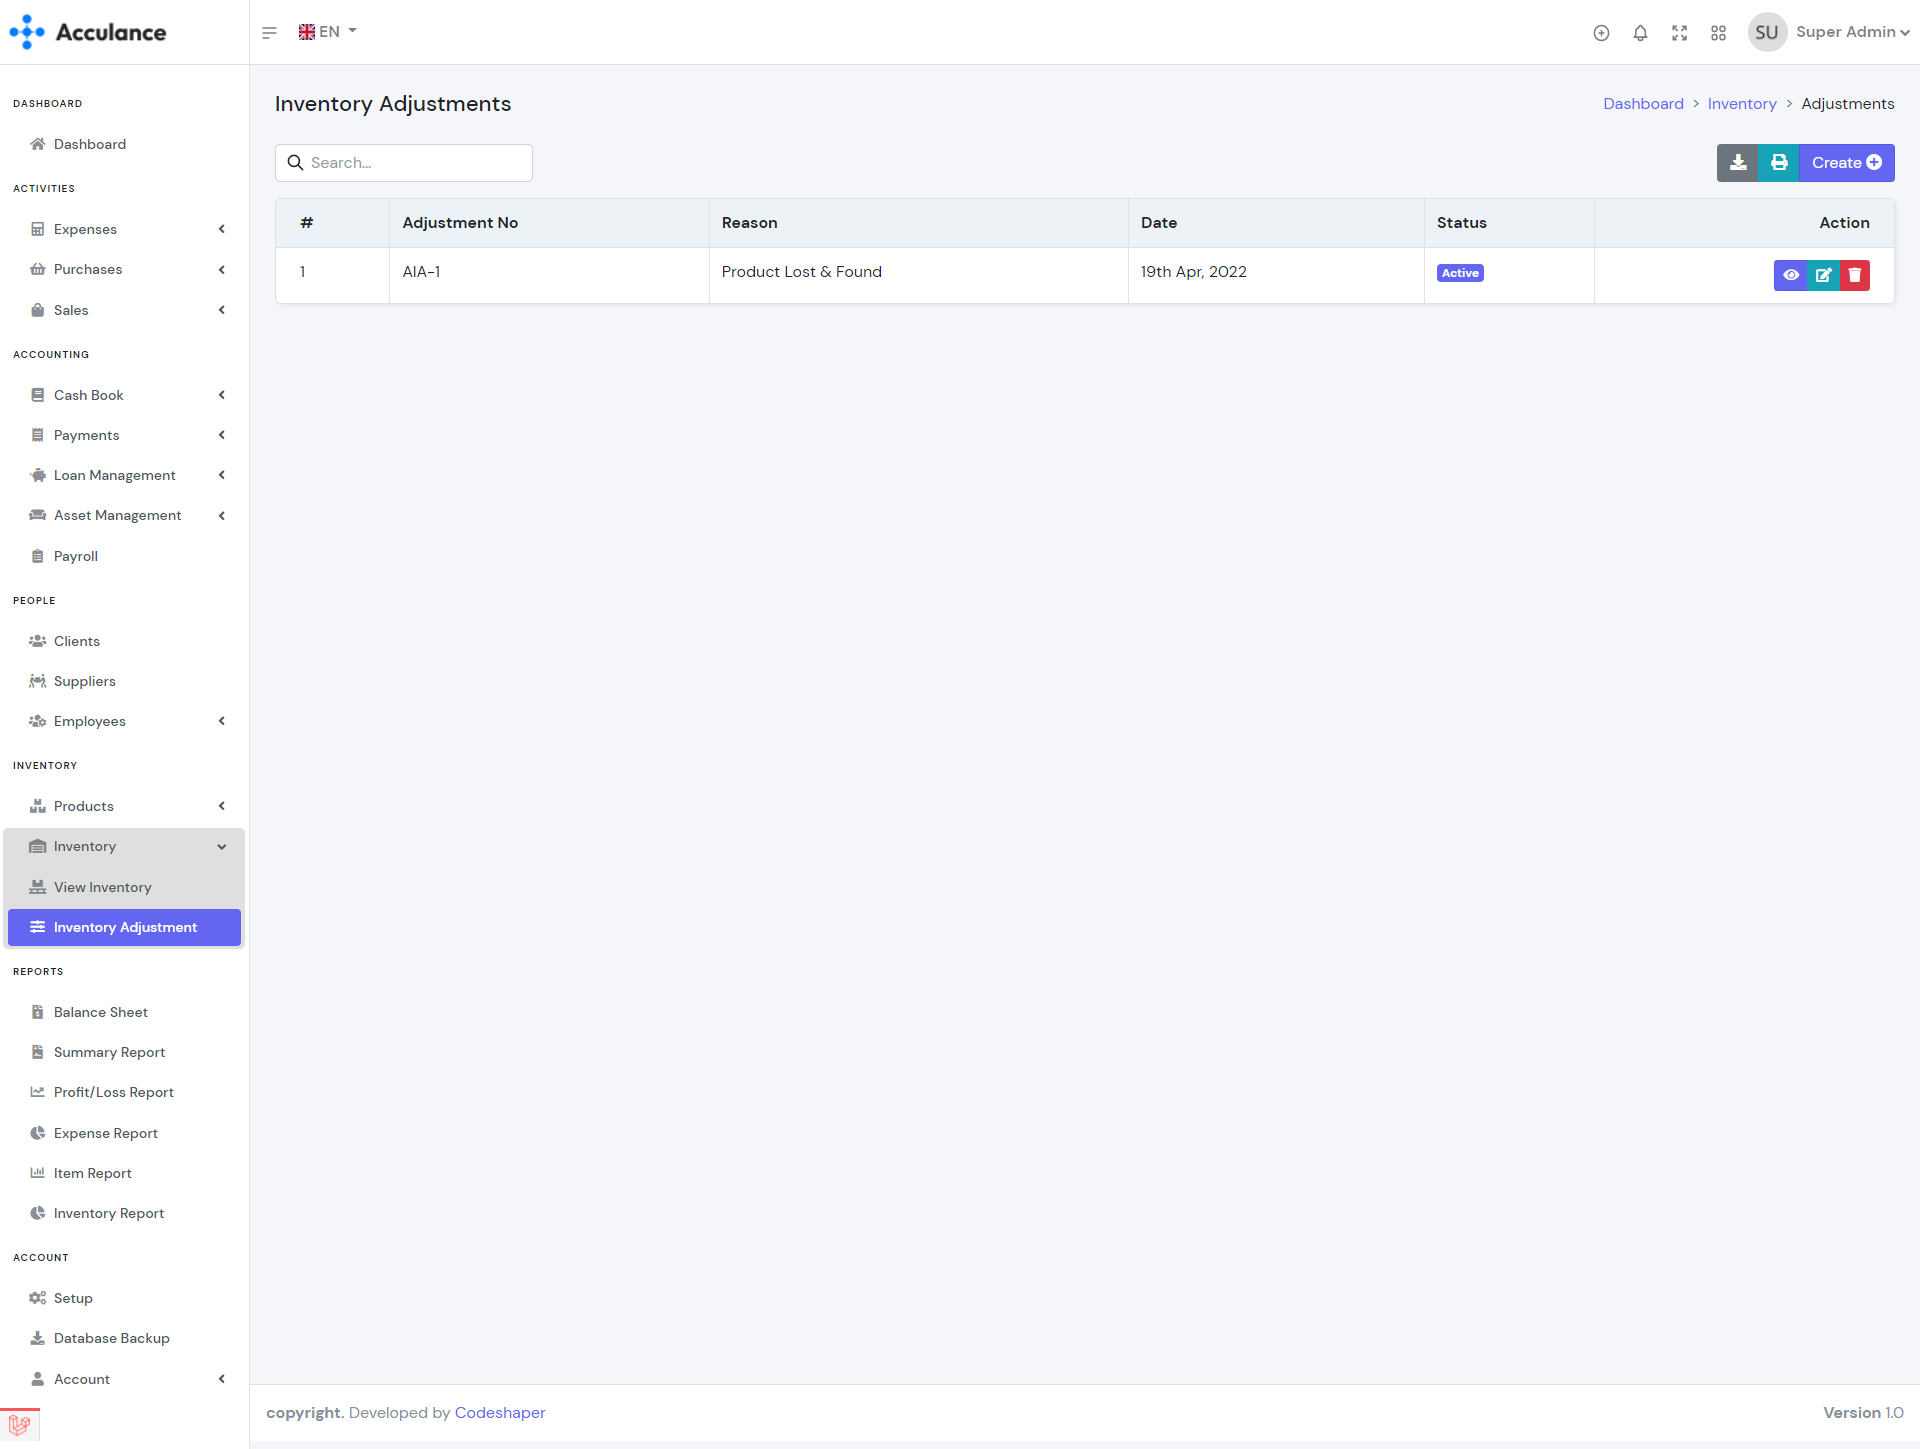
Inventory Adjustments List
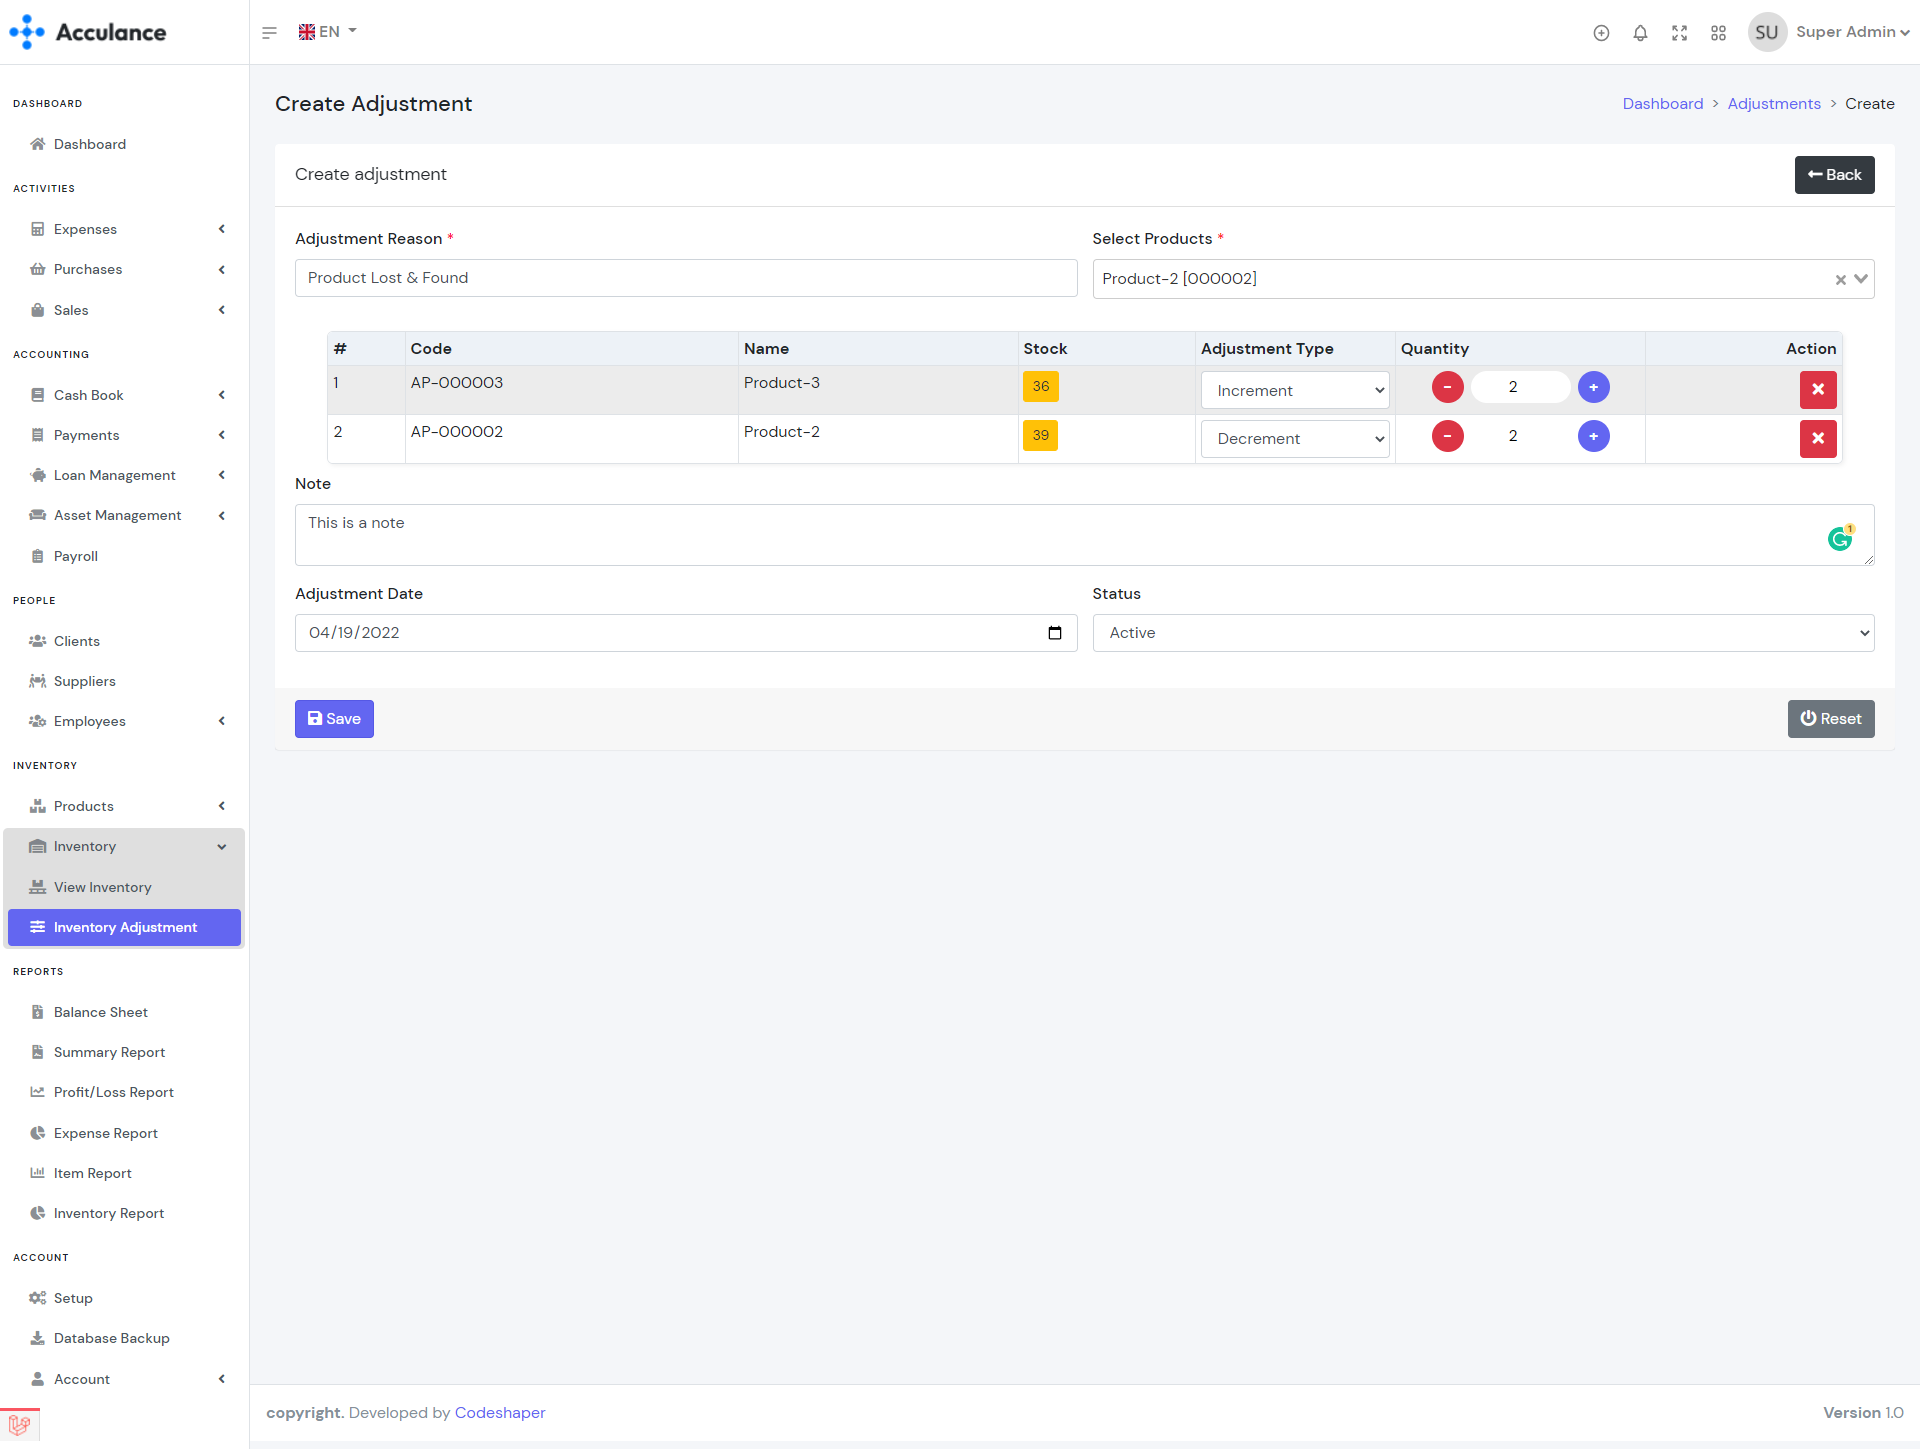
Create Adjustment
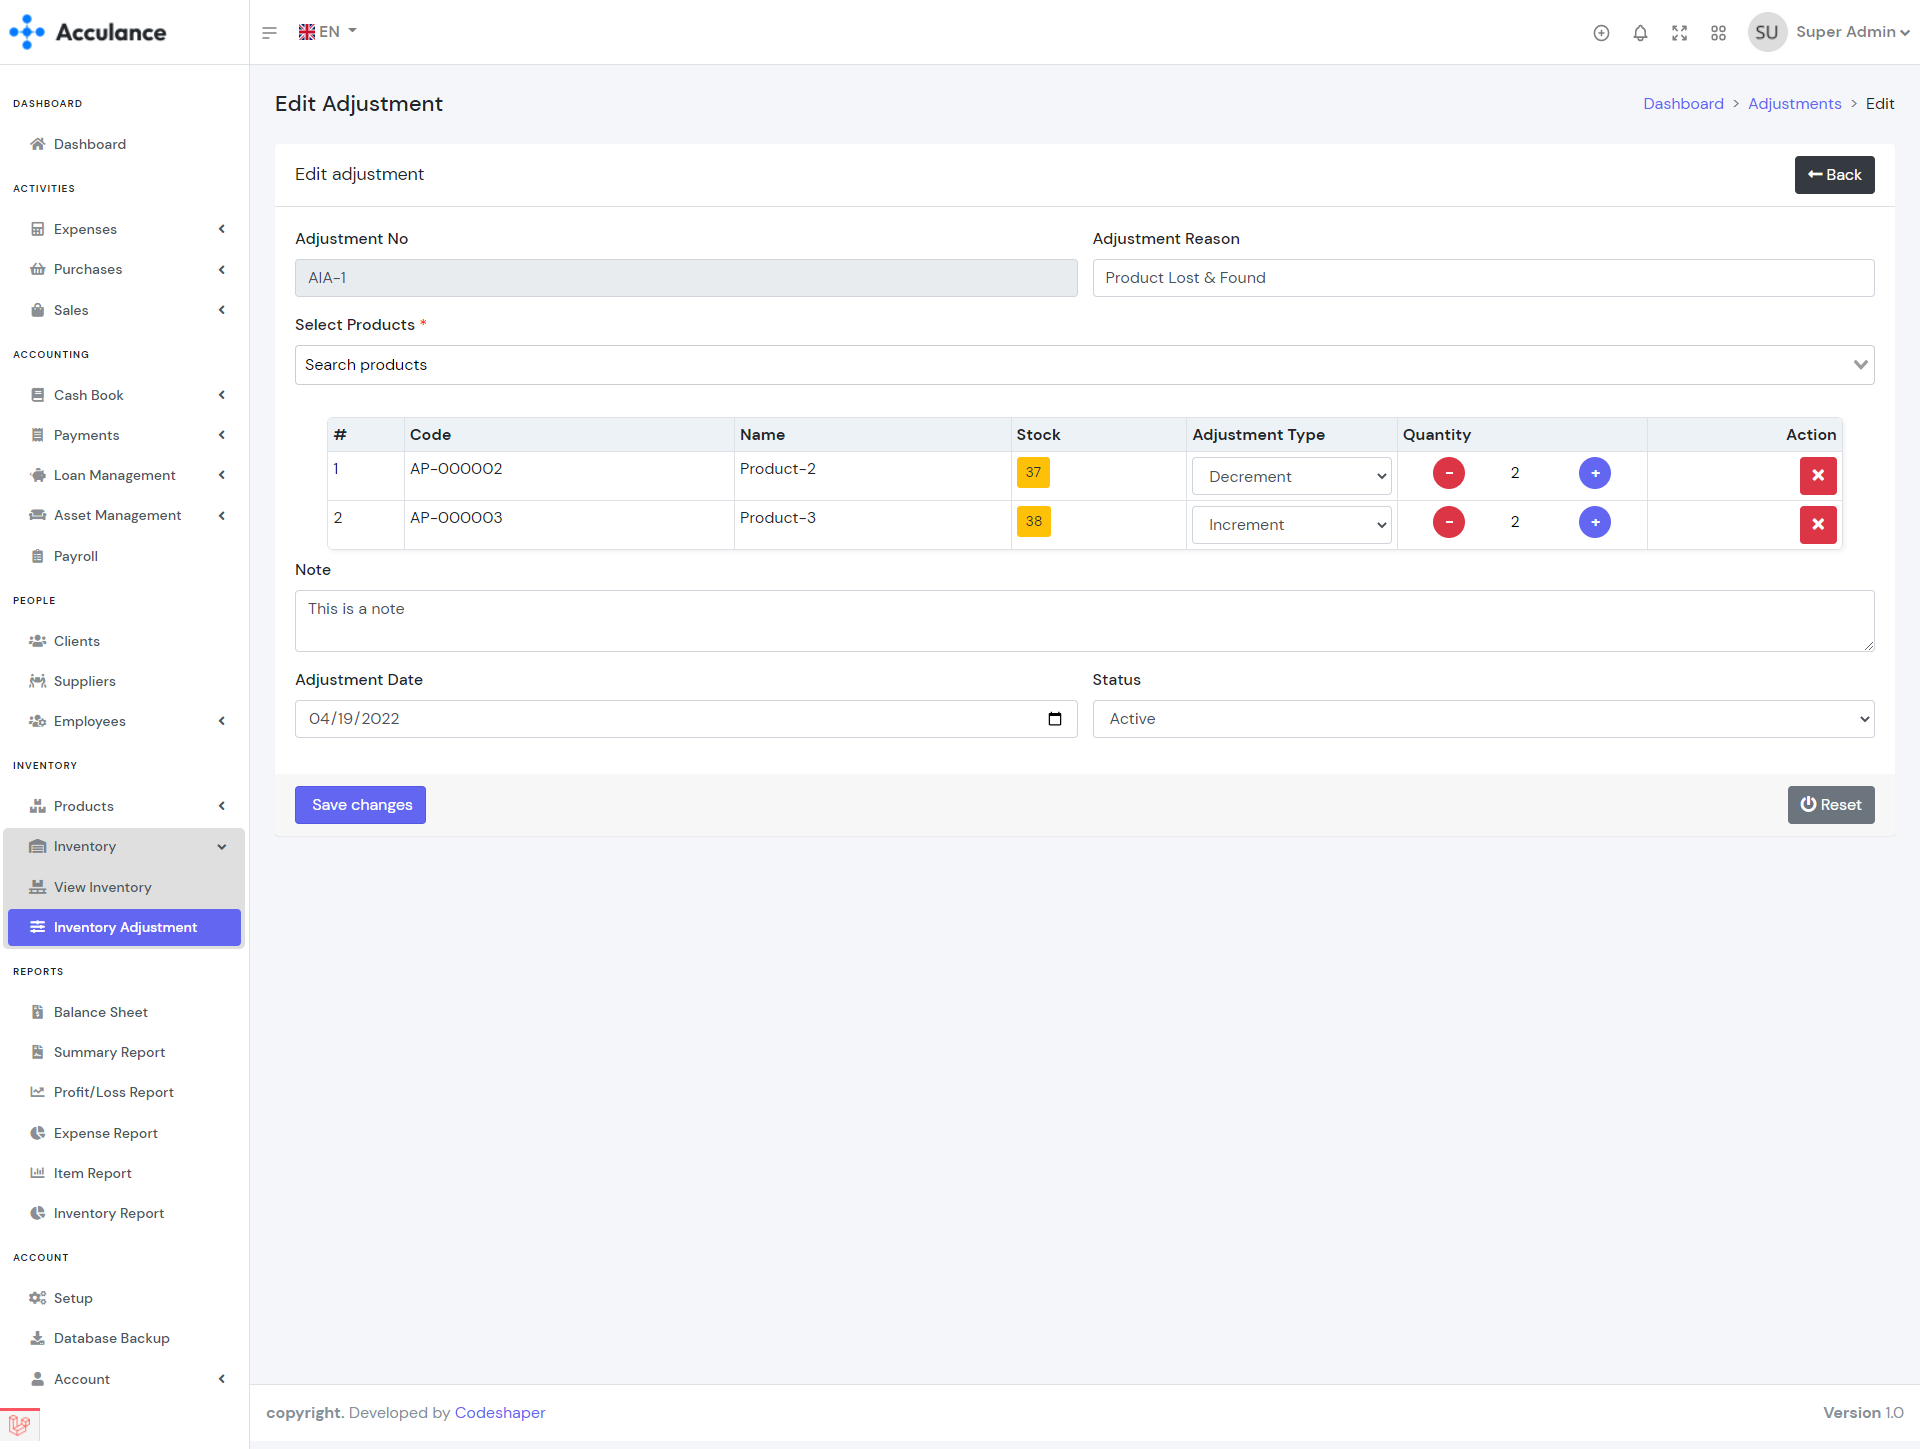
Edit Adjustment
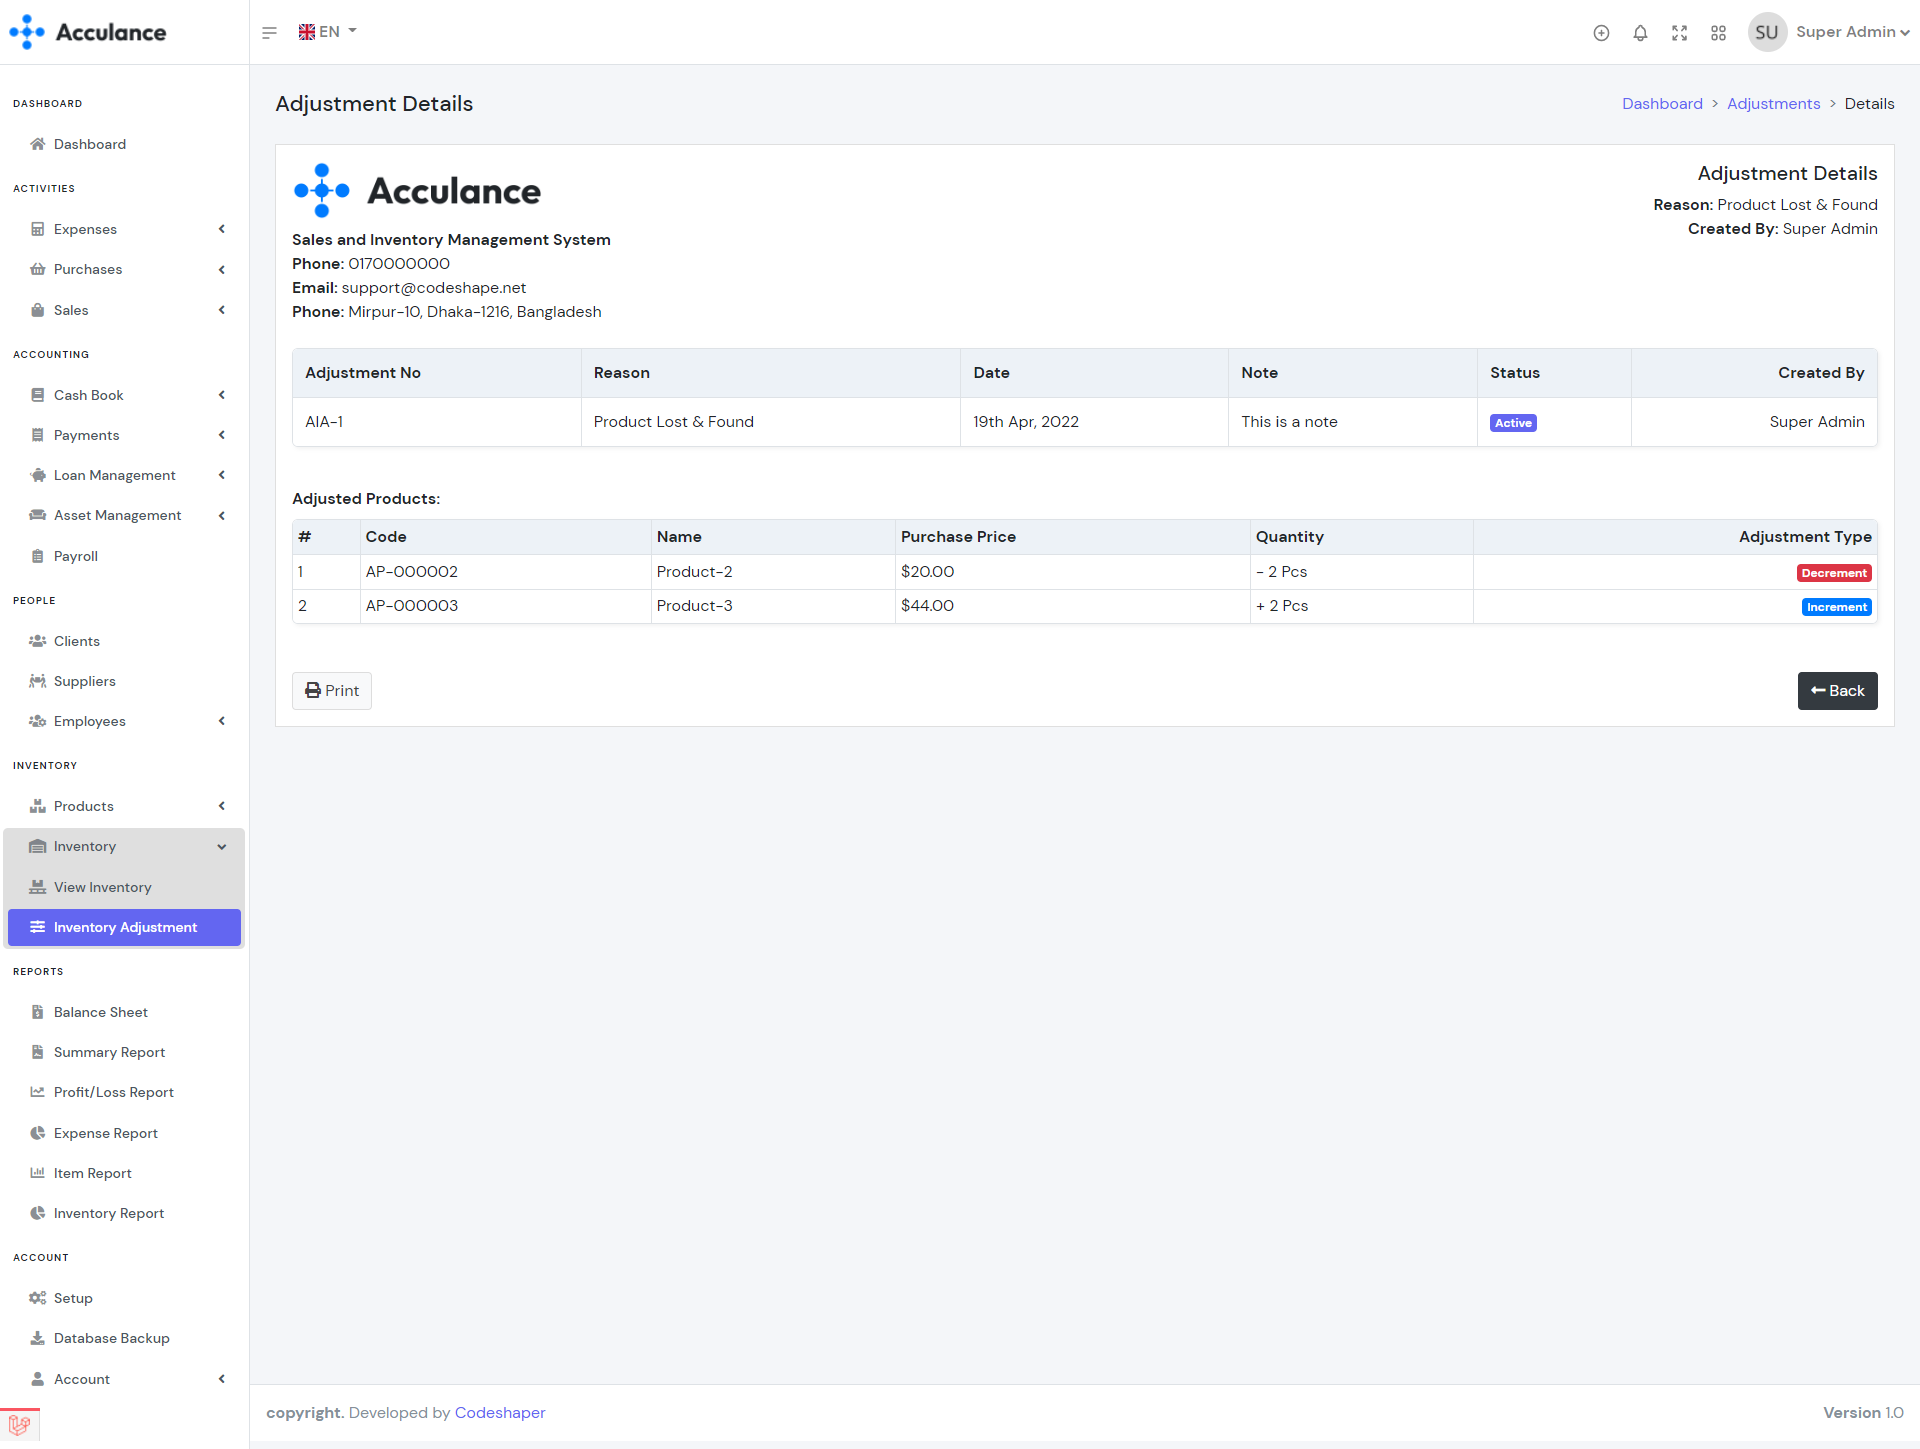
Inventory Adjustment Details
Profile
From the profile page, you can update your information such as your name. email, password. While updating your profile leave the password fields empty if you don't want to update your password.
| Required fields to update profile |
|---|
| Name => Your name. Enter your name. |
| Email => Your email. The email will be used for login so please use a valid and unique email. |
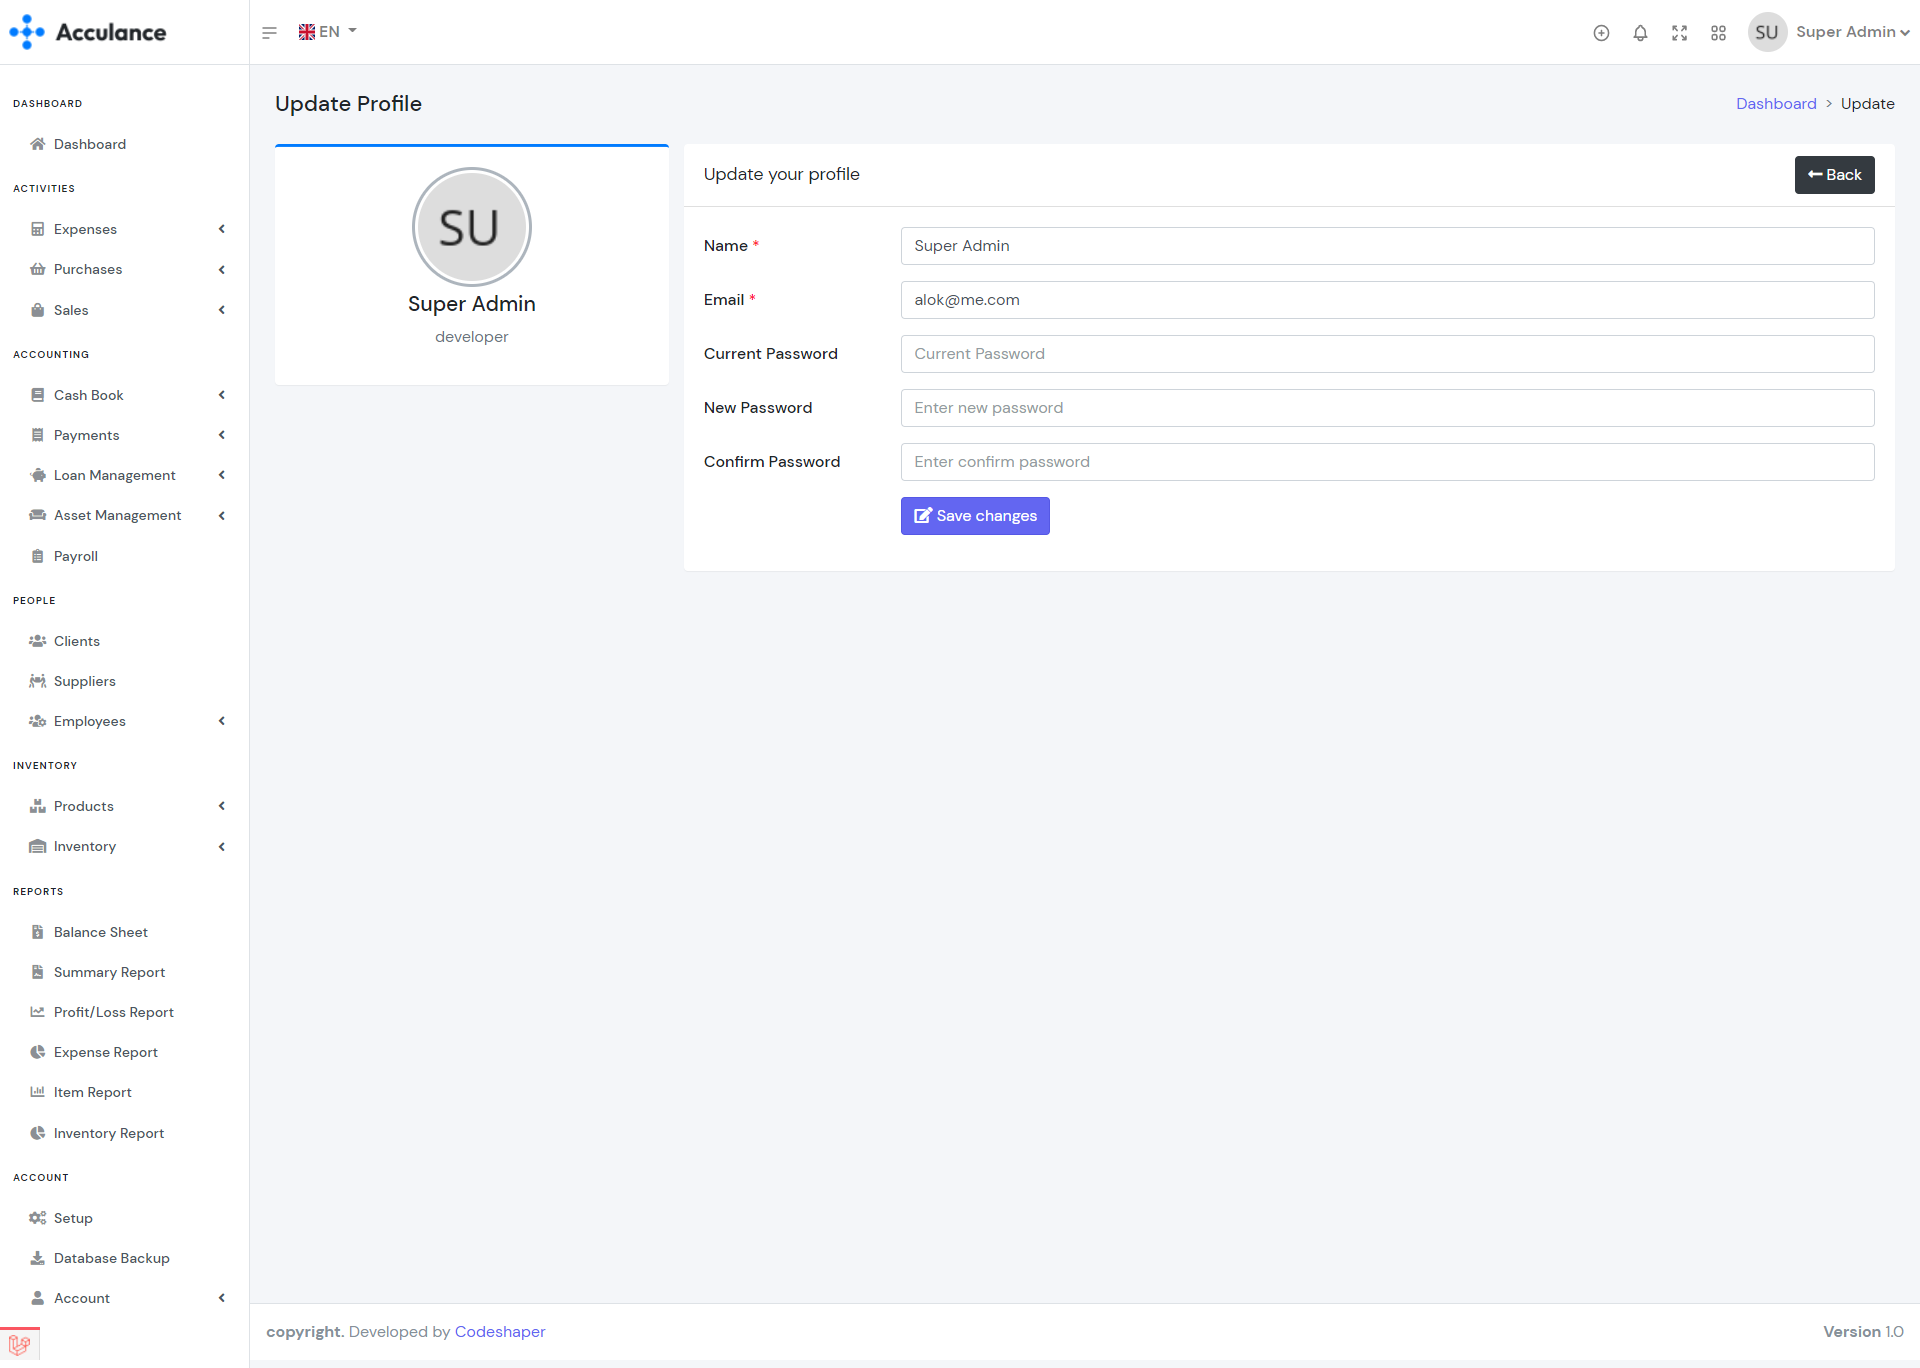
Update Profile
Database Backup
Database backup module helps you to keep your database backup. Currently, you will be able to take the backup in SQL format. We will add support for the other format in the coming future. If anything goes wrong you will be able to restore the system using the backup database. So we recommend you keep at least one backup per week. In order to make the database backup please add the MySQL DUMP_PATH on the .env file. Find your MySQL dump path and then add it to the .env file. It will be something like to below path: DUMP_PATH=C:\\laragon\bin\mysql\mysql-5.7.33-winx64\bin\mysqldump
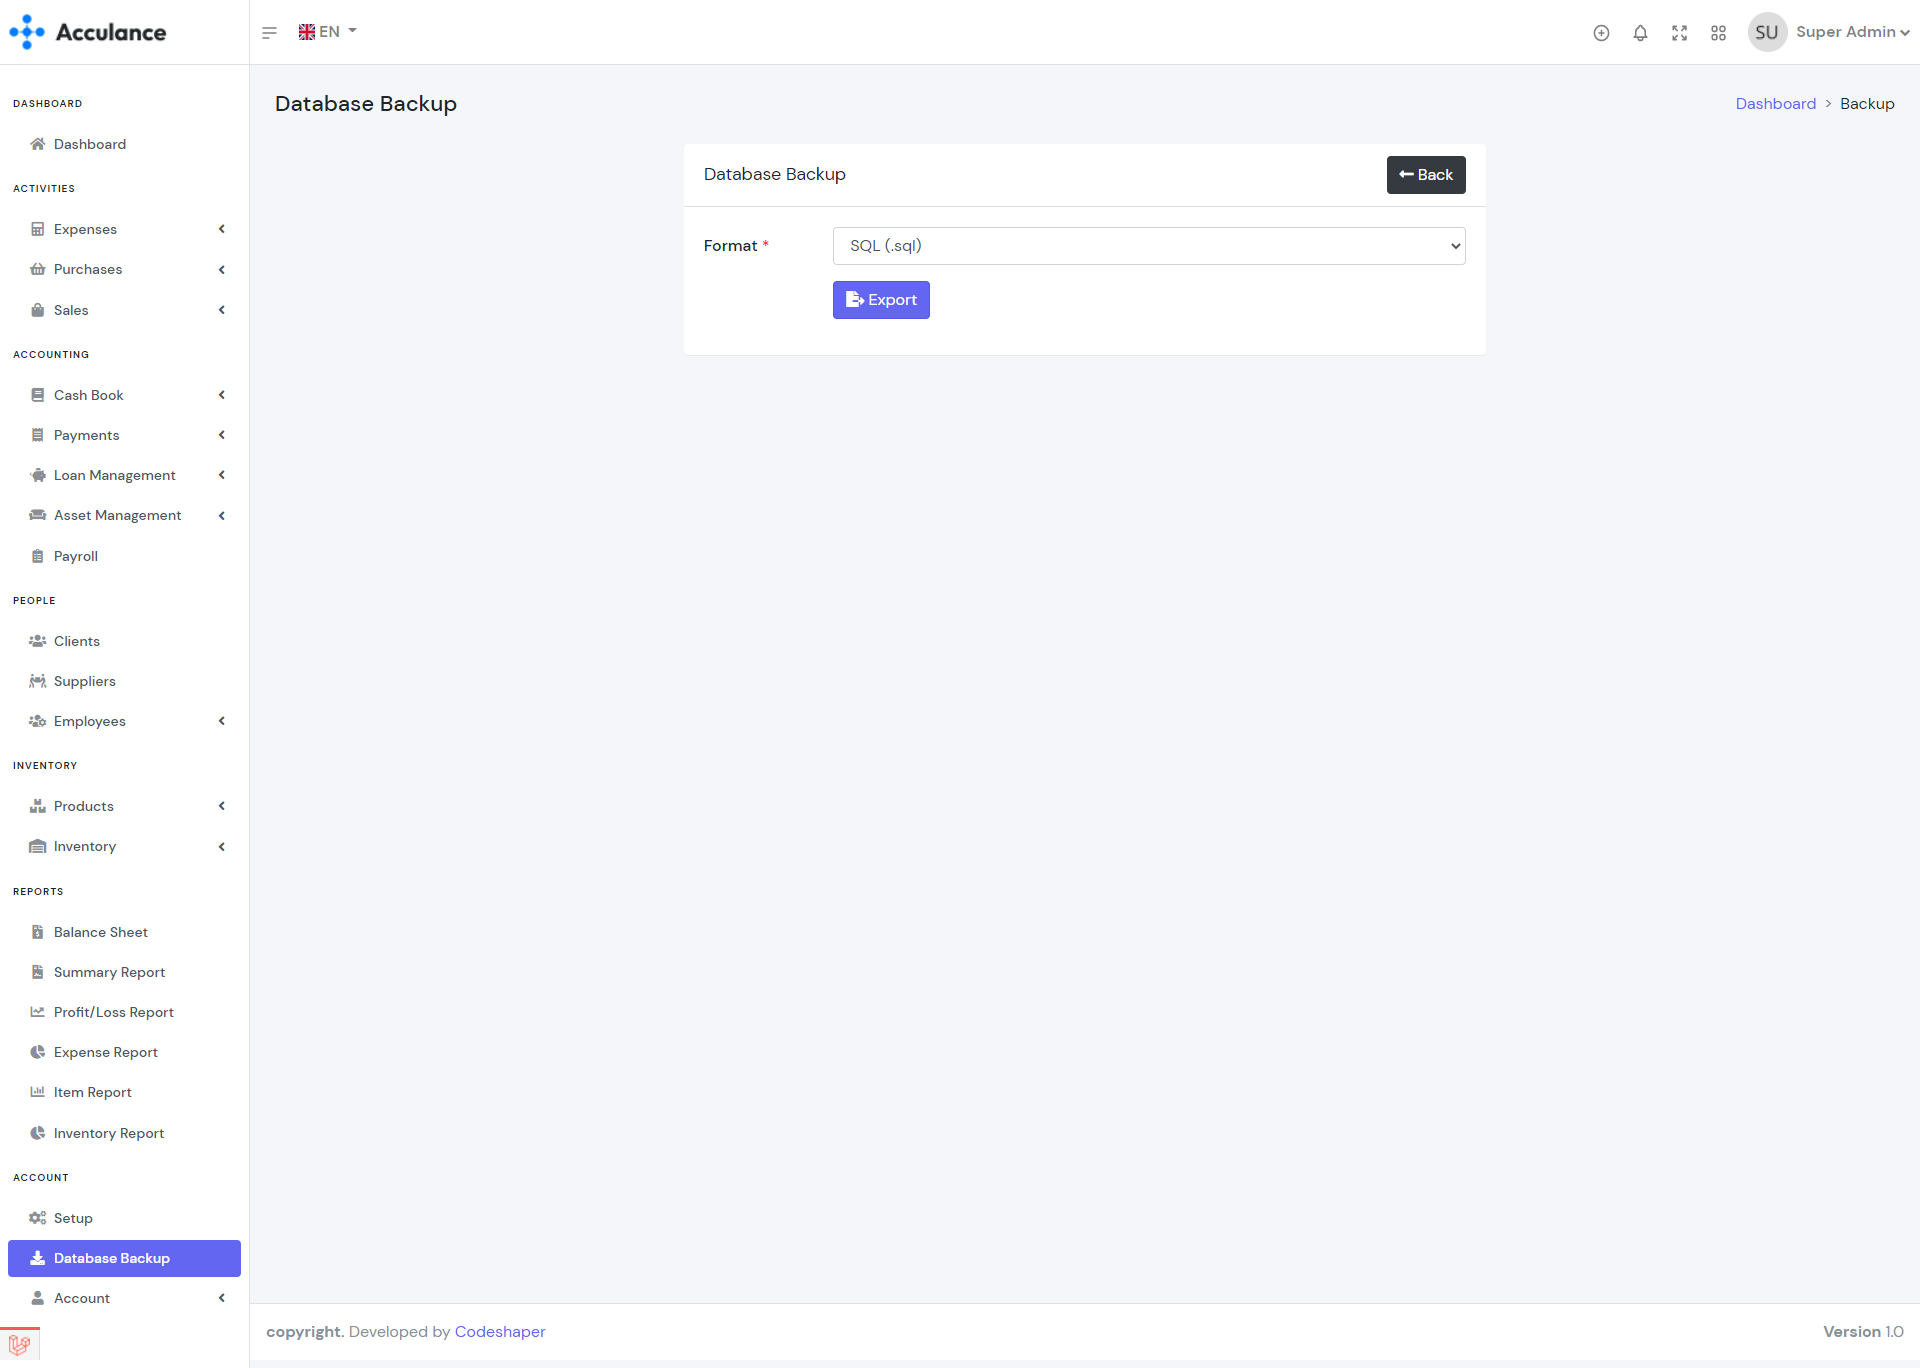
Database Backup
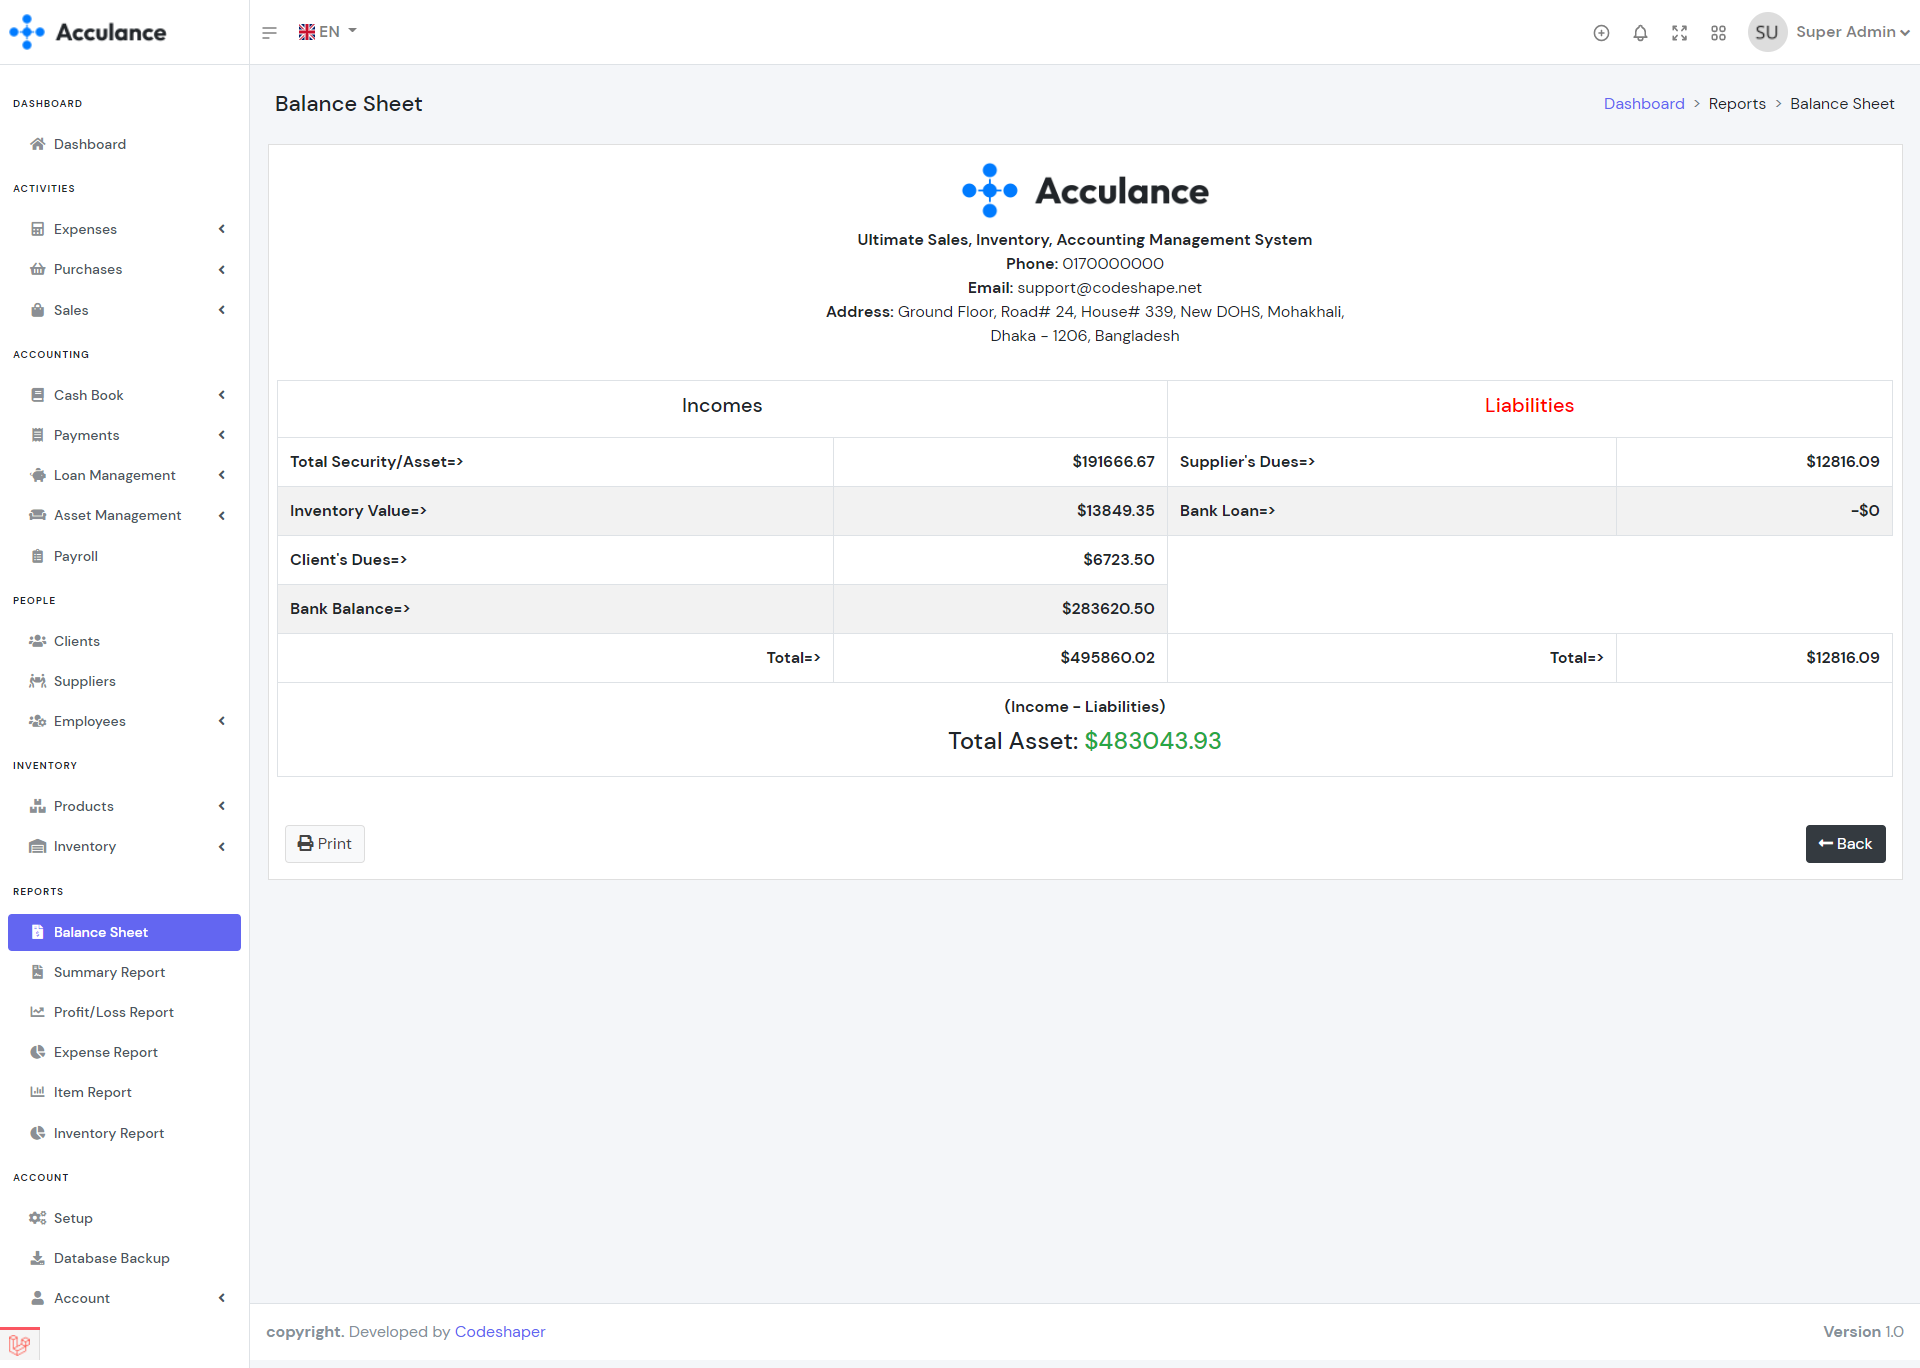
Balance Sheet
Balance Sheet report shows you the current summary of your business. In the Incomes section(on the left side) you will see the value of your total assets, inventory, client dues, and available account balances whereas in the Liabilities column you will see supplier dues, and bank loan amount. The Balance Sheet will update automatically based on your activities and transactions.
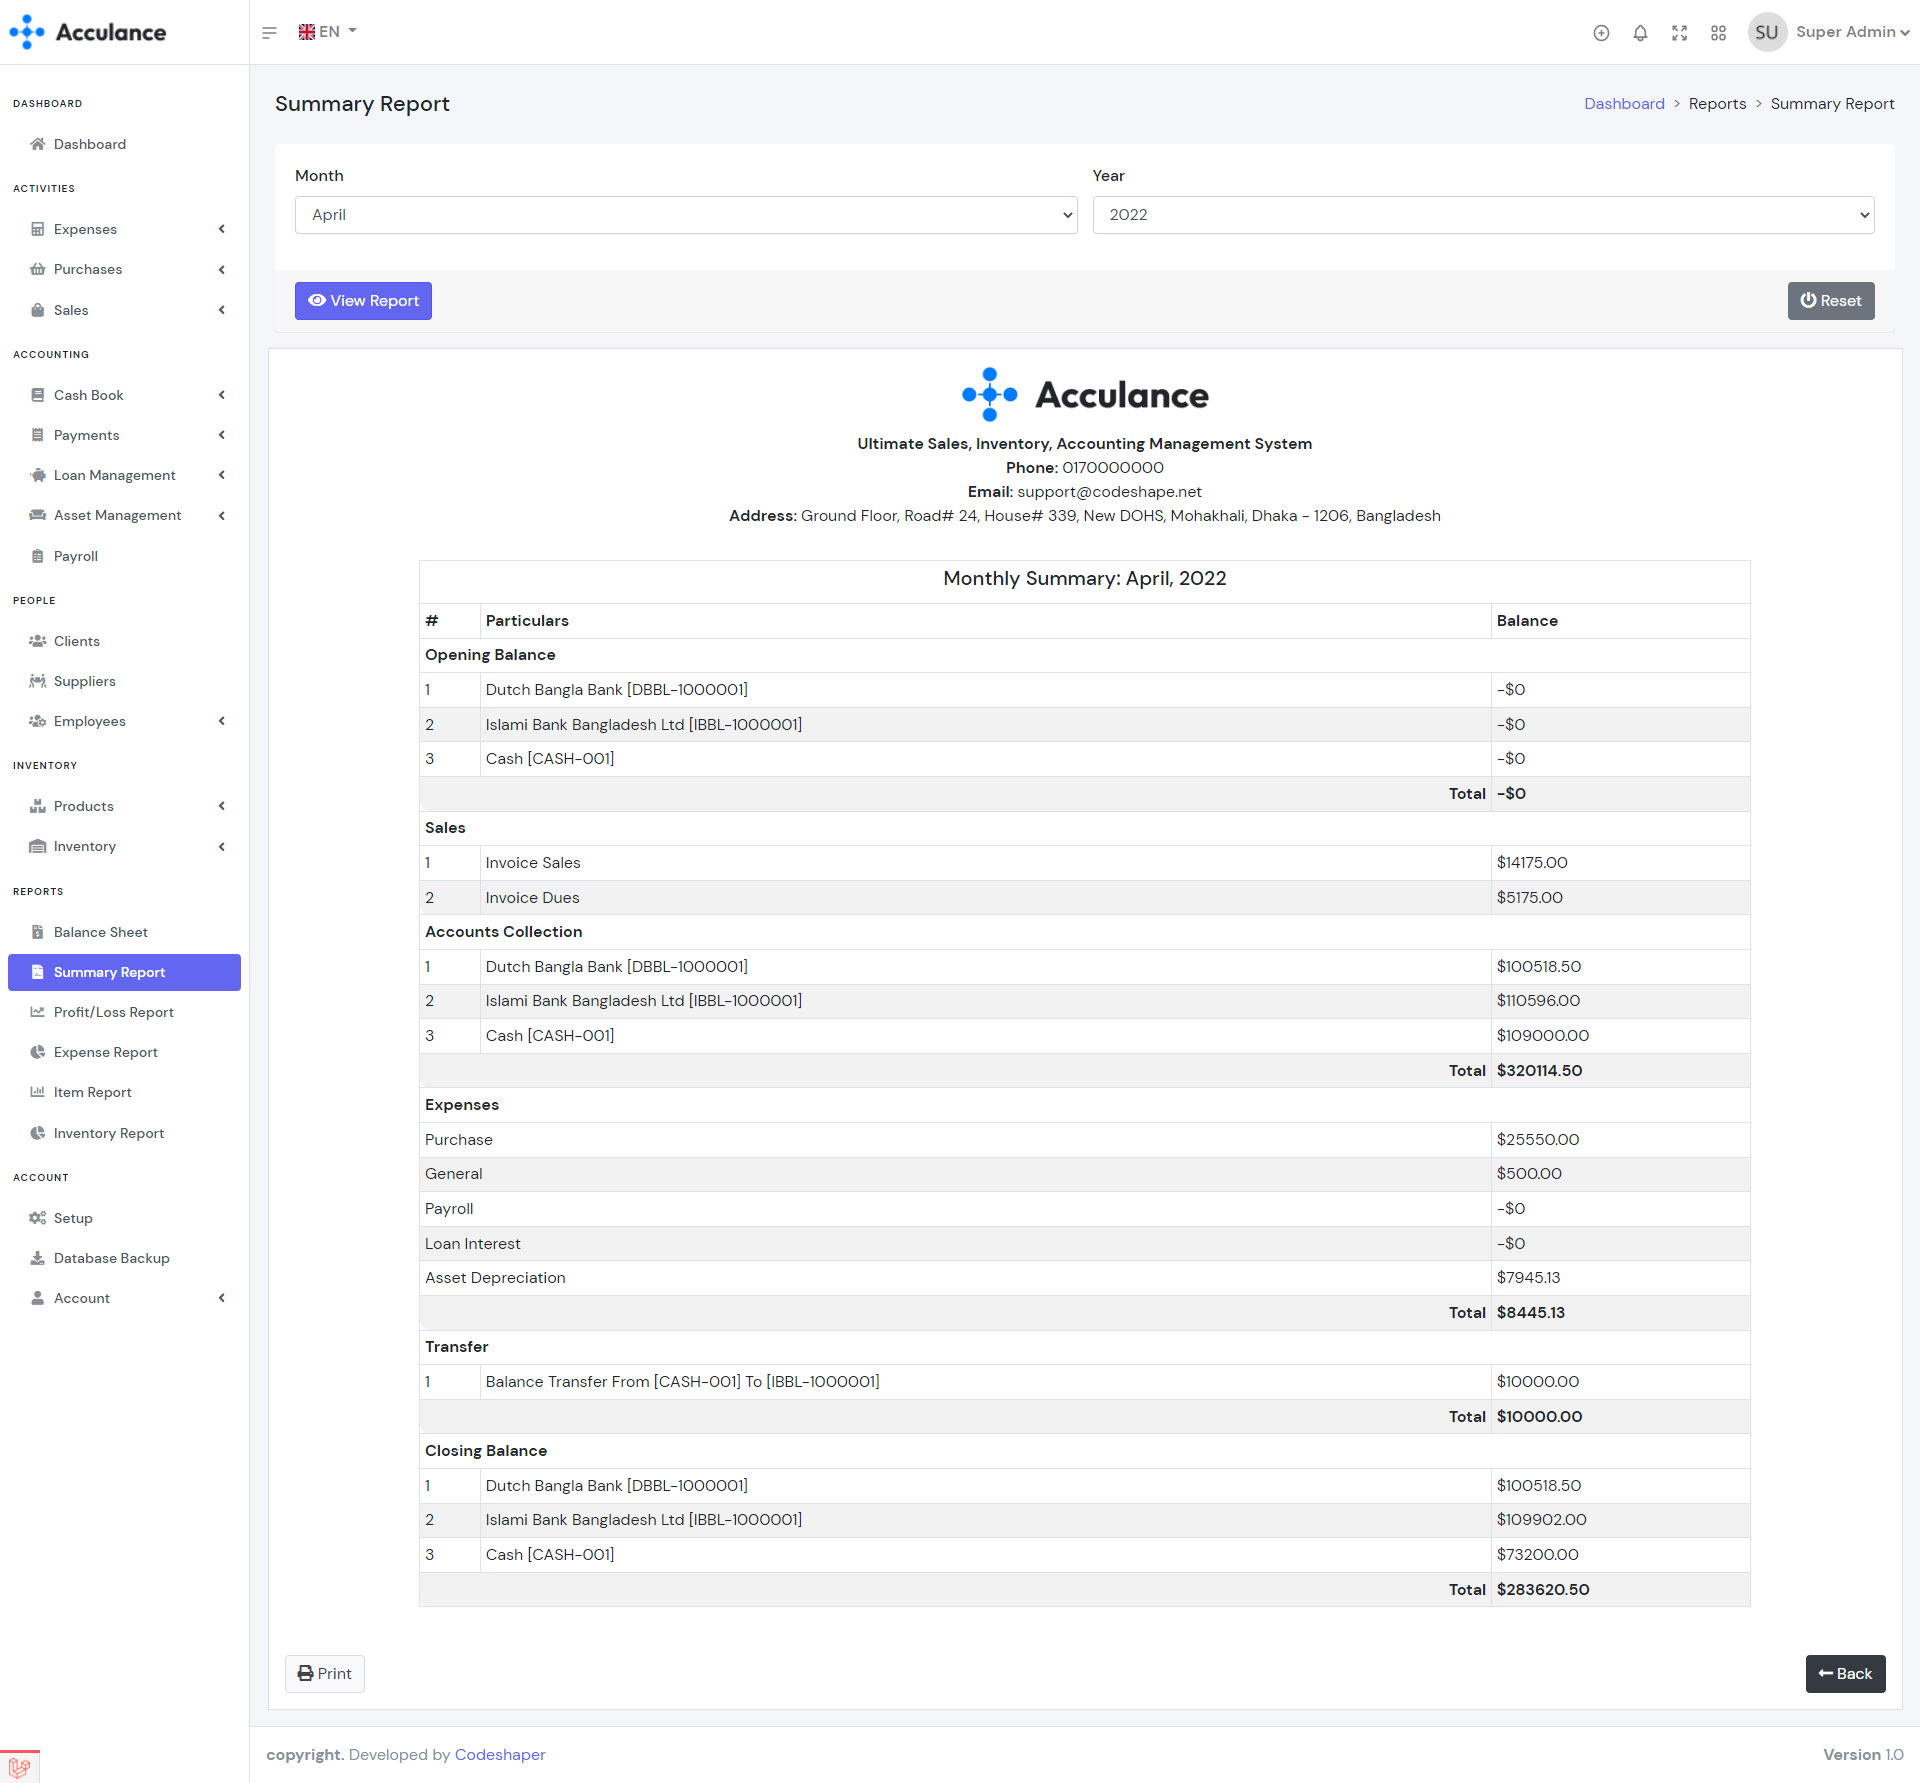
Summary Report
Summary Report report shows you the current activities of your business for a selected month and year. You can select the month and year to see a specific monthly summary report. The summary report will give you information about Opening Balance, Sales, Accounts Collection, Expenses, Transfer, and Closing Balance.
Profit/Loss Report
Profit/Loss Report shows you the gross and net Profit or Loss information for a selected date range. Gross profit/loss shows the profit/loss for each product whereas Net profit/loss shows you the total profit or loss for the selected date range. If you want to see the Net profit/loss then you need to select the Net Profit/Loss from the select option.
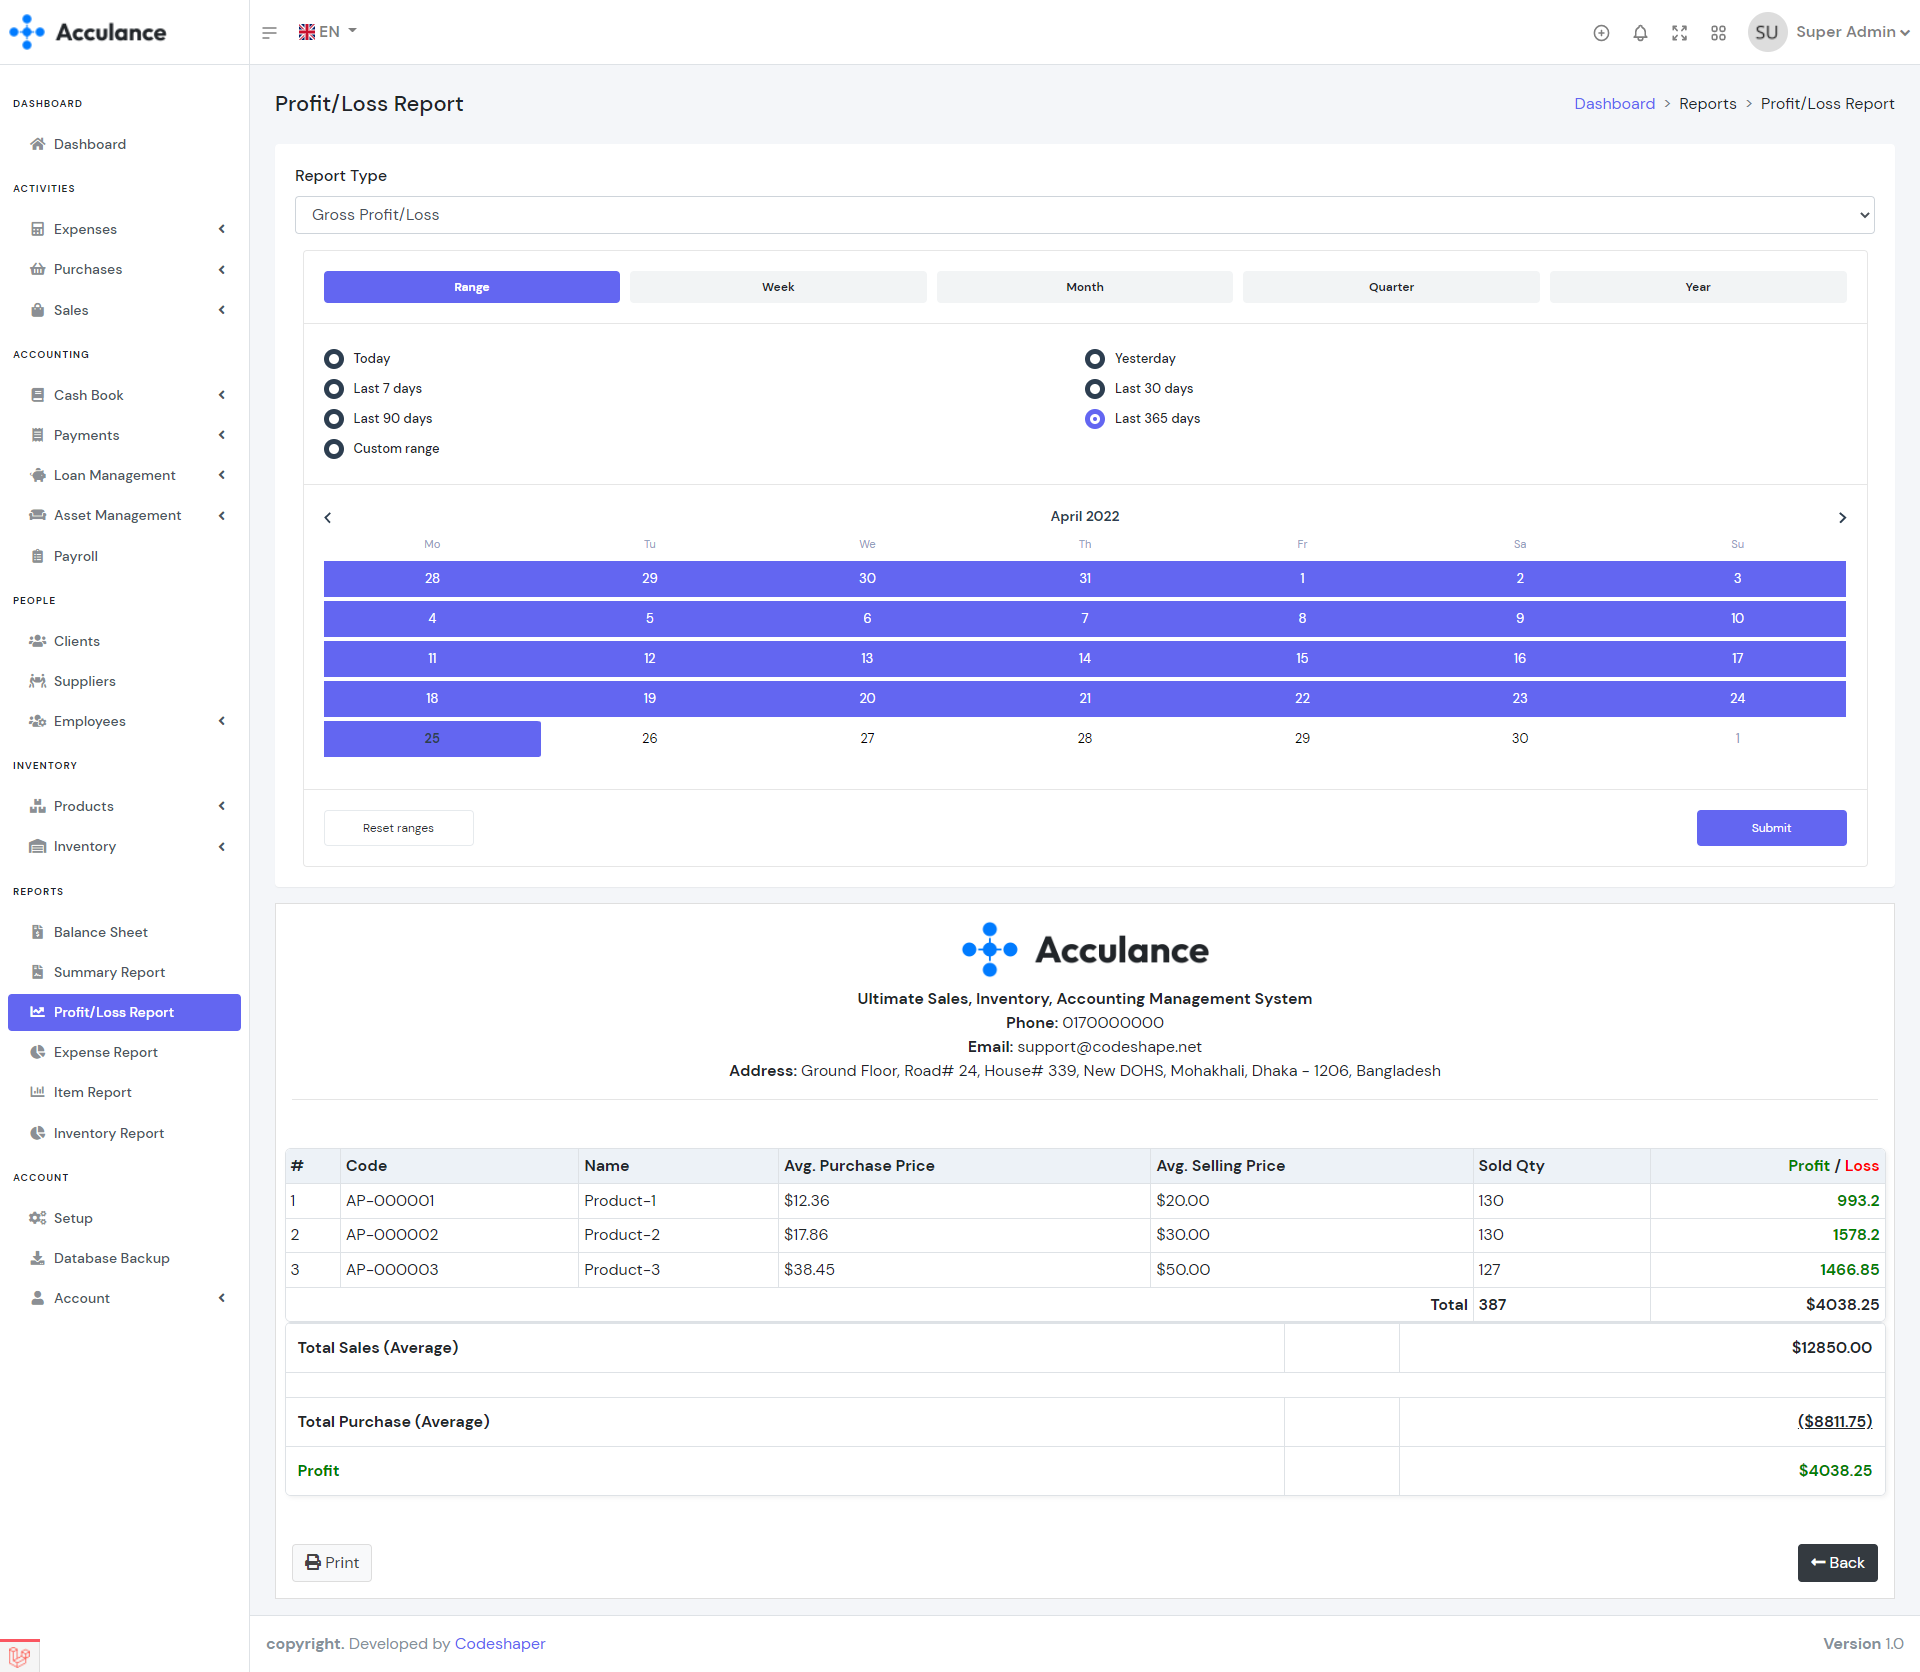
Gross Profit/Loss Report
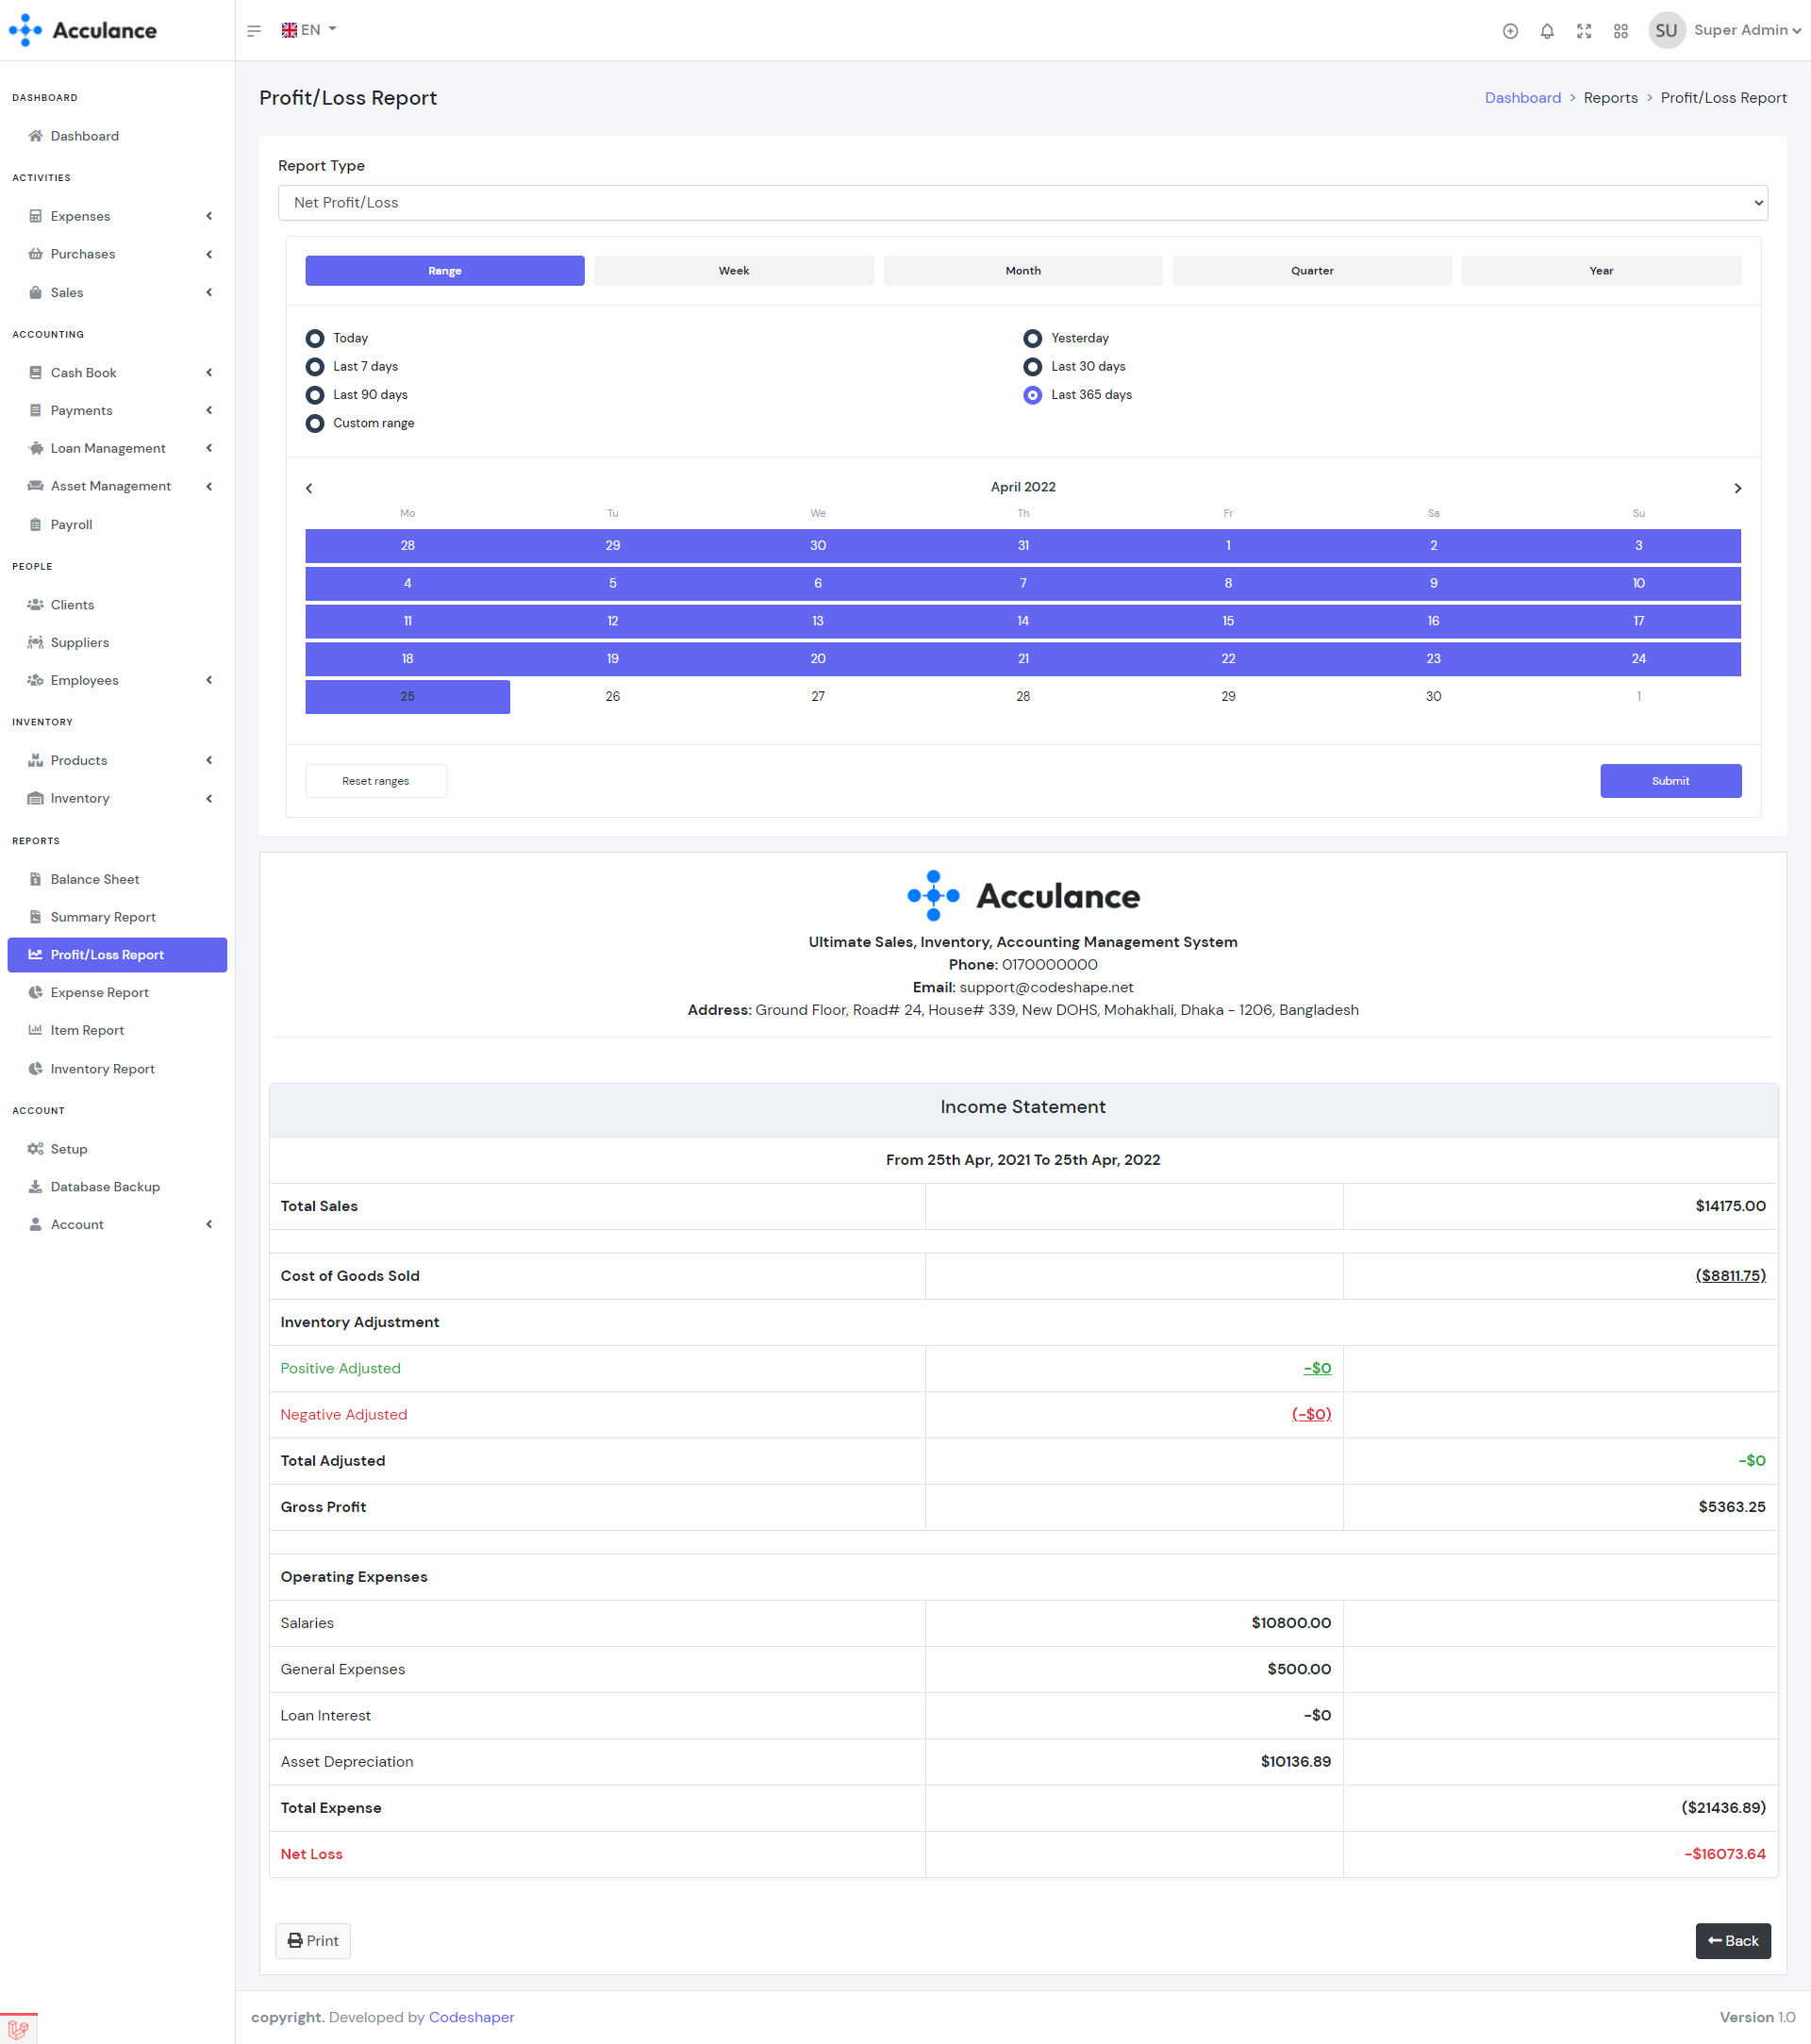
Net Profit/Loss Report
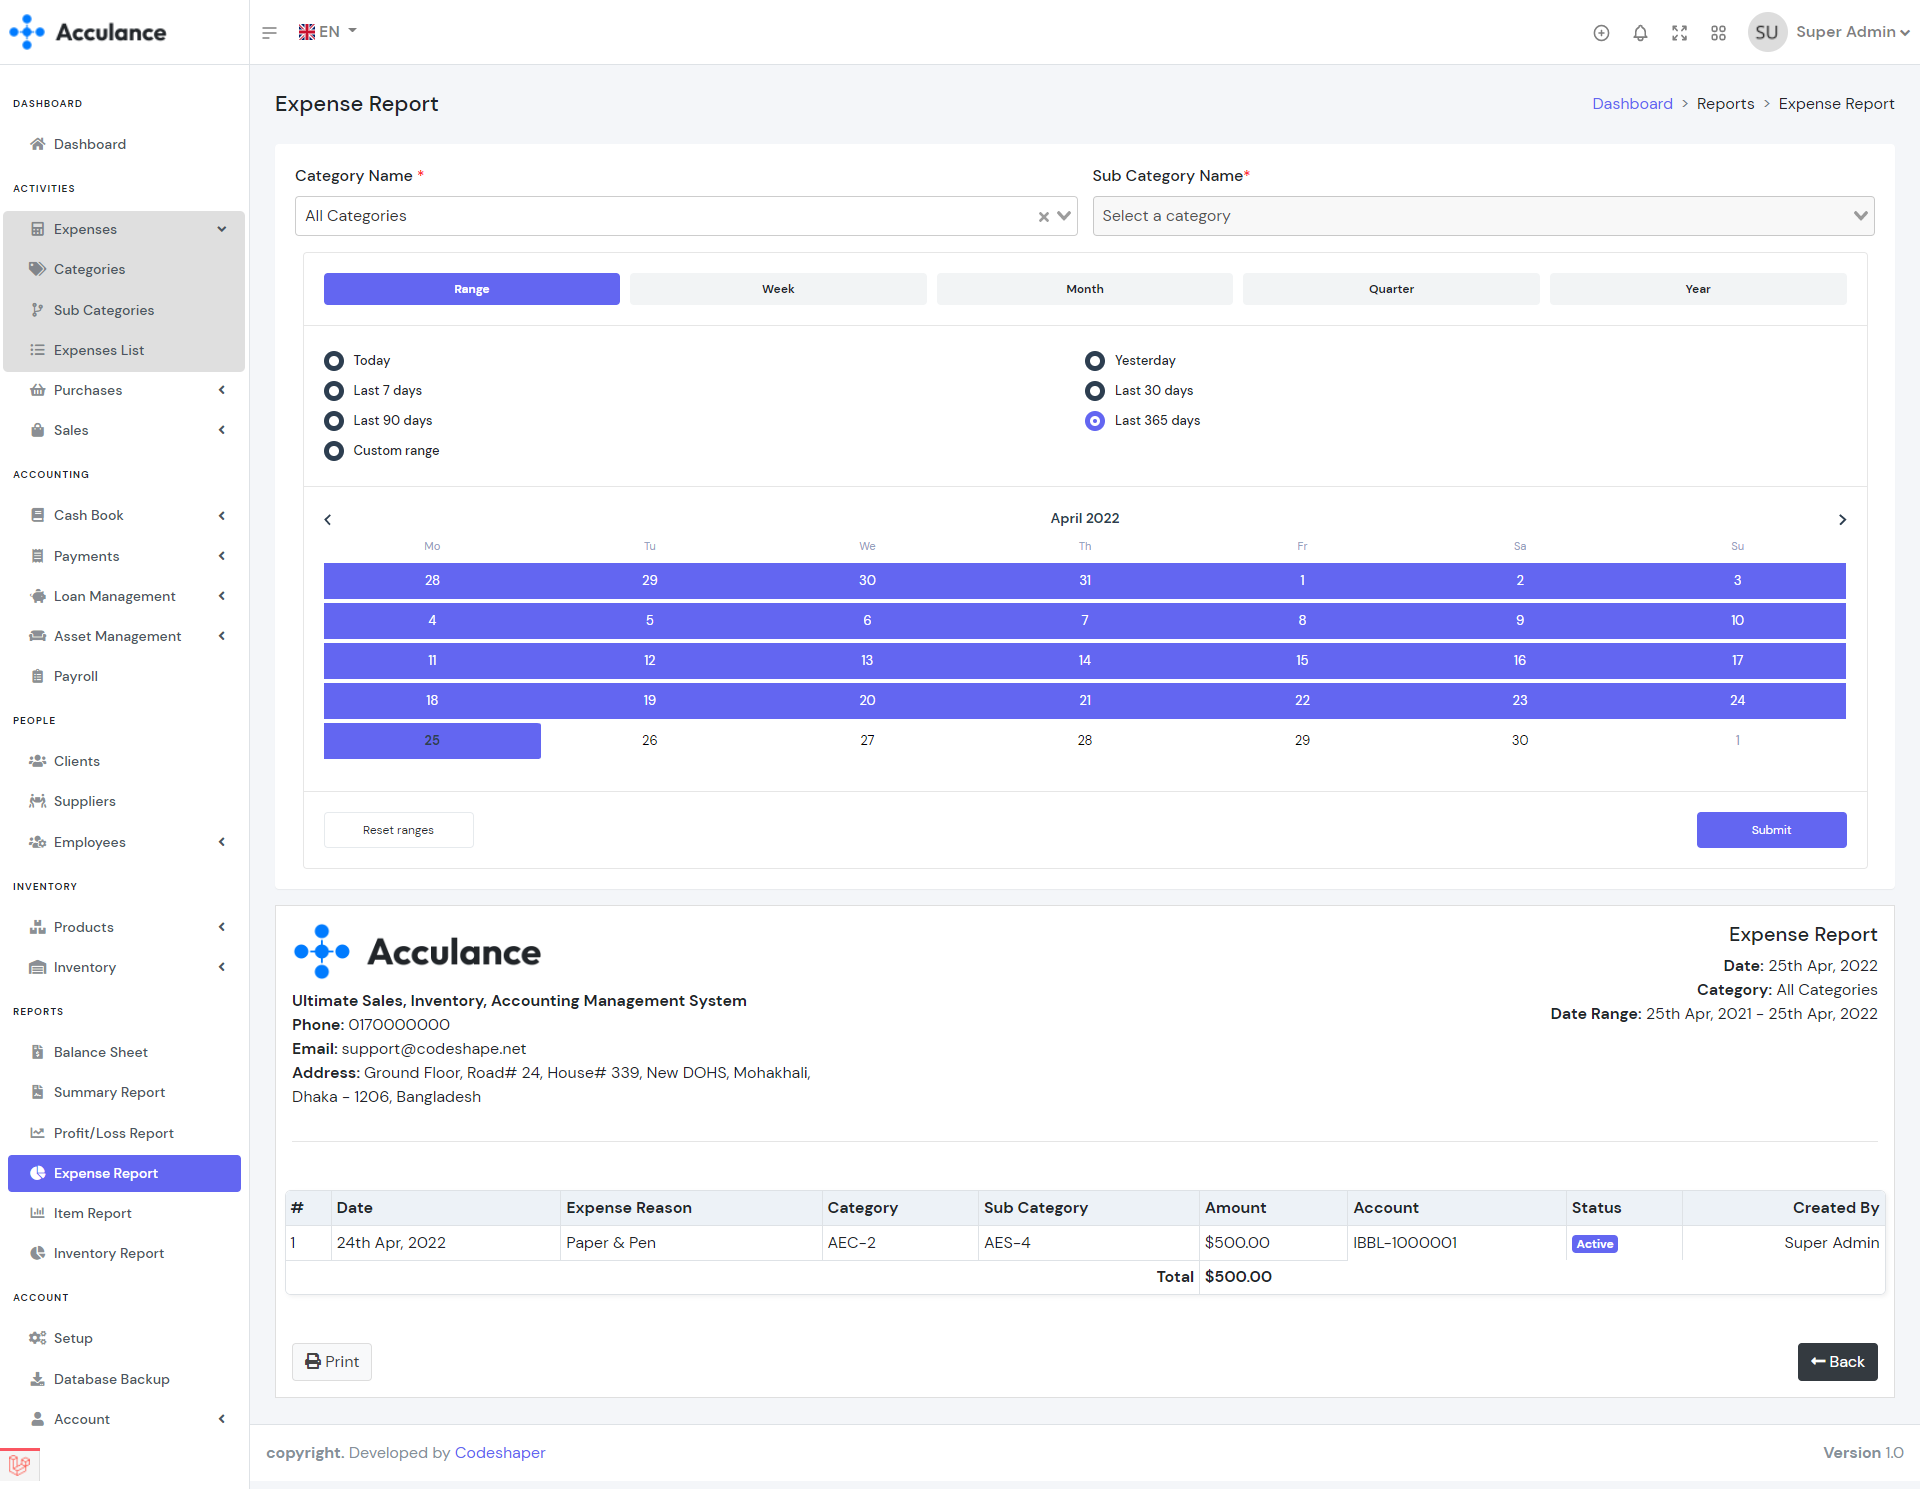
Expense Report
Expense Report shows you the expenses for a selected date range. You can see the specific category and sub-category expenses by selecting the category and sub-category.
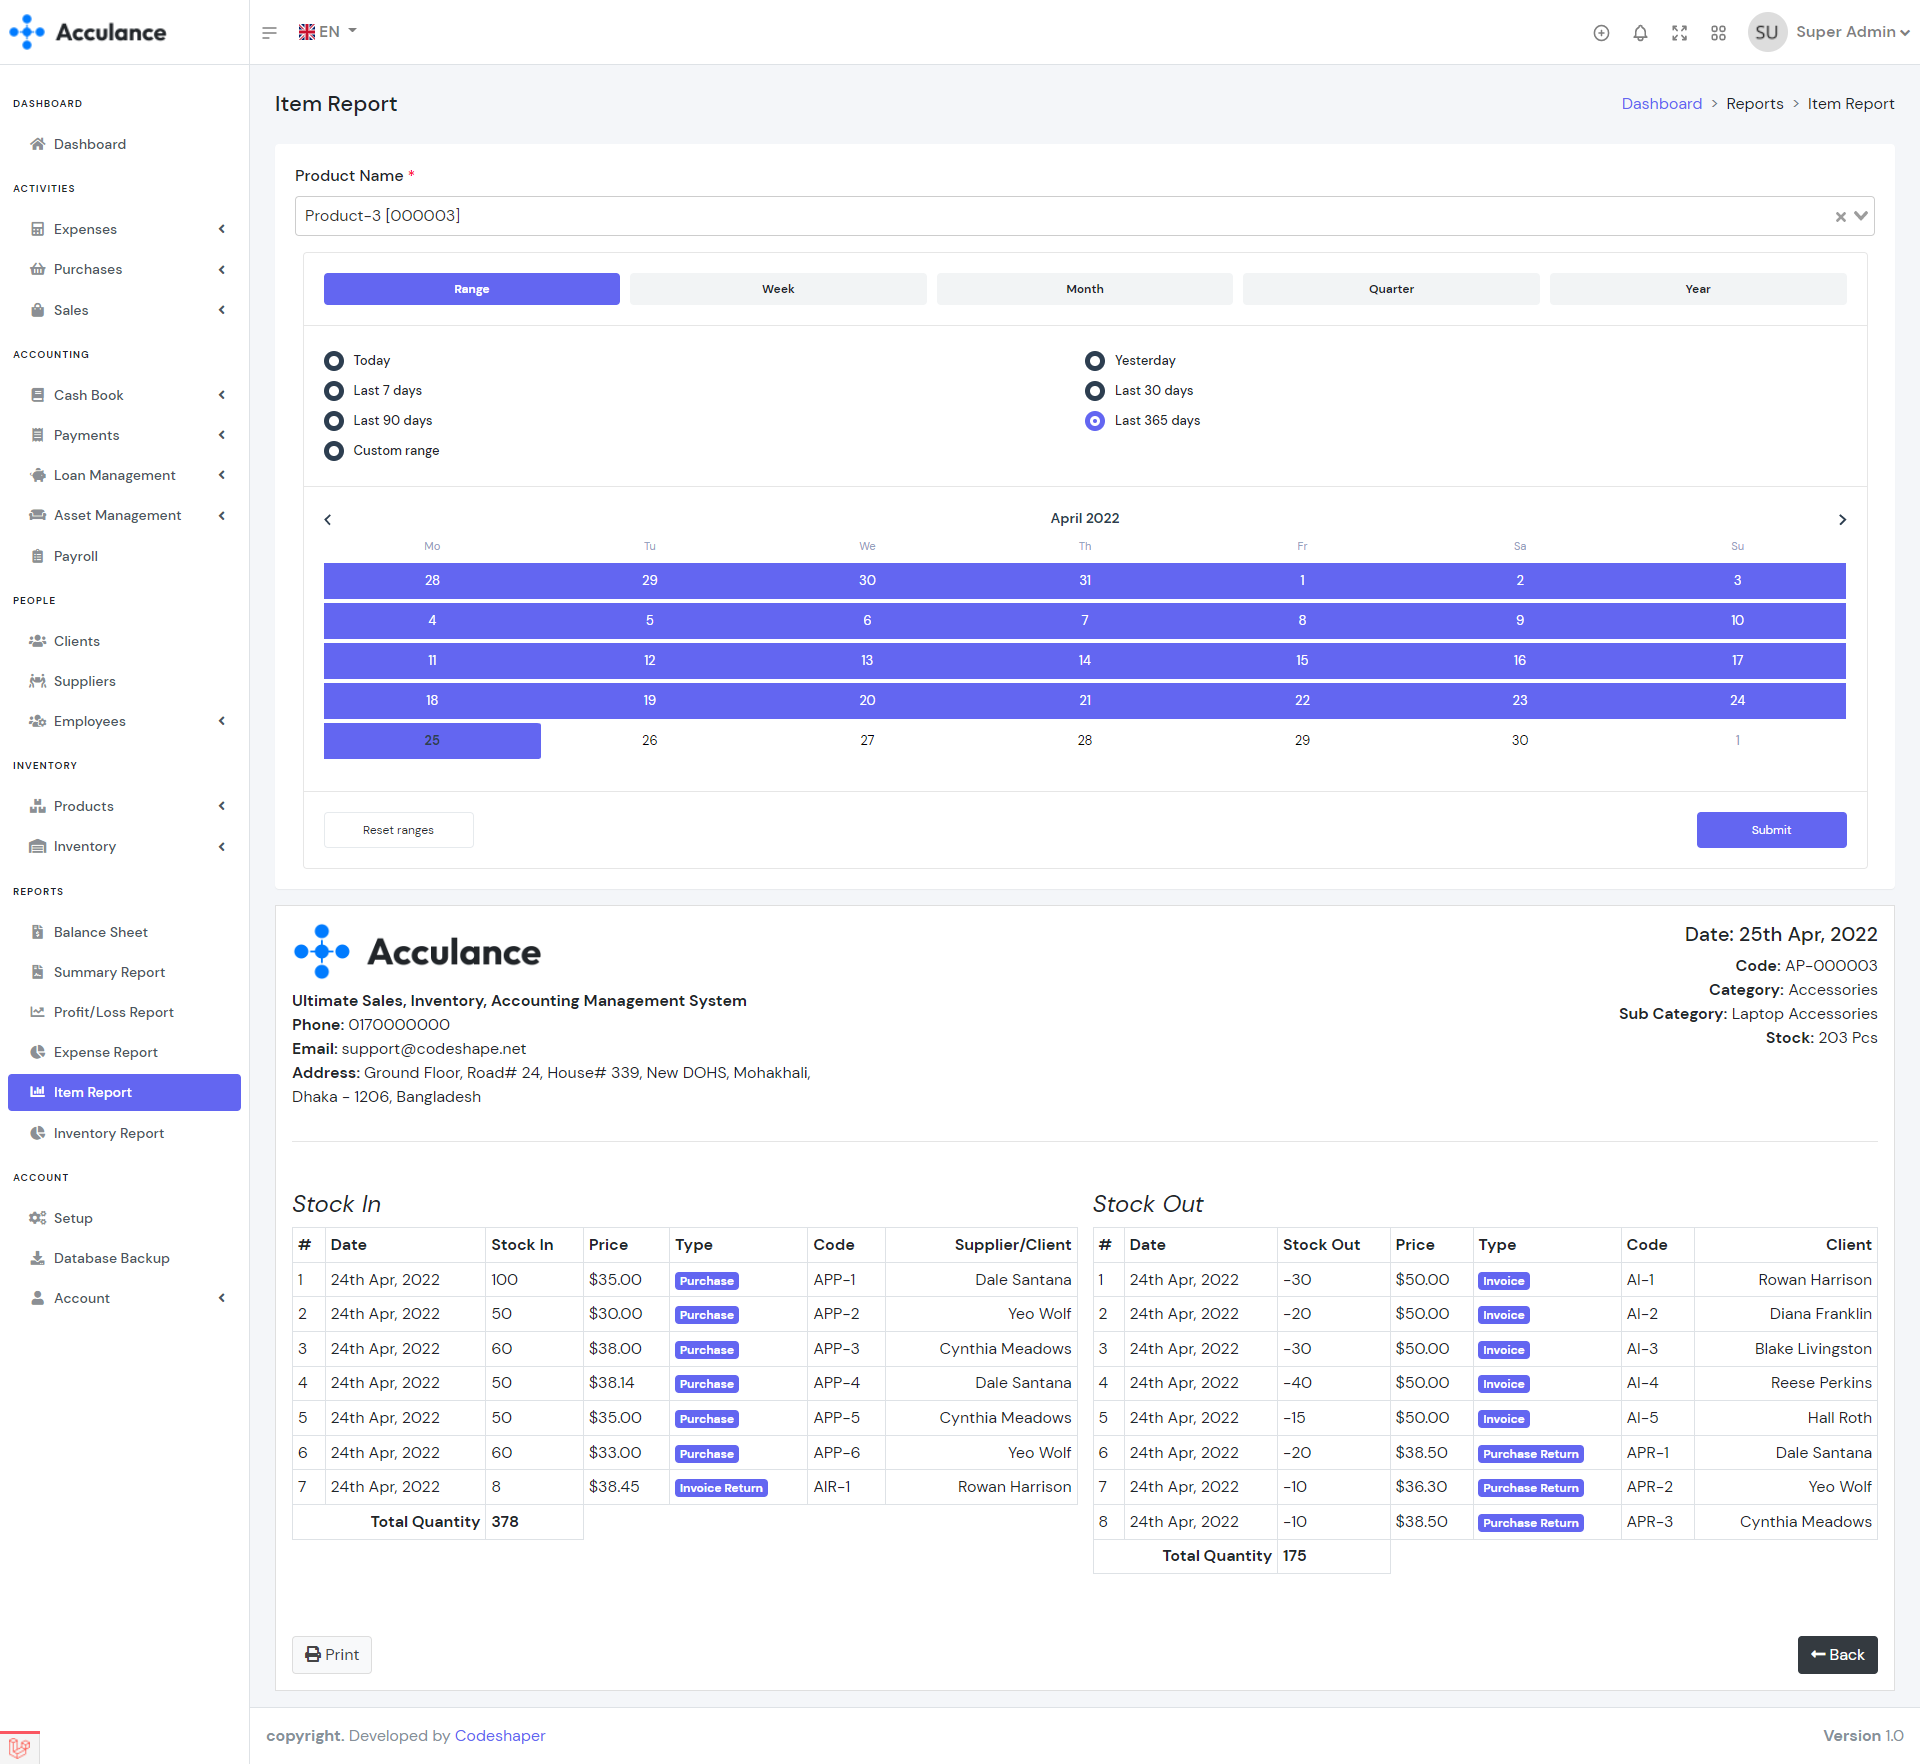
Item Report
Item Report report shows you the stock in and stock out information for a selected product and date range. You can select any product and date range to see the report.
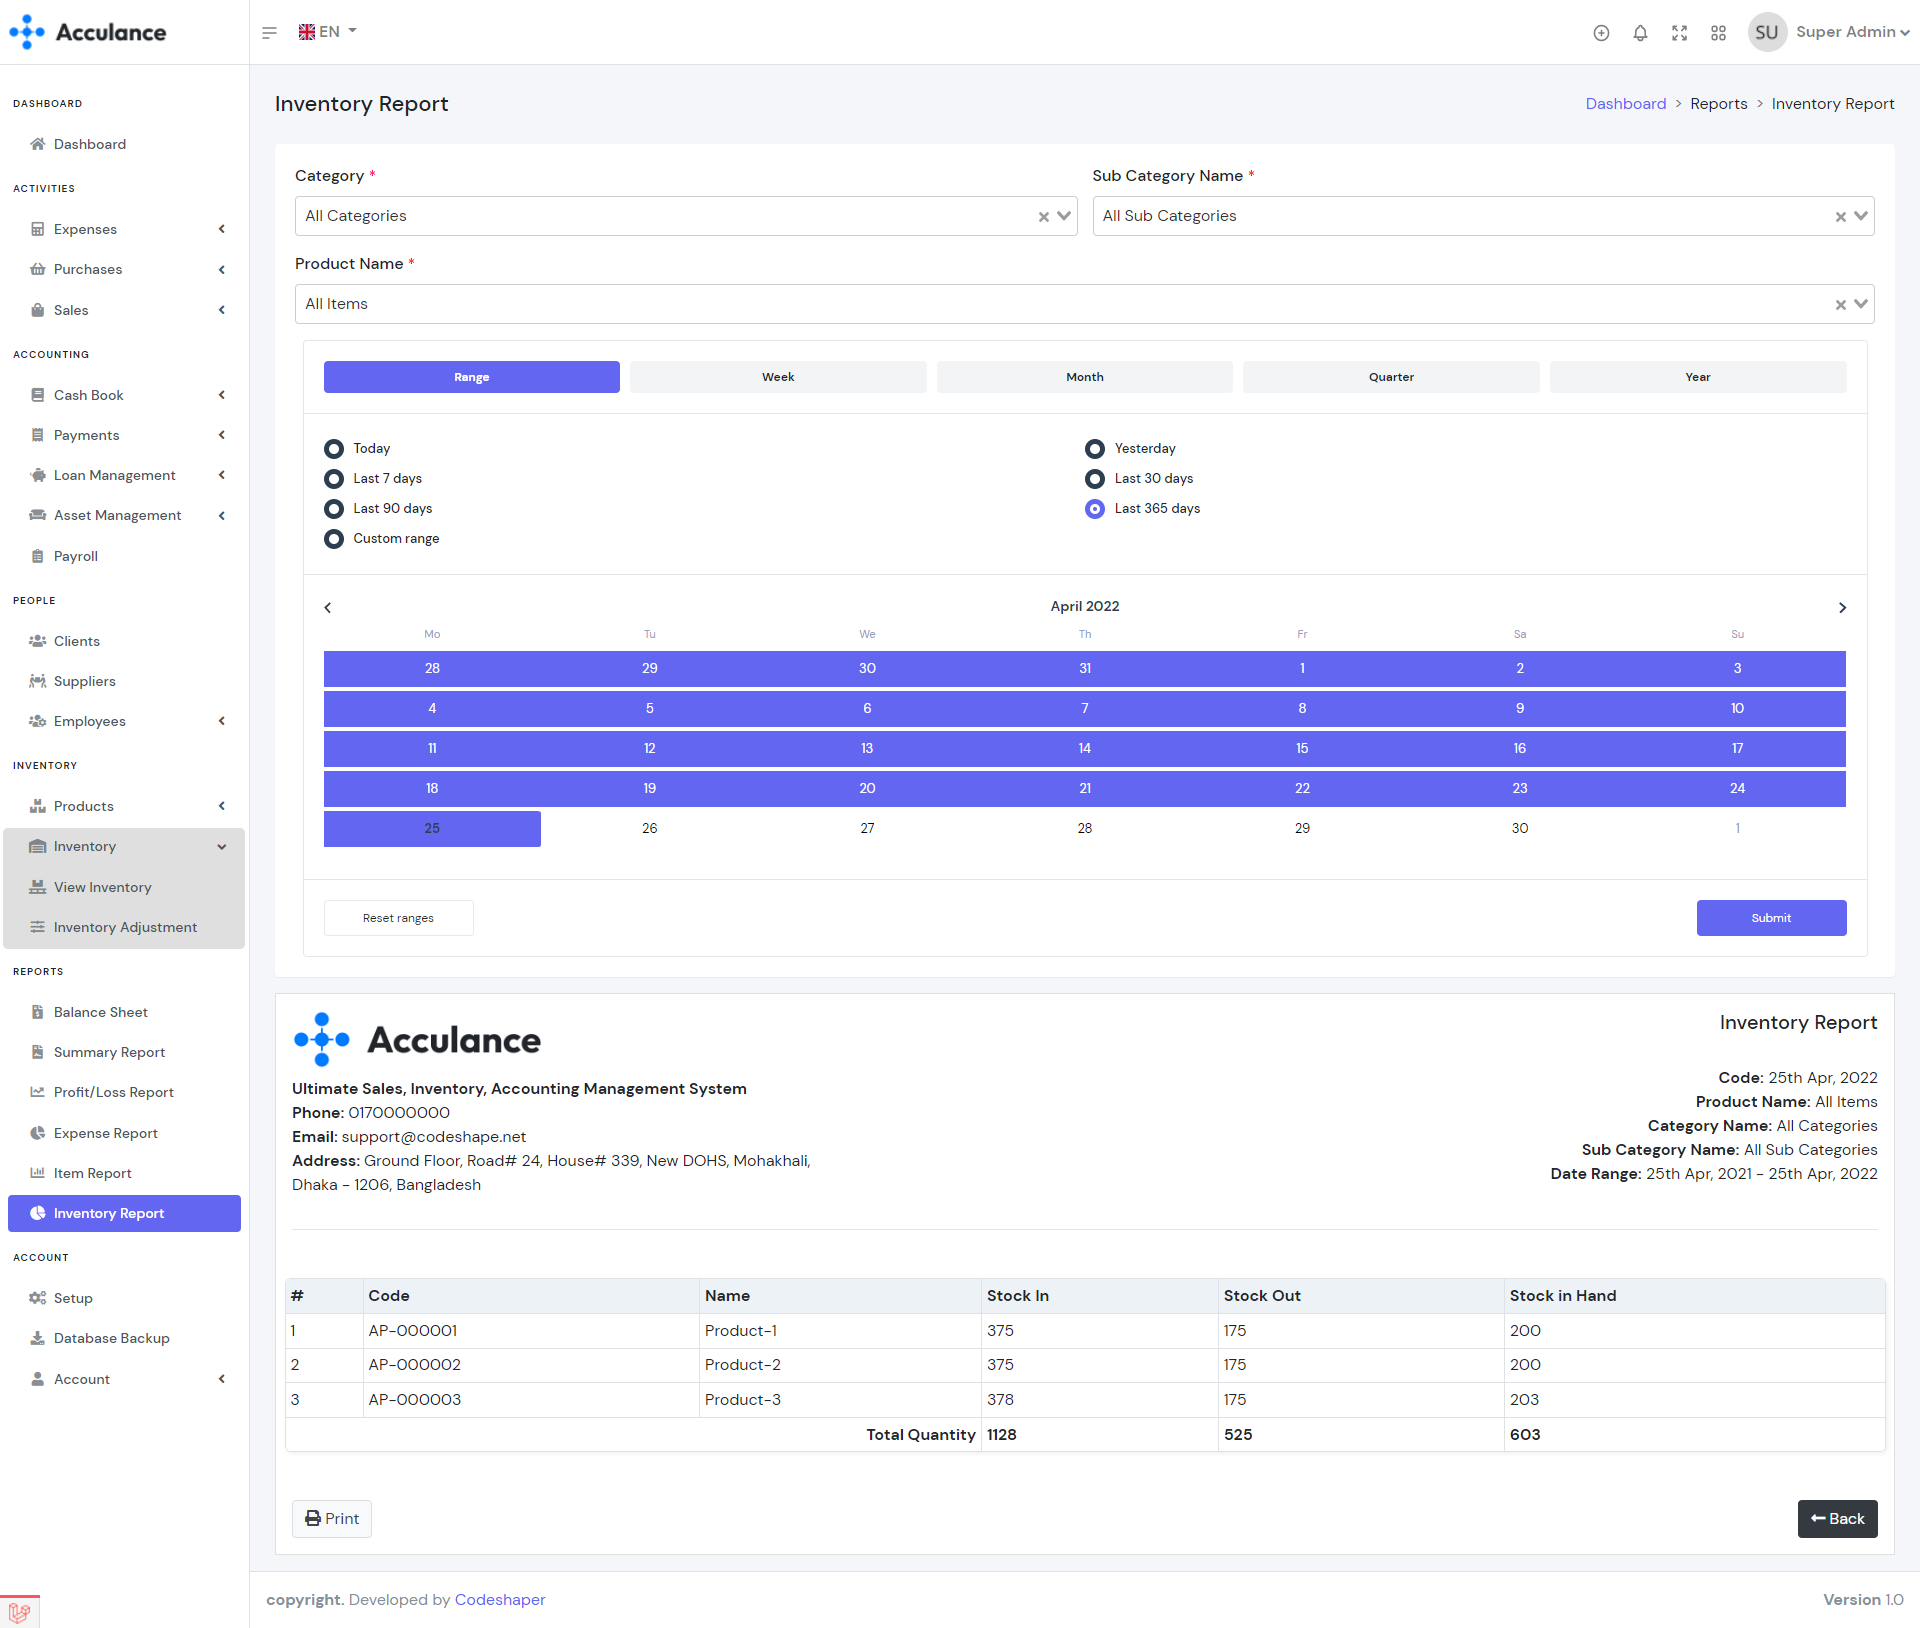
Inventory Report
Inventory Report Report shows you the Stock In, Stock Out information for a selected date range. You can see the specific category and sub-category product inventory report by selecting the category and sub-category. In order to see the inventory report please select category, sub category, product, and date range properly.
Credits
We’ve used the following resources as listed. Special thanks to all the authors for their hard work!
| Software Framework |
|---|
| Laravel |
| Vue Js |
| Bootstrap |
| Icons & Images |
|---|
| Fontawesome |
| Fauxels |
| Admin Dashboard |
|---|
| AdminLTE (Free Version) |
Support
We extend our heartfelt gratitude for choosing our product. Your feedback holds immense value to us, and we kindly request you to consider leaving an inspiring review. Whether you require assistance, fixes, or have feature requests, please don't hesitate to reach out to us through our dedicated support portal. Your satisfaction remains our priority.
Note: We are available for freelance work. So if you need any kind of modification in the system then let us know will try our best to assist you.
Thank You!
Your kind support in purchasing our product is highly appreciated! We send our best wishes for the success of your business and all your future endeavors. For more information about our offerings, please feel free to visit our website.
Have a great day and happy coding!